
Welcome to the world of cryptocurrency! As the popularity of digital currencies continues to rise, it’s important to understand how to securely manage and transfer your funds. In this comprehensive tutorial, we will guide you through the process of moving cryptocurrency from Coinbase, one of the most popular cryptocurrency exchange platforms, to MetaMask, a versatile and user-friendly wallet for Ethereum and ERC-20 tokens.
Why would you want to transfer your funds from Coinbase to MetaMask? While Coinbase offers a convenient way to buy, sell, and store cryptocurrency, MetaMask provides additional functionality and flexibility. As an Ethereum wallet, MetaMask allows you to interact with decentralized applications (dApps), participate in token sales, and securely manage your Ethereum-based assets. By transferring your funds to MetaMask, you’ll gain access to a whole new world of possibilities.
Before we dive into the step-by-step process, it’s important to note that transferring cryptocurrency involves risk, so make sure you are familiar with the basics of cryptocurrency security. We highly recommend enabling two-factor authentication (2FA) on both your Coinbase and MetaMask accounts, as well as using a strong and unique password. Additionally, double-check the wallet addresses and transaction details to avoid any mistakes or phishing attempts.
Now, let’s get started on mastering the art of transferring cryptocurrency from Coinbase to MetaMask. By following this comprehensive tutorial, you’ll gain the knowledge and confidence to securely move your funds and explore the exciting world of decentralized finance.
Mastering the Art of Transferring Cryptocurrency
Transferring cryptocurrency can sometimes be a daunting task, especially for beginners. However, with the right knowledge and guidance, it can become a straightforward process. In this tutorial, we will explore the art of transferring cryptocurrency from Coinbase to MetaMask, a popular digital wallet.
Getting started with Coinbase and MetaMask
Before you can transfer your cryptocurrency, you will need to have accounts set up on both Coinbase and MetaMask. Coinbase is a cryptocurrency exchange platform that allows you to buy, sell, and store various cryptocurrencies. MetaMask, on the other hand, is a digital wallet that allows you to securely manage your cryptocurrency assets.
To get started, sign up for an account on Coinbase and complete the necessary verification steps. Once you have your Coinbase account set up, download and install the MetaMask extension for your web browser. Create a MetaMask wallet and securely store the generated seed phrase.
Linking Coinbase and MetaMask
Once you have both Coinbase and MetaMask accounts set up, you will need to link them together to facilitate the transfer of funds. To do this, open MetaMask, click on the account icon, and select “Connect Hardware Wallet”. Then, click on “Coinbase Wallet” and follow the prompts to connect your Coinbase account to MetaMask.
- Open MetaMask and click on the account icon
- Select “Connect Hardware Wallet”
- Click on “Coinbase Wallet”
- Follow the prompts to connect your Coinbase account to MetaMask
Transferring cryptocurrency from Coinbase to MetaMask
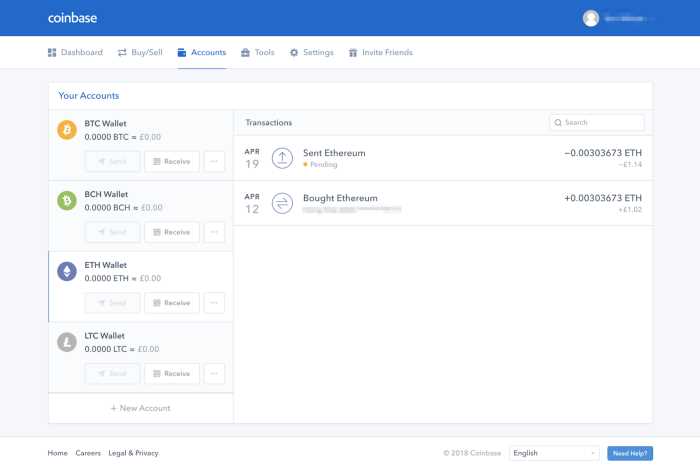
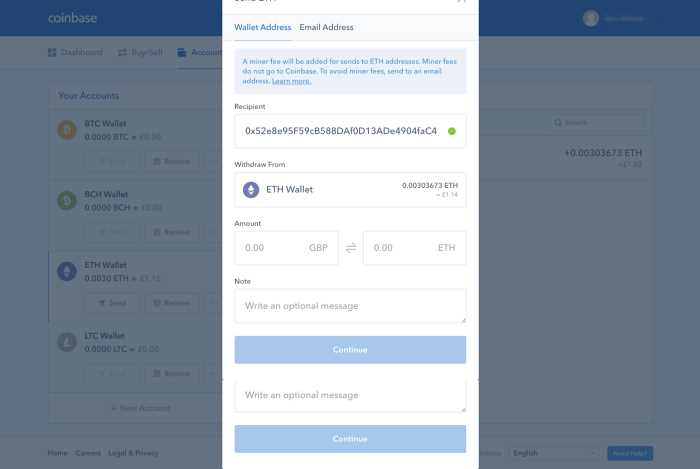
With your Coinbase and MetaMask accounts linked, you can now transfer your cryptocurrency. Start by logging into your Coinbase account and navigate to the “Accounts” section. Select the cryptocurrency you want to transfer and click on the “Send” button.
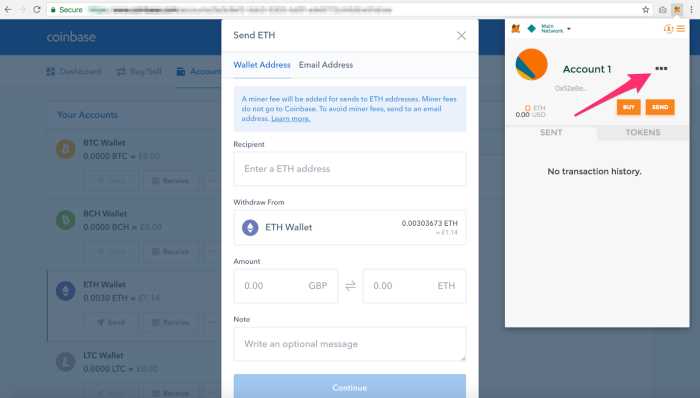
In the “Recipient” field, enter your MetaMask wallet address. Make sure to double-check the address to avoid any errors. Once you have entered the recipient address, specify the amount of cryptocurrency you want to transfer. Review the transaction details and click on the “Send” button to initiate the transfer.
- Login to your Coinbase account
- Navigate to the “Accounts” section
- Select the cryptocurrency you want to transfer
- Click on the “Send” button
- Enter your MetaMask wallet address as the recipient
- Specify the amount of cryptocurrency to transfer
- Review the transaction details and click “Send”
After initiating the transfer, you may need to wait for a confirmation on the blockchain. Once the transaction is confirmed, you will be able to see the transferred cryptocurrency in your MetaMask wallet. You can now securely manage and use your cryptocurrency assets within MetaMask.
Transferring cryptocurrency from Coinbase to MetaMask is an essential skill for anyone looking to actively engage with their crypto assets. By following the steps outlined in this tutorial, you will be able to master the art of transferring cryptocurrency and have full control over your digital assets.
Moving Funds from Coinbase to MetaMask: A Comprehensive Tutorial
Transferring cryptocurrency from Coinbase to MetaMask is a crucial step in engaging with decentralized finance (DeFi) applications. In this comprehensive tutorial, we will guide you through the process of moving funds from Coinbase to MetaMask, ensuring a seamless transition.
Step 1: Login and Set Up Metamask

Before you can transfer funds from Coinbase to MetaMask, you need to have both accounts set up and ready to use. First, log in to your MetaMask account, or if you don’t have one, download the MetaMask extension and create a new account. Make sure to securely store your private key or seed phrase.
Step 2: Obtain Your MetaMask Wallet Address

To transfer funds, you will need the wallet address of your MetaMask account. In the MetaMask extension, click on your account avatar and select “Copy Address to Clipboard” or “View Account Details” and copy the displayed wallet address.
Step 3: Log In to Coinbase
Next, log in to your Coinbase account or create a new account if you don’t have one already. Ensure that your Coinbase account is fully verified to enjoy unrestricted functionality.
Step 4: Navigate to Portfolio
Once logged in, navigate to the Portfolio section in Coinbase. This section displays a summary of your cryptocurrency holdings and account balances.
Step 5: Select the Cryptocurrency to Transfer
Identify the cryptocurrency you wish to transfer from Coinbase to MetaMask and click on it. This action will direct you to the respective cryptocurrency’s wallet page.
Step 6: Click on Send
In the cryptocurrency’s wallet page, locate the “Send” button and click on it. This action will prompt Coinbase to initiate the funds transfer process.
Step 7: Enter Your MetaMask Wallet Address
On the Send page, you will find a field labeled “Recipient.” Paste your MetaMask wallet address that you obtained in Step 2 into this field. Double-check the address for accuracy to avoid any transfer errors.
Step 8: Enter the Amount to Transfer
In the Amount field, specify the exact amount of cryptocurrency you want to transfer from Coinbase to MetaMask. Take note of any transaction fees charged by Coinbase, as these will reduce the final transfer amount received in MetaMask.
Step 9: Confirm and Initiate the Transfer

Review all the provided information, including the recipient address and transfer amount, to ensure accuracy. Once you are confident in the details, click on the “Send” or “Transfer” button to initiate the transfer process.
Step 10: Wait for the Transfer Confirmation
After submitting the transfer, Coinbase will process the transaction and initiate the transfer to your MetaMask wallet. The transfer time depends on the cryptocurrency network’s congestion and may take several minutes to complete.
Step 11: Check Your MetaMask Wallet Balance
Once the transfer is confirmed, open your MetaMask wallet and navigate to the respective cryptocurrency’s wallet page. You should see the transferred funds reflected in your MetaMask balance.
Congratulations! You have successfully moved funds from Coinbase to MetaMask. Now you can explore a world of decentralized finance and engage with various DeFi applications using your MetaMask wallet.
Step 1: Creating a MetaMask Wallet
Before you can transfer any cryptocurrency from Coinbase to MetaMask, you’ll need to create a MetaMask wallet. MetaMask is a browser extension that serves as a digital wallet for storing and managing your Ethereum or other ERC-20 tokens. Follow the steps below to create your own MetaMask wallet:
1. Install MetaMask
The first step is to install the MetaMask browser extension. You can visit the official MetaMask website (https://metamask.io) or search for “MetaMask” in your preferred web browser’s extension marketplace. Click on the “Add to [Browser Name]” button to install MetaMask.
2. Create a New Wallet
Once you’ve installed MetaMask, click on the MetaMask icon in your browser’s toolbar. A new tab or window will open, and you’ll see the MetaMask welcome screen. Click on the “Get Started” button to begin creating your wallet.
Follow the instructions on the screen to set up your MetaMask wallet. You’ll be asked to create and confirm a strong password for your wallet. Make sure to choose a password that is unique and secure.
3. Secret Backup Phrase
After creating your password, you’ll be presented with a secret backup phrase, also known as a seed phrase. This is a series of 12 or 24 randomly generated words that can be used to restore your wallet in case you forget your password or lose access to your device.
Write down the seed phrase and keep it in a safe place. Make sure to never share it with anyone, as anyone who has access to your seed phrase can gain access to your wallet.
4. Confirm Backup Phrase

To ensure that you have correctly written down your seed phrase, MetaMask will ask you to confirm some of the words from your backup phrase. Select the words in the correct order to proceed.
Once you’ve confirmed your backup phrase, you’ll have successfully created your MetaMask wallet! You can now use it to securely store and manage your cryptocurrency.
Step 2: Generating a Coinbase Wallet Address
After creating your MetaMask wallet, the next step is to generate a wallet address on Coinbase that you will use to transfer your cryptocurrency funds. Follow these steps:
- Log in to your Coinbase account.
- On the dashboard, click on the “Accounts” tab.
- Scroll down and select the cryptocurrency wallet you want to transfer.
- Click on the “Receive” button for that specific wallet.
- A unique wallet address will be generated for you.
- Copy the wallet address or use the QR code provided to receive funds.
It’s important to note that each cryptocurrency wallet on Coinbase will have a separate wallet address. Make sure to select the correct wallet before generating the wallet address to avoid any errors in the transfer process.
Step 3: Transferring Cryptocurrency from Coinbase to MetaMask
Once you have successfully set up your MetaMask wallet and connected it to your Coinbase account, you are ready to transfer your cryptocurrency from Coinbase to MetaMask. Follow the steps below to complete the transfer:
Step 3.1: Open MetaMask
Open the MetaMask extension in your web browser. You can find the MetaMask icon in the top-right corner of your browser.
Step 3.2: Copy Your MetaMask Address
In the MetaMask extension, click on the account icon. This will display your account address. Click the copy icon next to the address to copy it to your clipboard.
Step 3.3: Go to Coinbase
Go to the Coinbase website and log in to your account.
Step 3.4: Navigate to the Withdraw Page
In your Coinbase account, navigate to the “Accounts” tab and select the cryptocurrency you want to transfer. Click the “Send” button for that cryptocurrency.
Step 3.5: Paste Your MetaMask Address

In the “Recipient” field, paste your MetaMask address that you copied from the MetaMask extension.
Step 3.6: Enter the Amount

Enter the amount of cryptocurrency you want to transfer from Coinbase to MetaMask. Make sure to double-check the amount before proceeding.
Step 3.7: Confirm the Transfer
Review the details of your transfer, including the receiving address and the amount. Once you are certain that everything is correct, click the “Confirm” or “Send” button to finalize the transfer.
After confirming the transfer, you should see the cryptocurrency appear in your MetaMask wallet. Please note that the transfer may take some time to complete, depending on network congestion.
That’s it! You have successfully transferred cryptocurrency from Coinbase to MetaMask. You can now use your MetaMask wallet to interact with decentralized applications and manage your digital assets.
| Step | Action |
|---|---|
| Step 3.1 | Open MetaMask |
| Step 3.2 | Copy Your MetaMask Address |
| Step 3.3 | Go to Coinbase |
| Step 3.4 | Navigate to the Withdraw Page |
| Step 3.5 | Paste Your MetaMask Address |
| Step 3.6 | Enter the Amount |
| Step 3.7 | Confirm the Transfer |
What is Coinbase?
Coinbase is a popular cryptocurrency exchange platform that allows users to buy, sell, and store various cryptocurrencies.
What is MetaMask?
MetaMask is a digital wallet that allows users to securely store and manage their cryptocurrency assets, as well as interact with decentralized applications (DApps) on the Ethereum blockchain.
How can I transfer cryptocurrency from Coinbase to MetaMask?
To transfer cryptocurrency from Coinbase to MetaMask, you need to first open your MetaMask wallet and copy your wallet address. Then, log in to your Coinbase account and navigate to the “Send/Request” section. Enter your MetaMask wallet address as the recipient, select the amount of cryptocurrency you want to transfer, and confirm the transaction. The funds should be transferred to your MetaMask wallet shortly.