
Welcome to our step-by-step guide on how to add Cronos Network to Metamask! By following these simple instructions, you will be able to connect your Metamask wallet to the Cronos Network, enabling you to interact with decentralized applications (dApps) and manage your cryptocurrency on this network.
What is Cronos Network?
Cronos Network is a Layer 2 scaling solution built on the Crypto.org Chain. It aims to offer fast, secure, and affordable transaction processing, while retaining the security and decentralization features of the underlying blockchain. By bridging the gap between the Crypto.org Chain and Ethereum, Cronos Network provides users with more options and flexibility in their decentralized finance (DeFi) activities.
Why connect Metamask to Cronos Network?
Metamask is one of the most popular cryptocurrency wallets and browser extensions, widely used by the crypto community. By adding Cronos Network to your Metamask wallet, you gain access to a whole new range of dApps and DeFi projects built on Cronos. This allows you to explore and participate in the expanding Cronos ecosystem, take advantage of its features, and leverage its potential for growth.
Please note: Before you begin, make sure you have the latest version of Metamask installed on your device and that you have some funds available in your wallet to cover any gas fees.
How to Add Cronos Network to Metamask: Step-by-Step Guide
Metamask is one of the most popular cryptocurrency wallets, allowing users to interact with Decentralized Applications (DApps) on the Ethereum blockchain. However, with the advent of new blockchain networks, it is essential to add these networks to your Metamask wallet to access their functionalities.
Cronos Network is a blockchain platform built on top of the Ethereum network, focused on providing scalability and interoperability. By adding Cronos Network to your Metamask wallet, you will be able to utilize both Ethereum and Cronos functionalities seamlessly.
Follow these step-by-step instructions to add Cronos Network to Metamask:
Step 1: Launch your Metamask wallet extension by clicking on the Metamask icon in your browser toolbar.
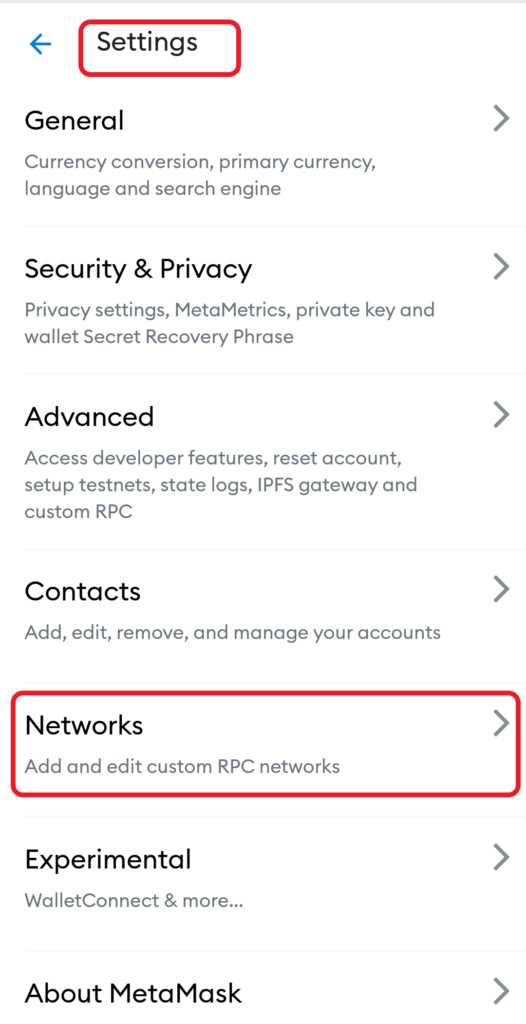
Step 2: If you already have a Metamask wallet, click on the account avatar located at the top-right corner of the extension. Select “Settings” from the drop-down menu.
Step 3: In the Settings menu, scroll down and select “Networks.”
Step 4: Click on the “Add Network” button.
Step 5: In the “New Network” form, fill in the following information:
- Network Name: Enter “Cronos” or any preferred name.
- RPC URL: Enter “https://cronos-testnet.crypto.org:8545” for the Cronos testnet network or “https://cronos.crypto.org:8545” for the Cronos mainnet network.
- Chain ID: Enter “0x13881” for the Cronos testnet network or “0x13882” for the Cronos mainnet network.
Step 6: Ensure the “Block Explorer URL” field is left empty. Click on the “Save” button to add the Cronos network to your Metamask wallet.
Step 7: Congratulations! You have successfully added the Cronos Network to your Metamask wallet. You can now switch between Ethereum and Cronos networks by clicking on the network name at the top of the Metamask extension.
By following these step-by-step instructions, you can easily add the Cronos Network to your Metamask wallet and take advantage of its powerful features. Enjoy seamless interaction with Cronos DApps while seamlessly hopping between Ethereum and Cronos networks.
Remember to exercise caution when transacting on any network and ensure you are interacting with legitimate and secure smart contracts.
Happy exploring!
Install Metamask Extension
To use Cronos Network on your internet browser, you will need to install the Metamask extension. Metamask is a digital wallet that allows you to interact with the Cronos Network blockchain.
Follow the step-by-step guide below to install Metamask:
Step 1: Open your browser
Open your internet browser (Chrome, Firefox, or Brave) and visit the Metamask website.
Step 2: Click “Get Chrome Extension”
Once on the Metamask website, click on the “Get Chrome Extension” button. This will redirect you to the Chrome Web Store.
Step 3: Add to Chrome
On the Chrome Web Store, click on the “Add to Chrome” button to start the installation process. A pop-up window will appear asking for confirmation.
Step 4: Confirm the installation
Click “Add extension” in the pop-up window to confirm the installation of the Metamask extension. The extension will then be added to your browser.
Step 5: Create a new wallet
Once the extension is installed, click on the Metamask icon that now appears on the top-right corner of your browser. Follow the on-screen instructions to create a new wallet or import an existing one.
Step 6: Set up a password
After creating a new wallet or importing an existing one, you will be prompted to set up a password. Choose a strong and secure password and enter it twice to confirm.
You have now successfully installed the Metamask extension! You can now use it to interact with the Cronos Network blockchain and add Cronos Network to your Metamask wallet.
Note: It is important to always keep your Metamask extension and wallet secure. Make sure to back up your seed phrase and password to prevent any unauthorized access to your funds.
Create or Import Metamask Wallet
To add Cronos Network to Metamask, you need to have a Metamask wallet. If you don’t have one already, you can create a new wallet or import an existing one. Here’s how:
1. Download the Metamask extension for your web browser, such as Chrome or Firefox.
2. Click on the Metamask icon in your browser toolbar and select “Create a Wallet” if you want to create a new wallet.
3. Follow the on-screen instructions to set up a new wallet. Make sure to choose a strong password and securely store your recovery seed phrase.
4. If you already have a Metamask wallet and want to import it, click on the Metamask icon and select “Import Wallet”.
5. Enter your recovery seed phrase or private key and follow the prompts to import your wallet.
6. Once your wallet is created or imported, you will see your account address and balance in the Metamask extension window.
Now that you have a Metamask wallet, you can proceed to add Cronos Network to it by following the rest of the guide.
Open Metamask and Go to Network Settings
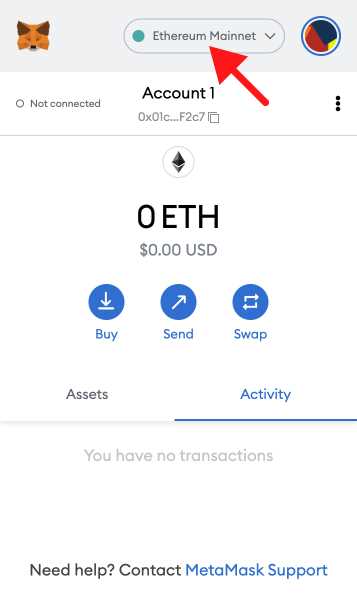
To add Cronos Network to Metamask, start by opening the Metamask extension in your browser. Click on the Metamask icon and select “Open Metamask” to launch the wallet interface.
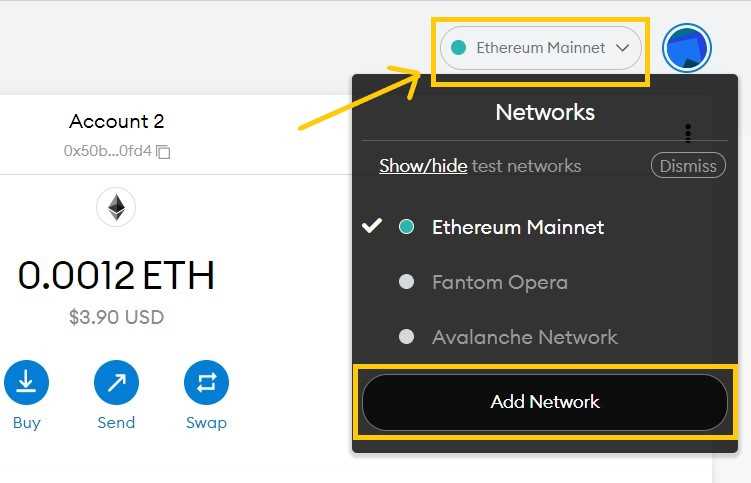
Once Metamask is open, look for the network selection menu at the top of the wallet interface. It is represented by a drop-down arrow next to the network name. Click on this menu to open the network settings.
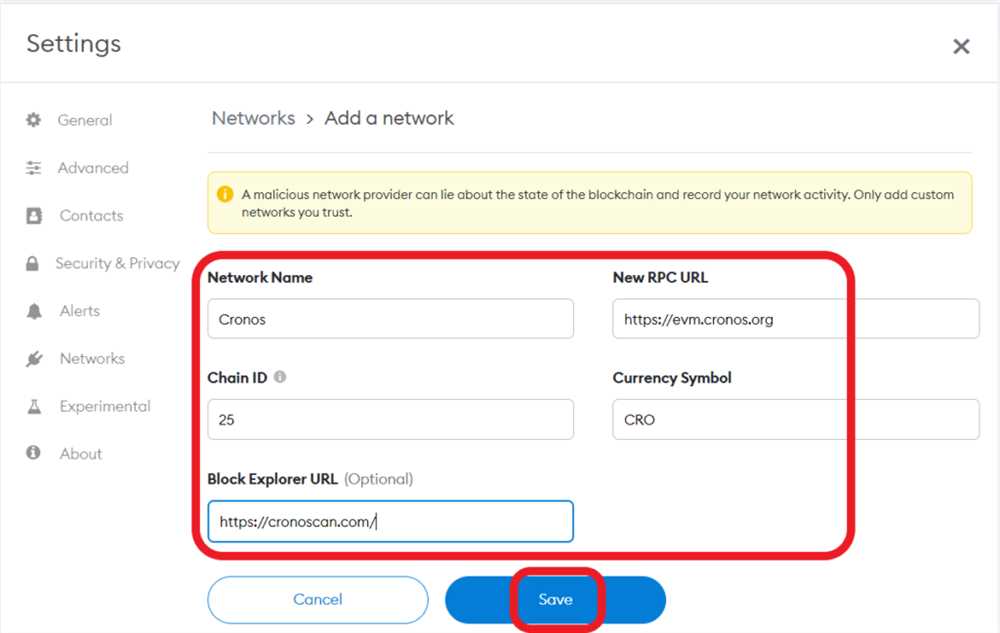
In the network settings, you will find different options for blockchain networks that you can connect to. To add Cronos Network, scroll down to the bottom of the list and click on “Add Network” button.
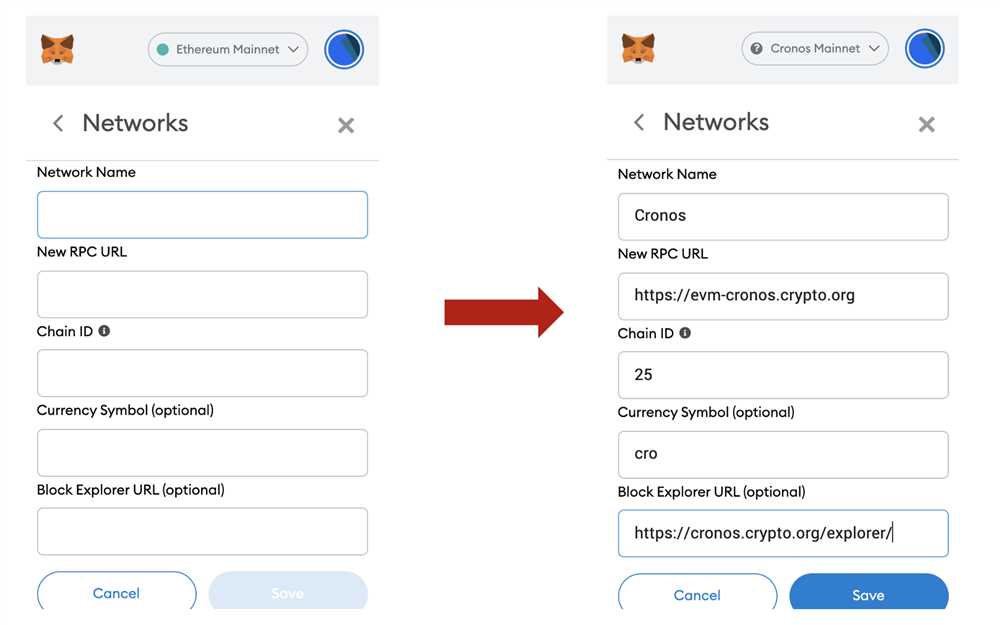
A new form will appear where you need to enter the network details for Cronos Network. Fill in the following information:
- Network Name: Cronos
- New RPC URL: https://cronos-testnet.crypto.org:8545
- Chain ID: 338
- Symbol: CRO
- Explorer URL: https://cronos-explorer.crypto.org
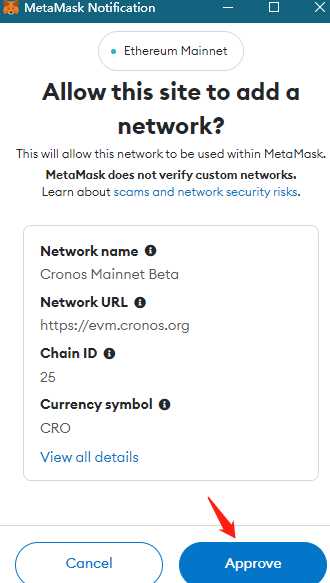
Double-check the details you entered to ensure accuracy. Once you have filled in the information, click on the “Save” button to add Cronos Network to Metamask.
Congratulations! You have successfully added Cronos Network to Metamask. Now you can switch to Cronos Network and start exploring the exciting world of this blockchain network.
Add Cronos Network

To add Cronos Network to your Metamask wallet, follow the step-by-step guide below:
Step 1: Open the Metamask Extension
Open the Metamask extension in your browser by clicking on the extension icon in your toolbar.
Step 2: Access Network Settings
Click on the network icon at the top of the Metamask window. It looks like a dropdown menu with a globe icon.
Step 3: Select “Custom RPC”
In the network settings dropdown, scroll to the bottom and click on “Custom RPC” to add a new network.
Step 4: Enter Cronos Network Details
In the “New RPC URL” field, enter the following URL for the Cronos Network: https://cronos-chain.crypto.org:8545
Give the network a name, such as “Cronos” or “Cronos Network”.
Step 5: Save and Connect
Click on the “Save” button to save the new network. Metamask will then connect to the Cronos Network using the provided URL.
You have successfully added the Cronos Network to your Metamask wallet! You can now switch to the Cronos Network by selecting it from the network dropdown in Metamask.
Note: Make sure you have the required testnet tokens or mainnet tokens to interact with the Cronos Network.
Disclaimer: Adding custom networks to Metamask can be risky. Make sure you trust the network provider before connecting to a new network.
Connect Metamask to Cronos Network
In order to connect your Metamask wallet to the Cronos Network, follow these step-by-step instructions:
Step 1: Install Metamask
If you haven’t already, install the Metamask browser extension by visiting the official Metamask website (https://metamask.io/). Choose the browser you are using and follow the installation instructions.
Step 2: Create or Import a Wallet
Open the Metamask extension in your browser and either create a new wallet or import an existing one by following the on-screen instructions. Make sure to securely store your wallet’s seed phrase as this is crucial for wallet recovery.
Step 3: Switch to Cronos Network
Once your wallet is set up, click on the network selection dropdown in the top right corner of the Metamask interface. Scroll down and click on “Custom RPC”.
In the “New RPC URL” field, enter the Cronos Network RPC endpoint: https://cronos-testnet.crypto.org:8545
Set the network name as “Cronos Testnet” and enter the currency symbol as “CRO”. Click on “Save” to add the Cronos Network to your network list.
Step 4: Connect to Cronos Network
Once you have saved the Cronos Network details, select “Cronos Testnet” from the network selection dropdown to connect your Metamask wallet to the Cronos Network.
Your Metamask wallet is now connected to the Cronos Network and you can start using it to interact with dApps and perform transactions on Cronos Network.
Note: Make sure to switch back to the appropriate network (Ethereum Mainnet, for example) when you are done using Cronos Network to avoid any unintentional transactions or interactions on the wrong network.
Why do I need to add Cronos Network to Metamask?
You need to add Cronos Network to Metamask in order to interact with the Cronos blockchain and use its decentralized applications and services.