
Welcome to the ultimate guide on unlocking the power of Metamask! Whether you’re a seasoned cryptocurrency user or just diving into the world of decentralized finance, Metamask is a must-have tool in your arsenal. This powerful browser extension allows you to securely navigate the Ethereum blockchain, interact with decentralized applications, and manage your digital assets, all in one place.
Logging in and managing your account with Metamask is a breeze. With just a few simple steps, you’ll be ready to explore the decentralized web and take control of your financial future. In this comprehensive guide, we’ll walk you through the entire process, from setting up your wallet to securely storing your private keys. Get ready to unleash the full potential of Metamask!
First things first, you’ll need to install Metamask. Simply head over to the official Metamask website or search for it in your browser’s extension store. Once installed, you’ll be prompted to create a new wallet or import an existing one. If you’re new to the world of Ethereum, creating a new wallet is a quick and easy process. Just follow the on-screen instructions and make sure to write down and securely store your recovery phrase – this will be your lifeline in case you ever need to restore your wallet.
Now that you have your wallet set up, it’s time to log in and start managing your account. Simply click on the Metamask icon in your browser toolbar and enter your password. Voila! You’re now logged in and ready to explore the decentralized world. From here, you can view your account balance, send and receive Ethereum and ERC-20 tokens, and connect to various decentralized applications.
Unlocking the Power of Metamask

Metamask is a powerful tool that allows users to interact with decentralized applications (dApps) on the Ethereum blockchain. With Metamask, users can manage their Ethereum accounts, securely store their digital assets, and securely sign transactions, all from their web browser.
One of the key features of Metamask is its ability to provide users with a secure and convenient way to log in to websites and dApps. Instead of relying on traditional username and password combinations, Metamask uses cryptographic keys to authenticate users.
When you first set up Metamask, you will be prompted to create a new Ethereum account. This account will be secured with a secret passphrase, known as a seed phrase. Remember to write down your seed phrase and keep it in a safe place, as it is the only way to restore your account if you lose access to your computer or phone.
Once you have set up your account, you can easily log in to websites and dApps that support Metamask. When you visit a supported site, Metamask will automatically detect the presence of a compatible dApp and display a pop-up window asking for your permission to connect.
By authorizing the connection, you are giving the dApp access to your Ethereum account. This allows the dApp to interact with your account and perform transactions on your behalf. However, it is important to always be cautious when granting access to your account and only connect to trusted websites and dApps.
Managing your Ethereum account with Metamask is also straightforward. You can view your account address, check your balance, and send or receive Ether and other ERC-20 tokens. Metamask also provides a built-in browser, which allows you to explore the Ethereum ecosystem and discover new dApps.
Overall, Metamask is a powerful tool for interacting with the Ethereum blockchain. It provides users with a convenient way to log in to dApps, manage their Ethereum accounts, and securely sign transactions. Whether you are a developer building decentralized applications or a user exploring the world of blockchain, Metamask is a must-have tool for unlocking the power of Ethereum.
The Ultimate Guide to Logging in and Managing Your Account
Logging in and managing your account on Metamask is an essential part of using this powerful Ethereum wallet and decentralized application platform. In this ultimate guide, we will walk you through the step-by-step process of getting started with Metamask, creating an account, logging in, and managing your account settings.
To get started, make sure you have the Metamask extension installed on your preferred web browser. Once installed, click on the Metamask icon in your browser’s toolbar to open the login screen.
If this is your first time using Metamask, you will need to create a new account. Click on the “Create a Wallet” button and follow the prompts to set up a strong password and get your secret backup phrase. Make sure to write down your backup phrase and keep it in a safe place, as it is the only way to recover your account if you forget your password or lose access to your device.
After creating your account, you will be prompted to import an existing account or create a new one. If you don’t have an existing account, select the “Create new account” option and Metamask will generate a new Ethereum address for you.
Once you have created or imported your account, you can log in to Metamask by entering your password. After logging in, you will be able to access and manage your account settings.
Metamask provides a variety of account management features, including the ability to view your account balance, send and receive Ether and ERC-20 tokens, and manage your connected dApps and browser extensions.
To view your account balance, click on the account icon in the top-right corner of the Metamask window. This will display your Ethereum address, account balance, and a list of your recent transactions.
To send or receive Ether or ERC-20 tokens, click on the “Send” or “Receive” buttons in the Metamask window. Enter the recipient’s Ethereum address and the amount you wish to send or receive, and click “Confirm” to complete the transaction.
You can also manage your connected dApps and browser extensions by clicking on the Metamask menu icon in the top-left corner of the window. From here, you can view and manage your connected accounts, add new accounts, and customize your account settings.
In conclusion, logging in and managing your account on Metamask is a straightforward process that gives you access to a wide range of features and functionalities. By following the steps outlined in this guide, you will be able to navigate the Metamask interface with ease and make the most of this powerful Ethereum wallet and decentralized application platform.
Getting Started with Metamask
Metamask is a browser extension that allows you to interact with the Ethereum network. In order to get started, you will need to install the extension on your preferred browser.
Installing Metamask

To install Metamask, follow these steps:
- Open your preferred browser
- Navigate to the Metamask download page
- Click on the “Get started” button
- Follow the on-screen instructions to add the extension to your browser
- Once the installation is complete, click on the Metamask icon in your browser toolbar to open the extension
Creating a Metamask Account
After installing Metamask, you will need to create an account. Follow these steps to create a new account:
- Click on the “Create a Wallet” button on the Metamask home screen
- Read and accept the terms of use
- You will be presented with a 12-word recovery phrase. Write down this phrase and keep it in a safe place. This phrase can be used to recover your account if you ever lose access to it.
- Click “Next” to verify your recovery phrase
- Enter your recovery phrase in the correct order
- Create a password for your account
- Click “Create” to finalize the account creation process
Logging in to Metamask
To log in to Metamask, follow these steps:
- Click on the Metamask icon in your browser toolbar to open the extension
- Enter your password
- Click “Unlock”
Managing Your Metamask Account
Once logged in to Metamask, you can manage your account settings, view your transaction history, and interact with dApps and the Ethereum network. Use the Metamask interface to navigate through the different features and functionalities.
Importing an Existing Account
If you already have an existing Ethereum account, you can import it into Metamask. To import an account, follow these steps:
- Click on the Metamask icon in your browser toolbar to open the extension
- Click on the account avatar in the top right corner of the Metamask interface
- Select “Import Account” from the dropdown menu
- Enter your account’s private key or recovery phrase
- Click “Import”
With these basic steps, you are now ready to get started with Metamask and unlock the power of the Ethereum network.
Setting up and Installing the Metamask Extension

If you want to experience the full power of decentralized finance (DeFi) and the Ethereum blockchain, you’ll need to set up and install the Metamask extension. Metamask is a popular browser extension that allows you to interact with decentralized applications (dApps) and manage your Ethereum accounts securely.
To get started, follow these simple steps:
- Open your favorite web browser (Metamask is compatible with Chrome, Firefox, Brave, and Edge).
- Visit the official Metamask website (https://metamask.io/) and click on the “Get Chrome Extension” or “Get Firefox Extension” button.
- You will be redirected to the Chrome Web Store or Firefox Add-ons page. Click on the “Add to Chrome” or “Add to Firefox” button.
- A pop-up window will appear, asking for confirmation to install the extension. Click on the “Add extension” button.
- Once the installation is complete, you will see the Metamask icon in the top-right corner of your browser.
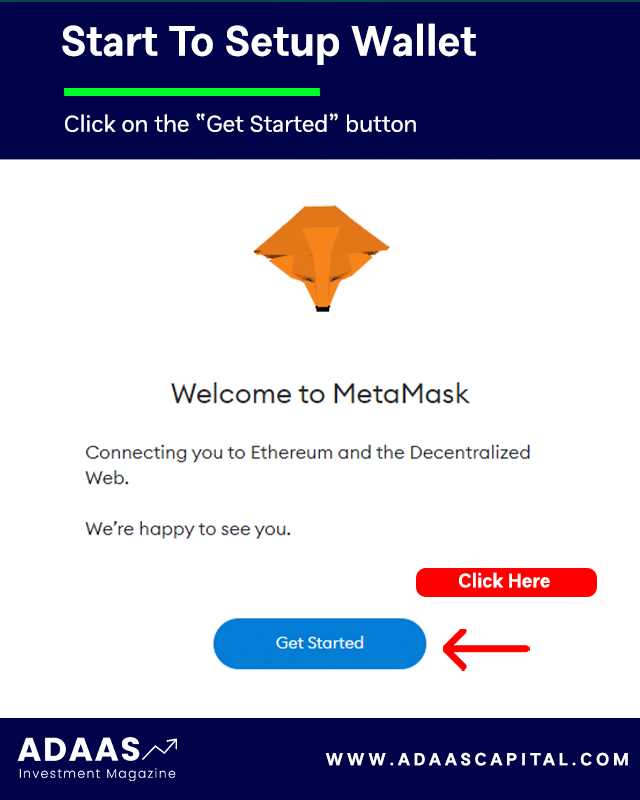
- Click on the Metamask icon to launch the extension. You will be greeted with a welcome screen.
- Click on the “Get Started” button and then choose whether you want to create a new wallet or import an existing one.
- If you choose to create a new wallet, you’ll need to set up a strong password. Make sure to remember it or write it down in a safe place.
- Follow the instructions to back up your seed phrase. This seed phrase is your wallet’s backup and can be used to restore your wallet if you ever lose access to it.
- After backing up your seed phrase, you’ll be prompted to confirm it by selecting the correct words in the correct order.
- Once your wallet is set up and backed up, you’re ready to use Metamask!
Now that you have Metamask installed and set up, you can log in to your wallet and start exploring the world of DeFi, interact with dApps, and manage your Ethereum accounts with ease.
Note: It’s essential to keep your Metamask extension up to date to ensure you have the latest security patches and features. Metamask will automatically update itself, but it’s always good practice to check for updates manually regularly.
Logging In and Importing Your Account

When it comes to using Metamask, the first step is to log in to your account. If you already have a Metamask account, you can simply click on the extension in your browser, enter your password, and you’ll be logged in.
If you’re new to Metamask or want to import an existing account, you can follow these steps:
- Open the Metamask extension in your browser and click on “Create a Wallet”.
- Read the terms of service and privacy policy, and click on “Accept”.
- Choose a strong password for your account and click on “Create”.
- Make sure to write down your secret backup phrase and keep it in a safe place. This backup phrase is crucial for recovering your account if you ever lose access to it.
- Click on “Next” and confirm your backup phrase by selecting the words in the correct order.
- Once your backup phrase is confirmed, your account will be created and you’ll be logged in.
If you already have a backup phrase from a previous Metamask account or another wallet, you can import it by following these steps:
- Click on the Metamask extension in your browser and choose “Import Wallet”.
- Enter your backup phrase in the correct order and click on “Import”.
- Your account will be imported and you’ll be logged in.
Once you’re logged in to your Metamask account, you can start managing your Ethereum addresses, interacting with dApps, and securely storing your digital assets.
| Logging In and Importing Your Account |
|---|
| 1. Open the Metamask extension |
| 2. Click on “Create a Wallet” |
| 3. Read and accept the terms |
| 4. Choose a strong password |
| 5. Write down your backup phrase |
| 6. Confirm your backup phrase |
| 7. Account created and logged in |
| 8. Click on “Import Wallet” |
| 9. Enter your backup phrase |
| 10. Account imported and logged in |
Creating a New Wallet and Generating a Seed Phrase

If you are new to Metamask, follow these steps to create a new wallet and generate a seed phrase:
Step 1: Install the Metamask extension by visiting the Chrome Web Store and clicking “Add to Chrome”.
Step 2: Once the extension is installed, click on the Metamask icon in your browser toolbar to open the extension.
Step 3: In the Metamask popup, click “Create a Wallet” to start the wallet creation process.
Step 4: You will be prompted to create a password for your new wallet. Make sure to choose a strong and secure password that you can remember.
Step 5: After entering a password, click “Create” to generate your new wallet.
Step 6: Metamask will then display your unique seed phrase. This seed phrase is extremely important as it can be used to recover your wallet if you ever lose access to it. Write down the seed phrase and store it in a safe and secure place.
Step 7: After writing down your seed phrase, click “Next” to confirm that you have safely stored it.
Step 8: Congratulations! You have successfully created a new wallet and generated a seed phrase with Metamask. Make sure to keep your seed phrase safe and never share it with anyone.
How can I log in and manage my Metamask account?
To log into your Metamask account, you simply need to click on the Metamask extension in your browser and enter your password or use your biometric authentication. Once logged in, you can manage your account by viewing your wallet balance, sending and receiving tokens, and interacting with decentralized applications (dApps).
What is Metamask and how does it work?
Metamask is a browser extension that serves as a digital wallet for storing and managing Ethereum and other ERC-20 tokens. It allows users to interact with decentralized applications (dApps) directly from their browser. Metamask securely stores users’ private keys and enables them to sign transactions and authenticate with dApps without sharing sensitive information.