
Metamask is an essential tool for Ethereum users, enabling them to interact with decentralized applications (dApps) in a user-friendly manner. Recently, the Polygon network has gained significant traction in the blockchain space due to its scalability and low transaction fees. If you want to tap into the power of Polygon and explore the various opportunities it offers, configuring Metamask for Polygon network integration is a crucial step.
By integrating Metamask with the Polygon network, you can enjoy faster and cheaper transactions, making it ideal for various use cases such as decentralized finance (DeFi), gaming, and non-fungible tokens (NFTs). This guide will walk you through the process of configuring Metamask for Polygon network integration, allowing you to seamlessly transfer your assets and interact with dApps on the Polygon network.
Before you begin, ensure that you have the latest version of Metamask installed and set up on your web browser. Once you have Metamask up and running, follow the step-by-step instructions below to configure it for Polygon network integration. Let’s unlock the power of Polygon and explore the possibilities it holds for decentralized applications!
Why Configure Metamask for Polygon Network Integration?
Metamask is one of the most popular cryptocurrency wallets that enables users to securely store, manage, and interact with their digital assets. By configuring Metamask for Polygon Network integration, users can unlock the power of the Polygon network.
The Polygon network is a Layer 2 scaling solution for Ethereum, designed to improve the scalability and transaction speed of the Ethereum network. By integrating with Polygon, Metamask users gain access to a wide range of benefits, including faster and cheaper transactions, enhanced scalability, and interoperability with other blockchain networks.
Configuring Metamask for Polygon Network integration allows users to seamlessly interact with decentralized applications (dApps) built on Polygon. This opens up a plethora of opportunities for users, including accessing a broader range of dApps, participating in yield farming and staking activities, and exploring new investment opportunities in the decentralized finance (DeFi) space.
Moreover, configuring Metamask for Polygon Network integration is a relatively straightforward process. Once configured, users can easily switch between the Ethereum and Polygon networks within their Metamask wallet, providing them with the flexibility to choose the network that best suits their needs.
In summary, configuring Metamask for Polygon Network integration unleashes the full potential of the Polygon network, offering improved scalability, faster transactions, and access to a wider array of dApps and DeFi opportunities. By taking advantage of this integration, users can enhance their crypto experience and tap into the limitless potential of the rapidly growing Polygon ecosystem.
Improve Your Crypto Experience with Polygon
Are you looking to enhance your cryptocurrency experience? Look no further than Polygon, a layer-2 scaling solution that aims to improve scalability and facilitate faster and cheaper transactions on the Ethereum network.
By integrating with the Polygon network, you can take advantage of a wide range of benefits. Here are a few ways you can improve your crypto experience with Polygon:
- Scalability: Polygon allows for faster and more scalable transactions compared to the Ethereum mainnet. This means you can make transactions quickly and at a lower cost.
- Lower Fees: With Polygon, you can reduce transaction fees significantly, making it more affordable to interact with decentralized applications (DApps) and perform transactions on the network.
- Smooth User Experience: Polygon’s integration with popular wallets like Metamask makes it easy for users to interact with DApps built on the Polygon network without needing to learn a new interface or use a different wallet.
- Access to Diverse DApps: With Polygon, you gain access to a wide range of DApps and decentralized finance (DeFi) protocols. This allows you to explore and take advantage of various opportunities in the crypto space.
- Compatibility: Polygon ensures compatibility with Ethereum, allowing you to transfer your assets seamlessly between the Ethereum mainnet and the Polygon network, giving you flexibility and convenience.
With the power of Polygon, you can enhance your crypto experience by enjoying faster and cheaper transactions, accessing a vast array of DApps and DeFi protocols, and reducing fees. So, why wait? Start exploring Polygon today and unlock the full potential of your crypto journey!
Step-by-Step Guide to Configuring Metamask for Polygon
Metamask is a popular browser extension that allows users to interact with decentralized applications (dApps) on the Ethereum blockchain. However, users can also configure Metamask to work with other blockchains, such as Polygon. Polygon is a Layer 2 scaling solution for Ethereum, which aims to improve its scalability and reduce transaction fees.
In this guide, we will walk you through the step-by-step process of configuring Metamask for Polygon network integration.
Step 1: Install Metamask Extension
If you haven’t already, install the Metamask extension on your preferred web browser. You can find the extension on the official Metamask website or in your browser’s extension store.
Step 2: Create or Import a Wallet
Once Metamask is installed, open the extension and either create a new wallet or import an existing one using your recovery phrase.
Step 3: Switch to Polygon Network
Click on the network selection dropdown at the top of the Metamask extension and choose “Custom RPC.”
In the “New RPC URL” field, enter “https://rpc-mainnet.maticvigil.com” as the RPC URL for the Polygon main network.
In the “ChainID” field, enter “137” as the Chain ID for Polygon.
Click “Save” to add the Polygon network to your Metamask.
Step 4: Add MATIC to Your Wallet
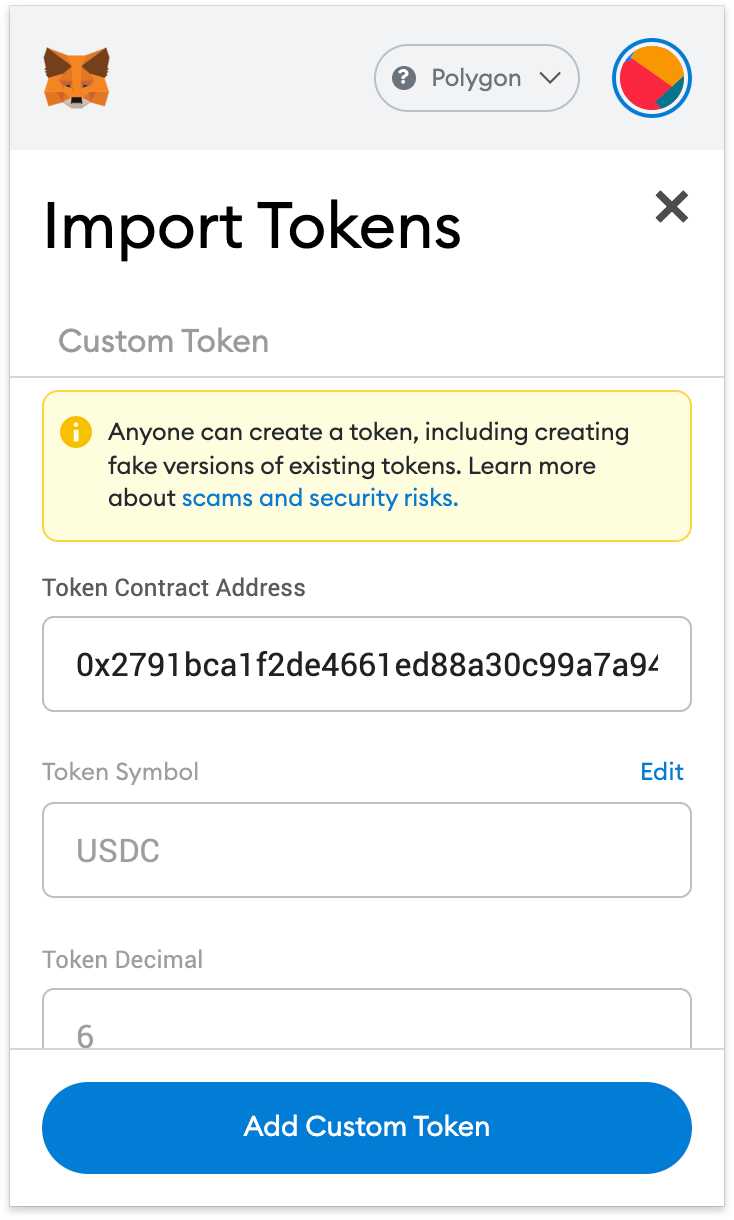
In order to interact with decentralized applications on the Polygon network, you will need to have some MATIC tokens in your wallet. To add MATIC to your wallet, click on the account dropdown in Metamask and choose “Add Token.”
In the “Custom Token” tab, enter the MATIC token contract address: “0x7D1AfA7B718fb893dB30A3aBc0Cfc608AaCfeBB0”.
Click “Next” and then “Add Tokens” to add MATIC to your wallet.
Step 5: Test Your Configuration
Now that you have configured Metamask for the Polygon network, you can test it by visiting a dApp that is built on Polygon. Open your preferred browser and navigate to a Polygon dApp, such as Aavegotchi or QuickSwap.
If everything is configured correctly, you should be able to connect your Metamask wallet to the dApp and start interacting with it using the Polygon network.
Conclusion
Configuring Metamask for Polygon network integration is a simple process that allows you to unlock the power of Polygon’s Layer 2 scaling solution. By following this step-by-step guide, you can seamlessly switch between the Ethereum and Polygon networks and enjoy faster transactions and lower fees.
Unlock the Power of Polygon with Metamask
Metamask is a popular cryptocurrency wallet that allows users to interact with decentralized applications (DApps) and connect to various blockchain networks. One of the networks that Metamask supports is Polygon, which offers fast and low-cost transactions for Ethereum-based applications.
By configuring Metamask for Polygon network integration, users can harness the power of Polygon and take advantage of its benefits. With Polygon, users can enjoy faster transaction confirmations and significantly lower gas fees compared to the Ethereum network. This makes it ideal for users who want to save on transaction costs and experience quicker transfers.
To unlock the power of Polygon with Metamask, users need to follow a few simple steps. First, they need to ensure that they have the latest version of Metamask installed. They can download the extension for their web browser and create or import their wallet.
Once Metamask is set up, users can switch to the Polygon network by following these steps:
| Step | Description |
|---|---|
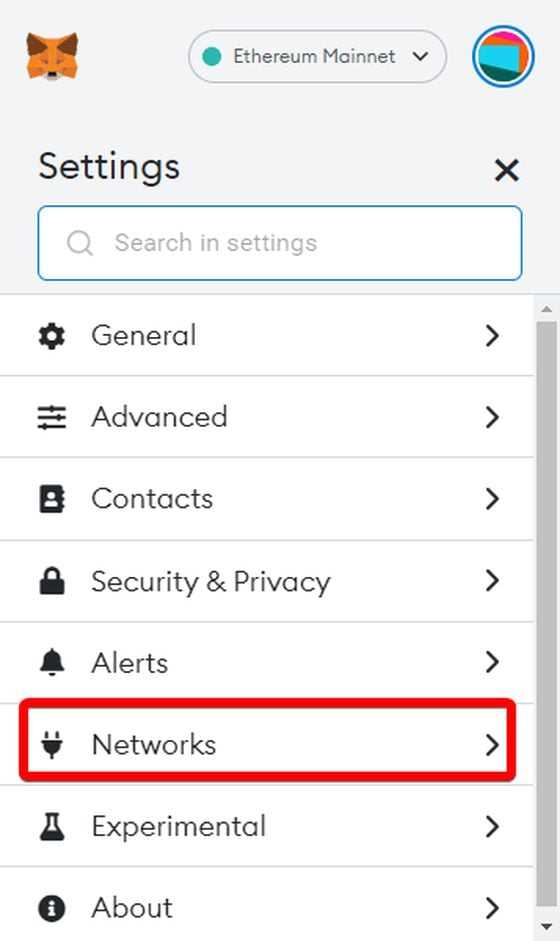
| Step 1 | Click on the Metamask extension icon in your browser and select “Settings”. |
| Step 2 | In the Settings menu, scroll down and click on “Networks”. |
| Step 3 | Click on “Add Network” to create a new network. |
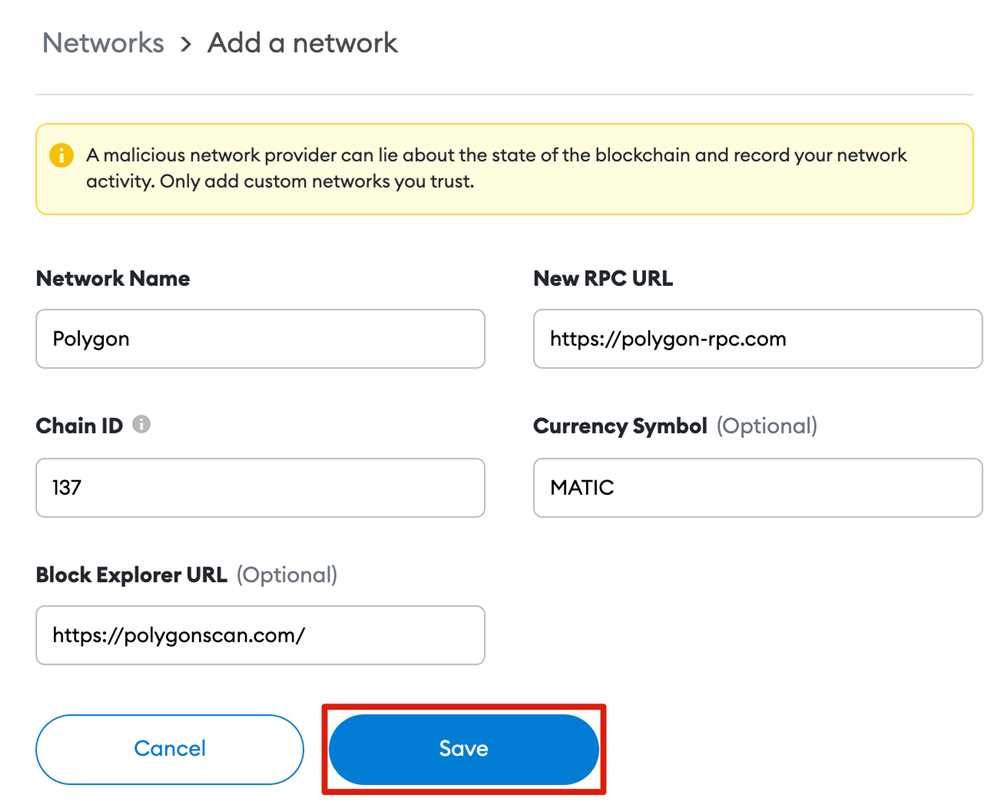
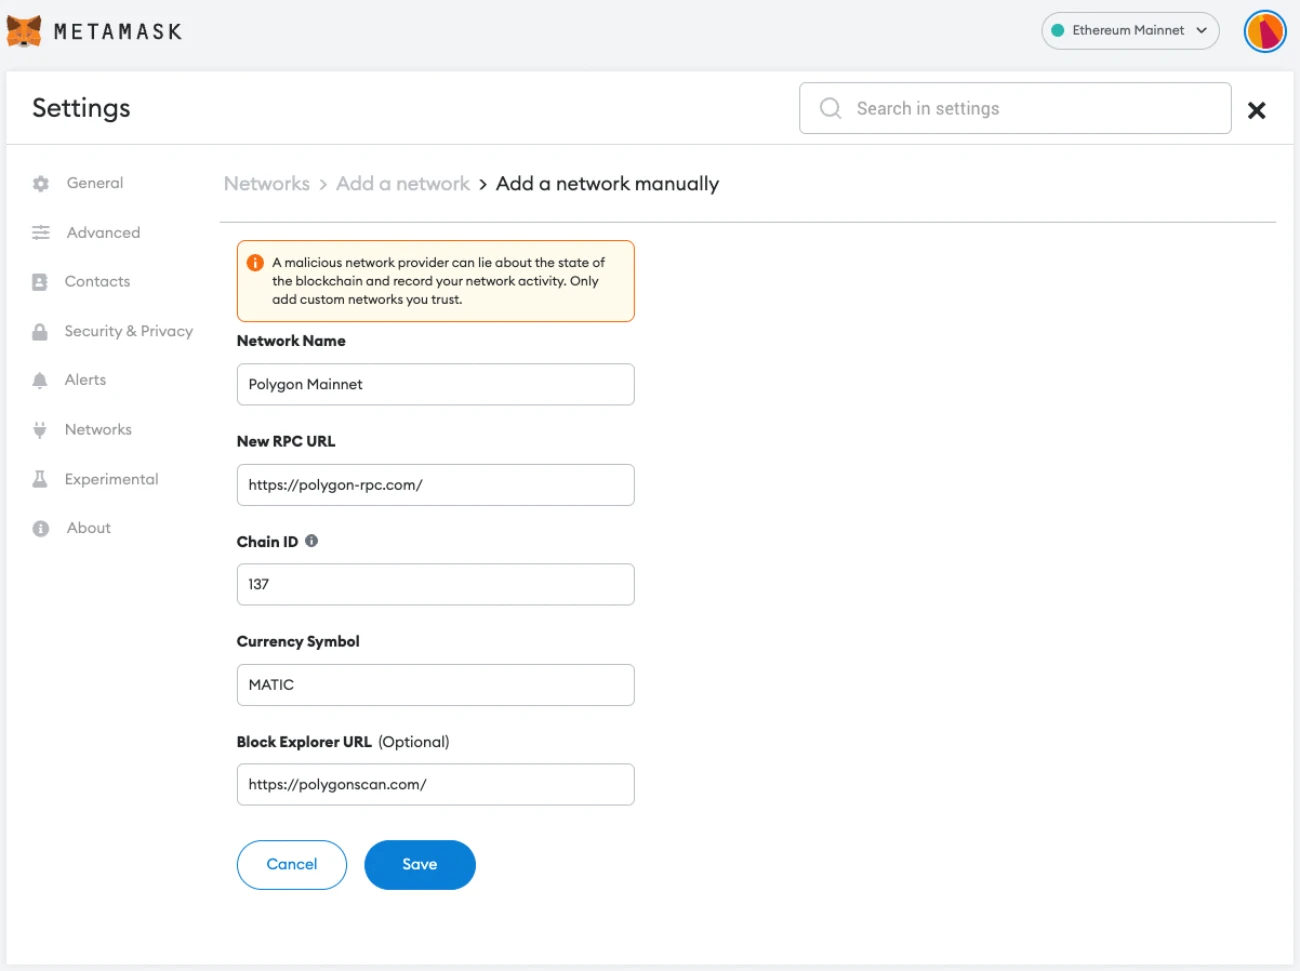
| Step 4 | Fill in the following information: |
| Network Name: Polygon | |
| New RPC URL: https://rpc-mainnet.maticvigil.com/ (for the mainnet) or https://rpc-testnet.maticvigil.com/ (for the testnet) | |
| Chain ID: 137 (for the mainnet) or 80001 (for the testnet) | |
| Symbol: MATIC | |
| Block Explorer URL: https://explorer-mainnet.maticvigil.com/ (for the mainnet) or https://explorer-mumbai.maticvigil.com/ (for the testnet) | |
| Step 5 | Click on “Save” to add the Polygon network to your Metamask wallet. |
| Step 6 | You can now switch to the Polygon network by selecting it from the network dropdown in the Metamask extension. |
Once you have successfully switched to the Polygon network, you can start using Metamask with Polygon-based DApps and enjoy the benefits of fast and cost-efficient transactions. So, unlock the power of Polygon with Metamask and experience a seamless blockchain experience!
What is Metamask?
Metamask is a digital wallet that allows users to interact with the Ethereum blockchain and decentralized applications (dApps).