
Metamask is a powerful tool that allows you to interact with the Ethereum blockchain directly from your browser. Whether you are a seasoned Ethereum enthusiast or just getting started, understanding how to manage your Ethereum transactions using Metamask is essential.
In this comprehensive guide, we will delve into the intricacies of Metamask and explore its various features. From setting up your wallet to executing transactions and managing your account, we will cover everything you need to know to use Metamask with confidence.
First, we will start by explaining what Metamask is and why it is a popular choice among Ethereum users. With its user-friendly interface and robust security measures, Metamask offers a seamless experience for managing your Ethereum transactions.
Next, we will walk you through the process of installing and setting up Metamask. We will guide you step-by-step, ensuring that you have a fully functional wallet that is securely connected to the Ethereum network.
Once your wallet is set up, we will show you how to execute transactions using Metamask. Whether you want to send Ether, interact with decentralized applications (dApps), or participate in token sales, we will cover all the essential steps to ensure smooth and successful transactions.
In addition to transaction management, we will also explore how to manage your account, import and export wallets, and secure your funds. We will provide tips and best practices to keep your Ethereum transactions safe and secure.
By the end of this guide, you will have a solid understanding of Metamask and how to effectively manage your Ethereum transactions. Whether you are a casual user or a developer, this knowledge will empower you to navigate the Ethereum ecosystem with ease and confidence.
Understanding Metamask Contact
Metamask is a popular cryptocurrency wallet that allows users to manage their Ethereum transactions. One of the key features of Metamask is the ability to add and manage contacts, making it easier to send and receive ETH and ERC20 tokens.
When you add a contact to Metamask, you are essentially saving the Ethereum address and associating it with a name or label. This makes it easier to remember and identify the recipient when you are sending tokens. You can also add metadata to the contact, such as a description or notes.
To add a contact, simply click on the “Add Contact” button in the Metamask interface. You will be prompted to enter the recipient’s Ethereum address and provide a name or label for the contact. You can also choose to add a description or notes if desired. Once you have added the contact, it will be saved in your Metamask wallet.
Managing your contacts in Metamask is simple and intuitive. You can easily edit or delete a contact by clicking on the corresponding buttons next to the contact’s information. You can also search for a specific contact by name or Ethereum address using the search bar.
When you are sending tokens using Metamask, you can select a contact from your list of saved contacts instead of manually entering the recipient’s Ethereum address. This reduces the risk of error and ensures that you are sending funds to the correct address.
| Contact Name | Ethereum Address | Description |
|---|---|---|
| Alice | 0x1234567890ABCDEF | Friend |
| Bob | 0x0987654321FEDCBA | Business Partner |
In the above example, Alice and Bob are saved contacts in Metamask. Their Ethereum addresses, along with their respective names and descriptions, are displayed in the table. When sending tokens to Alice or Bob, you can simply select their names from the contacts list instead of manually entering their Ethereum addresses.
In conclusion, understanding how to manage contacts in Metamask is essential for simplifying and streamlining your Ethereum transactions. By saving and labeling your contacts, you can easily send and receive ETH and ERC20 tokens without the hassle of remembering or copying Ethereum addresses.
A Guide to Managing Your Ethereum Transactions
Managing your Ethereum transactions can seem daunting, but with the help of Metamask, it can become a simple and straightforward process. In this guide, we will walk you through the basic steps of managing your Ethereum transactions using Metamask.
Step 1: Installing Metamask
The first step in managing your Ethereum transactions is to install the Metamask extension. Metamask is available as a browser extension for popular browsers like Chrome and Firefox. Simply search for Metamask in your browser’s extension store and click to install.
Step 2: Creating a Wallet
Once you have installed Metamask, you will need to create a wallet. Click on the Metamask icon in your browser’s toolbar and select “Create a Wallet” from the dropdown menu. Follow the on-screen instructions to set up your wallet, including creating a strong password and securely backing up your secret phrase.
Step 3: Connecting to Ethereum

After creating your wallet, you will need to connect Metamask to the Ethereum network. Click on the Metamask icon in your browser’s toolbar again and select “Main Ethereum Network” from the dropdown menu. If you are using a test network, such as Rinkeby or Ropsten, you can choose the respective network instead.
Step 4: Sending a Transaction
Now that you are connected to the Ethereum network, you can start managing your transactions. To send Ethereum to another address, click on the “Send” button in the Metamask interface. Enter the recipient’s address, the amount of Ethereum you want to send, and any optional transaction details. Review the transaction details and click “Confirm” to send the transaction.
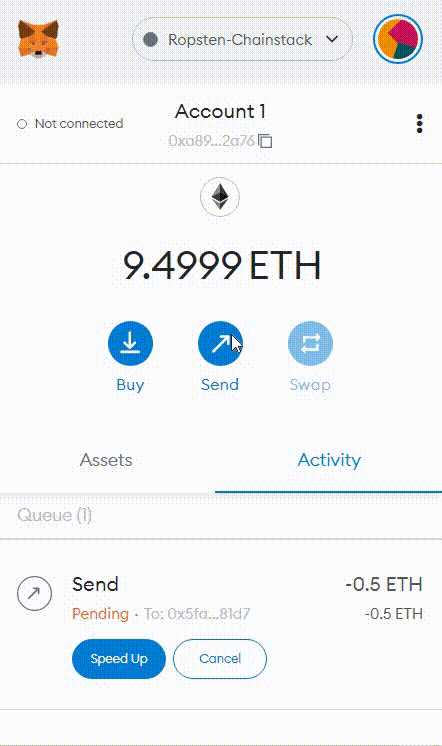
Step 5: Checking Transaction Status
After sending a transaction, you may want to check its status. To do this, click on the Metamask icon in your browser’s toolbar and select “Activity” from the dropdown menu. You will see a list of your recent transactions, including their status. If a transaction is pending, you can wait for it to be confirmed by the network.
Managing your Ethereum transactions with Metamask is as simple as following these steps. Remember to double-check the recipient’s address and transaction details before confirming any transaction. With practice, you will become more confident in managing your Ethereum transactions using Metamask.
What is Metamask?
Metamask is a browser extension that allows users to easily manage their Ethereum transactions and interact with decentralized applications (DApps) on the Ethereum network. It serves as a wallet, providing users with a way to store and manage their Ethereum and ERC20 tokens.
By installing Metamask, users can access their Ethereum wallet directly in their browser without the need for a separate wallet application. It integrates directly into the browser and provides users with a secure and convenient way to interact with the Ethereum network.
Key Features of Metamask
Metamask offers several key features that make it popular among Ethereum users:
- Wallet Management: Metamask allows users to create and manage multiple Ethereum wallets, giving them full control over their funds and transactions.
- Transaction History: With Metamask, users can easily track their transaction history, view pending and completed transactions, and monitor their account balances.
- Secure Key Management: Metamask stores the user’s private keys locally, encrypted with a password. This ensures that the user retains full control over their keys and funds.
- Integration with DApps: Metamask seamlessly integrates with numerous decentralized applications on the Ethereum network, allowing users to interact with DApps directly from their browser.
Using Metamask
To start using Metamask, simply install the browser extension and create a new wallet. Once the wallet is set up, users can import existing wallets or create new ones. Metamask also provides a user-friendly interface for sending and receiving Ethereum and ERC20 tokens, as well as interacting with DApps.
Metamask supports various networks, including the Ethereum mainnet, test networks, and custom networks. Users can easily switch between networks within the extension, allowing them to participate in various blockchain ecosystems.
Overall, Metamask is a powerful tool for managing Ethereum transactions and interacting with the Ethereum network. Its user-friendly interface and extensive feature set make it a popular choice among Ethereum users and developers alike.
| Features | Benefits |
|---|---|
| Wallet Management | Allows users full control over their funds and transactions |
| Transaction History | Easily track transaction history and monitor account balances |
| Secure Key Management | Ensures users retain full control over their keys and funds |
| Integration with DApps | Seamlessly interact with decentralized applications on the Ethereum network |
Managing Your Ethereum Transactions with Metamask
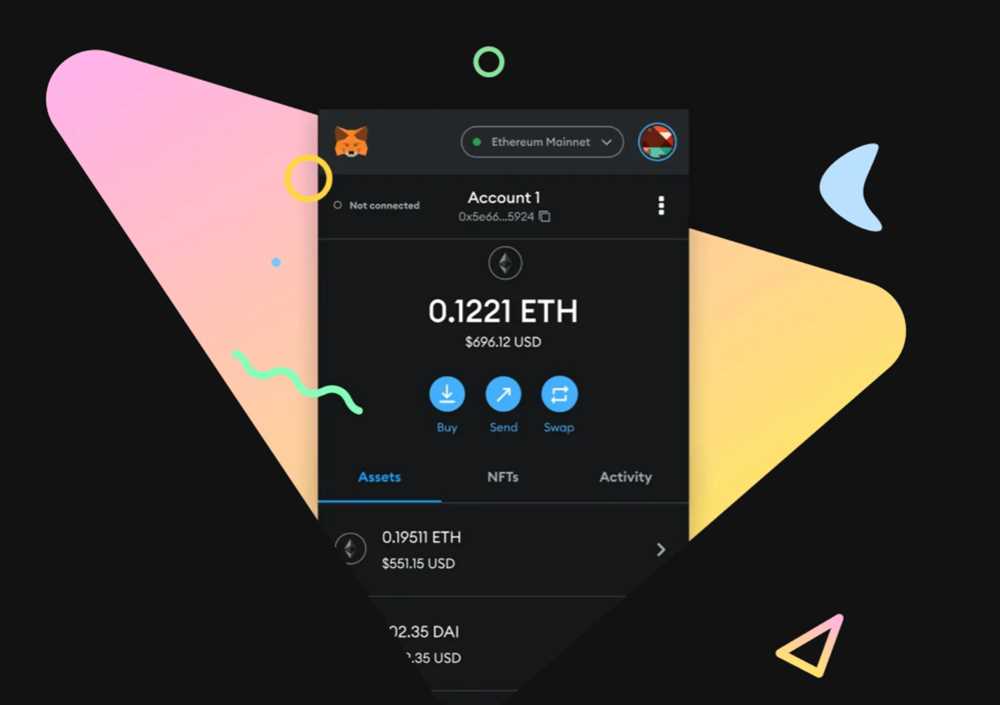
Metamask is a popular Ethereum wallet that allows you to manage your Ethereum transactions with ease. Using Metamask, you can send and receive Ethereum, interact with decentralized applications (DApps), and view your transaction history in a convenient and secure way.
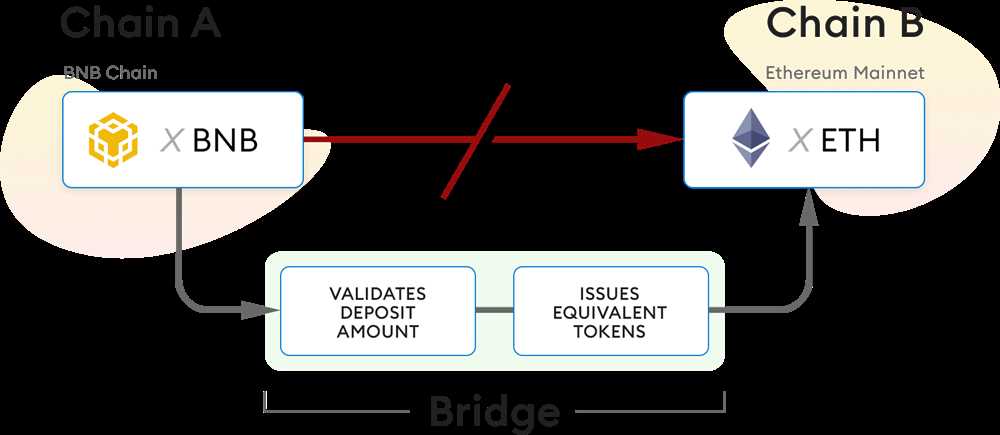
One of the key features of Metamask is its ability to connect to various Ethereum networks. By default, Metamask is connected to the Ethereum mainnet, but you can also switch to other networks such as the Ropsten, Kovan, or Rinkeby testnets. This allows you to test your transactions and contracts on different networks before deploying them on the mainnet.
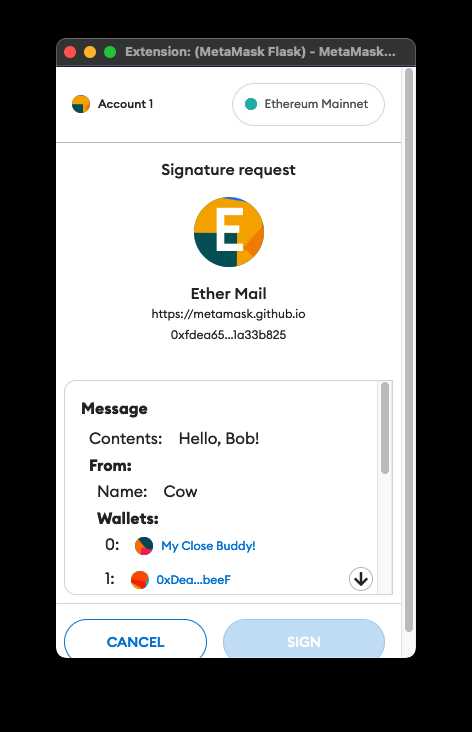
When you want to send Ethereum to another address, you can easily do so through Metamask’s user-friendly interface. Simply enter the recipient’s address, specify the amount of Ethereum you want to send, and confirm the transaction. Metamask will then prompt you to confirm the transaction using your wallet’s private key.
Metamask also provides you with a detailed transaction history, which allows you to keep track of all your previous transactions. You can view the date, time, sender, recipient, and amount for each transaction, making it easy to monitor your Ethereum activity.
In addition to managing your transactions, Metamask also allows you to interact with DApps. Many decentralized applications require you to connect your wallet to access their features. With Metamask, you can authenticate yourself and securely interact with these DApps without compromising your private keys.
Overall, Metamask simplifies the process of managing your Ethereum transactions. Its intuitive interface, support for multiple Ethereum networks, and transaction history make it a valuable tool for anyone involved in the Ethereum ecosystem.
| Key Features: |
|---|
| Connect to multiple Ethereum networks |
| Send and receive Ethereum |
| Interact with decentralized applications |
| View transaction history |
| Securely manage private keys |
Step-by-Step Instructions for Sending, Receiving, and Viewing Transactions
If you’re new to using Metamask, this guide will walk you through the process of sending, receiving, and viewing transactions on Ethereum.
Sending Transactions
To send a transaction using Metamask, follow these steps:
- Open the Metamask extension and click on the “Send” button.
- Enter the recipient’s Ethereum address in the “To” field.
- Choose the amount of Ether you want to send and select the appropriate unit (e.g., Ether or Gwei).
- Review the transaction details, including the gas fee.
- Click “Next” and confirm the transaction in the popup window.
- Wait for the transaction to be mined and confirmed on the Ethereum network.
Receiving Transactions
To receive a transaction using Metamask, follow these steps:
- Open the Metamask extension and click on the “Receive” button.
- Copy your Ethereum address from the popup window.
- Share your Ethereum address with the sender, who will use it to send you the transaction.
- Once the transaction is sent, it will appear in the “Transactions” tab of your Metamask extension.
Viewing Transactions
To view your transactions using Metamask, follow these steps:
- Open the Metamask extension.
- Click on the “Transactions” tab.
- You will see a list of your recent transactions, including the transaction hash, status, and details.
- You can click on a transaction to view more information, such as the sender, recipient, and transaction value.
By following these step-by-step instructions, you can easily send, receive, and view your Ethereum transactions using Metamask.
What is Metamask?
Metamask is a browser extension and a mobile app that allows users to interact with the Ethereum blockchain. It serves as a digital wallet to store, send, and receive Ethereum and ERC-20 tokens.
How can I install Metamask?
To install Metamask as a browser extension, you can go to the Metamask website and follow the instructions for your specific browser. To install Metamask on your mobile device, you can download it from the App Store or Google Play Store.
How do I add a custom network to Metamask?
To add a custom network to Metamask, you can go to the network selection dropdown and click on “Custom RPC”. From there, you can enter the details of the network you want to add, including the network name, RPC URL, chain ID, and symbol.
Can I use Metamask to send tokens to other addresses?
Yes, you can use Metamask to send tokens to other Ethereum addresses. You can simply enter the recipient’s address, choose the token you want to send, enter the amount, and confirm the transaction.