
Are you looking to exchange Ethereum (ETH) for Binance Coin (BNB) using MetaMask? This step-by-step guide will walk you through the process and help you make the exchange smoothly.
Step 1: Set up MetaMask
If you haven’t already, install the MetaMask browser extension and create a new wallet. Make sure to securely store your seed phrase as it will be needed to restore your wallet if necessary.
Step 2: Connect to Binance Smart Chain (BSC) Network
In the MetaMask extension, click on the network selection dropdown and select “Custom RPC.” Enter the following details:
- Network Name: Binance Smart Chain
- New RPC URL: https://bsc-dataseed.binance.org/
- Chain ID: 56
- Symbol: BNB
- Block Explorer URL: https://bscscan.com/
Step 3: Transfer ETH to MetaMask
Go to your Ethereum wallet and transfer the desired amount of ETH to your MetaMask wallet address. Make sure to account for network fees and confirm the transaction.
Step 4: Visit a Decentralized Exchange (DEX)
Open your browser and visit a decentralized exchange that supports ETH to BNB swaps, such as PancakeSwap. Connect your MetaMask wallet to the DEX.
Step 5: Select the Trade Pair
In the DEX interface, select ETH as your input currency and BNB as your output currency. Enter the amount of ETH you want to exchange, and the DEX will automatically calculate the estimated amount of BNB you will receive.
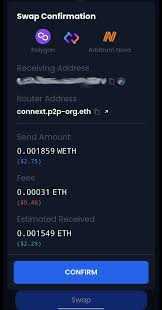
Step 6: Confirm the Swap
Review the transaction details, including the exchange rate and fees. If everything looks good, click on the “Swap” button and confirm the transaction in your MetaMask wallet. Wait for the transaction to be confirmed on the blockchain.
Step 7: Check Your BNB Balance
Once the transaction is confirmed, you should see your BNB balance updated in your MetaMask wallet. You can now use your newly acquired BNB for various purposes within the Binance Smart Chain ecosystem.
Follow these steps carefully, and you’ll be able to exchange your ETH for BNB using MetaMask without any issues. Happy swapping!
Install MetaMask Extension
If you don’t have MetaMask installed yet, you’ll need to install the MetaMask extension in your web browser. MetaMask is a digital wallet that allows you to manage your Ethereum (ETH) and other tokens.
To install MetaMask, follow these steps:
- Open your preferred web browser (such as Google Chrome, Firefox, or Brave).
- Go to the MetaMask official website or search for “MetaMask extension” in your browser’s search bar.
- Click on the official MetaMask website or the trusted source for the MetaMask extension.
- On the MetaMask website, click on the “Get Chrome Extension” or “Get Firefox Extension” button, depending on your browser.
- You will be redirected to the Chrome Web Store or Firefox Add-Ons website.
- Click on the “Add to Chrome” or “Add to Firefox” button, and then click “Add extension” on the confirmation prompt.
- MetaMask will be added as an extension to your browser.
- Click on the MetaMask extension icon that appears in the top-right corner of your browser.
- Follow the on-screen instructions to set up your MetaMask wallet. This includes creating a password and saving your recovery phrase (make sure to store it in a safe and secure place).
- Once your wallet is set up, you will have access to your Ethereum address and be able to connect to various decentralized applications (dApps) and exchanges.
Now that MetaMask is installed, you’re ready to proceed with the next steps to exchange ETH for BNB.
Create or Import a MetaMask Wallet
To get started with exchanging ETH for BNB using MetaMask, you will need to have a MetaMask wallet. If you don’t have one yet, follow these steps to create or import a MetaMask wallet:
Create a MetaMask Wallet
1. Install the MetaMask extension in your web browser by visiting the official MetaMask website.
2. Once installed, click on the MetaMask icon in your browser’s extension bar.
3. The MetaMask welcome screen will appear. Click on the “Get Started” button to begin.
4. Next, you will be asked to agree to the MetaMask terms of use. Read through the terms and click “Accept” if you agree.
5. In the next step, choose a strong password for your wallet. Make sure to remember this password and keep it secure.
6. After setting your password, click “Create” to generate your MetaMask wallet.
Import a MetaMask Wallet
If you already have a MetaMask wallet and want to import it, follow these steps:
1. Install the MetaMask extension in your web browser if you haven’t already.
2. Click on the MetaMask icon in your browser’s extension bar.
3. On the MetaMask welcome screen, click “Import Wallet” instead of “Get Started”.
4. You will be prompted to enter your wallet’s seed phrase. This is a unique set of words that you should have received when you first created your MetaMask wallet. Input the seed phrase accurately and click “Import”.
5. Lastly, you will need to set a new password for your imported wallet. Choose a strong password and click “Confirm” when you’re done.
That’s it! You have successfully created or imported a MetaMask wallet, which you can now use to exchange your ETH for BNB.
Connect MetaMask to the Ethereum Network
To begin the process of exchanging Ethereum (ETH) for Binance Coin (BNB) using MetaMask, you first need to connect MetaMask to the Ethereum network. Follow the steps below to establish the connection:
1. Install and Set Up MetaMask
If you don’t have MetaMask installed on your browser, you’ll need to install it from the MetaMask website. Once installed, set up your MetaMask account by creating a password and accepting the terms and conditions.
2. Create or Import an Ethereum Wallet
After setting up your MetaMask account, you’ll be prompted to either create a new Ethereum wallet or import an existing one. Choose the option that suits your needs and follow the instructions accordingly.
3. Access the MetaMask Extension
To access the MetaMask extension, click on the MetaMask icon located in your browser’s toolbar. This will open up the MetaMask interface.
4. Select the Ethereum Network
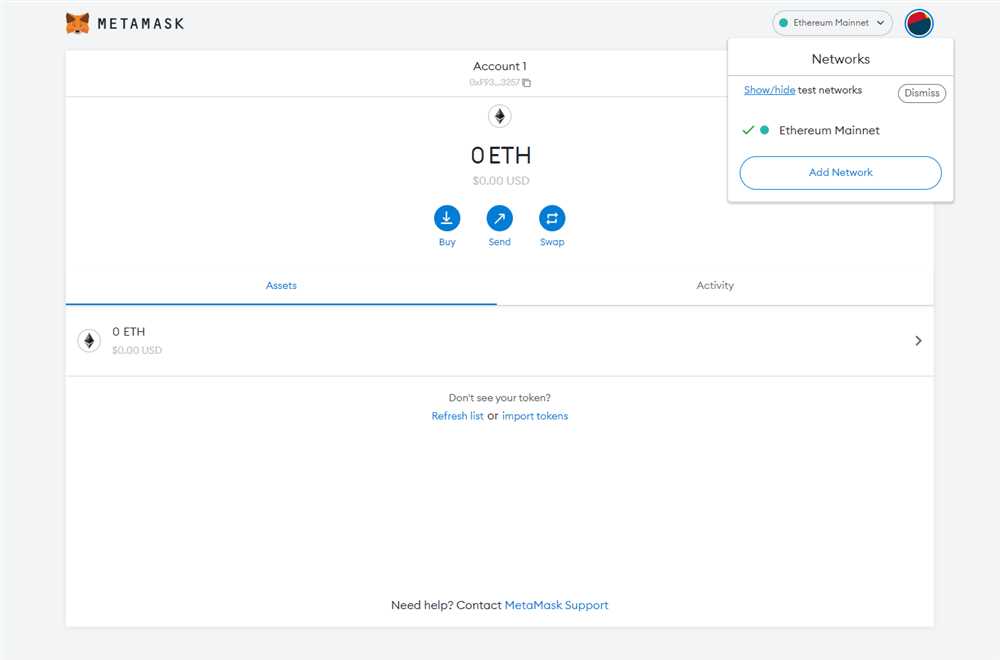
Once the MetaMask interface is open, you’ll need to select the Ethereum network. To do this, click on the network dropdown menu, usually located at the top of the screen, and select “Ethereum Mainnet”.
Note: Make sure you’re connected to the correct Ethereum network. Using the wrong network can result in the loss of funds or other complications.
5. Connect to the Ethereum Network
After selecting the Ethereum network, you’ll need to connect to it. Sometimes, MetaMask automatically connects to the network, but if you’re not connected, you’ll see a button that says “Connect”. Click on this button to establish the connection.
By following these steps, you’ll successfully connect MetaMask to the Ethereum network and be ready to proceed with exchanging ETH for BNB.
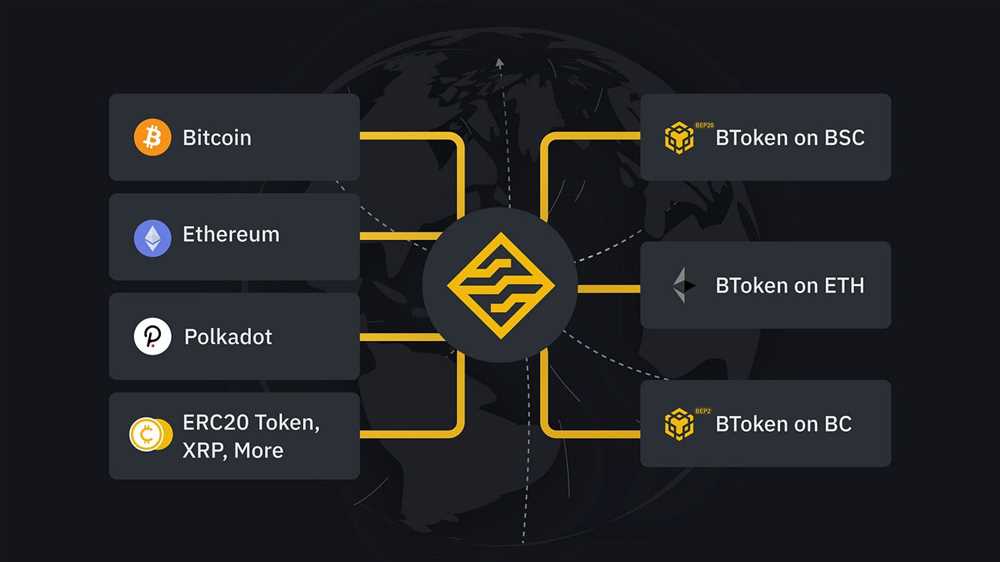
Add Binance Smart Chain to MetaMask
In order to exchange ETH for BNB using MetaMask, you will need to add Binance Smart Chain to your MetaMask wallet. Follow the step-by-step instructions below to do so:
Step 1: Open MetaMask
Open the MetaMask extension in your browser and make sure you are signed in to your MetaMask wallet.
Step 2: Click on the Network Selection Dropdown
Once you are signed in, you will see a panel in the top right corner of the MetaMask extension. Click on the network selection dropdown to open the network menu.
Step 3: Select “Custom RPC”
In the network menu, scroll down and select “Custom RPC”. This will allow you to add the Binance Smart Chain network to MetaMask manually.
Step 4: Enter Binance Smart Chain Details
Once you have selected “Custom RPC”, a form will appear where you can enter the Binance Smart Chain details. Fill in the following information:
- Network Name: Binance Smart Chain
- New RPC URL: https://bsc-dataseed.binance.org/
- Chain ID: 56
- Symbol: BNB
- Block Explorer URL: https://bscscan.com/
Step 5: Save and Switch to Binance Smart Chain Network
After entering the Binance Smart Chain details, click “Save” to add the network to MetaMask. Once saved, you will see the Binance Smart Chain network listed in the network selection dropdown. Select it to switch to the Binance Smart Chain network.
Now you have successfully added the Binance Smart Chain to MetaMask. You can proceed to exchange your ETH for BNB using MetaMask on the Binance Smart Chain network.
Exchange ETH for BNB on Binance DEX
If you want to exchange your Ethereum (ETH) for Binance Coin (BNB), you can do so on the Binance Decentralized Exchange (DEX). Here is a step-by-step guide on how to make the exchange:
- First, make sure you have an account on the Binance DEX platform. If you don’t have one, you will need to create an account and complete the necessary verification process.
- Once you have logged into your Binance DEX account, navigate to the “Markets” section of the platform.
- In the search bar, type “ETH” to locate the ETH/BNB trading pair. Click on it to open the trading page for this pair.
- On the trading page, you will see two sections – “Buy” and “Sell”. Since you want to exchange ETH for BNB, you will use the “Sell” section.
- In the “Sell” section, enter the amount of ETH you want to exchange for BNB. You can either specify the amount of ETH or the equivalent value in BNB.
- Underneath the input field, you will see the current market price for ETH/BNB. This will show you how much BNB you will receive for the specified amount of ETH.
- If you are satisfied with the exchange rate and the amount you will receive, click on the “Sell” button to proceed with the exchange.
- A confirmation window will appear, asking you to confirm the transaction details. Carefully review the information and make sure it is correct.
- If everything looks good, click on the “Confirm” button to complete the exchange.
- Once the transaction is processed, you will see the BNB balance in your Binance DEX wallet. Congratulations, you have successfully exchanged ETH for BNB on Binance DEX!
Remember to always double-check the details of your transaction before confirming it. Also, keep in mind that transaction fees may apply when using Binance DEX. Make sure to review the fee structure on the platform to understand the costs associated with your exchange.
Is it possible to exchange ETH for BNB using MetaMask?
Yes, it is possible to exchange ETH for BNB using MetaMask.
Are there any fees involved in exchanging ETH for BNB using MetaMask?
Yes, there are fees involved in exchanging ETH for BNB using MetaMask. These fees can include network transaction fees and fees charged by the DEX platform for the swap.
Is it necessary to have both ETH and BNB in my MetaMask wallet to exchange ETH for BNB?
Yes, it is necessary to have both ETH and BNB in your MetaMask wallet to exchange ETH for BNB. ETH will be used for the exchange, and BNB will be received in return.
Can I exchange any amount of ETH for BNB using MetaMask?
Yes, you can exchange any amount of ETH for BNB using MetaMask, as long as you have enough balance in your wallet to cover the transaction and any associated fees.