
Metamask is a popular and user-friendly cryptocurrency wallet that allows users to securely store, send, and receive digital assets. It has gained a significant following in the crypto community due to its ease of use and comprehensive features. However, did you know that you can expand your crypto horizons by adding new chains to Metamask?
Adding new chains to Metamask opens up a world of possibilities, allowing you to access and interact with different decentralized applications (DApps) and explore new crypto ecosystems. Whether you’re interested in participating in a specific blockchain network or exploring new investment opportunities, adding chains to Metamask is a crucial step.
This step-by-step guide will walk you through the process of adding chains to Metamask, empowering you to take full advantage of the crypto world. From finding the chain’s network details to configuring Metamask and verifying the chain, you’ll learn how to seamlessly integrate new chains into your wallet.
By expanding your crypto horizons and adding new chains to Metamask, you’ll have access to a wider range of digital assets, projects, and opportunities. So, let’s get started and unlock the full potential of your Metamask wallet!
What Is Metamask?
Metamask is a popular cryptocurrency wallet and browser extension that allows users to interact with the Ethereum blockchain. It not only acts as a digital wallet for storing Ethereum and ERC-20 tokens, but also provides a seamless experience for accessing decentralized applications (dApps) directly from the browser.
With Metamask, users have full control over their funds and can securely manage their crypto assets. It offers a user-friendly interface that simplifies the process of sending and receiving transactions, as well as interacting with smart contracts.
In addition to Ethereum, Metamask supports various other blockchains and enables users to seamlessly switch between different networks. This flexibility allows users to access a wider range of decentralized applications and explore the full potential of the blockchain ecosystem.
Metamask also provides users with a built-in cryptocurrency exchange, allowing them to easily swap tokens within the wallet. This feature eliminates the need to use external exchanges and provides a convenient way to manage and diversify crypto holdings.
Overall, Metamask is an essential tool for anyone interested in the world of cryptocurrencies. It empowers users to securely manage their digital assets, explore decentralized applications, and participate in the growing blockchain economy.
Step-by-Step Guide to Adding Chains to Metamask
Metamask is a popular Ethereum wallet and browser extension that allows you to interact with decentralized applications (dApps) on the Ethereum blockchain. By default, Metamask supports the Ethereum mainnet, but did you know that you can also add other chains to your Metamask wallet? Adding additional chains to Metamask can expand your crypto horizons and allow you to explore other blockchain networks and their unique features.
Step 1: Open Metamask
To get started, open the Metamask browser extension on your preferred browser. If you don’t have Metamask installed yet, you can easily download it from the official website and set it up.
Step 2: Access Network Settings
Once you have Metamask open, click on the network dropdown menu located at the top of the extension interface. From the dropdown menu, select “Custom RPC” to access the network settings.
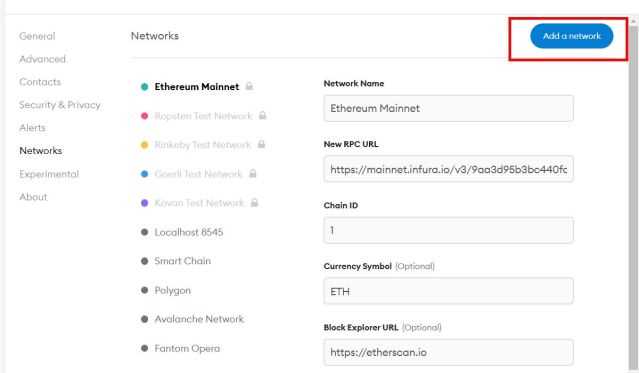
Step 3: Add a New Chain
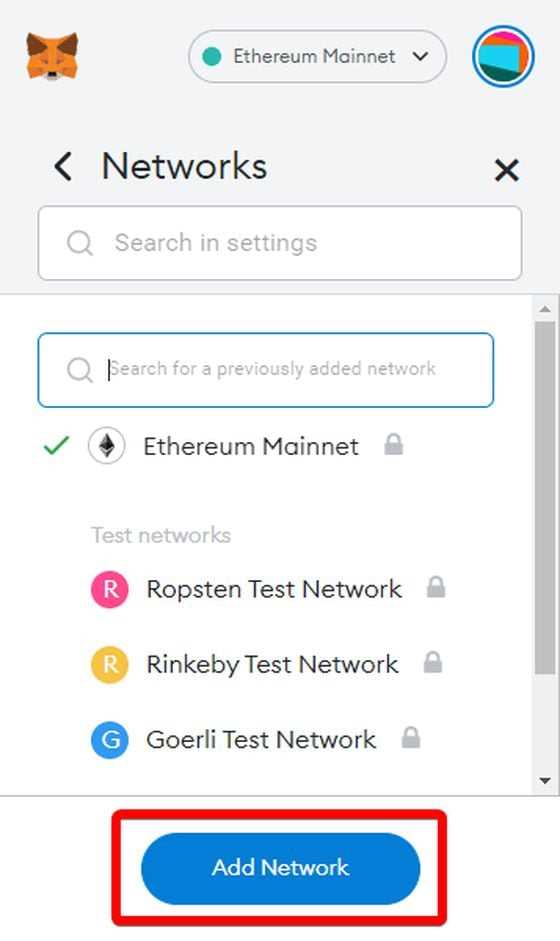
In the network settings section, you will see an option to add a new network. Click on the “Add Network” button to start adding a new chain.
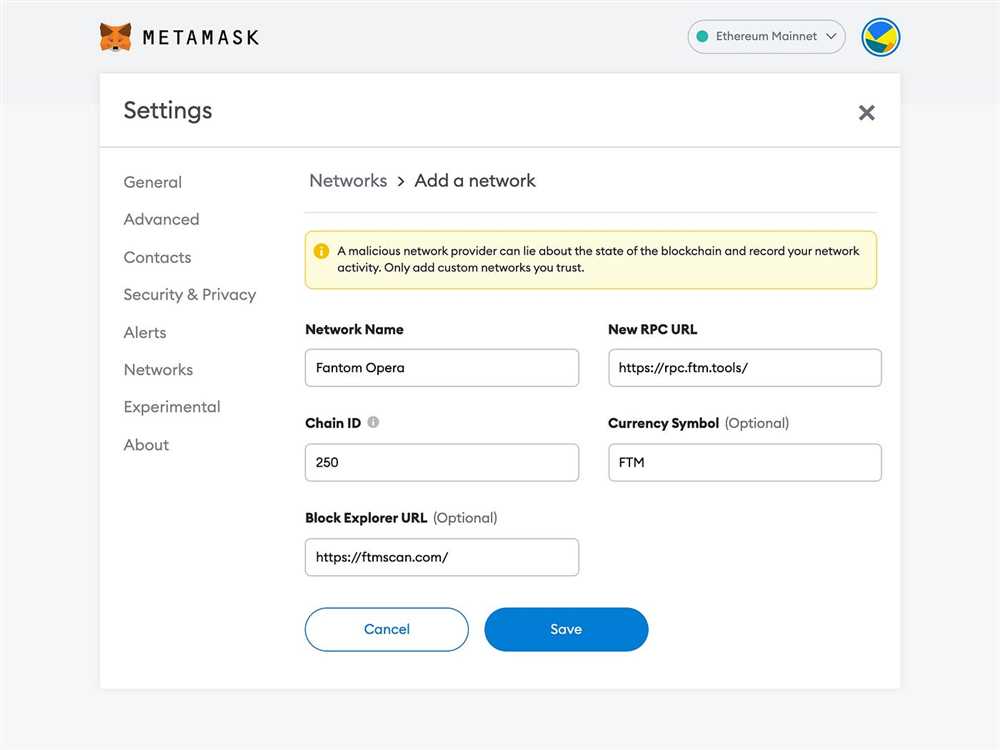
Step 4: Enter Chain Details
In the add network form, you will need to provide a few details about the chain you want to add. These details include:
- Network Name: Enter a name for the chain (e.g., Binance Smart Chain, Polygon).
- New RPC URL: Enter the RPC URL for the chain. You can usually find this information on the chain’s official website or documentation.
- Chain ID: Enter the unique identifier for the chain.
- Currency Symbol (optional): Enter the currency symbol used on the chain.
- Block Explorer URL (optional): Enter the URL for the block explorer of the chain.
Make sure to double-check the information you entered to ensure accuracy.
Step 5: Save and Select Chain
After entering all the necessary details, click on the “Save” button to save the new chain configuration. Once saved, the new chain will appear in the network dropdown menu.
To switch to the newly added chain, simply select it from the network dropdown menu. Metamask will prompt you to confirm the network switch, and once confirmed, you will be connected to the selected chain.
With your new chain added to Metamask, you can now explore decentralized applications and interact with the unique features of that chain. Keep in mind that each chain may have its own tokens, dApps, and functionalities, so be sure to do your research and understand the specifics of the chain you add.
Disclaimer: Adding custom chains to Metamask involves some technical knowledge and carries inherent risks. Ensure that you only add chains from trusted sources and exercise caution when interacting with new chains.
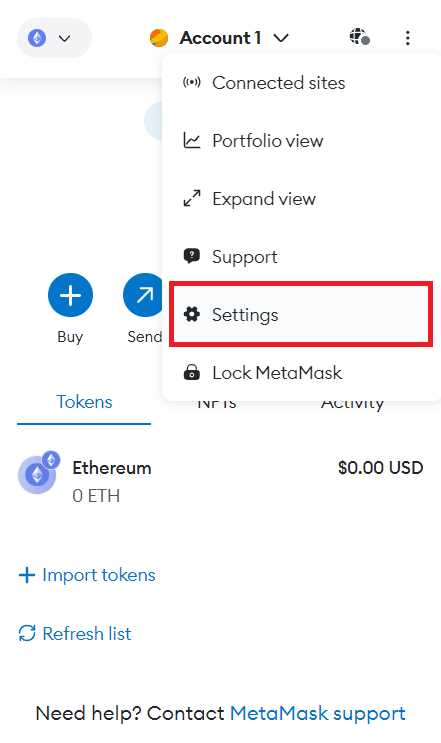
Open Metamask and Navigate to Settings
To add new chains to your Metamask account, you’ll need to open the Metamask extension in your browser. Look for the fox icon in your browser toolbar and click on it to open the Metamask wallet.
Once the wallet is open, locate and click on the three horizontal bars in the top-right corner of the wallet interface. This will open the main menu.
In the main menu, select “Settings” to access the settings page.
Select “Network & Security” and Click “Add Network”
Once you have launched your Metamask wallet and logged in, you will see the main dashboard with your wallet address. To add a new blockchain network to Metamask, you need to navigate to the “Settings” menu.
- Click on the profile icon located at the top right corner of the Metamask window. It looks like a circle with a silhouette of a person.
- A dropdown menu will appear. In the menu, select the “Settings” option. It is represented by a gear icon.
- After clicking on the “Settings” option, a new window will open up with various options. Look for “Network & Security” and click on it.
- In the “Network & Security” section, you will find the option to “Add Network.” Click on that option to proceed.
By selecting “Add Network,” you are given the ability to add a new blockchain network to your Metamask wallet. This is where you enter the network details, such as the network name, RPC URL, chain ID, symbol, and block explorer URL.
Adding a new network to your Metamask allows you to access decentralized applications (DApps) that are built on different blockchains. It expands your crypto horizons and enables you to interact with various blockchain ecosystems.
Enter Chain Details and Save
Once you have selected “Custom RPC”, you will need to enter the details for the chain you want to add to your Metamask wallet. This includes the chain name, symbol, and the RPC URL.
Chain Name
Choose a name for the chain that will help you easily identify it. This could be the name of the blockchain network or any other name that makes sense to you.
Chain Symbol
Enter a symbol or abbreviation for the chain. This will be displayed in your Metamask wallet alongside the chain name.
For example, if you are adding the Binance Smart Chain, you could enter “BNB” as the chain symbol.
RPC URL
This is the most important detail that you need to enter accurately. The RPC URL is the endpoint that your Metamask wallet will use to connect to the desired blockchain network.
Make sure to get the correct RPC URL from a reliable source, such as the official documentation of the blockchain network you are adding.
Once you have entered all the required details, click on the “Save” button to add the chain to your Metamask wallet.
What is a chain ID?
A chain ID is a unique identifier for a blockchain network. It helps Metamask differentiate between different chains and prevents confusion when interacting with multiple chains.
What is an RPC URL?
An RPC URL (Remote Procedure Call URL) is a web address that allows communication between different blockchain networks and applications. It is used to send requests and receive responses from the blockchain network.