
MetaMask is a popular browser extension that allows users to interact with decentralized applications (dApps) on the Ethereum blockchain. By default, MetaMask connects to the Ethereum mainnet. However, users may also want to connect to other networks, such as testnets or custom networks. In this step-by-step guide, we will show you how to add a network to MetaMask.
Step 1: Open MetaMask
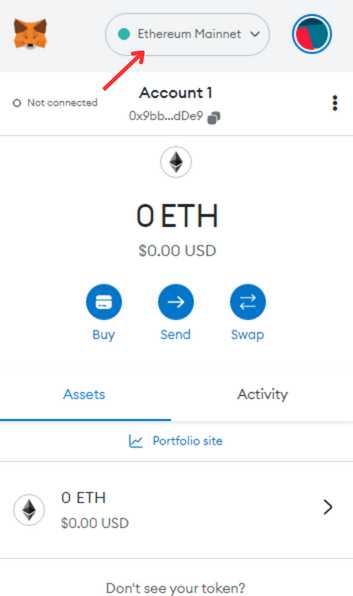
If you haven’t already, install the MetaMask extension for your preferred browser and set up your wallet. Once you have MetaMask installed, open it by clicking on the extension icon in the top right corner of your browser.
Step 2: Click on the Network Dropdown
In the MetaMask interface, you will see a network dropdown in the top center of the window. By default, this dropdown will display “Main Ethereum Network.” Click on the dropdown to see the list of available networks.
Step 3: Select “Custom RPC”
In the network dropdown, scroll down to the bottom and click on “Custom RPC.” This option allows you to add a custom network to MetaMask.
Step 4: Fill in Network Details
In the “New Network” screen that appears, you will need to fill in the details of the network you want to add. This includes the network name, RPC URL, chain ID, symbol, and block explorer URL. Make sure to double-check these details as they are crucial for connecting to the correct network.
NOTE: The RPC URL is provided by the network you want to connect to. If you are connecting to a testnet or custom network, you will usually find the RPC URL in the network’s documentation.
Step 5: Save Network Settings
After filling in the network details, click on the “Save” button. MetaMask will validate the network settings and add the network to your list of available networks.
Step 6: Switch to the New Network
Once the network is added, you can switch to it by selecting it from the network dropdown. MetaMask will connect to the new network, and you will be able to interact with dApps and use the features specific to that network.
NOTE: Remember that switching networks will change the Blockchain you are connected to, so always make sure you are on the correct network before performing any transactions or transfers.
Congratulations! You have successfully added a network to MetaMask. Enjoy exploring the decentralized web and all its possibilities.
Step-by-Step Guide: Adding a Network to MetaMask
MetaMask is a popular browser extension that allows you to interact with decentralized applications (dApps) on various blockchain networks. By default, MetaMask is connected to the Ethereum network, but you can also add custom networks to it, such as test networks or other blockchain platforms. Here is a step-by-step guide on how to add a network to MetaMask:
- Open the MetaMask extension in your browser by clicking on the MetaMask icon.
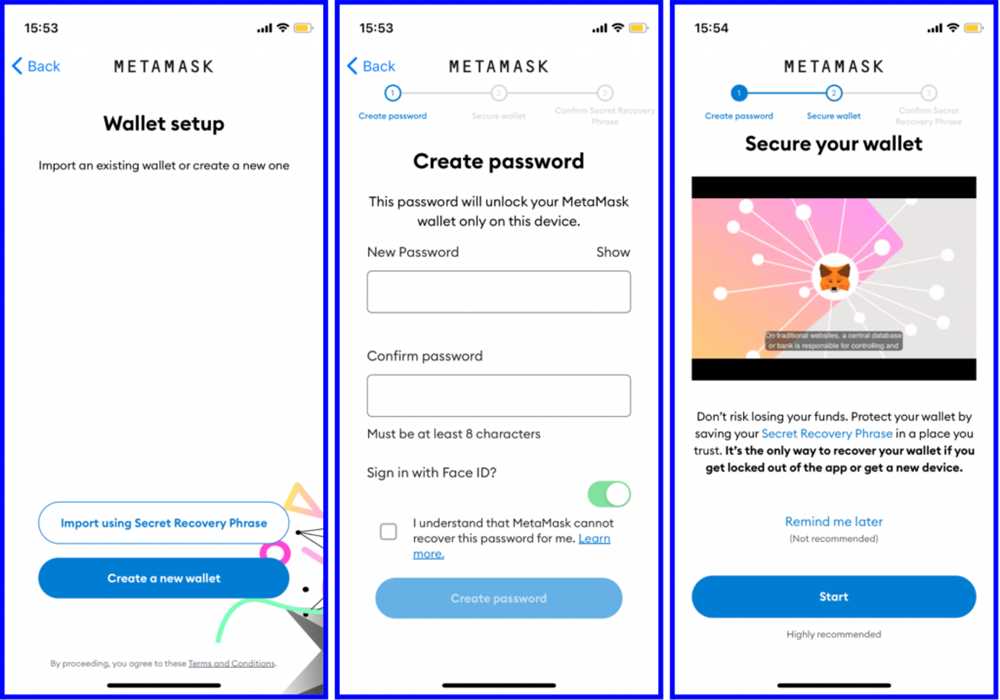
- If you already have an existing MetaMask wallet, make sure you are logged in. If not, create a new wallet and set up a password.
- Once you are logged in, click on the network dropdown arrow located at the top center of the MetaMask window.
- A dropdown menu will appear with various network options. Scroll down and click on “Custom RPC”.
- In the “New RPC URL” field, enter the URL of the network you want to add. Make sure you have the correct URL from a trusted source.
- Optional: Give your network a custom name by entering it in the “Chain Name” field.
- Enter the network’s currency symbol or ticker in the “Symbol” field.
- Enter the network’s block explorer URL in the “Block Explorer URL” field.
- Click on the “Save” button to add the network to MetaMask.
- Your newly added network will now appear in the network dropdown menu. Select it to switch to the added network.
That’s it! You have successfully added a network to MetaMask. Now you can interact with dApps and use different blockchain networks without the need for multiple wallets.
Step 1: Accessing MetaMask Settings
Adding a network to MetaMask requires accessing the MetaMask settings page. Here is a step-by-step guide on how to do it:
- Open your web browser and navigate to the MetaMask extension.
- Click on the MetaMask icon in your browser toolbar. It will open the MetaMask popup.
- In the MetaMask popup, click on the account icon.
- A dropdown menu will appear. Select “Settings”.
- This will redirect you to the MetaMask settings page.
Once you have accessed the MetaMask settings page, you can proceed to the next step in adding a network to MetaMask.
Step 2: Selecting Networks

After installing MetaMask, the next step is to select the network you want to use. MetaMask supports various networks, including the Ethereum mainnet, testnets, and custom networks.
To select a network, follow these steps:
| Step | Instruction |
| 1 | Click on the MetaMask extension icon in your browser’s toolbar. |
| 2 | A popup window will appear, showing your current network. Click on the network dropdown menu located at the top of the window. |
| 3 | A list of available networks will be displayed. Select the desired network from the list. |
| 4 | If the network you want to use is not listed, click on “Custom RPC” at the bottom of the list. |
| 5 | Enter the network details, including the RPC URL, chain ID, symbol, and block explorer URL. |
| 6 | Click on “Save” to add the custom network to MetaMask. |
| 7 | Once you have selected or added a network, MetaMask will automatically connect to that network. |
Remember to use caution when connecting to custom networks, as they may not have the same level of security as the Ethereum mainnet. It is recommended to only connect to trusted networks or those recommended by reputable sources.
Step 3: Adding a Custom Network
MetaMask allows you to add custom networks, in case you want to connect to a network that is not listed in the default options. Here’s how you can add a custom network:
Step 1: Open MetaMask Settings
First, click on the MetaMask extension icon in your browser toolbar to open the MetaMask interface. Then, click on the account icon and select “Settings” from the dropdown menu.
Step 2: Navigate to Networks

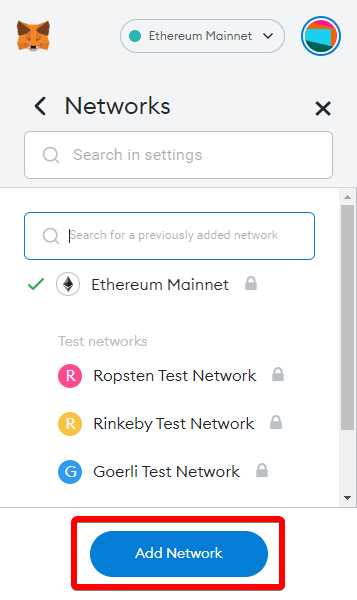
In the settings menu, click on the “Networks” tab to access the network settings.
Step 3: Add Custom Network
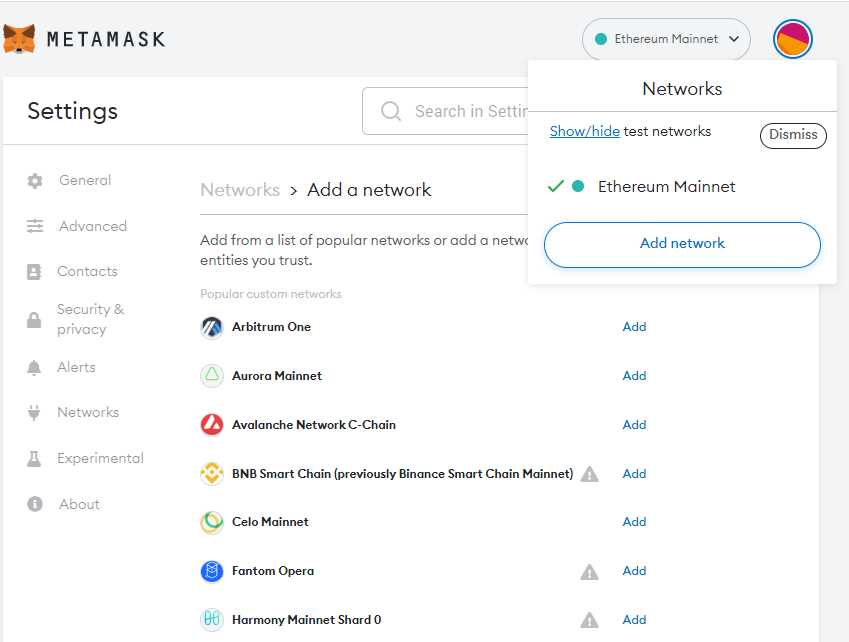
Scroll down to the end of the networks list and click on “Add Network” to add a new custom network.
Fill in the following details:
- Network Name: Enter a name for the network.
- New RPC URL: Enter the URL of the network you want to connect to.
- Chain ID: Enter the chain ID of the network.
- Symbol: Enter the symbol of the network’s native currency.
- Block Explorer URL: Optionally, enter the URL of a block explorer for the network.
Make sure to double-check the details you entered, as any mistakes could prevent you from connecting to the network correctly.
Once you have filled in the details, click on “Save” to add the custom network to MetaMask.
Congratulations! You have successfully added a custom network to MetaMask. You can now select this network from the network dropdown menu and start using it.
Note: Adding a custom network involves some technical knowledge and research about the network you want to connect to. Make sure you understand the implications and risks before connecting to a custom network.
Pro Tip: You can find the required details for adding a custom network from the network’s official documentation or by doing a search online.
What is MetaMask?
MetaMask is a cryptocurrency wallet and browser extension that allows users to interact with the Ethereum network and dApps (decentralized applications) through their web browser.
Why would I need to add a network to MetaMask?
You would need to add a network to MetaMask if you want to interact with a blockchain or network that is not natively supported by MetaMask. By adding a network, you can connect to a specific blockchain and perform transactions or interact with dApps on that network.