
Are you looking to add AVAX to your Metamask wallet? You’ve come to the right place! In this step-by-step guide, we will walk you through the process of adding AVAX, the native cryptocurrency of the Avalanche network, to your Metamask wallet.
Metamask is a popular Ethereum wallet that allows users to manage their cryptocurrencies and interact with decentralized applications (dApps). Adding AVAX to your Metamask wallet will enable you to participate in the Avalanche ecosystem and take advantage of its features.
Before we begin, make sure you have Metamask installed and set up on your browser. If you haven’t done so already, go to the Metamask website and follow the instructions to install the extension on your preferred browser. Once you have Metamask installed, follow the steps below to add AVAX to your wallet:
Step 1: Open Metamask and make sure you are logged in to your wallet. If you are not logged in, enter your password and click on the extension icon to open the wallet interface.
Step 2: Once you are logged in, click on the dropdown menu located at the top of the wallet interface. In the dropdown menu, select “Custom RPC”.
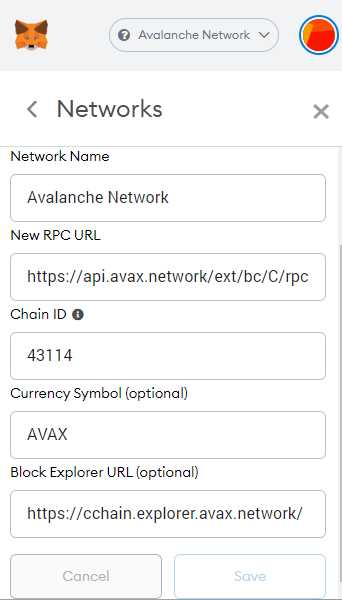
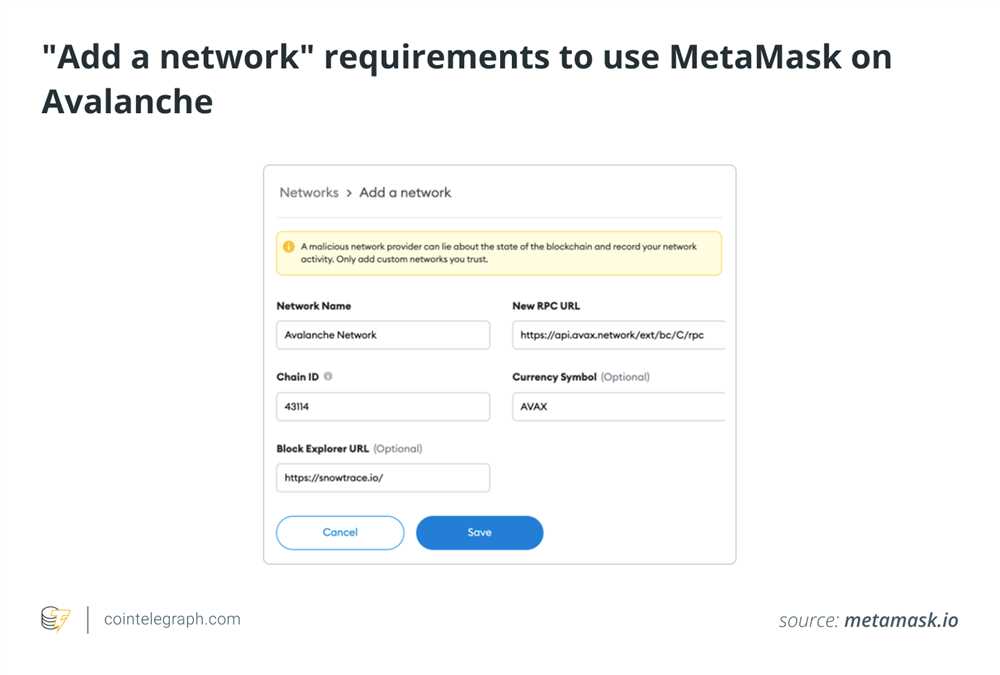
Step 3: In the “New RPC URL” field, enter the Avalanche network’s RPC URL: https://api.avax.network/ext/bc/C/rpc. Make sure to select the Avalanche Mainnet network as the Network Name.
Step 4: After entering the RPC URL and Network Name, click on “Save”. Metamask will now connect to the Avalanche network, and you will be able to see the AVAX balance in your wallet.
Step 5: To add AVAX tokens to your Metamask wallet, click on the “Assets” tab in the wallet interface. In the assets list, click on “Add Token”.
Step 6: In the “Token Contract Address” field, enter the AVAX token contract address: 0x1ce0c2827e2ef14d5c4f29a091d735a204794041. Metamask will automatically fetch the token symbol (AVAX) and decimal places (18) for you. Click on “Next”.
Step 7: Review the token details and click on “Add Tokens” to finalize the process. You have now successfully added AVAX to your Metamask wallet!
You can now use your AVAX tokens to interact with Avalanche dApps and participate in the Avalanche ecosystem. Remember to always exercise caution when transacting with cryptocurrencies and keep your wallet’s private keys and mnemonic phrase secure.
Note: Adding AVAX to Metamask is a one-time process. Once you have added AVAX to your wallet, it will be available for you to use until you remove it from your assets list.
Thank you for following this step-by-step guide on how to add AVAX to Metamask. We hope you found it helpful and that you are now ready to explore the exciting world of Avalanche!
Step-by-Step Guide: Add AVAX to Metamask
Metamask is a popular cryptocurrency wallet that allows users to securely manage and store their digital assets. If you’re looking to add AVAX (the native token of the Avalanche blockchain) to your Metamask wallet, follow these step-by-step instructions:
1. Open your Metamask wallet by clicking on the extension icon in your web browser’s toolbar.
2. In the Metamask interface, click on the “Assets” tab located at the top of the screen.
3. Scroll down and click on the “Add Token” button.
4. A new window will appear with three options: “Custom Token”, “Search Token”, and “Default Token List”. Click on the “Custom Token” tab.
5. In the “Token Contract Address” field, paste the AVAX token contract address: [AVAX contract address].
6. The “Token Symbol” and “Decimals of Precision” fields should automatically populate with the corresponding values for AVAX. If they don’t, manually enter “AVAX” in the “Token Symbol” field and “18” in the “Decimals of Precision” field.
7. Click on the “Next” button to proceed to the next step.
8. Review the token information and click on the “Add Tokens” button to finalize the process.
9. Congratulations! You have successfully added AVAX to your Metamask wallet. You can now view your AVAX balance and make transactions using this token.
Please note that AVAX is an ERC-20 token, meaning it runs on the Ethereum blockchain. Make sure that you have enough Ether (ETH) in your Metamask wallet to cover any transaction fees when interacting with AVAX.
Remember to always exercise caution and double-check the token address before proceeding with any transaction. Scammers can create fake tokens with similar names to steal your funds.
That’s it! You can now start using AVAX in your Metamask wallet. Enjoy your trading and investing!
Step 1: Install Metamask Extension
To add AVAX to your Metamask wallet, the first step is to install the Metamask extension in your web browser. Follow the steps below to install the Metamask extension:
1. Open your web browser and search for “Metamask” in the search engine.
2. Click on the official website link for Metamask.
3. On the Metamask website, find the “Download” button and click on it.
4. A new page will open with options to install the extension for different web browsers.
5. Choose your web browser from the available options (e.g., Chrome, Firefox, Brave) and click on the corresponding button.
6. Your browser will then navigate you to the extension’s page on the specific web browser’s store.
7. Click on the “Add” or “Install” button to start installing the Metamask extension.
8. The extension will be downloaded and installed in your web browser.
9. Once the installation is complete, you will see the Metamask icon added to your browser’s toolbar or extension area.
That’s it! You have successfully installed the Metamask extension on your web browser. In the next step, we will guide you through setting up your Metamask wallet and adding AVAX to it.
Step 2: Create a Metamask Wallet
In order to add AVAX to Metamask, you first need to create a wallet on the Metamask platform. Follow the steps below to create your wallet:
1. Install the Metamask Extension

If you haven’t done so already, go to the Metamask website and install the Metamask browser extension for your preferred browser. Metamask is available for Chrome, Firefox, Brave, and Edge.
2. Set Up Your Wallet
After installing the extension, click on the Metamask icon in your browser toolbar to open the extension. You will be prompted to set up a new wallet. Click on “Get Started” to proceed.
Follow the on-screen instructions to set up a password for your wallet. Make sure to choose a strong password that you can remember.
After setting up the password, you will be provided with a secret backup phrase. This backup phrase is crucial for recovering your wallet in case you lose access to your device. Write down the backup phrase and store it in a safe place. Do not share it with anyone!
3. Confirm and Access Your Wallet
Next, you will be asked to confirm the backup phrase by selecting words in the correct order. This step is important to ensure that you have saved the backup phrase correctly. Select the words in the correct order and click on “Confirm” to proceed.
Once you have confirmed the backup phrase, your wallet will be created and you will be able to access it by entering your password.
Congratulations! You have successfully created a Metamask wallet. Now you are ready to add AVAX to your wallet and start using it for transactions.
Remember to keep your wallet password and backup phrase secure and never share them with anyone.
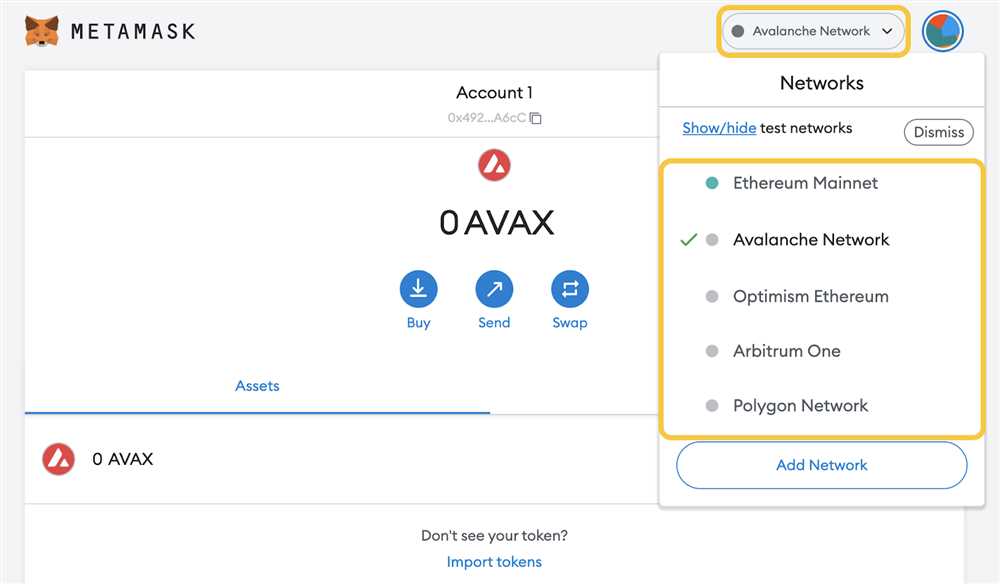
Step 3: Connect Metamask to Avalanche Network
Once you have added AVAX to your Metamask wallet, you need to connect Metamask to the Avalanche network in order to use AVAX tokens. Follow these steps:
- Click on the Metamask extension icon in your browser’s toolbar.
- A dropdown menu will appear. Click on the network dropdown (it will display “Ethereum Mainnet” by default).
- Scroll down and click on “Custom RPC” at the bottom of the list.
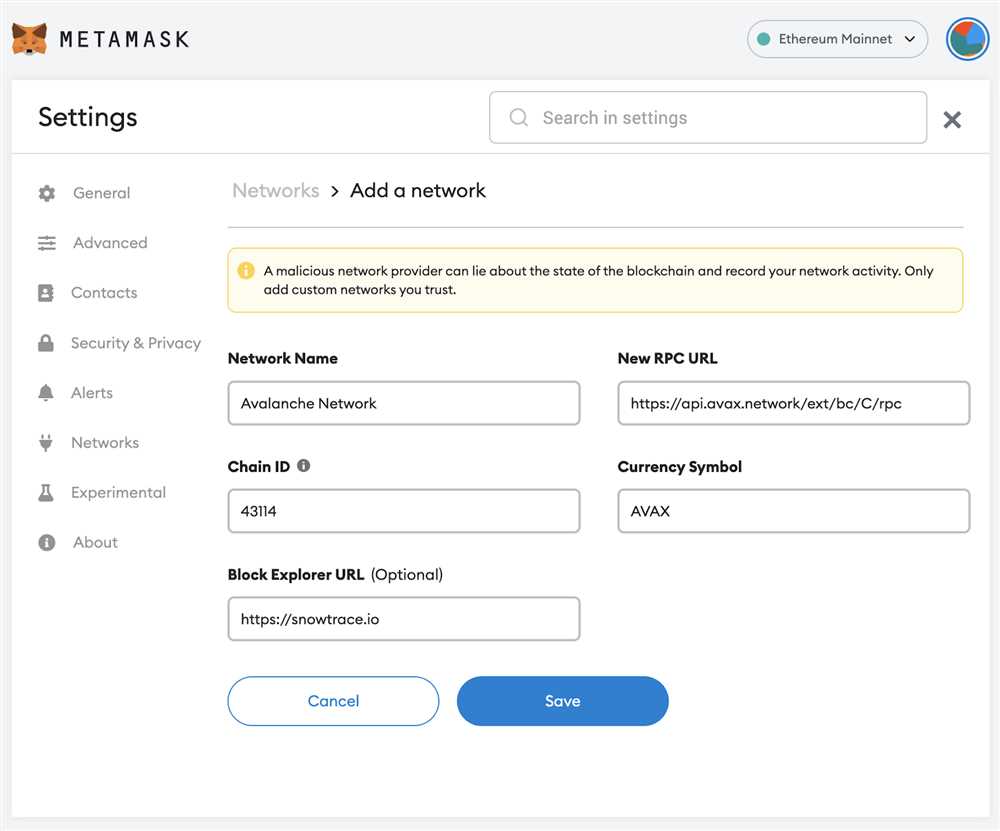
- A form will appear where you can enter the Avalanche network details. Fill in the following information:
- Network Name: Avalanche Mainnet
- New RPC URL: https://api.avax.network/ext/bc/C/rpc
- Chain ID: 43114
- Symbol: AVAX
- Block Explorer URL (optional): https://cchain.explorer.avax.network/
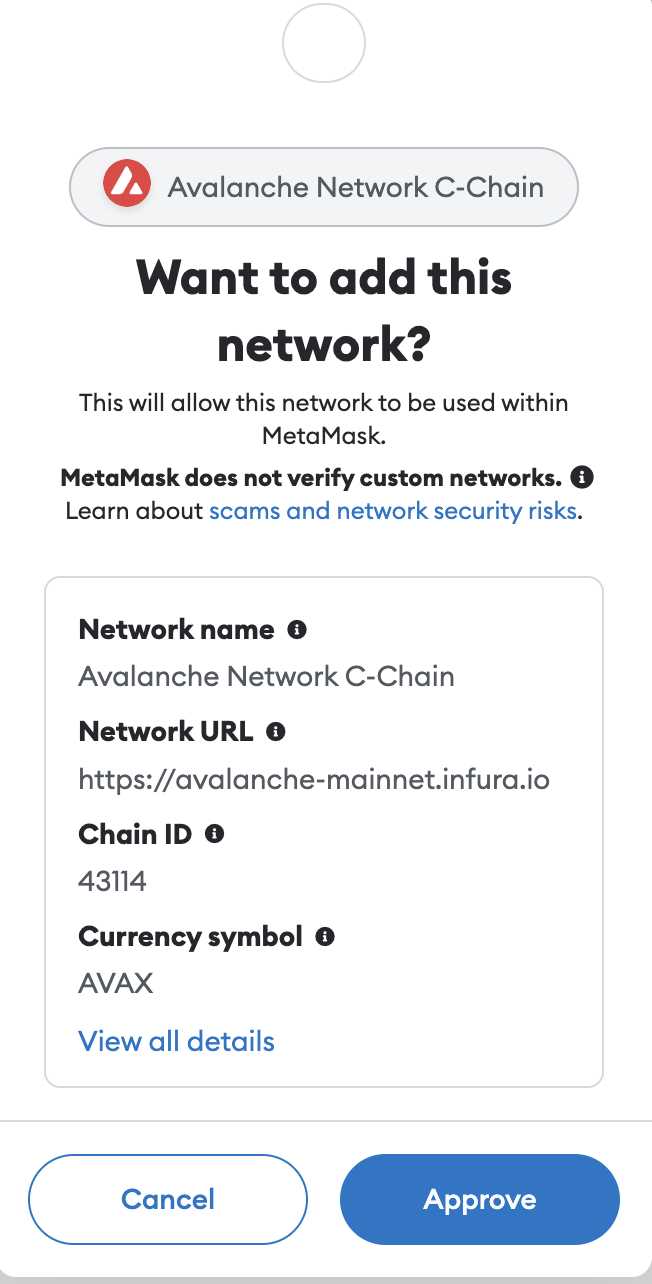
- Click on “Save” to connect Metamask to the Avalanche network.
- Your Metamask wallet is now connected to the Avalanche network. You can now use your AVAX tokens and interact with dApps on Avalanche.
Note: Make sure you have some ETH in your Metamask wallet for transaction fees on the Avalanche network.
Congratulations! You have successfully connected Metamask to the Avalanche network. You are now ready to explore the world of AVAX tokens and decentralized applications on Avalanche.
Step 4: Add AVAX to Metamask Wallet

Once you have set up your Metamask wallet and connected to the Avalanche Network, you are ready to add AVAX to your wallet.
Here is a step-by-step guide to help you add AVAX to your Metamask wallet:
1. Open your Metamask wallet and make sure you are connected to the Avalanche Network.
2. Click on the “Assets” tab at the top of the Metamask wallet interface.
3. On the left side, you will see a list of supported tokens. Scroll down and click on the “Add Token” button.
4. A new window will appear. Click on the “Custom Token” tab.
5. In the “Token Contract Address” field, enter the AVAX contract address: [insert AVAX contract address].
6. The “Token Symbol” and “Decimals of Precision” fields should automatically populate with “AVAX” and “18” respectively. If they don’t, enter “AVAX” and “18” manually.
7. Click on the “Next” button.
8. Review the information and click on the “Add Tokens” button to confirm the addition of AVAX to your Metamask wallet.
9. You should now see AVAX listed under the “Assets” tab in your Metamask wallet.
10. Congratulations! You have successfully added AVAX to your Metamask wallet. You’re now ready to send, receive, and manage AVAX using Metamask.
Remember to double-check the AVAX address before making any transactions to avoid any potential loss of funds.
What is AVAX?
AVAX is the native cryptocurrency of the Avalanche network. It is used for various purposes such as paying for transaction fees, participating in network consensus, and incentivizing validators.
Why should I add AVAX to Metamask?
Adding AVAX to Metamask allows you to easily manage your AVAX tokens alongside your other Ethereum-based assets. It provides a convenient way to view your AVAX balance, send and receive AVAX, and interact with decentralized applications on the Avalanche network.
Can I use Metamask to store AVAX long-term?
While Metamask is primarily designed for Ethereum-based assets, it can also be used to store AVAX. However, it is important to note that Metamask is a hot wallet, meaning it is connected to the internet. For long-term storage, it is generally recommended to use a cold wallet or a hardware wallet for better security.
Is there a fee to add AVAX to Metamask?
No, there is no fee to add AVAX to Metamask. However, you may need to pay a small transaction fee when sending or receiving AVAX.