
Welcome to our step-by-step guide on how to add Matic Network to your Metamask wallet! Matic Network is a Layer 2 scaling solution for Ethereum that aims to provide users with faster and cheaper transactions. By adding Matic Network to your Metamask wallet, you’ll be able to seamlessly interact with Matic dapps and enjoy the benefits of this robust network.
To begin, make sure you have the Metamask extension installed in your browser. If you don’t have it yet, you can easily download and install it from the official Metamask website. Once you have Metamask set up, follow the steps below to add Matic Network:
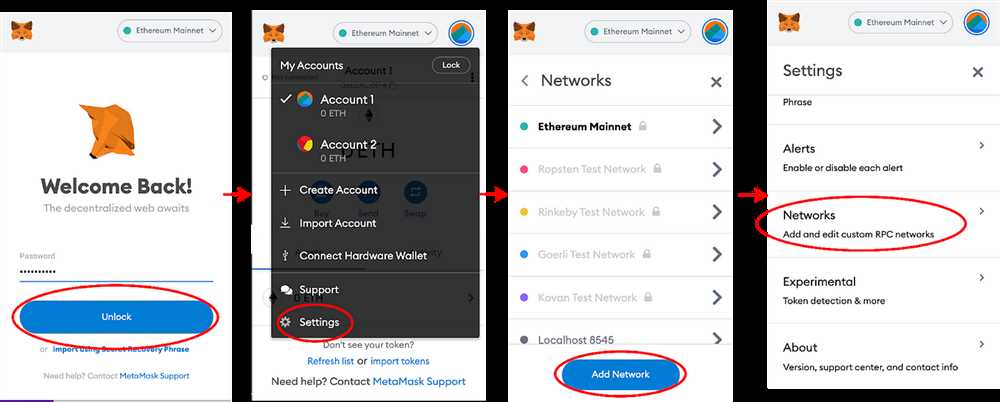
Step 1: Access Metamask Settings
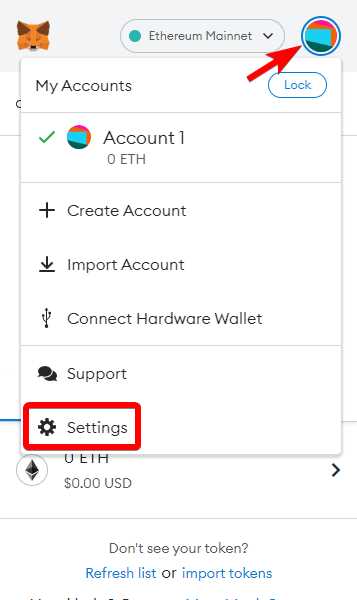
In your browser, click on the Metamask extension icon located in the top right corner. This will open the Metamask pop-up window. Next, click on the profile picture or the account icon to open the account menu. From the dropdown menu, select “Settings” to access the Metamask settings page.
Step 2: Network Selection
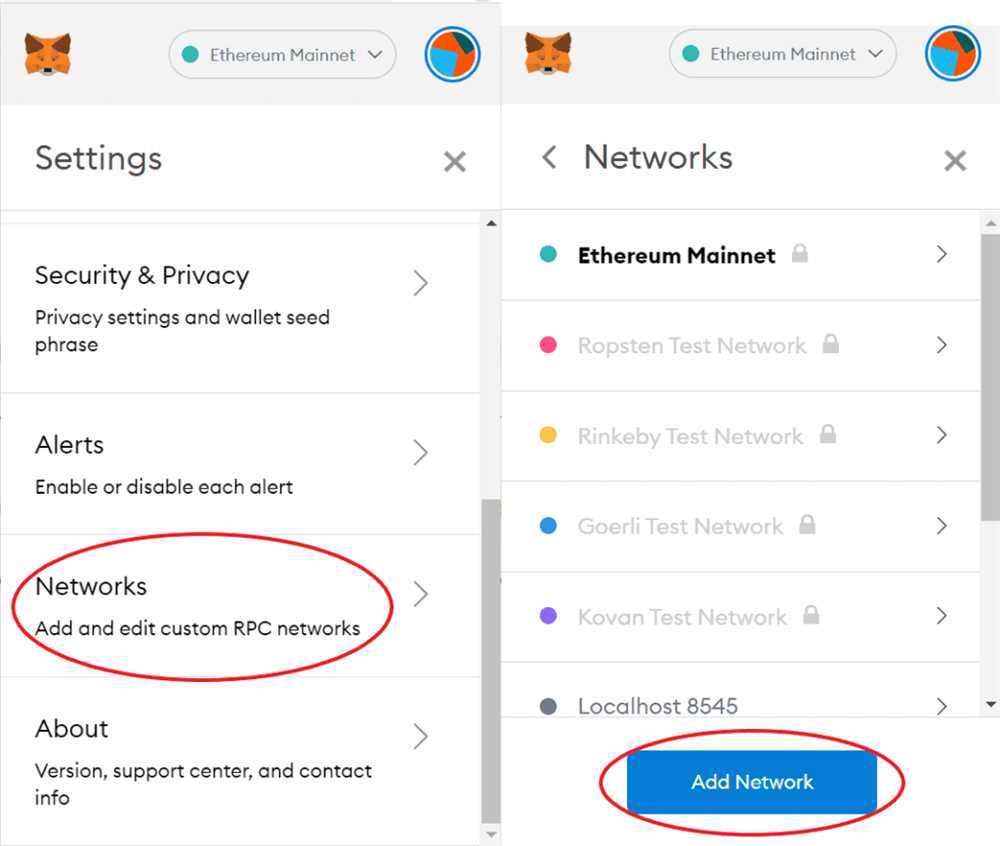
On the settings page, you’ll see a list of options. Look for the “Networks” tab and click on it. This will display the networks available in your Metamask wallet. Scroll down and click on the “Add Network” button to proceed with adding Matic Network.
Step 3: Add Matic Network
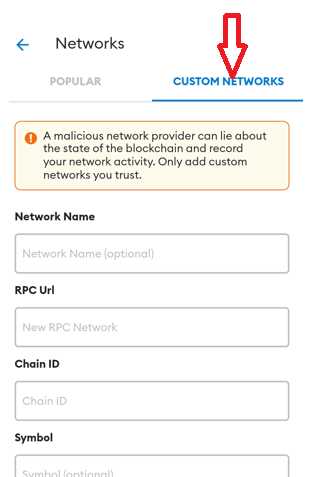
In the “Add Network” form, you’ll need to enter the following details:
Network Name: Matic Mainnet
New RPC URL: https://rpc-mainnet.matic.network
Chain ID: 137
Symbol: MATIC
Block Explorer URL: https://explorer.matic.network/
Once you have filled in all the required fields, click on the “Save” button to add Matic Network to your Metamask wallet. You’ll now be able to switch between Ethereum and Matic Network for your transactions and interactions within Metamask.
Step 4: Confirming Matic Network
To confirm that Matic Network has been successfully added, go back to the Metamask extension icon and click on it to open the pop-up window. Next, click on the account icon to open the account menu. From the dropdown menu, select “Matic Mainnet” to switch to Matic Network. You should now see “Matic Mainnet” as the active network in your Metamask wallet.
Congratulations! You have successfully added Matic Network to your Metamask wallet. Now you can enjoy faster and cheaper transactions on the Matic Network and explore the exciting world of Matic dapps with ease.
Step 1: Install the MetaMask Extension

To get started with adding Matic Network to your MetaMask wallet, you first need to install the MetaMask extension on your web browser. MetaMask is available as an extension for Google Chrome, Mozilla Firefox, and Brave browsers.
Install MetaMask on Google Chrome
To install MetaMask on Google Chrome, follow these steps:
- Open the Google Chrome browser on your computer.
- Visit the Chrome Web Store by typing in “chrome://extensions/” in the address bar.
- In the search bar on the Chrome Web Store, type in “MetaMask” and press Enter.
- Click on the “Add to Chrome” button next to the MetaMask extension.
- A pop-up window will appear, asking for confirmation to add the extension. Click on the “Add extension” button.
- The MetaMask extension will now be installed on your browser.
Install MetaMask on Mozilla Firefox
To install MetaMask on Mozilla Firefox, follow these steps:
- Open the Mozilla Firefox browser on your computer.
- Visit the Mozilla Firefox Add-Ons page by typing in “about:addons” in the address bar.
- In the search bar on the Add-Ons page, type in “MetaMask” and press Enter.
- Click on the “Add to Firefox” button next to the MetaMask extension.
- A pop-up window will appear, asking for confirmation to add the extension. Click on the “Add” button.
- The MetaMask extension will now be installed on your browser.
Install MetaMask on Brave Browser
To install MetaMask on the Brave browser, follow these steps:
- Open the Brave browser on your computer.
- Click on the menu icon (three horizontal lines) in the top-right corner of the browser window.
- In the menu, select “Extensions” to open the Extensions page.
- In the Extensions page, click on the “Get more extensions” link at the bottom.
- Search for “MetaMask” in the search bar on the Chrome Web Store page that opens.
- Click on the “Add to Brave” button next to the MetaMask extension.
- A pop-up window will appear, asking for confirmation to add the extension. Click on the “Add extension” button.
- The MetaMask extension will now be installed on your browser.
Once you have successfully installed the MetaMask extension on your browser, you can proceed to the next step.
Step 2: Create a MetaMask Wallet
Once you have installed the MetaMask extension on your web browser, it’s time to create a MetaMask wallet to securely store your digital assets on the Matic Network. Follow the steps below to create a new wallet:
1. Launch MetaMask
Click on the MetaMask extension icon in your browser’s toolbar to launch the MetaMask application.
2. Get Started
A new tab will open with the MetaMask interface. Click on the “Get Started” button to begin the wallet creation process.
3. Terms of Use

Read and accept the terms of use by checking the box and clicking on the “Accept” button.
4. Create a New Wallet
Click on the “Create a Wallet” button to generate a new wallet for your Matic Network assets.
5. Create a Strong Password
Create and enter a strong password for your wallet. Make sure to use a combination of letters, numbers, and symbols to enhance its security. Confirm the password by entering it again in the confirmation field.
6. Backup Phrase
Your wallet’s backup phrase will be shown on the screen. It is essential to securely store this backup phrase as it can be used to recover your wallet if you ever lose access to it. Write it down and keep it in a safe place, preferably offline.
7. Confirm Backup Phrase
To ensure that you have saved your backup phrase correctly, you will be asked to confirm some of the words from the backup phrase. Select the correct words from each drop-down list in the correct order.
8. Wallet Created
Congratulations! You have successfully created your MetaMask wallet. You can now use it to interact with the Matic Network and store your digital assets securely. Make sure to keep your password and backup phrase safe and private.
Step 3: Open the MetaMask Wallet
Before you can start adding the Matic Network to your MetaMask wallet, make sure you have the MetaMask extension installed in your browser. If you don’t have it installed yet, you can download it from the official MetaMask website.
Once you have MetaMask installed, open your browser and click on the MetaMask extension icon in the top right corner of your browser window. This will open the MetaMask wallet.
If you already have a MetaMask wallet set up, you can enter your password to unlock it. If you don’t have a wallet set up, you will need to create a new one by following the on-screen instructions.
Once you have successfully logged into your MetaMask wallet, you will be able to see your account balance and access all the features provided by MetaMask. Make sure you have enough ETH in your wallet to cover the gas fees required for the transactions on the Matic Network.
Now that your MetaMask wallet is open, you are ready to proceed to the next step and add the Matic Network to your wallet.
Step 4: Add Custom RPC Network
Now that you have installed the Matic Network extension and logged into your Metamask wallet, the next step is to add the Matic Network as a custom RPC network. This will allow you to interact with the Matic Network directly from your Metamask wallet.
Step 4.1: Open the Metamask Settings
Click on the Metamask extension icon at the top right corner of your browser. Then, click on the Settings option.
Step 4.2: Click on Networks
In the Metamask settings, click on the Networks tab. Here, you will be able to see the list of networks that are already configured in your Metamask wallet.
Step 4.3: Add a New Network
At the bottom of the Networks tab, you will find an option to add a new network. Click on the “Add Network” button.
Step 4.4: Configure the Matic Network
In the “New Network” section, fill in the following details to configure the Matic Network:
- Network Name: Matic Mainnet
- New RPC URL: https://rpc-mainnet.maticvigil.com/
- ChainID: 137
- Currency Symbol: MATIC
- Block Explorer URL: https://explorer.matic.network/
Once you have entered all the details, click on the “Save” button to add the Matic Network to your Metamask wallet.
Congratulations! You have successfully added the Matic Network as a custom RPC network in your Metamask wallet. Now you can start using the Matic Network directly from your Metamask wallet for seamless and fast transactions.
Step 5: Configure Matic Network on MetaMask
Now that you have added the Matic Network to your MetaMask wallet, you need to configure it in order to use it for transactions on the Matic Network.
Follow these steps to configure Matic Network on MetaMask:
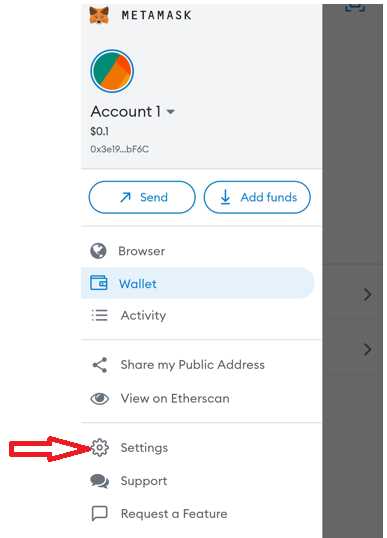
- Open your MetaMask extension or app.
- Click on the account icon in the top-right corner of the window.
- From the dropdown menu, select “Settings”.
- Within the “Settings” menu, click on the “Networks” tab.
- Scroll down and click on the “Add Network” button.
- Enter the following details:
- Network Name: Matic Mainnet
- New RPC URL: https://rpc-mainnet.maticvigil.com/
- Chain ID: 137
- Symbol: MATIC
- Block Explorer URL: https://explorer.matic.network/
- Click on the “Save” button to add the Matic Network to your MetaMask.
- After saving, select the “Matic Mainnet” from the network dropdown in your MetaMask.
- Congratulations! You have successfully configured Matic Network on MetaMask.
Now you can use your MetaMask wallet to interact with decentralized applications (dApps) and perform transactions on the Matic Network.
What is Matic Network?
Matic Network is a layer 2 scaling solution for Ethereum, designed to provide a high-performance and low-cost infrastructure for decentralized applications (dApps). It achieves scalability by using sidechains called “Matic PoS Chains” that are connected to the Ethereum mainnet. Matic Network aims to address the limitations of high fees and slow transactions on the Ethereum network.
Why should I add Matic Network to my Metamask?
Adding Matic Network to your Metamask allows you to interact with dApps and use decentralized finance (DeFi) platforms that are built on the Matic Network. It gives you access to faster and cheaper transactions compared to the Ethereum mainnet. By adding Matic Network, you can take advantage of the benefits of scalability and lower costs offered by the Matic Network ecosystem.
Can I transfer my Ethereum assets to Matic Network?
Yes, you can transfer your Ethereum assets to Matic Network using the Matic bridge. The Matic bridge allows you to transfer tokens between the Ethereum mainnet and the Matic Network. By transferring your assets to Matic Network, you can benefit from faster transactions and lower fees. However, it’s important to note that transferring assets between networks involves some costs and considerations, so make sure to do your research and understand the process before proceeding.
Are there any risks involved in adding Matic Network to Metamask?
Adding Matic Network to Metamask itself does not pose any significant risks. However, it’s important to exercise caution when using any network and interacting with smart contracts. There is always a risk of potential scams or vulnerabilities in decentralized applications (dApps) and smart contracts. It’s recommended to do thorough research and exercise caution before engaging with any dApp or smart contract on Matic Network or any other blockchain network.