
Welcome to our step-by-step guide on how to add Ethereum (ETH) to your Metamask wallet. Metamask is a popular browser extension wallet that allows you to securely store and manage your cryptocurrencies. Adding ETH to your Metamask wallet will enable you to send, receive, and interact with the Ethereum network.
Step 1: Install and Set Up Metamask
If you haven’t already installed Metamask, head over to the official website and follow the instructions to add the extension to your preferred browser. Create a new wallet or import an existing one using your seed phrase.
Step 2: Copy your Metamask Wallet Address
Once your Metamask wallet is set up, copy your wallet address. You can find it by clicking on the extension icon in your browser toolbar and then clicking on the three dots next to your account name. Select “Copy Address to clipboard” option.
Step 3: Purchase ETH
Now it’s time to purchase ETH and send it to your Metamask wallet. You can buy ETH from a cryptocurrency exchange or through a peer-to-peer platform. Follow the on-screen instructions to complete the transaction.
Step 4: Send ETH to your Metamask Wallet
Once you have purchased ETH, navigate to your exchange or peer-to-peer platform’s withdrawal feature. Paste your Metamask wallet address in the recipient address field and specify the amount of ETH you want to send. Double-check the address to avoid any mistakes.
Step 5: Confirm the Transaction
After entering the necessary details, review the transaction and confirm it. Depending on the network congestion, it may take some time for the transaction to be confirmed on the Ethereum network.
Step 6: Check your Metamask Wallet
Once the transaction is confirmed, you can check your Metamask wallet to see the newly added ETH. Click on the extension icon in your browser toolbar and navigate to the account where you sent the ETH. You should see the updated balance.
Congratulations! You have successfully added ETH to your Metamask wallet. Now you can use your wallet to interact with decentralized applications, participate in token sales, or send ETH to other addresses.
Step 1: Install and Set Up Metamask
The first step in adding ETH to your Metamask wallet is to install and set up the Metamask extension on your preferred web browser. Follow the steps below to complete this process:
|
1. Open your web browser and go to the Metamask website. |
|
2. Click on the “Get Chrome Extension” button if you are using Google Chrome, or “Get Firefox Extension” if you are using Mozilla Firefox. |
|
3. A new tab will open with the Metamask extension page on the Chrome Web Store or Firefox Add-ons website. Click on the “Add to Chrome” or “Add to Firefox” button. |
|
4. A pop-up window will appear asking for confirmation to add the extension. Click on the “Add extension” button. |
|
5. The Metamask extension icon will now appear in the top-right corner of your browser’s toolbar. |
|
6. Click on the Metamask extension icon to open the welcome page. |
|
7. Click on the “Get Started” button. |
|
8. Read and accept the terms of use by clicking on the “Accept” button. |
|
9. Create a strong password for your Metamask wallet and click on the “Create” button. |
|
10. A secret phrase will be generated. Write down this secret phrase and keep it safe as it will be used for wallet recovery in case of a lost or stolen device. |
|
11. Confirm your secret phrase by selecting the correct words in the correct order. |
|
12. Congratulations! You have successfully installed and set up your Metamask wallet. You can now proceed to the next step to add ETH to your wallet. |
Learn how to download, install, and configure Metamask
Metamask is a popular browser extension that allows users to interact with decentralized applications (DApps) on the Ethereum blockchain. In this step-by-step guide, we will walk you through the process of downloading, installing, and configuring Metamask on your browser.
Step 1: Download Metamask
To get started, you will first need to download Metamask from the official website. Visit the Metamask website at https://metamask.io and click on the “Get Chrome Extension” button if you are using Google Chrome. If you are using a different browser, click on the “Other Platforms” button to find the relevant download link.
Step 2: Install Metamask
Once the download is complete, locate the setup file and run it to start the installation process. Follow the on-screen instructions to install Metamask on your browser. After the installation is complete, you will see the Metamask icon added to your browser’s toolbar.
Step 3: Configure Metamask
Click on the Metamask icon in your browser’s toolbar to open the extension. You will be prompted to create a new wallet or import an existing one. If you are new to Metamask, select the option to create a new wallet. Follow the instructions to set up a password and create a new wallet.
Once your wallet is created, you will receive a unique 12-word seed phrase. Make sure to write down this seed phrase and store it in a safe place. This seed phrase can be used to restore your wallet if you ever lose access to your account.
After creating your wallet, you will be taken to the main Metamask interface. Here, you can manage your Ethereum accounts, view your transaction history, and interact with DApps.
That’s it! You have successfully downloaded, installed, and configured Metamask on your browser. Now you can start using Metamask to interact with the Ethereum blockchain and participate in decentralized finance (DeFi) applications.
Note: It is important to ensure the security of your Metamask wallet by keeping your seed phrase confidential and regularly updating your browser and Metamask extension to the latest version. Additionally, be cautious of phishing attempts and only download Metamask from trusted sources.
Step 2: Create a Metamask Wallet
To add ETH to your Metamask wallet, first you need to create a wallet on the Metamask extension.
Here’s how you can create a Metamask wallet:
- Install the Metamask extension from the Metamask website and open it.
- Click on “Create New Wallet” to start the wallet creation process.
- Read and accept the terms and conditions presented by Metamask.
- Create a strong password for your wallet and confirm it.
- Click on “Create” to proceed.
- On the next screen, you will be presented with a unique 12-word seed phrase. This phrase is important as it can be used to recover your wallet if you ever lose access to it. Write down the seed phrase and keep it safe.
- Confirm the seed phrase by selecting the words in the correct order as displayed.
- Your Metamask wallet is now created. You can now access your wallet and perform various actions such as adding ETH.
Make sure to keep your wallet password and seed phrase safe and secure. With the wallet created, you’re now ready to move on to the next step and add ETH to your Metamask wallet.
Discover how to create a new Metamask wallet and set a secure password
Creating a new Metamask wallet is a simple process that allows you to securely store your Ethereum and other ERC-20 tokens. Follow these steps to create your wallet and set a strong password:
Step 1: Download and Install Metamask
First, you need to download and install the Metamask browser extension. Visit the official Metamask website or find it in the Chrome Web Store or Firefox Add-ons.
Step 2: Launch Metamask and Set Up a New Wallet
After installing Metamask, you will see its icon in your browser’s toolbar. Click on it to launch the extension. Once open, click on the “Get Started” button to begin the wallet setup process.
Metamask will present you with the terms of service. Take a moment to review them, and if you agree, click on the “Accept” button.
Step 3: Create a New Wallet
To create a new wallet, click on the “Create a Wallet” option. Metamask will generate a unique 12-word seed phrase for you. Make sure to write down or securely save this phrase, as it is crucial for recovering your wallet if you ever lose access to it.
Once you have your seed phrase, you will be prompted to confirm it in the correct order. Fill in the words one by one, and then click on the “Confirm” button.
Step 4: Set a Secure Password
Next, choose a strong password for your Metamask wallet. Make sure to use a combination of uppercase and lowercase letters, numbers, and special characters. This password will encrypt your wallet and protect it from unauthorized access.
Enter your password in both the “New Password” and “Confirm Password” fields. Once you have set a secure password, click on the “Create” button.
Congratulations! You have successfully created a new Metamask wallet and set a secure password. Now you can add ETH and other tokens to your wallet and start using decentralized applications.
Step 3: Add ETH to your Metamask Wallet

Now that you have your Metamask wallet set up and connected to your browser, it’s time to add some ETH to your wallet.
Here are the steps to follow:
- Open your Metamask extension in your browser.
- Click on the “Assets” tab at the top of the extension window.
- Select “ETH” from the list of available assets.
- Click on the “Receive” button next to the asset name.
- A new window will appear with your wallet address and a QR code.
- You can copy your wallet address or scan the QR code to receive ETH.
- Once you have your wallet address, you can use it to receive ETH from another wallet or exchange.
- Make sure to double-check and verify that the wallet address is correct before sending any ETH.
Congratulations! You have successfully added ETH to your Metamask wallet. Now you can use your ETH to participate in decentralized finance (DeFi) applications, trade on decentralized exchanges, or simply hold it as an investment.
Find out how to add ETH to your new Metamask wallet and verify the transaction
If you’ve recently set up a new Metamask wallet and are wondering how to add ETH to it, you’ve come to the right place. In this step-by-step guide, we will walk you through the process of adding ETH to your Metamask wallet and verifying the transaction.
Step 1: Open your Metamask wallet
The first thing you need to do is open your Metamask wallet. If you haven’t installed it yet, make sure to download and install the Metamask extension on your browser. Once installed, click on the Metamask icon in your browser toolbar to open the wallet.
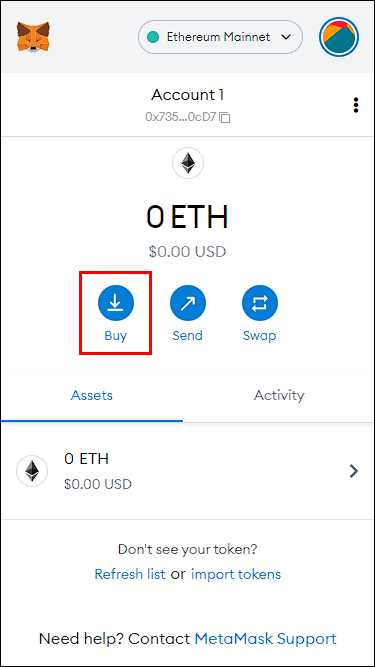
Step 2: Access the ‘Deposit’ option
Once your Metamask wallet is open, you will see a user-friendly interface with various options. Look for the ‘Deposit’ option, which is usually represented by an upward arrow or a ‘Buy’ button. Click on this option to proceed.
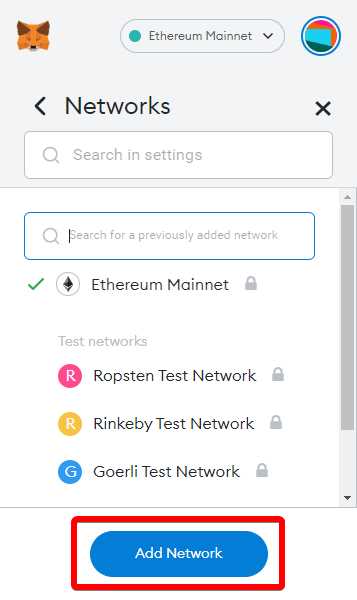
Step 3: Select the ‘Ethereum’ network
After clicking on the ‘Deposit’ option, you will be prompted to select a network. Choose the ‘Ethereum’ network, as ETH is an Ethereum-based cryptocurrency.
Step 4: Copy your wallet address
Once you’ve selected the Ethereum network, Metamask will generate a unique wallet address for you. This address is essential for receiving ETH. To copy your wallet address, click on the ‘Copy’ button next to it. Make sure to keep this address safe and secure.
Step 5: Send ETH to your wallet address
Now that you have your wallet address copied, you can use it to receive ETH from another wallet or exchange. Go to the wallet or exchange platform from where you want to send ETH and provide your copied wallet address as the recipient address. Follow the platform-specific instructions to complete the transaction.
Step 6: Verify the transaction
Once you’ve sent the ETH to your Metamask wallet, you need to verify the transaction. Metamask will automatically display the pending transaction in your wallet interface. To verify the transaction, simply click on the transaction and review the details. Make sure that the recipient address matches your wallet address and that the transaction amount is correct. If everything looks good, click on the ‘Confirm’ button to complete the verification process.
Step 7: Wait for confirmation
After verifying the transaction, you will need to wait for it to be confirmed on the Ethereum blockchain. The confirmation time may vary depending on network congestion, but it usually takes a few minutes. You can track the status of your transaction by clicking on the transaction in your Metamask wallet and checking the confirmation status.
Congratulations! You have successfully added ETH to your new Metamask wallet and verified the transaction. Now you can use your ETH for various purposes, such as participating in decentralized finance (DeFi) protocols or making transactions on Ethereum-based platforms.
Note: It’s important to double-check the recipient address and transaction details before confirming any transaction to avoid any potential loss of funds.
2. Can I add ETH to Metamask from any exchange?
Yes, you can add ETH to your Metamask wallet from any exchange that supports Ethereum. Simply follow the instructions provided by the exchange to withdraw ETH to your Metamask wallet address. Make sure to double-check the address to avoid sending funds to the wrong wallet.
3. Is there a minimum amount of ETH I can add to my Metamask wallet?
No, there is no minimum amount of ETH that you can add to your Metamask wallet. You can add any amount of ETH based on your needs and preferences. However, keep in mind that there might be transaction fees associated with adding ETH, so it’s always good to check the fee structure before making a transaction.
4. How long does it take for the added ETH to reflect in my Metamask balance?
The time it takes for the added ETH to reflect in your Metamask balance depends on several factors, including the network congestion and the transaction fee you’ve set. Generally, it can take anywhere from a few seconds to several minutes. You can track the progress of your transaction using a block explorer by searching for your wallet address or the transaction hash.
5. Can I add tokens other than ETH to my Metamask wallet?
Yes, you can add tokens other than ETH to your Metamask wallet. Metamask supports various ERC-20 tokens, which are tokens built on the Ethereum blockchain. To add tokens, you’ll need to find the token’s contract address and add it as a custom token in your Metamask wallet. Once added, you’ll be able to see and manage your tokens alongside ETH in your wallet.