
Are you new to the world of cryptocurrencies and wondering how to send Ethereum from Coinbase to Metamask? Look no further! In this article, we will guide you through the steps to transfer your Ethereum from Coinbase, one of the most popular cryptocurrency exchanges, to Metamask, a digital wallet for storing and managing Ethereum and other ERC-20 tokens.
Metamask is a browser extension that allows you to interact with decentralized applications (dApps) on the Ethereum network. It provides a secure and user-friendly interface for managing your Ethereum assets. Coinbase, on the other hand, is a beginner-friendly exchange that allows you to buy, sell, and store cryptocurrencies, including Ethereum.
Before you can send Ethereum from Coinbase to Metamask, you’ll need to have both a Coinbase account and a Metamask wallet set up. If you haven’t done so already, you can easily create an account on Coinbase and install the Metamask extension on your preferred web browser.
Once you have both accounts set up, you’re ready to transfer your Ethereum. In the next sections, we’ll walk you through the process step by step, so you can confidently send your Ethereum from Coinbase to Metamask and start exploring the exciting world of decentralized finance (DeFi) and dApps.
Setting Up Metamask Wallet
Metamask is a popular cryptocurrency wallet that allows you to securely store, manage, and interact with Ethereum and ERC-20 tokens. Follow these steps to set up your Metamask wallet:
- Install the Metamask browser extension. To do this, go to the official Metamask website and download the extension for your preferred browser (Chrome, Firefox, or Brave).
- Once the extension is installed, open it and click on “Create a Wallet”.
- Create a strong password for your wallet. Make sure to choose a password that is difficult to guess and includes a combination of letters, numbers, and special characters.
- After setting the password, you will be given a secret backup phrase consisting of 12 or 24 words. This backup phrase is crucial for recovering your wallet if you ever lose access to your device or forget your password. Write down the backup phrase and store it in a safe place.
- Confirm your backup phrase by selecting the words in the correct order.
- Agree to the terms of service and privacy policy.
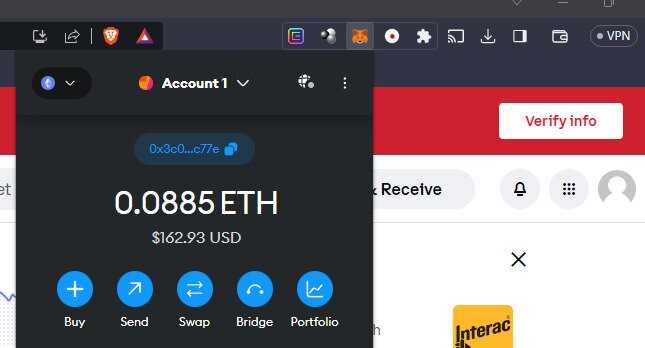
- Your Metamask wallet is now set up and ready to use! You can view your Ethereum address by clicking on your account name at the top right corner of the extension. You can also customize your wallet settings and import additional accounts if needed.
Remember to keep your password and backup phrase secure and never share them with anyone. With Metamask, you can easily send and receive Ethereum from your Coinbase account or any other Ethereum wallet.
Creating a Metamask Account
Metamask is a digital wallet and a browser extension that allows you to manage your Ethereum and other cryptocurrencies directly from your web browser. In order to send Ethereum from Coinbase to Metamask, you will need to have a Metamask account. Here’s how to create one:
Step 1: Install Metamask
The first step is to install the Metamask extension in your preferred browser. Metamask is available for Chrome, Firefox, and Brave browsers. Simply search for “Metamask” in the extension store of your browser and click on the “Add to Chrome/Firefox/Brave” button to install it.
Step 2: Set Up Metamask
After installing Metamask, click on the Metamask icon in your browser toolbar to launch the extension. You will be taken to the Metamask welcome screen.
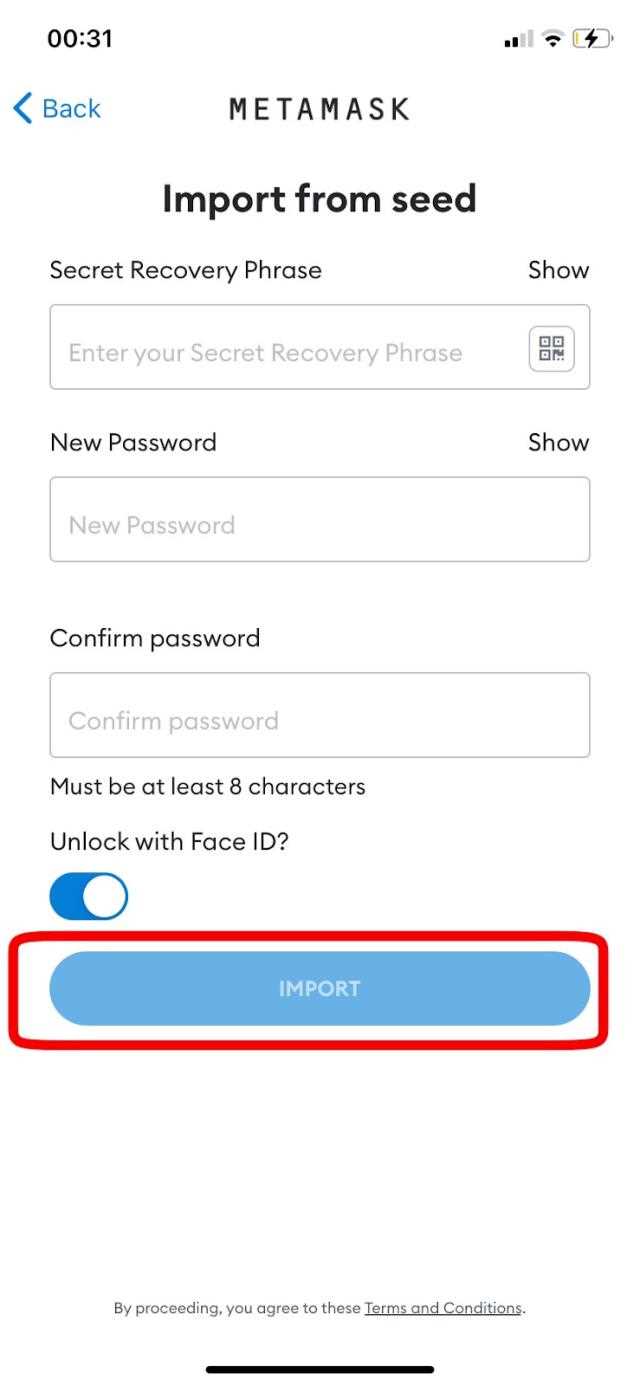
If you already have a Metamask account, choose the “Import Wallet” option and follow the prompts to import your existing account. If you don’t have a Metamask account yet, select the “Create Wallet” option.
Next, set a strong password for your Metamask account. Make sure to choose a password that is unique and not easily guessable. Confirm the password and click on the “Create” button.
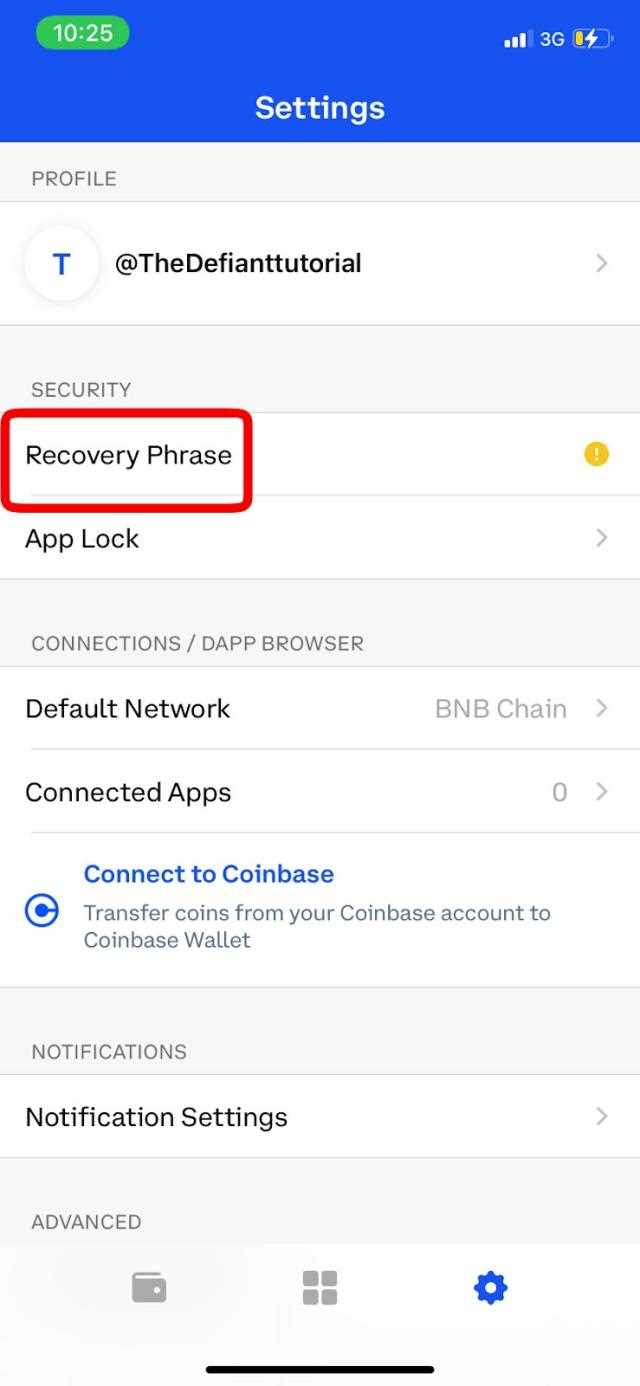
Now, you will be asked to back up your seed phrase. This is a set of 12 random words that can be used to restore your Metamask account in case you forget your password or lose access to your device. It is important to securely store your seed phrase and never share it with anyone. Write down the seed phrase in the order provided and keep it in a safe place.
After backing up your seed phrase, Metamask will ask you to confirm the words in the correct order. This is a security measure to ensure that you have properly saved your seed phrase. Enter the words in the correct order and click on the “Confirm” button.
Finally, you will be taken to the main Metamask screen where you can see your Ethereum address, account balance, and other information. Congratulations! You have successfully created a Metamask account.
Note: It is highly recommended to use a hardware wallet like Ledger or Trezor with Metamask for enhanced security.
Now that you have a Metamask account, you are ready to proceed with sending Ethereum from Coinbase to Metamask. Please refer to the next sections for further instructions.
Installing Metamask Extension
To send Ethereum from Coinbase to Metamask, you will need to have the Metamask extension installed in your web browser. Follow the steps below to install Metamask:
Step 1: Open your web browser
Make sure you have a supported web browser, such as Google Chrome or Mozilla Firefox, installed on your computer.
Step 2: Go to the Metamask website
Visit the Metamask website at https://metamask.io/ or search for “Metamask” in your preferred search engine.
Step 3: Install the extension
On the Metamask website, you will see a button that says “Get Chrome Extension” or “Get Firefox Extension”. Click on the button that corresponds to your web browser.
Step 4: Add to Chrome or Add to Firefox
A pop-up will appear asking for your confirmation to add the extension to your browser. Click on “Add to Chrome” or “Add to Firefox” to proceed with the installation.
Step 5: Set up a password
After the installation is complete, click on the Metamask icon that appears in the top-right corner of your browser to open the extension. Set up a strong password to secure your Metamask account. Make sure to save this password in a safe place, as there is no recovery option.
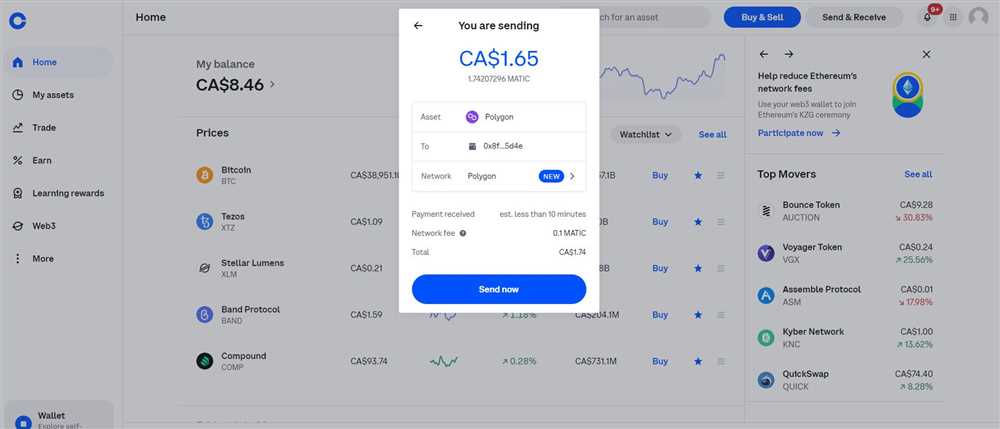
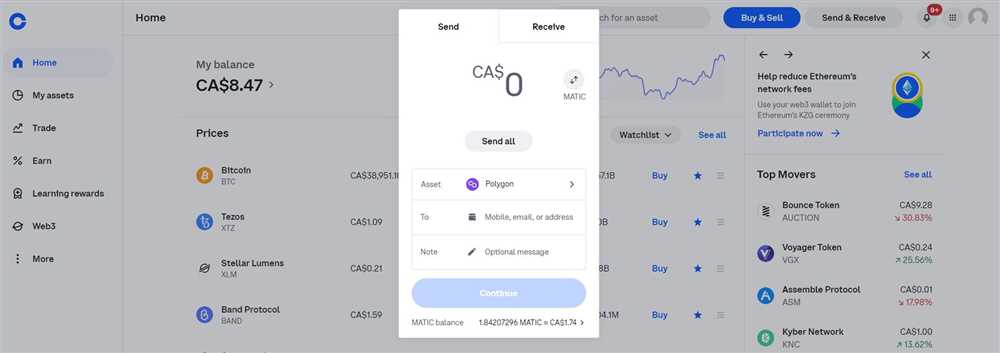
Once you have successfully installed the Metamask extension, you can proceed to connect it to your Coinbase account and transfer Ethereum.
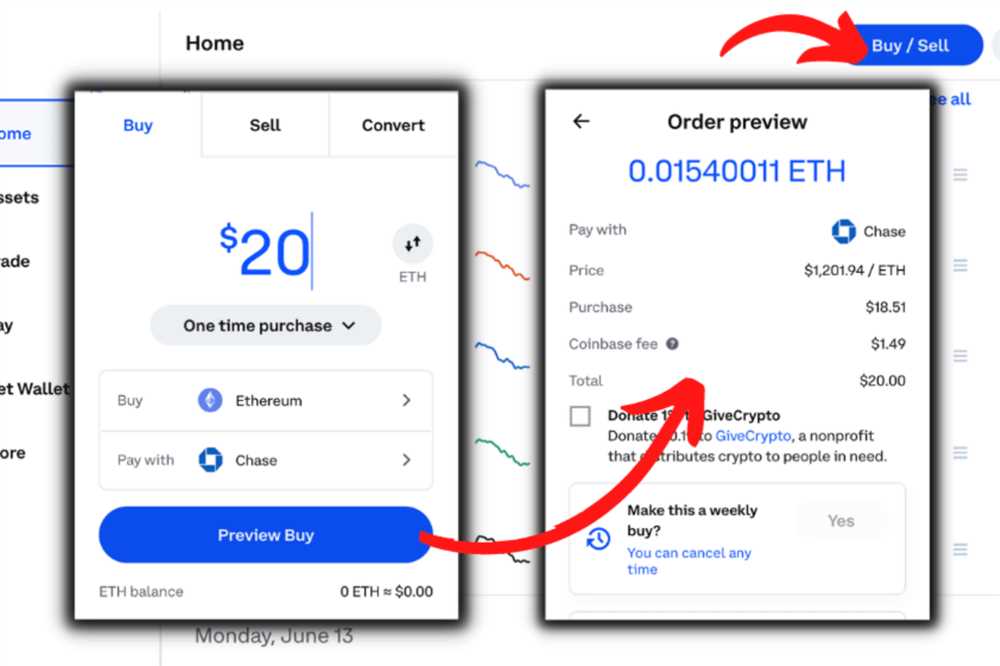
Creating Coinbase Account
In order to send Ethereum from Coinbase to Metamask, you first need to create a Coinbase account. Here are the steps to follow:
| Step 1: | Go to the Coinbase website (www.coinbase.com) and click on the “Create Account” button. |
| Step 2: | Enter your email address, first name, last name, and create a password for your account. |
| Step 3: | Read and accept the terms of service and privacy policy. |
| Step 4: | Complete the identity verification process by providing your phone number and verifying it with a code. |
| Step 5: | Provide additional personal information, such as your date of birth and physical address. |
| Step 6: | Choose whether you want to enable two-factor authentication for added security. |
| Step 7: | Once your account is created, you can start buying and selling cryptocurrencies on Coinbase. |
Remember to keep your Coinbase account secure by using a strong password and enabling two-factor authentication.
Signing Up for Coinbase Account
To send Ethereum from Coinbase to Metamask, you will first need to create an account on Coinbase. Follow the steps below to sign up for a Coinbase account:
Step 1: Visit the Coinbase Website
Open your preferred web browser and go to the Coinbase website.
Step 2: Click on “Sign Up”
On the Coinbase homepage, locate the “Sign Up” button and click on it.
Step 3: Fill in the Required Information
You will be presented with a registration form. Fill in your name, email address, and password.
Step 4: Agree to the Terms and Conditions
Read through Coinbase’s terms and conditions, and if you agree, check the box indicating your acceptance.
Step 5: Complete the Registration
Click on the “Create Account” button to complete your registration.
Once you have successfully signed up for a Coinbase account, you will be able to proceed with sending Ethereum from Coinbase to Metamask.
Verifying Your Coinbase Account
Before you can send Ethereum from Coinbase to Metamask, you need to verify your Coinbase account. Verifying your account is an important security step that helps Coinbase ensure the safety of your funds.
To verify your Coinbase account, follow these steps:
- Sign in to your Coinbase account using your email and password.
- Click on your profile icon in the top right corner of the dashboard.
- Select “Settings” from the dropdown menu.
- In the “Verification” section, click on the “Get Started” button.
- Provide the required personal information, such as your full name, date of birth, and address.
- Upload a government-issued ID, such as a passport or driver’s license.
- Follow the prompts to complete the verification process.
- Once your account is verified, you will receive a confirmation email from Coinbase.
It is important to note that the verification process may take some time to complete, as Coinbase needs to review and verify the information you provided. You may be required to provide additional documentation or answer further questions during this process.
Verifying your Coinbase account is crucial to ensure the security of your funds and comply with regulatory requirements. Once your account is verified, you can proceed with sending Ethereum from Coinbase to Metamask.
What is Coinbase?
Coinbase is a popular cryptocurrency exchange and wallet platform that allows users to buy, sell, and store various cryptocurrencies, including Ethereum. It provides user-friendly interfaces for managing cryptocurrency transactions, making it a convenient option for beginners and experienced users alike.
Can I use Metamask with other cryptocurrencies?
Yes, Metamask is a multi-cryptocurrency wallet that supports various cryptocurrencies, including Ethereum and ERC-20 tokens. However, it is primarily designed for Ethereum-based tokens and decentralized applications (dApps). If you want to use other cryptocurrencies, it is recommended to use wallets specifically designed for those cryptocurrencies.