
Decentralized finance (DeFi) has emerged as one of the hottest trends in the cryptocurrency space. With its potential to democratize financial services and offer participants more control over their money, DeFi has gained significant attention from both enthusiasts and investors alike.
One of the key tools that enable users to participate in DeFi is the Metamask desktop app. Metamask is a web3 wallet that allows users to interact with decentralized applications (dApps) on the Ethereum blockchain. With Metamask, users can securely store their digital assets, manage their Ethereum accounts, and easily access various DeFi protocols.
Whether you are new to DeFi or a seasoned investor, this beginner’s guide will walk you through the process of setting up and using the Metamask desktop app. We will cover everything from creating your first Ethereum wallet to exploring different DeFi platforms and making your first transactions. By the end of this guide, you will have the necessary knowledge to dive into the exciting world of decentralized finance using Metamask.
What is Metamask Desktop App
Metamask Desktop App is a cryptocurrency wallet and decentralized application (dApp) browser, designed for easy access and interaction with the Ethereum blockchain. It is a browser extension that allows users to manage their Ethereum accounts, securely store their digital assets, and interact with dApps seamlessly.
With Metamask Desktop App, users can create multiple wallets, import existing ones, and securely store their private keys. This makes it easy to manage and access their Ethereum accounts without the need for complex hardware wallets or manual account setups.
In addition to managing accounts and storing assets, Metamask Desktop App also serves as a dApp browser. It allows users to conveniently interact with various dApps built on the Ethereum blockchain, such as decentralized exchanges, lending platforms, decentralized games, and more. Users can easily connect their wallets to these dApps, authorizing transactions and interacting with smart contracts all within the app.
One of the key features of Metamask Desktop App is its support for decentralized finance (DeFi) applications. DeFi is an evolving ecosystem of financial protocols and applications that aim to create an open, transparent, and inclusive financial system on the blockchain. Metamask Desktop App enables users to access and utilize various DeFi protocols, such as lending and borrowing platforms, decentralized exchanges, yield farming, and more.
| Features of Metamask Desktop App |
|---|
| Securely store and manage Ethereum accounts |
| Multiple wallet support |
| Access and interact with dApps on the Ethereum blockchain |
| Authorizing transactions and interacting with smart contracts |
| Support for decentralized finance (DeFi) applications |
Overall, Metamask Desktop App is a powerful tool for anyone looking to interact with the Ethereum blockchain, manage their digital assets, and explore the world of decentralized finance. Its user-friendly interface and extensive features make it a popular choice among Ethereum users and decentralized application enthusiasts.
Getting Started
Before you can begin using the Metamask Desktop App for decentralized finance, you will need to set up an account and install the application on your desktop computer. Follow these steps to get started:
- Visit the official Metamask website and download the Desktop App for your operating system.
- Once the download is complete, open the installer and follow the on-screen instructions to install the application.
- After the installation is complete, open the Metamask Desktop App from your desktop or applications folder.
- Create a new account by clicking on the “Create a Wallet” option.
- Set a strong password for your account and click “Create” to proceed.
- Write down the secret backup phrase or seed phrase that is provided. This is a crucial step, as it can be used to recover your account if you ever forget your password.
- Confirm your backup phrase by selecting the words in the correct order. This step ensures that you have properly saved your backup phrase.
- Once your backup phrase is confirmed, your account is ready for use. You can now access and manage your digital assets in the Metamask Desktop App.
With your account set up, you can now explore and interact with various decentralized finance applications such as decentralized exchanges (DEXs), lending platforms, and more. The Metamask Desktop App provides a convenient and secure interface for interacting with the decentralized web.
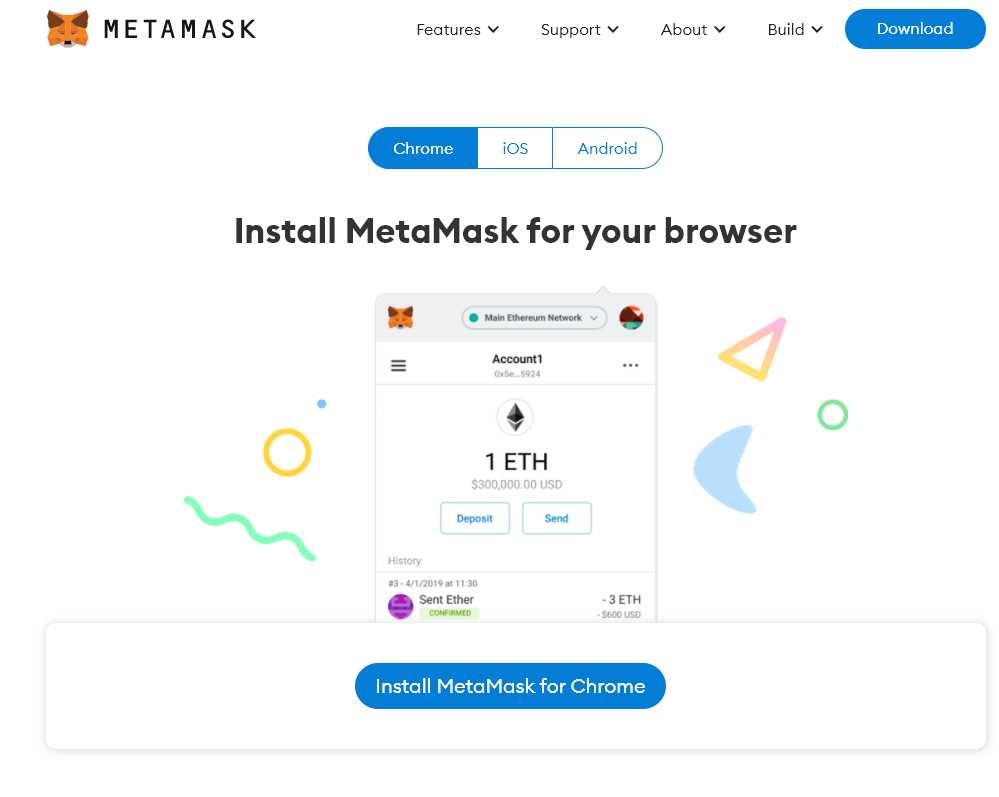
Installing Metamask
To get started with decentralized finance (DeFi), you’ll need to install the Metamask wallet on your desktop computer. Metamask is a popular Ethereum wallet that allows you to securely store, send, and receive Ethereum and other ERC-20 tokens.
Step 1: Download the Metamask App
The first step is to download the Metamask app for your operating system. Metamask is available for Windows, macOS, and Linux. Visit the official Metamask website or go to the app store or marketplace for your operating system and search for “Metamask”.
Step 2: Install the Metamask App
Once you’ve downloaded the Metamask app, follow the installation prompts to install it on your computer. The installation process will vary depending on your operating system, but it usually involves clicking through a few screens and agreeing to the terms and conditions.
Once the installation is complete, you should see the Metamask icon on your desktop or in your applications folder. Double-click the icon to launch the app.
Step 3: Create a Metamask Account
When you open the Metamask app for the first time, you’ll be prompted to create a new account. Click on the “Create a Wallet” button and follow the instructions to set up a new account. Make sure to securely store your recovery phrase, as this is the only way to recover your wallet if you forget your password.
After creating a new account, you’ll be asked to set a password for your wallet. Make sure to choose a strong, unique password to protect your funds.
Step 4: Connect to the Ethereum Network

Once you’ve created a new account, Metamask will prompt you to connect to the Ethereum network. Click on the network dropdown in the top right corner of the app and select “Main Ethereum Network” to connect to the main Ethereum network.
With Metamask now installed and connected to the Ethereum network, you’re ready to start exploring the world of decentralized finance (DeFi) and interacting with decentralized applications (dApps) on the Ethereum blockchain.
| Pros | Cons |
|---|---|
| Securely store, send, and receive Ethereum and ERC-20 tokens | Requires installation on a desktop computer |
| Easy-to-use interface | Must remember password and recovery phrase |
| Supports the Ethereum main network and other test networks | May have compatibility issues with certain operating systems or browsers |
Creating an Account
Getting started with the MetaMask desktop app is a simple process that allows you to take control of your own finances in the decentralized world of blockchain. Follow the steps below to create your MetaMask account:
Step 1: Download and Install MetaMask
To begin, visit the official MetaMask website and download the desktop app for your operating system. Once downloaded, run the installation file and follow the on-screen instructions to complete the installation.
Step 2: Launch MetaMask and Create a New Wallet

After installing MetaMask, you can launch the app from your computer’s applications or programs menu. Upon launching, you will be prompted to create a new wallet. Click on the “Get Started” button to proceed.
In the wallet creation screen, you will be asked to set a strong password for your MetaMask account. Make sure to choose a password that is unique and not easily guessable. Remember to store your password in a safe place, as it cannot be recovered if lost or forgotten.
Once you have set a password, click on the “Create” button to proceed. You will then be presented with a secret backup phrase. This backup phrase is extremely important as it can be used to recover your account in case your device is lost or damaged. Make sure to write down the backup phrase and store it securely. Do not share it with anyone.
Step 3: Confirm Your Backup Phrase
To ensure that you have properly written down your backup phrase, MetaMask will ask you to confirm it. Carefully enter each word of your backup phrase in the correct order and click on the “Confirm” button.
Once you have confirmed your backup phrase, your MetaMask account will be successfully created. You can now start exploring the world of decentralized finance and interacting with various blockchain-based applications.
Note: It is highly recommended to enable additional security measures like two-factor authentication and hardware wallet integration to further secure your MetaMask account.
Importing an Account
To use the Metamask Desktop App, you can import an existing Ethereum account or create a new one. Importing an account allows you to access your existing wallet balance and transaction history.
Step 1: Install Metamask Desktop App
If you haven’t already, download and install the Metamask Desktop App from the official website. Ensure that you are downloading from a trusted source.
Step 2: Open Metamask and Click on ‘Import Account’
Launch the Metamask App. On the initial setup screen, click on the “Import Account” option.
Note: If you are importing an account from another wallet or service, make sure you have the corresponding private key or mnemonic phrase.
Step 3: Enter Your Private Key or Mnemonic Phrase
Enter your private key or mnemonic phrase in the provided input field. Make sure to double-check for any typos or errors before proceeding. Your private key should be kept secure and not shared with anyone.
Remember: If you are importing a mnemonic phrase, be cautious with your keystrokes as an incorrect sequence of words could lead to the loss of your funds.
Step 4: Set a Password

Choose a strong and secure password to protect your Metamask account. Make sure to use a combination of uppercase and lowercase letters, numbers, and special characters. This password will be required every time you want to access your account.
Tip: Use a password manager to generate and securely store your passwords.
Step 5: Confirm and Finish Importing

Review the details you entered and ensure everything is correct. Once you are satisfied, click on the “Import Account” button to finish the import process. Metamask will validate the information and import your account.
Note: Importing an account may take a few moments, depending on your computer’s processing power and internet connection speed.
Congratulations! You have successfully imported your Ethereum account into the Metamask Desktop App. Now you can securely manage and interact with decentralized finance (DeFi) applications using the app’s convenient interface.
Using Metamask
Metamask is a popular wallet for managing decentralized finances. In this section, we will explore the various features and functionalities of Metamask.
1. Installing Metamask
To get started, you need to install the Metamask extension in your browser. Visit the official Metamask website and follow the instructions to install the extension.
2. Creating a Wallet
Once Metamask is installed, you can create a new wallet. Click on the Metamask icon, then click on “Create a Wallet” and follow the steps to generate a new wallet. Make sure to secure your wallet with a strong password and write down the secret backup phrase.
3. Connecting to a Network
Metamask allows you to connect to different networks. By default, it connects to the Ethereum main network. To connect to a different network, click on the network name on the top of the Metamask popup and select the desired network.
4. Importing an Existing Wallet
If you already have a wallet, you can import it into Metamask. Click on the Metamask icon, then click on “Import Wallet” and follow the steps to import your existing wallet using the secret backup phrase.
5. Managing Assets
Metamask enables you to manage various assets, including cryptocurrencies and tokens. You can view your balances, send and receive assets, and even add custom tokens. Simply click on the “Assets” tab in the Metamask popup to access these features.
6. Interacting with DApps
Metamask makes it easy to interact with decentralized applications (DApps) built on blockchain networks. Many DApps require you to connect your wallet to access their features. Simply click on the DApp’s website link, and Metamask will automatically detect and connect to it.
7. Ensuring Security
Security is crucial when using Metamask as it involves managing your digital assets. Always ensure that your browser and Metamask are up to date with the latest versions. Be wary of phishing attempts and only enter your wallet details on trusted websites.
| Feature | Description |
|---|---|
| Installing Metamask | Go to the official Metamask website and follow the instructions to install the extension in your browser |
| Creating a Wallet | Click on the Metamask icon, then click on “Create a Wallet” and follow the steps to generate a new wallet |
| Connecting to a Network | Click on the network name on the top of the Metamask popup and select the desired network |
| Importing an Existing Wallet | Click on the Metamask icon, then click on “Import Wallet” and follow the steps to import your existing wallet using the secret backup phrase |
| Managing Assets | View balances, send and receive assets, add custom tokens |
| Interacting with DApps | Click on the DApp’s website link and Metamask will automatically connect |
| Ensuring Security | Keep your browser and Metamask updated, be cautious of phishing attempts |
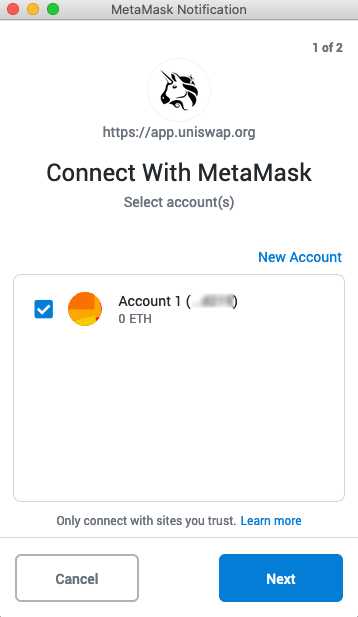
Connecting to a dApp
In order to interact with a decentralized application (dApp) using the Metamask Desktop App, you will need to connect your wallet to the dApp. Follow these steps to connect:
- Make sure you have the Metamask Desktop App installed and set up on your computer.
- Open the dApp you want to connect to in your web browser.
- You should see a Metamask extension icon in your browser toolbar. Click on it.
- A pop-up window will appear with the Metamask logo and a connect button. Click on the connect button.
- You will be redirected to the Metamask app and asked to authorize the connection. Review the information and click on the approve button if you want to proceed.
- Once you approve the connection, you will be redirected back to the dApp website.
- Your wallet is now connected to the dApp, and you can start using its features.
It’s important to note that some dApps may require additional permissions or actions to be performed in order to fully access their functionalities. Make sure to read the dApp’s documentation or user guide for more information.
What is Metamask Desktop App?
Metamask Desktop App is a digital wallet that allows users to manage their cryptocurrency and interact with decentralized applications (dApps) on the Ethereum blockchain.
How do I install Metamask Desktop App?
To install Metamask Desktop App, visit the official website, download the application for your operating system, and follow the installation instructions provided. Once installed, you can create a new wallet or import an existing one.
What can I do with Metamask Desktop App?
With Metamask Desktop App, you can send and receive cryptocurrency, store and manage your digital assets, interact with decentralized applications, participate in decentralized finance (DeFi) protocols, and more.
Does Metamask Desktop App support multiple cryptocurrencies?
Yes, Metamask Desktop App supports multiple cryptocurrencies, including Ethereum (ETH) and all ERC-20 tokens. You can manage and interact with a wide range of digital assets on the Ethereum blockchain.
Is Metamask Desktop App safe to use?
Metamask Desktop App is considered safe to use, as it uses industry-standard security measures to protect user funds and private keys. However, it’s always important to practice good security habits, such as using a strong password and enabling two-factor authentication.