
Transferring coins from Coinbase to Metamask is a straightforward process that allows you to take control of your cryptocurrency holdings and access the benefits of a decentralized wallet. Metamask, a popular Ethereum wallet, provides users with a secure and convenient way to manage their digital assets.
Before you begin, ensure that you have both a Coinbase account and the Metamask extension installed on your web browser. Once you have these prerequisites set up, follow the step-by-step guide below to seamlessly transfer your coins:
Step 1: Open your web browser and access the Coinbase website. Log in to your account using your credentials.
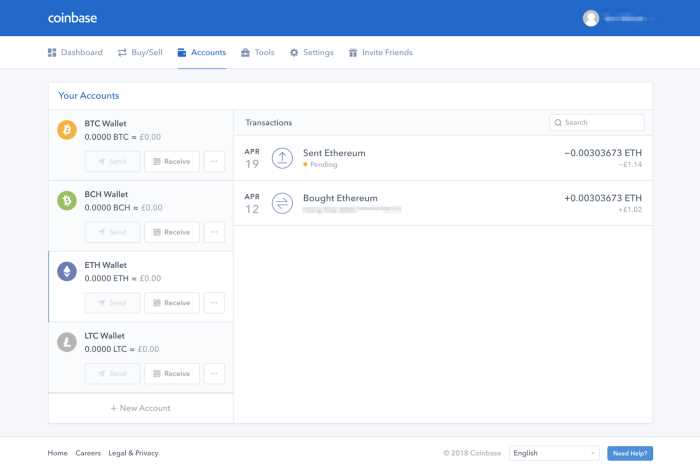
Step 2: Once logged in, navigate to the “Accounts” tab on the Coinbase dashboard.
Step 3: Locate the coin you wish to transfer from Coinbase to Metamask. Click on that coin’s wallet to access the specific wallet page.
Step 4: On the wallet page, click on the “Send” button to initiate the transfer process.
Step 5: In the “Recipient” field, enter your Metamask wallet address. Make sure to double-check the address to avoid any errors.
Step 6: Specify the amount of coins you want to transfer in the “Amount” field. Take into account any transaction fees that may apply.
Step 7: Review all the details of your transaction, including the recipient address and the amount being transferred. Ensure that everything is accurate.
Step 8: Once you have verified all the details, click on the “Send” button to initiate the transfer. You may be prompted to enter two-factor authentication if you have enabled it on Coinbase.
Step 9: Wait for the transaction to be confirmed on the blockchain. This typically takes a few minutes, but it can vary depending on network congestion.
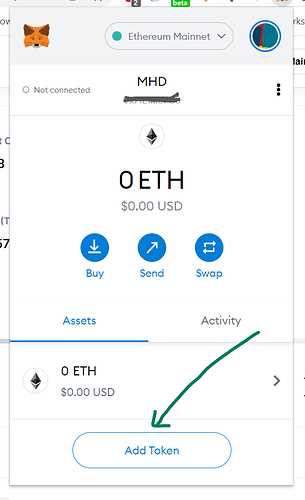
Step 10: Once the transaction is confirmed, open your Metamask extension and navigate to the “Assets” tab. You should see your transferred coins listed in your Metamask wallet.
Congratulations! You have successfully transferred your coins from Coinbase to Metamask. You can now enjoy the benefits of a decentralized wallet and take full control of your digital assets.
Remember to exercise caution when handling cryptocurrencies and to double-check all wallet addresses before initiating any transfers.
The Importance of Transferring Coins from Coinbase to Metamask
Transferring coins from Coinbase to Metamask is an important step to ensure the security and control of your digital assets. By moving your coins from a centralized exchange like Coinbase to a decentralized wallet like Metamask, you regain ownership of your funds and reduce the risk of losing them in the event of a hacking or security breach.
When you leave your coins on Coinbase, you are essentially entrusting the security of your funds to a third-party platform. While Coinbase has implemented various security measures, including cold storage and two-factor authentication, no centralized exchange is completely immune to security threats.
By transferring your coins to Metamask, you eliminate the risk of potential breaches or hacks on the exchange. Metamask, a browser extension wallet, allows you to securely store your cryptocurrencies on your own device, giving you full control over your private keys. This provides an added layer of security, as your funds are no longer held by a third-party entity.
Another benefit of using Metamask is its compatibility with decentralized applications (DApps). Many DApps, such as decentralized exchanges and lending platforms, require you to connect your wallet before you can participate. By transferring your coins to Metamask, you can easily access and interact with these DApps without the need to send funds from Coinbase each time.
Furthermore, transferring your coins to Metamask allows you to take advantage of the full range of features offered by this wallet. Metamask supports a wide variety of cryptocurrencies and tokens, allowing you to manage and track your entire portfolio in one place. It also provides easy integration with popular blockchain networks like Ethereum, enabling you to seamlessly interact with the decentralized ecosystem.
In conclusion, transferring coins from Coinbase to Metamask is essential for maintaining the security, control, and flexibility of your digital assets. By doing so, you eliminate the reliance on a centralized exchange and protect your funds from potential security threats. Additionally, you gain access to the full range of features offered by a decentralized wallet, enabling you to fully engage with the decentralized ecosystem.
Step 1: Creating a Wallet on Metamask
To transfer coins from Coinbase to Metamask, you first need to create a wallet on the Metamask platform. Follow the steps below to set up your wallet:
- Download and install the Metamask extension on your web browser. Metamask is available for Chrome, Firefox, Brave, and Edge.
- Once installed, click on the Metamask extension icon in your browser’s toolbar to open the wallet.
- Click on the “Get Started” button to begin the process of creating a new wallet.
- You will be prompted to set up a password for your wallet. Choose a strong password that is difficult to guess and click “Create.”
- Next, you will be shown a secret backup phrase consisting of 12 random words. It is important to write down and store this phrase securely. These words serve as a backup to your wallet and will be needed if you ever lose access to your Metamask account.
- After you have safely stored your secret backup phrase, click on the words in the correct order to verify that you have recorded them accurately. This step ensures that you have correctly saved your backup phrase.
- With the backup phrase verified, your wallet setup is complete. You can now click on the “All Done” button to access your wallet.
- When you open your wallet, you will be in the main Metamask interface where you can view your account address, balance, and transaction history. You are now ready to transfer coins from Coinbase to your Metamask wallet.
By following these steps, you have successfully created a wallet on Metamask. Now, you can move on to the next steps to initiate the transfer of coins from Coinbase to Metamask.
Setting Up Metamask on Your Browser
Step 1: Open your browser and go to the Metamask website.
Step 2: Click on the “Get Chrome Extension” button to download the Metamask extension.
Step 3: Once the extension is downloaded, click on the Metamask logo in your browser’s toolbar.
Step 4: A pop-up will appear, asking for your permission to create a new wallet. Click on the “Get Started” button.
Step 5: Set a strong password to secure your wallet. Make sure to choose a password that is unique and not easy to guess. Click on the “Create” button when you’re done.
Step 6: Metamask will then display a set of 12 random words. These words are your secret backup phrase, which you can use to restore your wallet in case you forget your password or lose access to your device. Write down these words and keep them in a safe place.
Step 7: Confirm your backup phrase by selecting the words in the correct order. This step verifies that you have written down the backup phrase correctly. Click on the “Confirm” button when you’re done.
Step 8: Metamask will ask you to agree to its terms of service. Read through the terms and click on the checkbox to indicate that you agree. Then, click on the “Accept” button.
Step 9: Congratulations! You have successfully set up Metamask on your browser. You can now use it to manage your Ethereum-based tokens and interact with decentralized applications.
Disclaimer: It is essential to keep your password and backup phrase secure. Sharing them with anyone else may lead to the loss of your funds.
Step 2: Generating a Wallet Address on Metamask
Once you have installed and set up the Metamask extension on your browser, follow these steps to generate a wallet address:
Step 2.1: Launching Metamask
Open your browser and click on the Metamask extension icon located in the top-right corner of your browser toolbar. A small window will appear.
Step 2.2: Creating a New Wallet
In the Metamask window, click on the “Get Started” button and then select the “Create a Wallet” option.
Step 2.3: Setting Up a Password
Choose a strong and secure password for your wallet and enter it in the provided field. Confirm the password and click on the “Create” button.
Step 2.4: Saving the Secret Backup Phrase
You will be presented with a secret backup phrase consisting of 12 randomly generated words. It is crucial to write down this phrase and store it in a safe place offline. Click on the “Next” button after saving the backup phrase.
Step 2.5: Confirming the Backup Phrase
To ensure you have correctly saved the secret backup phrase, you will be given a quiz where you will have to select the correct words from your backup phrase. Choose the words in the correct order and click on the “Confirm” button.
Step 2.6: Account Activation
After successfully confirming your backup phrase, your Metamask wallet will be activated. You can click on the “All Done” button to access your wallet.
Step 2.7: Copying the Wallet Address
In the main Metamask interface, click on the account avatar located in the top-right corner and select “Copy Address to Clipboard”. Your wallet address will be copied to your clipboard.
| Tip: | Make sure to double-check the wallet address copied to your clipboard before proceeding with the transaction. |
|---|
Now that you have successfully generated a wallet address on Metamask, you can proceed to the next step to transfer coins from Coinbase to Metamask.
Obtaining Your Wallet Address
In order to transfer coins from Coinbase to Metamask, you will need to obtain the wallet address of your Metamask account. Follow these steps to retrieve your wallet address:
- Open your Metamask extension in your browser.
- Click on the account icon located at the top right corner of the extension.
- Select the account for which you would like to obtain the wallet address.
- Once the account is selected, click on the “More Options” button (represented by three dots).
- From the dropdown menu, choose “Copy Address to Clipboard” to copy the wallet address.
Now that you have your Metamask wallet address copied, you can proceed with the transfer process by pasting it as the recipient address in the Coinbase withdrawal section. Make sure to double-check that the wallet address is correct to avoid any errors or loss of funds.
Step 3: Withdrawing Coins from Coinbase
Now that you have set up your Metamask wallet and connected it to your Coinbase account, you are ready to withdraw your coins from Coinbase. Here are the steps you need to follow:
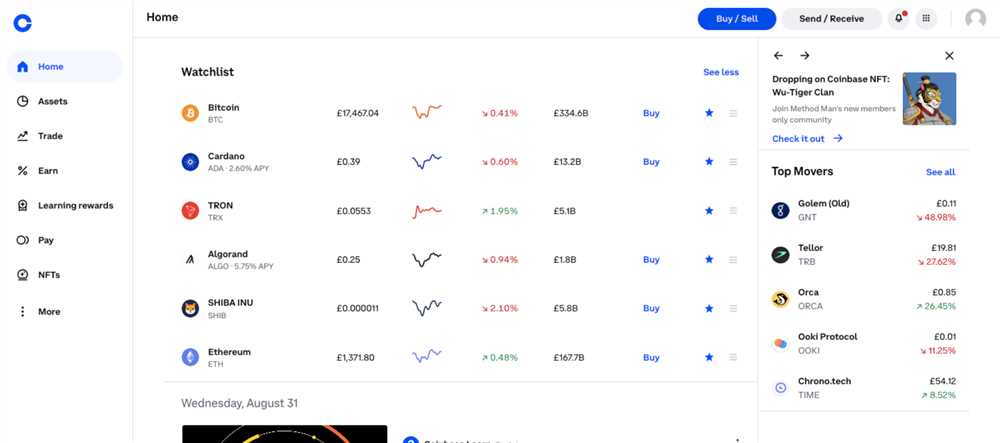
- Log in to your Coinbase account.
- Click on the “Accounts” tab and select the cryptocurrency that you want to withdraw.
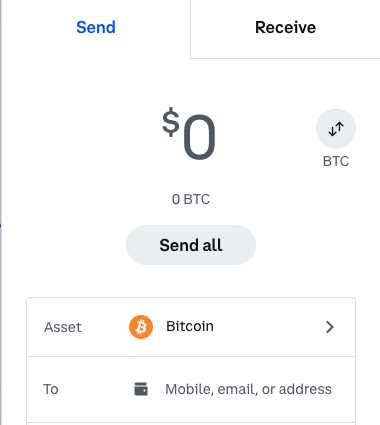
- Click on the “Send” button for the chosen cryptocurrency.
- In the recipient field, enter your Metamask wallet address. Make sure to double-check the address to avoid any mistakes.
- Specify the amount of coins you want to withdraw. If you want to withdraw all your coins, choose the “Max” option.
- Review the transaction details and double-check the recipient address and the amount.
- Click on the “Send” button to initiate the withdrawal process.
- Once the transaction is confirmed, you will see the coins in your Metamask wallet.
It is important to note that the withdrawal process may take some time depending on the network congestion and the cryptocurrency you are withdrawing. Make sure to keep an eye on the transaction status on both Coinbase and Metamask to ensure the transfer is successfully completed.
Transferring Coins from Coinbase to Metamask
If you’re interested in decentralization and want to take control of your cryptocurrencies, you might be considering using a tool like Metamask. Metamask is an Ethereum wallet that allows you to interact with decentralized applications (dApps) directly from your browser.
To get started, you’ll need to transfer your coins from Coinbase to Metamask. Follow the step-by-step guide below:
Step 1: Install the Metamask Extension
Open your browser and visit the official Metamask website. Download and install the Metamask extension for your browser. Once installed, set up a new wallet by following the instructions provided.
Step 2: Get Your Metamask Wallet Address
Once you have set up your Metamask wallet, click on the extension icon in your browser’s toolbar. In the Metamask popup, click on the account icon and select “Copy Address to Clipboard”. This will copy your wallet address, which you will need for the next step.
Step 3: Transfer Coins from Coinbase to Metamask
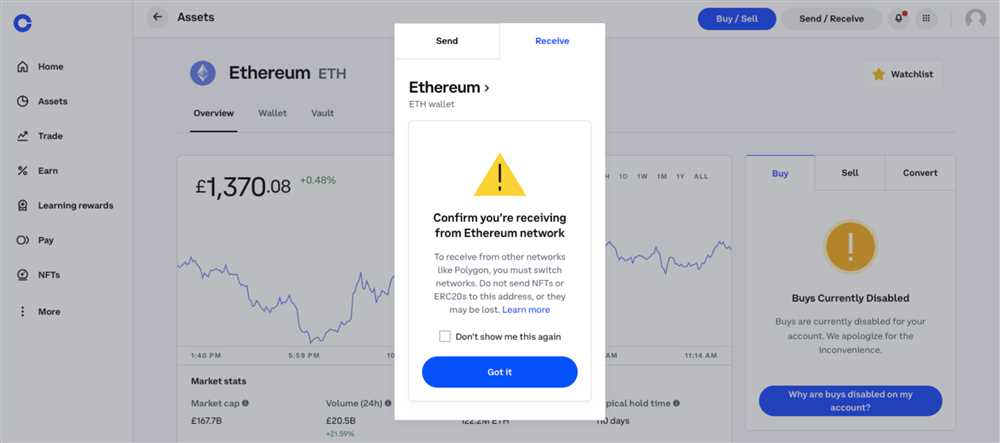
Log in to your Coinbase account and navigate to the “Send/Receive” section. Choose the cryptocurrency you want to transfer, such as Ethereum (ETH). Enter your Metamask wallet address in the recipient field. Double-check the address to ensure accuracy.
Important: Make sure you are using your Ethereum wallet address from Metamask and not the address of any other blockchain. Sending coins to the wrong address may result in permanent loss.
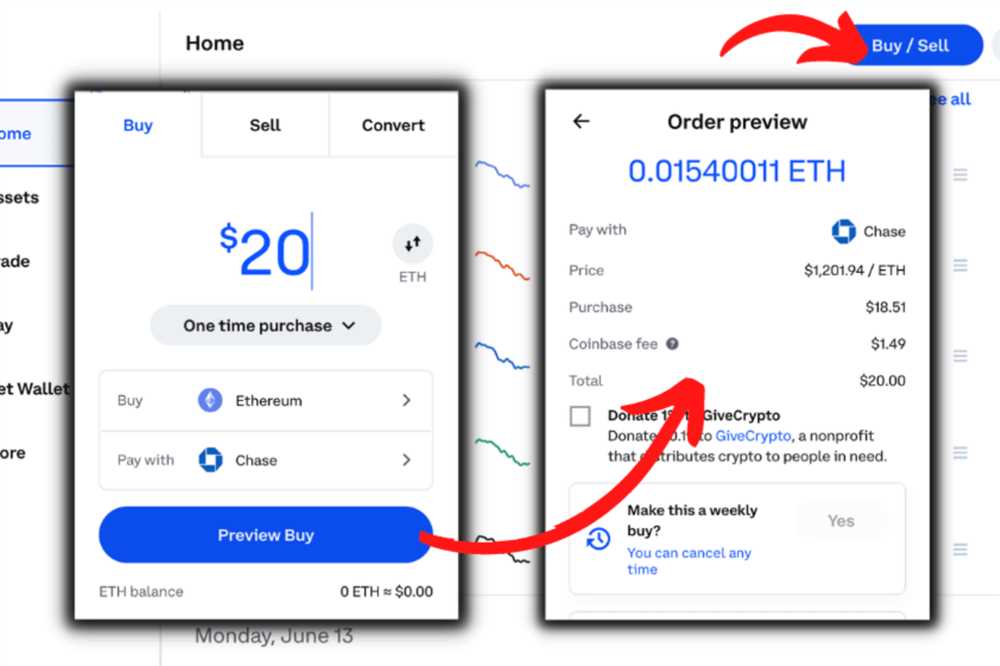
Specify the amount you wish to transfer and confirm the transaction. Coinbase may charge a small fee for the transaction. Once the transfer is complete, the coins will be sent to your Metamask wallet.
Step 4: Confirm Receipt in Metamask
Open the Metamask extension in your browser and navigate to the “Assets” tab. Here, you should see the transferred coins in your wallet balance. Confirm that the amount matches the transfer from Coinbase to ensure everything went smoothly.
Congratulations! You have successfully transferred your coins from Coinbase to Metamask. You can now use your Metamask wallet to interact with dApps, take part in decentralized finance (DeFi), and securely store your cryptocurrencies.
Note: The specific steps may vary slightly depending on updates to the platforms involved. Always ensure you are using the latest versions of Coinbase and Metamask for the most accurate instructions.
What is Coinbase?
Coinbase is a popular cryptocurrency exchange platform that allows users to buy, sell, and hold various cryptocurrencies.
What is Metamask?
Metamask is a cryptocurrency wallet and browser extension that allows users to store, manage, and interact with their cryptocurrencies and decentralized applications (DApps) on the Ethereum blockchain.
Why would someone want to transfer coins from Coinbase to Metamask?
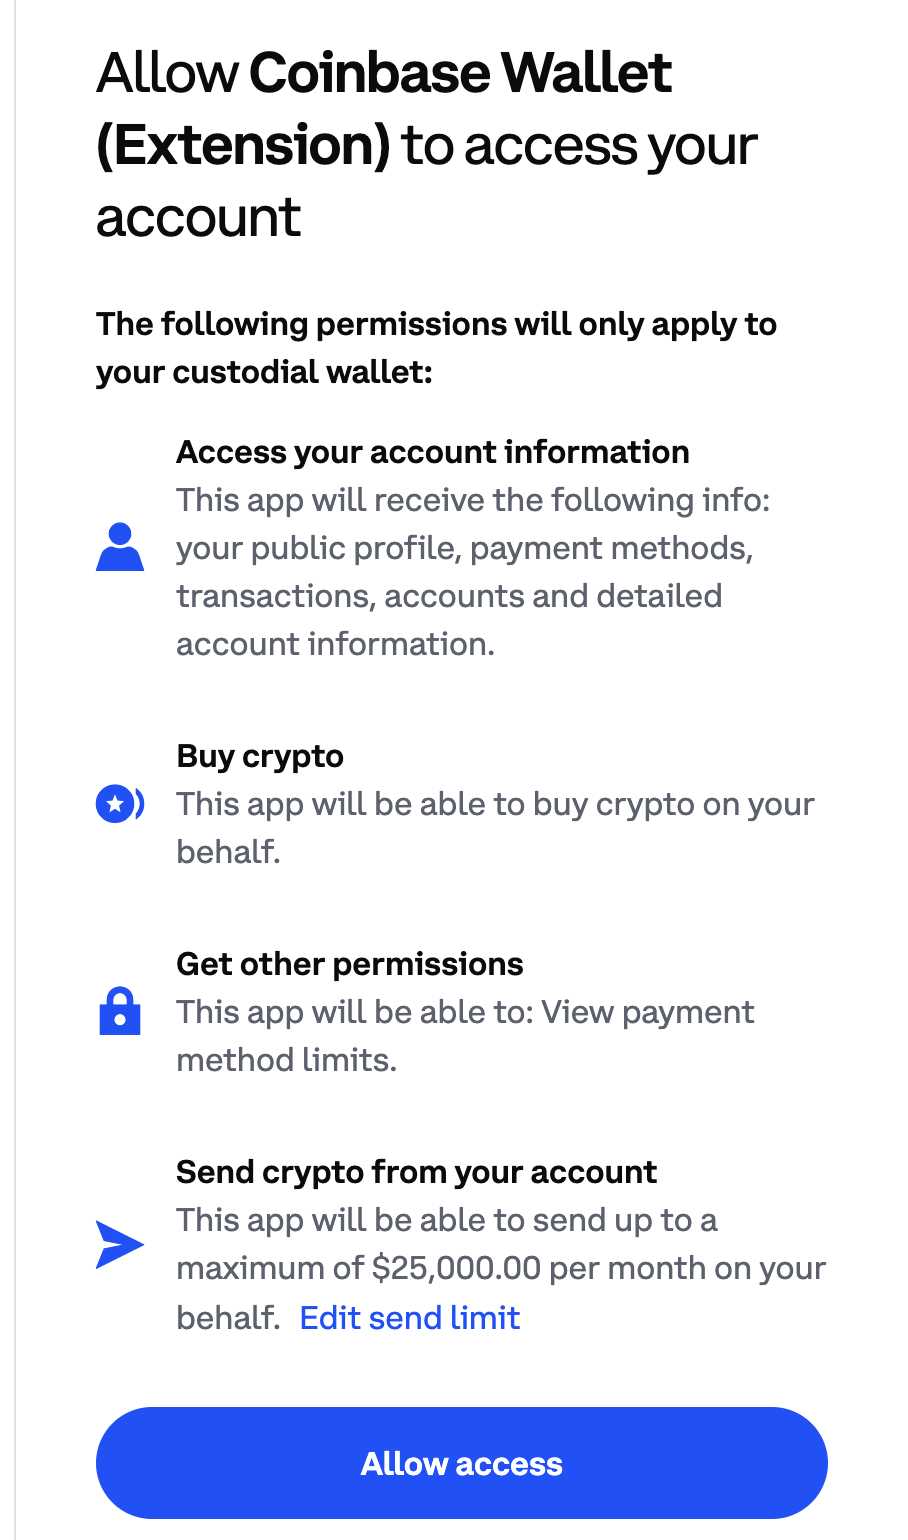
There are several reasons why someone might want to transfer coins from Coinbase to Metamask. One reason is that Coinbase is a centralized exchange, meaning they control the private keys to your cryptocurrencies. By transferring your coins to Metamask, you gain full control over your private keys and therefore have greater security and ownership over your assets. Additionally, Metamask allows users to interact with decentralized applications (DApps) on the Ethereum blockchain, so transferring coins to Metamask allows users to access and use these DApps.