
Are you looking to use USDT (Tether) with MetaMask but unsure where to start? Look no further! In this easy-to-follow guide, we’ll walk you through the simple process of using USDT with MetaMask in just five steps.
Step 1: Install and Set up MetaMask – If you haven’t already, download and install the MetaMask extension for your browser. Once installed, create a new wallet or import an existing one. Set up a strong password and keep your recovery phrase somewhere safe.
Step 2: Add USDT Token to MetaMask – After setting up MetaMask, log in to your wallet. In your wallet overview, click on the “Tokens” tab. Then, click on “Add Token” and enter the contract address of USDT: 0xdac17f958d2ee523a2206206994597c13d831ec7. MetaMask will automatically fill in the token symbol and decimals of precision.
Step 3: Transfer USDT to your MetaMask Wallet – To use USDT with MetaMask, you’ll need to transfer some USDT from your existing wallet or exchange. Obtain your MetaMask wallet address by clicking on the account icon. Once you have the address, initiate a transfer of USDT from your other wallet or exchange to your MetaMask wallet.
Step 4: Confirm Transaction – After initiating the transfer, you’ll need to confirm the transaction. Open your MetaMask extension and navigate to the “Activity” tab. You should see your pending transaction. Verify the details and click on “Confirm” to proceed. This might require paying a small gas fee, so keep some ETH in your wallet to cover the fee.
Step 5: Start Using USDT with MetaMask – Congratulations! You can now start using USDT with MetaMask. Whether you want to send USDT to others, utilize it for online purchases, or interact with decentralized finance (DeFi) protocols, MetaMask provides a seamless and secure way to manage your USDT funds.
By following these five simple steps, you can easily use USDT with MetaMask and enjoy the benefits of this popular stablecoin. Happy transacting!
Step 1: Install MetaMask Extension
MetaMask is a popular browser extension that allows you to interact with decentralized applications (dApps) on the Ethereum blockchain. To get started with using USDT with MetaMask, you first need to install the MetaMask extension on your browser. Follow the steps below to install MetaMask:
- Open your preferred web browser (Chrome, Firefox, Brave, etc.)
- Go to the MetaMask website: https://metamask.io/
- Click on the “Get Chrome Extension” or “Download” button, depending on your browser
- You will be redirected to the extension page of your browser’s web store
- Click on the “Add to Chrome” button (or equivalent) to start the installation process
- A confirmation prompt will appear, click on “Add Extension” to confirm
- The MetaMask extension will start downloading and installing
- Once the installation is complete, the MetaMask icon will appear in your browser’s toolbar
- Click on the MetaMask icon to launch the extension
- Follow the on-screen instructions to create a new MetaMask wallet or import an existing one
Congratulations! You have successfully installed MetaMask on your browser. In the next step, we will guide you on how to set up your MetaMask wallet to use USDT.
Step 2: Create a MetaMask Wallet
In order to use USDT with MetaMask, you’ll need to have a MetaMask wallet. If you already have one, you can skip this step and proceed to the next one. If you don’t have a MetaMask wallet, follow the instructions below to create one:
1. Install the MetaMask extension
The first step is to install the MetaMask extension in your web browser. You can find it in the Chrome Web Store or the Firefox Add-ons marketplace. Simply search for “MetaMask” and click on the “Add to Chrome” or “Add to Firefox” button to install it.
2. Launch MetaMask
Once the extension is installed, you should see the MetaMask icon at the top-right corner of your browser. Click on the icon to launch MetaMask.
3. Accept the terms of use
When you launch MetaMask for the first time, you’ll be presented with the terms of use. Read them carefully and click on the “Accept” button to proceed.
4. Create a new wallet
After accepting the terms of use, you’ll be prompted to create a new wallet. Click on the “Create a Wallet” button to start the process.
5. Set up a password
Next, you’ll need to set up a password for your MetaMask wallet. Make sure to choose a strong password that is unique and not used for any other account. Enter the password in the designated field and click on the “Create” button.
6. Backup your seed phrase
Once your wallet is created, you’ll be shown a seed phrase consisting of 12 random words. This seed phrase is very important, as it can be used to restore your wallet if you ever forget your password or lose access to your device. Write down the seed phrase and keep it in a safe place. Do not share it with anyone.
7. Confirm your seed phrase
As an additional security measure, MetaMask will ask you to confirm your seed phrase by selecting the words in the correct order. Click on the words in the correct order to complete the confirmation process.
Congratulations! You have successfully created a MetaMask wallet. In the next step, we’ll show you how to connect your MetaMask wallet to the Binance Smart Chain and add USDT to it.
Step 3: Connect MetaMask to Binance
Once you have set up your MetaMask wallet, the next step is to connect it to Binance, a popular cryptocurrency exchange. This will allow you to easily transfer USDT from Binance to your MetaMask wallet.
Here’s how you can connect MetaMask to Binance:
- Open the Binance website and log in to your account.
- Go to the “Wallet” section and click on “Overview”.
- Search for “USDT” in the list of tokens and click on “Withdraw”.
- A pop-up window will appear, asking for the withdrawal address. Copy the MetaMask wallet address from the MetaMask extension and paste it into the withdrawal address field.
- Enter the amount of USDT you want to transfer and click on “Submit”.
- You will receive a confirmation email from Binance. Follow the instructions in the email to complete the withdrawal process.
Once the transfer is completed, you will be able to see the USDT balance in your MetaMask wallet. You can now use this USDT to make transactions or interact with decentralized applications.
Step 4: Add USDT to MetaMask
Now that you have MetaMask set up and connected to your wallet, the next step is to add USDT (Tether) to your MetaMask wallet. Follow the steps below:
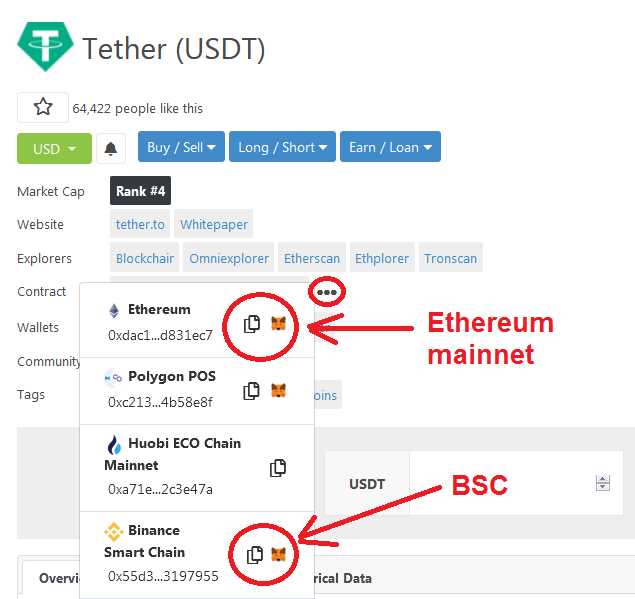
1. Find the USDT contract address:
Go to a reliable cryptocurrency information website or a blockchain explorer and find the contract address for USDT (Tether) on the Ethereum network. Make sure the address is for the Ethereum network and not any other network like Binance Smart Chain or Tron.
2. Go to the MetaMask wallet:
Click on the MetaMask extension in your browser toolbar and open your wallet.
3. Click on “Assets”:
In the MetaMask wallet, click on the “Assets” tab located at the top of the interface to access the asset management section.
4. Click on “Add Token”:
In the asset management section, click on the “Add Token” button to initiate the process of adding a custom token to your wallet.
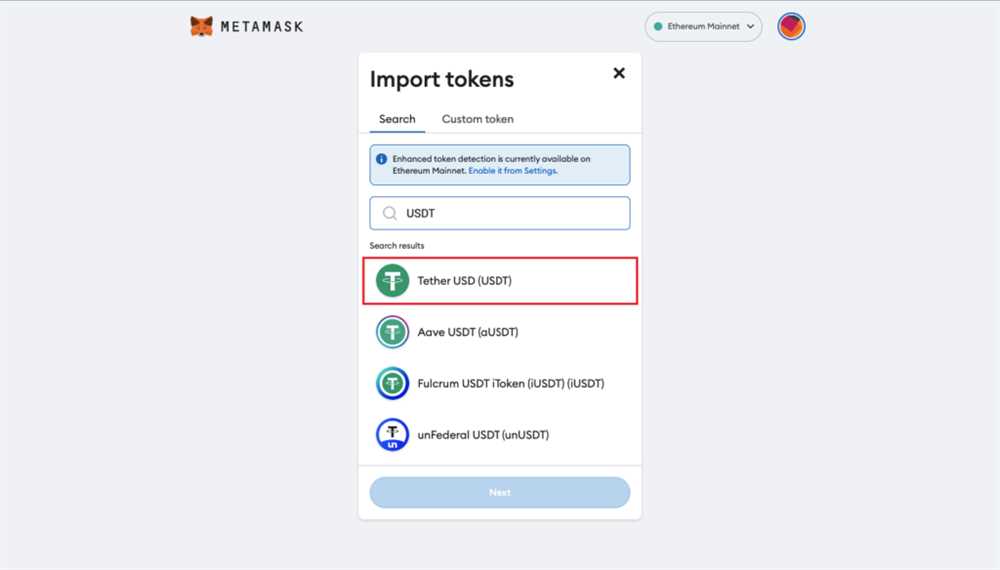
5. Select “Custom Token” tab:
A pop-up window will appear with two tabs – “Search” and “Custom Token”. Select the “Custom Token” tab to proceed.
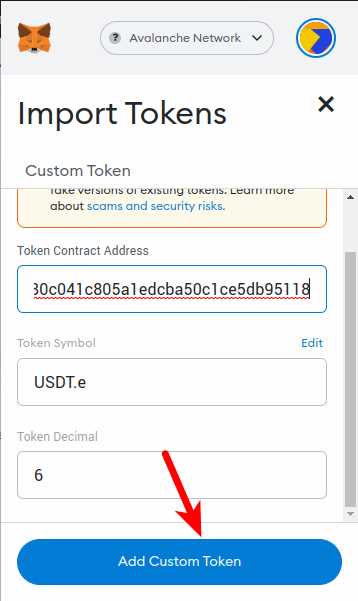
6. Paste the USDT contract address:
In the “Custom Token” tab, paste the USDT (Tether) contract address that you found in step 1 into the “Token Contract Address” field.
7. Click on “Next”:
After pasting the contract address, click on the “Next” button to proceed to the next step.
8. Review token details:
The MetaMask wallet will automatically fetch the token details based on the contract address you provided. Review the token details such as the token symbol (USDT), token name (Tether), and decimals of precision. Verify that the details match the USDT token you want to add.
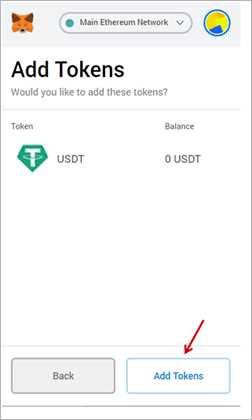
9. Click on “Add Tokens”:
If everything looks correct, click on the “Add Tokens” button to add USDT (Tether) to your MetaMask wallet.
10. USDT is added to MetaMask:
Congratulations! You have successfully added USDT (Tether) to your MetaMask wallet. You should now see the USDT balance in your wallet, and you can use it for transactions and DeFi activities on the Ethereum network.
Step 5: Use USDT with MetaMask
Now that you have USDT in your MetaMask wallet, you can start using it for various purposes. Here are a few things you can do with your USDT:
- Send USDT: You can easily send USDT to other Ethereum addresses using your MetaMask wallet. Simply enter the recipient’s address, specify the amount of USDT you want to send, and confirm the transaction.
- Receive USDT: You can also receive USDT from others by sharing your MetaMask wallet address. Once someone sends USDT to your address, it will appear in your wallet balance.
- Trade USDT for other cryptocurrencies: With USDT in your MetaMask wallet, you can access decentralized exchanges and trade it for other cryptocurrencies. This allows you to diversify your digital asset portfolio.
- Use USDT for payments: Many online merchants and service providers accept USDT as a form of payment. You can use your MetaMask wallet to pay for goods and services by simply selecting USDT as the payment method.
- Hold USDT as a stablecoin: If you’re looking for a stable asset to store your value, USDT can be a great choice. Its value is pegged to the US dollar, making it less volatile compared to other cryptocurrencies.
Remember to always double-check the transaction details before sending or receiving USDT. Also, keep your MetaMask wallet secure by using strong passwords and enabling additional security features like two-factor authentication.
By following these simple steps, you can easily start using USDT with your MetaMask wallet and take advantage of its benefits in the Ethereum ecosystem.
What is USDT?
USDT stands for Tether, a cryptocurrency token that is pegged to the value of the US dollar. It is designed to provide stability and act as a medium of exchange.
Why would I want to use USDT with MetaMask?
Using USDT with MetaMask allows you to easily interact with decentralized finance (DeFi) applications and make transactions using USDT as a form of payment. It provides a seamless integration between your MetaMask wallet and the USDT token.
Can I buy USDT directly with MetaMask?
No, MetaMask does not have a built-in feature to directly purchase USDT. However, you can buy USDT from a cryptocurrency exchange and then transfer it to your MetaMask wallet.
Are there any fees associated with using USDT with MetaMask?
Yes, when you transfer USDT from one address to another using MetaMask, you will need to pay a transaction fee. The fee amount depends on the network congestion and gas prices at the time of the transaction.