
If you’re an Ethereum user, chances are you’re already familiar with Metamask. It’s a popular browser extension that allows you to interact with decentralized applications (dApps) on the Ethereum network. But what if you want to access dApps on other networks, such as AVAX? In this step-by-step guide, we’ll walk you through the process of adding the AVAX network to your Metamask wallet.
Step 1: Install Metamask
The first step is to install the Metamask browser extension if you haven’t already. You can find it in the Chrome Web Store or the Firefox Add-ons Marketplace. Once installed, you’ll see the Metamask logo in the top right corner of your browser.
Step 2: Create or Import a Wallet
If you already have a Metamask wallet, you can skip this step. Otherwise, click on the Metamask logo and choose “Create a Wallet” or “Import Wallet” if you have an existing one. Follow the instructions to set up your wallet and secure it with a strong password.
Step 3: Connect to the Avalanche Network
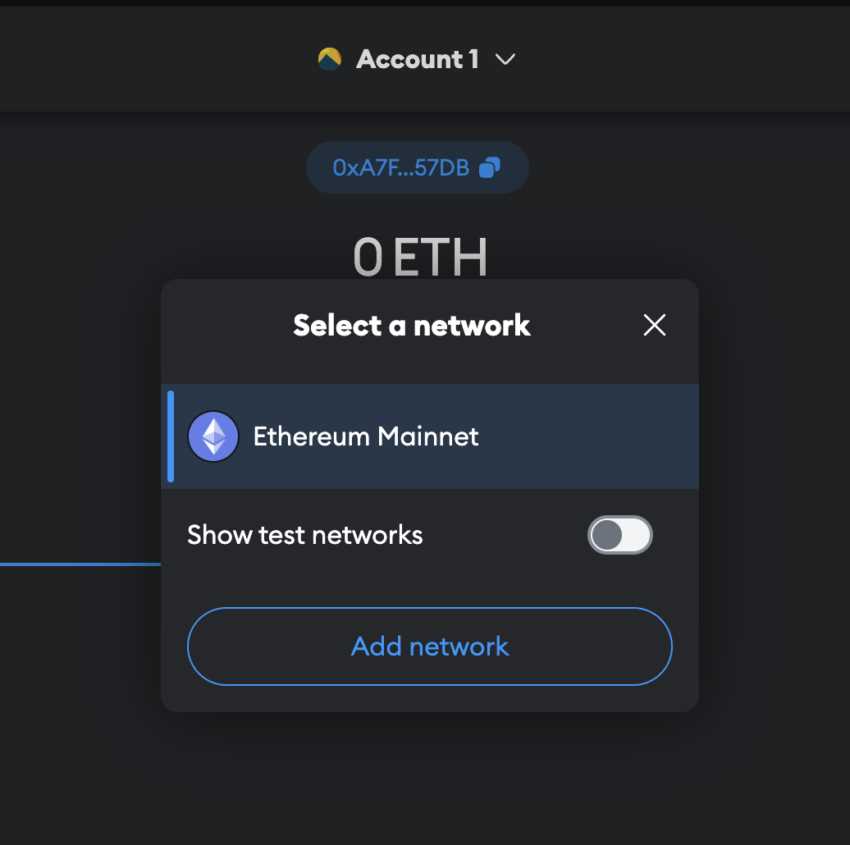
Once your wallet is set up, click on the Metamask logo to open the extension. In the top left corner, you’ll see the network name (e.g., “Ethereum Mainnet” by default). Click on it and select “Custom RPC” from the dropdown menu.
Step 4: Add AVAX Network Details
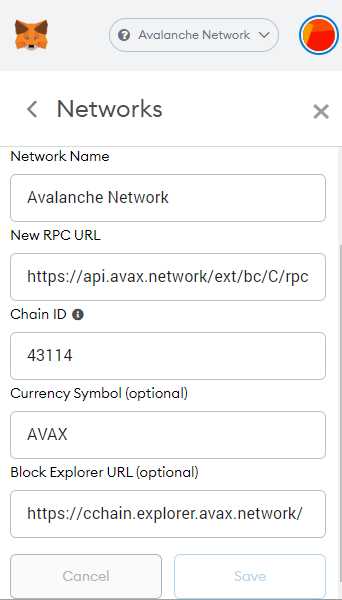
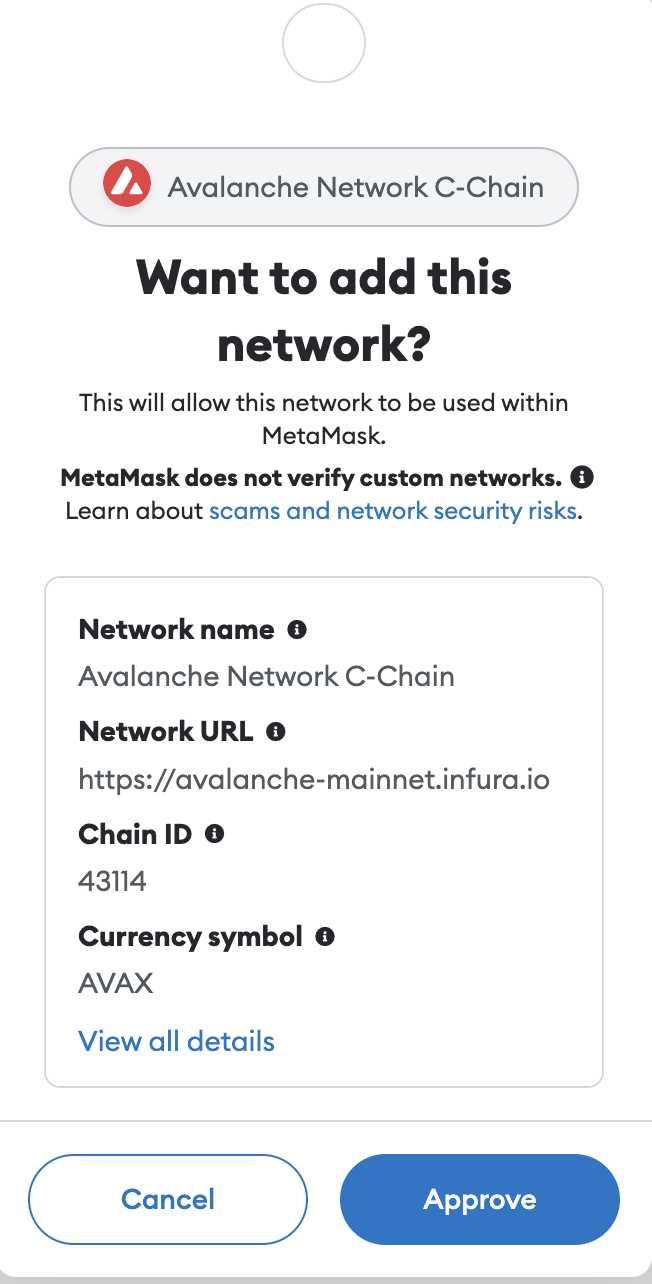
In the “New Network” section, fill in the following details:
Network Name: AVAX
RPC URL: https://api.avax.network/ext/bc/C/rpc
Chain ID: 43114
Symbol: AVAX
Explorer URL: https://cchain.explorer.avax.network/
Double-check that the information is correct, then click “Save” to add the AVAX network to your Metamask wallet.
Step 5: Switch to the AVAX Network
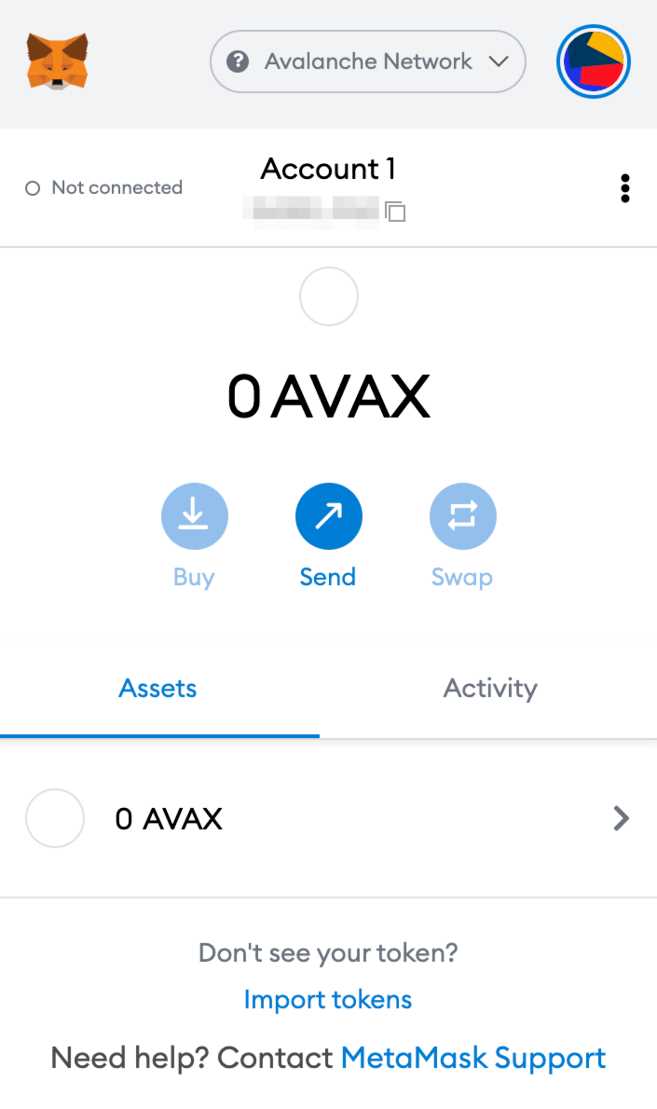
You should now see the AVAX network listed in the network dropdown menu. Select it to switch to the AVAX network. Your Metamask wallet is now connected to the AVAX network, and you can start using dApps and interacting with the AVAX ecosystem.
Congratulations! You’ve successfully added the AVAX network to your Metamask wallet. Remember to be cautious when interacting with dApps and to safeguard your private keys and wallet information. Enjoy exploring the AVAX network!
How to Add AVAX Network
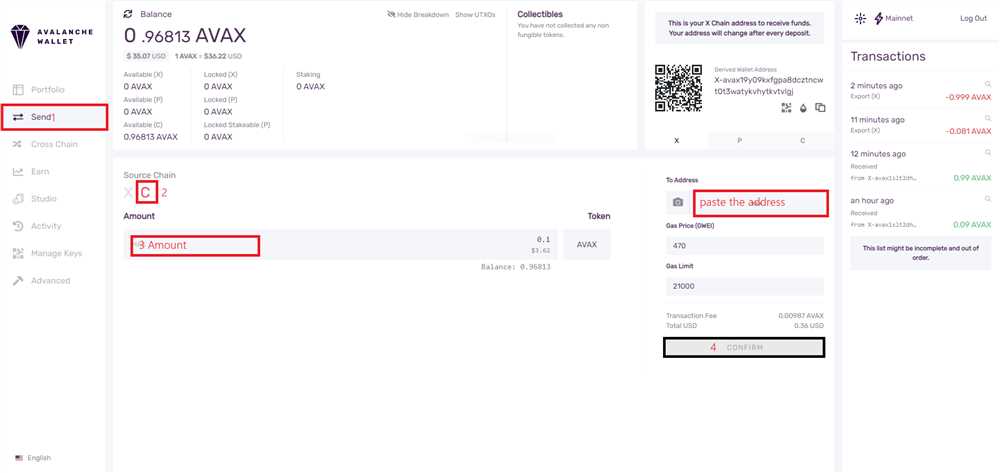
Adding the AVAX network to your Metamask wallet allows you to interact with the Avalanche blockchain and access AVAX tokens. Follow these steps to add AVAX network to your Metamask:
-
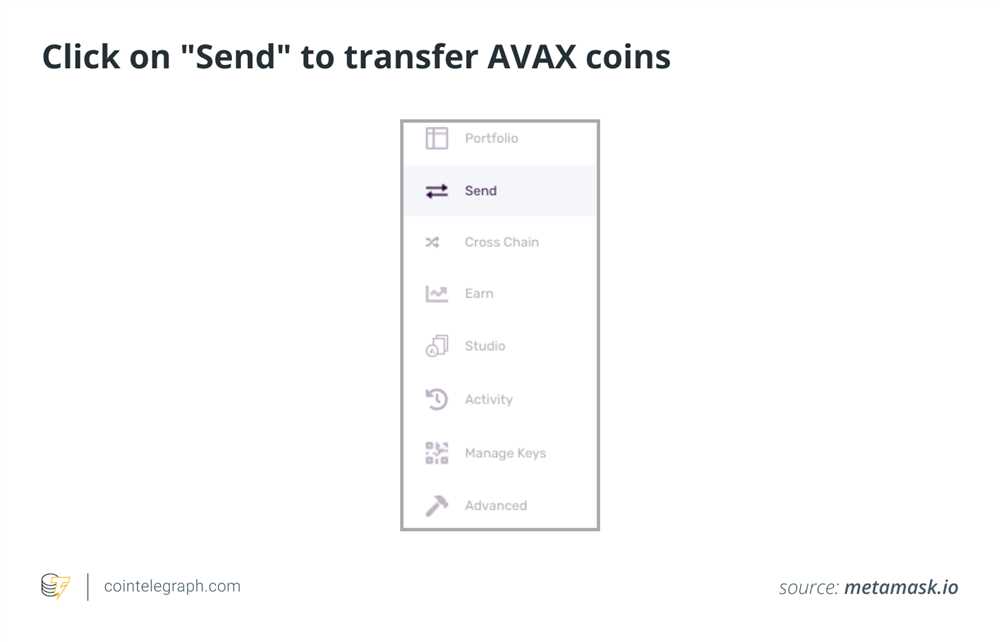
Open your Metamask wallet extension in your browser.
-
Click on the network dropdown menu located at the top of the wallet interface.
-
Scroll down to the bottom of the network list and click on “Custom RPC”.
-
In the “New Network” form, enter the following details:
- Network Name: AVAX
- New RPC URL: https://api.avax.network/ext/bc/C/rpc
- Chain ID: 43114
- Symbol: AVAX
- Block Explorer URL: https://cchain.explorer.avax.network/
-
Click on “Save” to add the AVAX network to your Metamask wallet.
After adding the AVAX network, you should now see AVAX as an option in the network dropdown menu of your Metamask wallet. You can interact with the AVAX blockchain and perform transactions with AVAX tokens using your Metamask wallet on the AVAX network.
Step 1: Install and Open Metamask
To add the AVAX Network to your Metamask wallet, you will first need to install and open the Metamask extension in your web browser.
Installation
The first step is to install the Metamask extension. You can do this by visiting the official Metamask website or by searching for “Metamask” in your browser’s extension store.
Once you find the Metamask extension, click on the “Install” button and wait for the installation process to complete.
Opening Metamask
After the installation is complete, you can open Metamask by clicking on the Metamask icon in your browser’s toolbar. It usually looks like a fox or a puzzle piece.
If you can’t find the Metamask icon in your toolbar, you can also access it by clicking on the browser extension menu and selecting Metamask from the list of installed extensions.
When you open Metamask for the first time, you will be prompted to create a new wallet or import an existing one. Follow the instructions on the screen to set up your wallet.
Note: Make sure to securely store and backup your wallet’s seed phrase. It is your responsibility to keep your wallet and funds safe.
Once you have set up your wallet, you will be able to see your account balance and access various features of Metamask, such as sending and receiving tokens.
In the next steps, we will learn how to add the AVAX Network to your Metamask wallet.
Step 2: Access Network Settings
After adding the custom network to your MetaMask wallet, the next step is to access the network settings.
To access the network settings, click on the MetaMask extension icon located at the top right corner of your browser. This will open the MetaMask dropdown menu.
From the dropdown menu, click on the “Settings” option. This will take you to the settings panel of your MetaMask wallet.
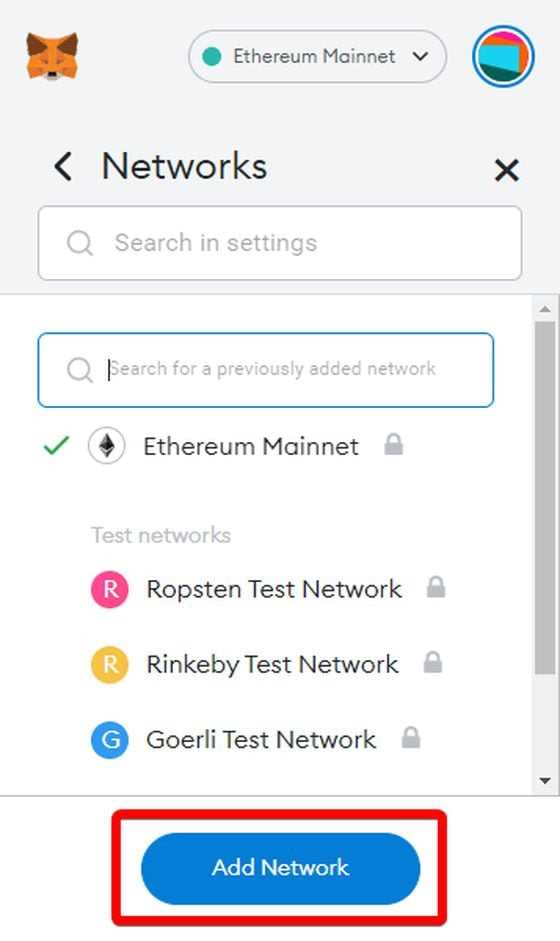
Networks tab
Within the settings panel, locate and click on the “Networks” tab. This tab allows you to manage the different networks connected to your MetaMask wallet.
Under the Networks tab, you will see a list of networks already added to your wallet. Scroll down to the bottom of the list, where you will find an option to add a new network.
Add Network
To add the AVAX network, click on the “Add Network” button. This will open a popup window where you can enter the details of the AVAX network.
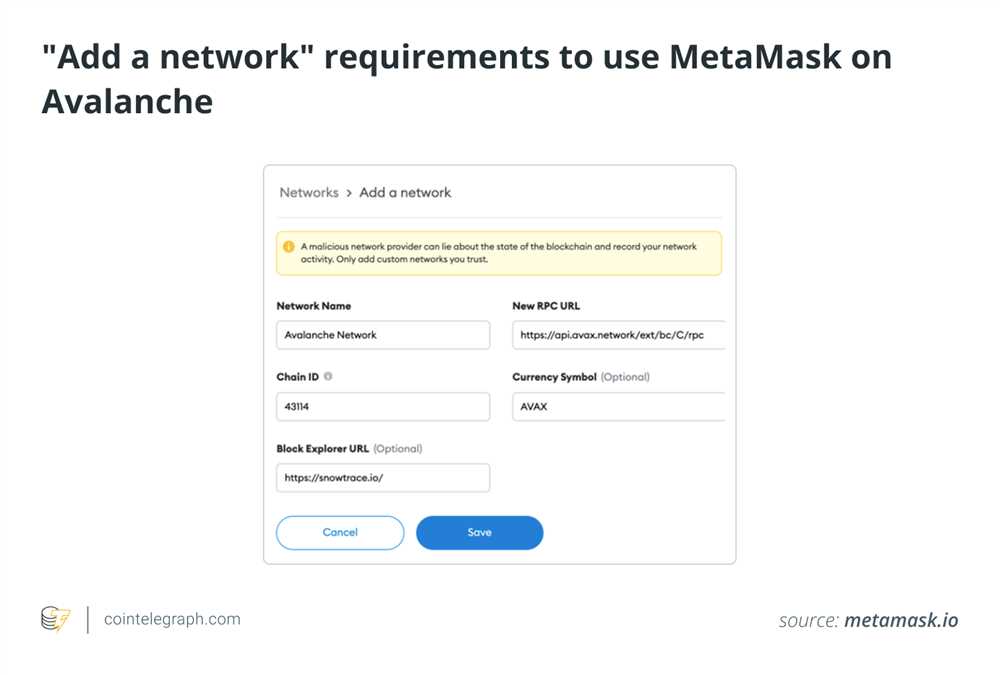
Enter the following information in the respective fields:
- Network Name: AVAX
- New RPC URL: Copy and paste the RPC URL provided by the AVAX network.
- Chain ID: Copy and paste the Chain ID provided by the AVAX network.
- Symbol (optional): AVAX
- Block Explorer URL (optional): Copy and paste the Block Explorer URL provided by the AVAX network.
After entering the required details, click on the “Save” button to add the AVAX network to your MetaMask wallet.
Your AVAX network should now appear in the list of networks within the MetaMask settings panel.
Once the AVAX network is successfully added, you can switch to this network by clicking on the network dropdown located at the top of the MetaMask extension and selecting the AVAX network.
Now you are ready to use the AVAX network with your MetaMask wallet.
Step 3: Add AVAX Network
Once you have installed the Metamask extension and created a new wallet, you need to add the AVAX network to your Metamask account in order to interact with the AVAX network and its dApps. Follow the steps below to add the AVAX network:
Step 3.1: Open Metamask
Click on the Metamask icon in your browser’s extension toolbar to open the Metamask wallet.
Step 3.2: Access Networks
In the Metamask wallet, click on the network selection dropdown located at the top of the wallet. It will display the currently selected network.
Step 3.3: Custom RPC Network
Scroll down to the bottom of the network list and click on “Custom RPC” to add a custom network.
Step 3.4: Fill in AVAX Network Details
Fill in the following details for the AVAX network:
| Network Name | New RPC URL | ChainID | Symbol |
|---|---|---|---|
| AVAX | https://avax.network | 43114 | AVAX |
Step 3.5: Save Changes
Click on the “Save” button to save the changes and add the AVAX network to your Metamask wallet.
Congratulations! You have successfully added the AVAX network to your Metamask account. You can now start exploring and interacting with the AVAX network and its dApps.
What is AVAX network?
AVAX network is the native blockchain platform of Avalanche, a decentralized network that enables users to create and launch their own custom blockchains and digital assets.
Why should I add AVAX network to Metamask?
By adding AVAX network to Metamask, you can easily access and interact with Avalanche-based decentralized applications (dApps) directly from your Metamask wallet.