
Welcome to our comprehensive tutorial on getting started with Sepolia on Metamask! In this tutorial, we will walk you through the step-by-step process of setting up Sepolia, a decentralized search engine, on your Metamask wallet. Sepolia allows users to access the decentralized web and search for information without relying on traditional search engines.
If you’re new to Metamask, don’t worry – we’ll guide you through the process of setting up an account and installing the Metamask extension in your browser. Once you have Metamask set up, we’ll show you how to add the Sepolia search engine to your list of supported networks. This will allow you to access Sepolia directly from your Metamask wallet and start searching the decentralized web!
We believe that Sepolia has the potential to revolutionize the way we access information on the internet. By using decentralized technologies like blockchain, Sepolia provides users with a censorship-resistant and privacy-focused search experience. Whether you’re a developer looking for decentralized applications (dApps) or a user seeking reliable and unfiltered information, Sepolia is the perfect tool for you.
So, let’s get started and learn how to set up Sepolia on Metamask. By the end of this tutorial, you’ll be ready to explore the decentralized web and experience the freedom and privacy it offers. Let’s dive in!
What Is Sepolia?
Sepolia is a decentralized application (DApp) running on the Ethereum blockchain. It is an innovative platform that allows users to create and manage non-fungible tokens (NFTs), which are unique digital assets that represent ownership of a specific item, artwork, or digital collectible.
With Sepolia, users can mint their own NFTs, meaning they can create their own digital assets and assign them a unique value and identity. These NFTs can then be bought, sold, or traded on various decentralized marketplaces, allowing creators to monetize their digital creations in a secure and transparent manner.
Sepolia leverages the power of smart contracts, which are self-executing contracts with predefined rules and conditions that automatically execute transactions when certain conditions are met. These smart contracts ensure that the ownership of NFTs is irrevocable and that transactions are executed in a trustless manner without the need for intermediaries.
The Sepolia platform also provides a user-friendly interface, allowing users to easily connect their digital wallets such as Metamask and interact with the DApp. Users can view their NFT collections, track their value, and participate in NFT auctions or sales.
Key Features of Sepolia:
- Mint your own NFTs with unique values and identities
- Buy, sell, or trade NFTs on decentralized marketplaces
- Secure and transparent transactions powered by smart contracts
- User-friendly interface to easily interact with the DApp
- Track the value of your NFT collections
- Participate in NFT auctions or sales
In summary, Sepolia is an exciting and innovative platform that brings the world of NFTs to the Ethereum blockchain. It provides users with the ability to create, manage, and monetize their own digital assets in a secure and transparent manner. Whether you are an artist, collector, or simply interested in the world of digital assets, Sepolia offers a powerful and user-friendly platform to explore and unleash your creativity.
Preparing Your Metamask Account for Sepolia
Before you can start using Sepolia on Metamask, you need to make sure that your Metamask account is properly set up and configured. Follow these steps to prepare your Metamask account for Sepolia:
| Step 1: | Install Metamask |
| Step 2: | Create a New Account or Import an Existing Account |
| Step 3: | Access the Metamask Settings |
| Step 4: | Connect to the Sepolia Network |
Step 1: Install Metamask
If you haven’t already done so, you will need to install the Metamask extension for your web browser. Go to the official Metamask website and follow the installation instructions for your browser.
Step 2: Create a New Account or Import an Existing Account
Once Metamask is installed, open the extension and create a new account if you don’t already have one. Make sure to securely store your account information, including the seed phrase, as this will be needed for account recovery.
If you already have a Metamask account, you can import it into your current installation by clicking on the “Import Account” button and following the prompts.
Step 3: Access the Metamask Settings
Click on the Metamask extension icon in your browser’s toolbar to open the Metamask interface. From there, click on the profile picture or account icon to access the settings.
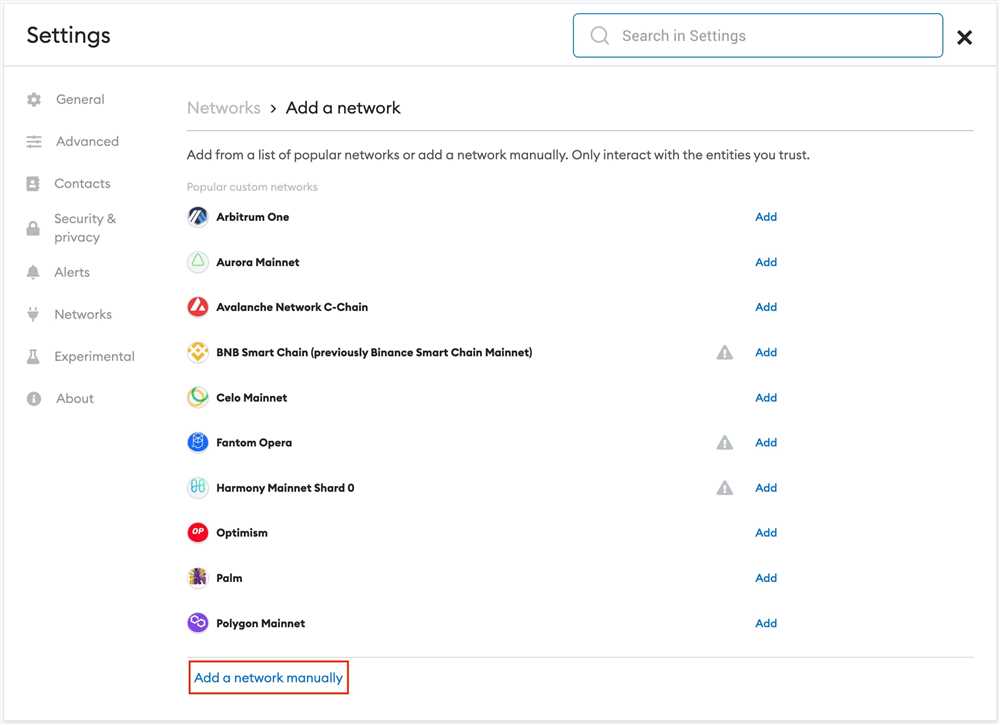
Step 4: Connect to the Sepolia Network
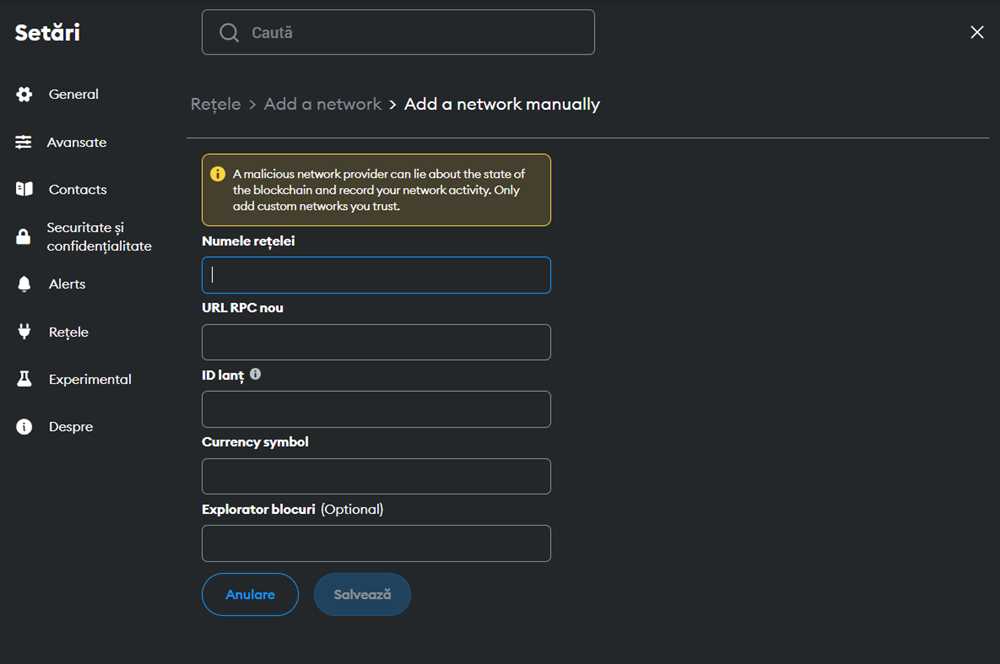
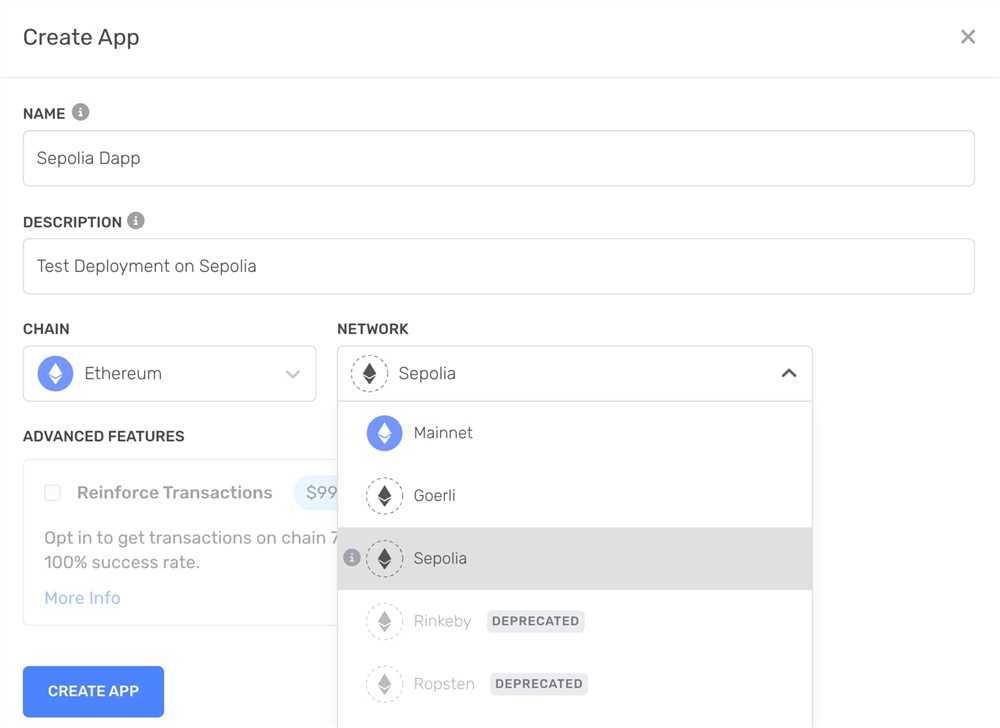
In the Metamask settings, scroll down to the Networks section and click on “Add Network”. Enter the following details:
| Network Name: | Sepolia |
| New RPC URL: | https://sepolia.network |
| Chain ID: | 2574 |
| Symbol: | SEPOL |
After entering the details, click on “Save” to add the Sepolia network to your Metamask account. You should now see the Sepolia network listed in the Networks section.
That’s it! Your Metamask account is now prepared for Sepolia. You can now use Sepolia tokens and interact with the Sepolia network via your Metamask wallet.
Setting Up and Configuring Metamask for Sepolia
Before you can start using Sepolia on Metamask, you need to set up and configure your Metamask account properly. Follow the steps below to get started:
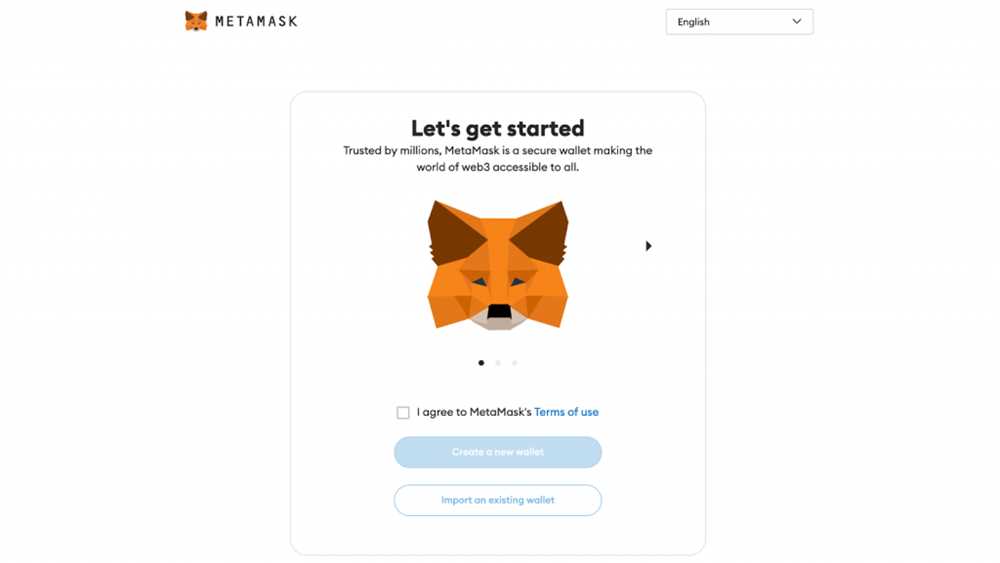
1. Install the Metamask Extension
If you haven’t already, you need to install the Metamask extension on your web browser. Go to the official Metamask website or search for the extension in your browser’s extension store. Once you find it, click on the “Add to [browser name]” button to install it.
2. Create a Metamask Account
After installing the extension, click on the Metamask icon in your browser’s toolbar. This will open the Metamask extension. If this is your first time using Metamask, click on the “Create a Wallet” button to create a new account. Follow the on-screen instructions to set up a password and write down your seed phrase.
3. Write Down your Seed Phrase
Your seed phrase is a set of words that can be used to recover your Metamask account in case you lose access to your device. Make sure to write down your seed phrase and store it in a safe place. Do not share it with anyone else to protect the security of your account.
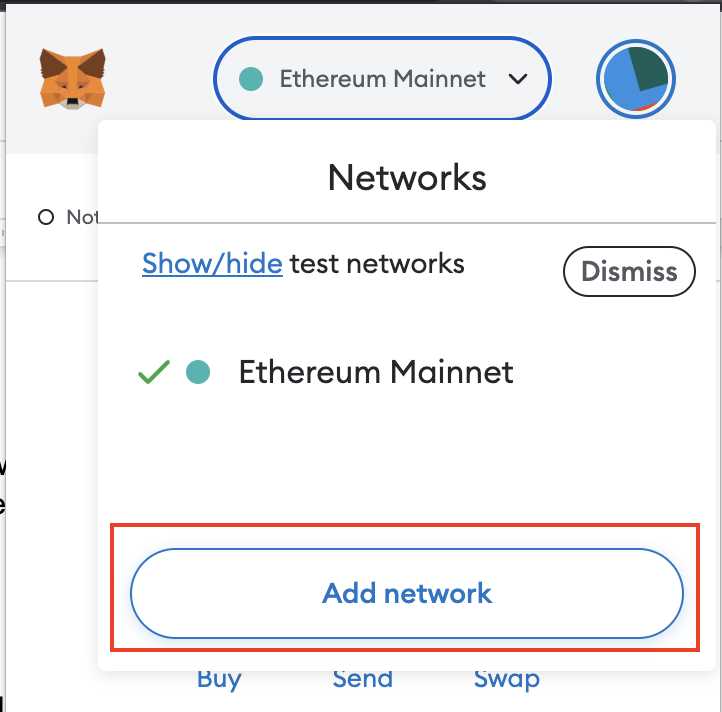
4. Switch to the Sepolia Network
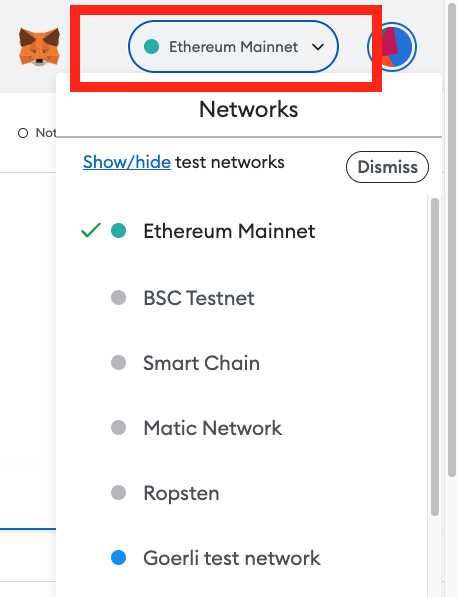
By default, Metamask is set to use the Ethereum network. To connect to the Sepolia network, click on the network dropdown on the top of the Metamask extension. Then, click on “Custom RPC” to enter the Sepolia network details:
Network Name: Sepolia
New RPC URL: https://sepolia.network
Chain ID: 1234
Once you have entered the details, click on “Save” to switch to the Sepolia network. Now you are ready to start using Sepolia with Metamask!
Note: Make sure you are connected to the correct network before transacting, as using the wrong network can result in lost funds.
Purchasing and Installing Sepolia on Metamask
In order to start purchasing and installing Sepolia on Metamask, you will need to follow a few steps. Here is a comprehensive guide to help you through the process:
Step 1: Install and Set Up Metamask
If you haven’t already, you will need to install the Metamask browser extension. You can find it in the Chrome Web Store or any other supported browser’s extension store. Once installed, follow the instructions to create a new wallet or import an existing one.
Step 2: Add Ethereum to Your Wallet
In order to purchase Sepolia, you will need to have some Ethereum (ETH) in your Metamask wallet. If you don’t have any, you can purchase ETH from a supported exchange using your local currency. Once you have ETH in your wallet, you are ready to proceed to the next step.
Step 3: Find Sepolia on the Metamask Dapp Browser
Open the Metamask Dapp Browser and navigate to the Sepolia marketplace. You can do this by either typing the URL directly or searching for Sepolia in the Dapp Browser search bar. Once you are on the Sepolia marketplace, you should see the various Sepolia items available for purchase.
Step 4: Choose and Purchase Sepolia
Browse through the available Sepolia items and select the one you want to purchase. Click on the item to view more details and make sure it fits your criteria. Once you have decided, click on the “Buy” button or any similar button that indicates the purchase process.
Step 5: Confirm the Transaction
A Metamask pop-up will appear, showing you the details of the transaction, including the amount of ETH being used for the purchase. Review the details carefully and then click “Confirm” to proceed with the transaction. Wait for the transaction to be processed and confirmed on the Ethereum network.
Step 6: Install Sepolia on Metamask
Once the transaction is confirmed, you will need to install Sepolia as an asset in your Metamask wallet. This will allow you to view and interact with your purchased Sepolia items. Follow the instructions provided by the Sepolia marketplace to install and import your Sepolia asset into Metamask.
That’s it! You have successfully purchased and installed Sepolia on Metamask. You can now enjoy your Sepolia items and explore the various features and functionalities offered by the marketplace.
Step-by-Step Guide to Buying and Installing Sepolia
Sepolia is a revolutionary decentralized application built on the Ethereum blockchain. To get started with Sepolia, you’ll need to buy and install the Sepolia token (SPN) on your Metamask wallet. Follow these step-by-step instructions to complete the process:
|
Exploring the Sepolia Interface
Once you have set up Sepolia on your Metamask, you can start exploring its user interface. Here are the key features and functionalities you should be aware of:
- Wallet Balance: The wallet balance is displayed on the top right corner of the Sepolia interface. This shows the amount of cryptocurrency tokens you currently hold in your wallet.
- Token Overview: Below the wallet balance, you will find a visual representation of your token holdings. This section provides an overview of the different tokens you own along with their respective values.
- Transaction History: Sepolia displays your transaction history in a list format. This helps you keep track of all the transactions you have made using your wallet.
- Send Tokens: To send tokens to another wallet address, you can use the “Send Tokens” feature. Simply enter the recipient’s wallet address, specify the amount of tokens you want to send, and click on the “Send” button.
- Receive Tokens: If you want to receive tokens from another wallet, you can use the “Receive Tokens” feature. Sepolia will generate a unique wallet address for you, which you can share with the sender to receive the tokens.
- Add Tokens: Sepolia allows you to add custom tokens to your wallet. This feature is useful if you want to hold tokens that are not listed by default. Simply enter the token address and the token symbol, and Sepolia will add it to your wallet.
- Token Swap: With the token swap feature, you can exchange one token for another directly within Sepolia. This provides a seamless way to convert between different tokens without leaving the interface.
- Settings: The settings section allows you to customize various aspects of your Sepolia experience. You can change the display currency, manage network settings, and more.
- Help and Support: If you need any assistance or have any questions, Sepolia provides help and support resources. You can access the knowledge base, contact customer support, or join the community forums for further assistance.
By familiarizing yourself with these features, you will be able to navigate and utilize the Sepolia interface effectively and make the most out of your cryptocurrency wallet experience.
Understanding the Different Sections and Functions of Sepolia
Sepolia is a decentralized marketplace built on the Ethereum blockchain that aims to revolutionize online shopping. In order to navigate and make the most out of Sepolia, it is important to understand the different sections and functions that it offers.
1. Home

The Home section is the landing page of Sepolia. It gives you an overview of the latest products, featured sellers, and trending categories. This section allows users to easily discover new products and explore various categories.
2. Products
The Products section is where you can find a wide range of products listed by different sellers on the Sepolia marketplace. You can filter the products based on categories, price range, and other parameters to find exactly what you are looking for. Each product listing includes details such as name, description, price, and seller information.
3. Sellers
The Sellers section showcases all the sellers on Sepolia. Here, you can browse through different sellers and access their profiles. Each seller profile includes information about the seller, their reputation, ratings, and the products they offer. You can also contact the seller directly from their profile.
4. My Orders
The My Orders section is where you can view and manage your past orders on Sepolia. Here, you can track the status of your orders, view order details, and leave reviews for the products you have purchased.
5. My Listings
The My Listings section is where sellers can manage their product listings. It allows sellers to add new products, update existing listings, and track the performance of their listings.
6. Wallet
The Wallet section is where you can manage your cryptocurrency wallet on Sepolia. It allows you to view your balance, transfer funds, and perform other financial transactions related to your Sepolia account.
Overall, understanding the different sections and functions of Sepolia is crucial for effectively navigating the platform and making the most out of your online shopping experience.
What is Sepolia?
Sepolia is a decentralized finance (DeFi) protocol built on top of the Ethereum blockchain. It aims to provide users with a range of financial services, including lending, borrowing, and yield farming.
How can I get started with Sepolia?
To get started with Sepolia, you will need to have the Metamask wallet installed. Once you have Metamask set up, you can connect it to Sepolia and start using its features.
What is Metamask?
Metamask is a popular cryptocurrency wallet and browser extension that allows users to interact with decentralized applications (dApps) on the Ethereum blockchain. It provides a user-friendly interface for managing Ethereum wallets and interacting with smart contracts.
What are the benefits of using Sepolia?
Some benefits of using Sepolia include access to decentralized financial services such as lending and borrowing, the ability to earn yields through yield farming, and the security and transparency provided by the Ethereum blockchain. Additionally, Sepolia aims to provide competitive interest rates and lower fees compared to traditional financial institutions.