
Metamask is a popular cryptocurrency wallet that allows users to interact with decentralized applications (dApps) on the Ethereum blockchain. However, did you know that you can also add support for other blockchains, like Cosmos, to your Metamask wallet?
If you’re interested in exploring the Cosmos ecosystem and using dApps built on the Cosmos network, adding Cosmos to your Metamask wallet is a crucial step. With Cosmos support, you can seamlessly connect with different blockchain networks and enjoy a wider range of decentralized applications.
In this tutorial, we will guide you through the process of adding Cosmos to your Metamask wallet. By the end of this tutorial, you will be able to send and receive Cosmos tokens, interact with Cosmos-based dApps, and manage your Cosmos assets directly from your Metamask wallet.
Before we begin, make sure you have the latest version of Metamask installed on your browser. If you don’t have it, you can download and install it from the official Metamask website. Once you have Metamask installed, follow the step-by-step instructions below to add Cosmos to your wallet.
Step 1: Open the Metamask extension on your browser and click on the menu icon (three horizontal lines) in the top-right corner of the extension window. From the menu, select “Settings”.
Step 2: In the Settings menu, scroll down and click on “Networks”.
Step 3: On the Networks page, click on the “Add Network” button.
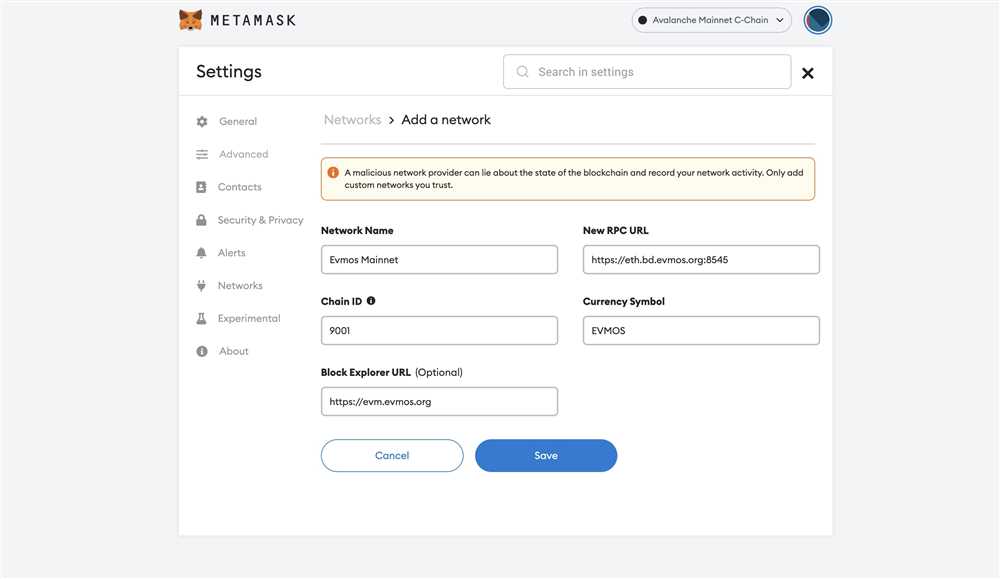
Step 4: In the “New Network” form, enter the following details:
Network Name: Cosmos
New RPC URL: Enter the RPC URL specific to the Cosmos network you want to connect to. For example, if you want to connect to the Cosmos Hub, the RPC URL is https://rpc.cosmos.network.
Chain ID: Enter the Chain ID specific to the Cosmos network you want to connect to. For example, the Chain ID for the Cosmos Hub is “cosmoshub-3”.
Currency Symbol: Enter the currency symbol of the Cosmos network you want to connect to. For example, for the Cosmos Hub, the currency symbol is “ATOM”.
Block Explorer URL: Enter the Block Explorer URL specific to the Cosmos network you want to connect to. For example, for the Cosmos Hub, the Block Explorer URL is https://www.mintscan.io.
Step 5: After entering the details, click on the “Save” button. Metamask will save the Cosmos network settings, and you will be redirected to the Networks page.
That’s it! You have successfully added Cosmos to your Metamask wallet. Now you can start exploring the Cosmos ecosystem, interacting with Cosmos-based dApps, and managing your Cosmos assets directly from your Metamask wallet.
Note: Adding Cosmos to Metamask only adds support for the Cosmos network; it does not swap your Ethereum wallet to a Cosmos wallet. Your Ethereum assets will remain intact, and you can switch between the Ethereum and Cosmos networks whenever you want.
What is Cosmos?

Cosmos is a blockchain ecosystem designed to enable communication and interoperability between different blockchains. It aims to solve the scalability and coordination issues that currently limit the functionality and effectiveness of individual blockchains.
Cosmos achieves this by introducing a framework that allows multiple independent blockchains, referred to as “zones,” to communicate and exchange information with each other. These zones are connected through the Cosmos Hub, which acts as a central hub for cross-chain communication.
The core technology behind Cosmos is the Tendermint consensus algorithm, which provides fast and secure consensus for the zone blockchains. Tendermint uses a variation of the traditional Byzantine Fault Tolerance (BFT) algorithm, allowing for quick confirmation of transactions with high levels of security.
By enabling interoperability between different blockchains, Cosmos aims to create an internet of blockchains, where assets and data can be seamlessly transferred between different ecosystems. This interoperability opens up a wide range of possibilities for applications and services that can leverage the unique features and advantages of various blockchains.
Overall, Cosmos seeks to create a more scalable, efficient, and interconnected blockchain ecosystem that can support the growth and adoption of decentralized applications on a global scale.
Overview of the Cosmos Network
The Cosmos Network is a decentralized network of interconnected blockchains powered by the Tendermint consensus protocol. It aims to enable the exchange of digital assets and data across different blockchain platforms in a scalable and interoperable manner.
At the core of the Cosmos Network is the Hub, a secure and scalable blockchain that acts as the main point of connection for all the interconnected blockchains known as Zones. The Hub facilitates communication and asset transfers between different Zones, allowing for cross-chain interoperability.
The Cosmos Network introduces the concept of Inter-Blockchain Communication (IBC), which enables secure and reliable communication between different blockchains. With IBC, users can transfer digital assets and data from one blockchain to another, opening up a wide range of possibilities for decentralized applications and services.
The Cosmos Network also features a native cryptocurrency called ATOM, which is used for staking and governance within the network. ATOM holders can participate in the consensus mechanism and earn rewards by staking their tokens. They also have the power to vote on proposals and influence the direction of the network.
Overall, the Cosmos Network aims to solve the scalability and interoperability challenges faced by existing blockchain networks. By enabling communication and asset transfers between different blockchains, it opens up new possibilities for decentralized applications and paves the way for a more interconnected and inclusive blockchain ecosystem.
What is Metamask?
Metamask is a browser extension that functions as a cryptocurrency wallet and allows users to interact with decentralized applications (dApps) on the Ethereum blockchain. It is compatible with major web browsers such as Chrome, Firefox, and Brave.
With Metamask, users can securely store and manage their Ethereum and ERC-20 tokens, as well as participate in token sales (ICOs) and decentralized finance (DeFi) platforms.
Metamask provides a user-friendly interface that seamlessly integrates with your browser, making it easy to navigate through various dApps and interact with blockchain applications. It also offers additional features like importing existing wallets and creating multiple accounts for better organization.
Key Features of Metamask

1. Wallet Management: Metamask enables users to create, import, and manage multiple Ethereum wallets, providing users with greater control over their digital assets.
2. Secure Transactions: Metamask ensures the privacy and security of transactions by using encryption and protecting the user’s private keys. Transactions can only be approved through the user’s consent within the wallet.
3. Access to dApps: Metamask acts as a bridge between the browser and the Ethereum blockchain, allowing users to easily access and interact with various decentralized applications.
4. Token Support: Metamask supports a wide range of Ethereum-based tokens, including ERC-20 tokens. This enables users to manage and transfer their tokens without the need for separate wallets.
Overall, Metamask simplifies the process of interacting with the Ethereum blockchain and empowers users to navigate the world of decentralized applications with ease and security.
How to Connect Cosmos to Metamask?
To connect Cosmos to Metamask, you’ll need to follow a few steps:
Step 1: Install Metamask
If you haven’t already, install the Metamask extension in your browser. Metamask is available for Chrome, Firefox, Brave, and Edge.
Step 2: Create or Import a Wallet
If you don’t have a wallet, you’ll need to create one. Metamask will guide you through the process of creating a new wallet with a password. If you already have a wallet, you can import it into Metamask using your seed phrase or private key.
Step 3: Change Network
By default, Metamask connects to the Ethereum network. To connect to the Cosmos network, you’ll need to change the network in Metamask.
- Click on the Metamask extension in your browser toolbar.
- In the Metamask window, click on the current network (it should say “Main Ethereum Network” or something similar).
- In the dropdown menu, select “Custom RPC”.
- In the “New RPC URL” field, enter the URL for the Cosmos network you want to connect to (e.g., “https://rpc.cosmos.network”).
- Click “Save” to save the network settings.
Step 4: Connect to Cosmos
Once you’ve changed the network, you can connect Metamask to Cosmos.
- Go to the Cosmos website for the network you want to connect to (e.g., “https://cosmos.network”).
- Find the “Connect to Metamask” button or a similar option on the website.
- Click on the button to connect Metamask to Cosmos.
- Authorize the connection in the Metamask popup window.
That’s it! You should now be connected to Cosmos using Metamask. You can now use Metamask to interact with Cosmos-based applications and manage your Cosmos assets.
Step-by-Step Guide for Adding Cosmos to Metamask Wallet
Adding Cosmos (ATOM) to your Metamask wallet allows you to easily manage your ATOM tokens and interact with the Cosmos network. Follow the steps below to add Cosmos to your Metamask wallet:
Step 1: Install Metamask Extension
If you haven’t already, install the Metamask browser extension by visiting the official Metamask website or searching for Metamask in the extension store of your preferred browser. Follow the instructions to set up and create a new Metamask wallet.
Step 2: Access Metamask Wallet
Once you have installed the Metamask extension, click on the Metamask icon in your browser’s toolbar to open the wallet. Enter your wallet’s password or use your preferred authentication method to unlock your wallet.
Step 3: Add Cosmos Network
In the Metamask wallet interface, click on the network selection dropdown menu (usually displaying “Main Ethereum Network” by default). Scroll down and click on “Custom RPC” to manually add a new network.
Step 4: Fill in Cosmos Network Details
In the “Custom RPC” section, fill in the following Cosmos network details:
- Network Name: Cosmos
- New RPC URL: Enter the RPC URL for the Cosmos network, provided by a trusted source or your own node
- Chain ID: Enter the chain ID for the Cosmos network
- Symbol: ATOM
- Block Explorer URL: Enter the URL for a Cosmos block explorer
Step 5: Save Cosmos Network

After filling in the network details, click on the “Save” button to add the Cosmos network to your Metamask wallet.
Once the Cosmos network is added, you can switch to it by selecting it from the network selection dropdown menu in your Metamask wallet. You can then view your ATOM balance and perform transactions on the Cosmos network through Metamask.
Remember to exercise caution and verify the accuracy of the network details before adding a new network to your Metamask wallet to avoid potential scams or security risks.
How to Send and Receive Cosmos on Metamask?
Metamask is a popular wallet that allows users to interact with the Cosmos blockchain. With Metamask, you can send and receive Cosmos (ATOM) tokens easily and securely. Here is a step-by-step guide on how to send and receive Cosmos on Metamask:
- Make sure you have installed and set up Metamask on your browser. If you haven’t done so, you can download and install Metamask from the official website.
- Create or import a Cosmos (ATOM) wallet in Metamask. To create a new wallet, click on the Metamask extension icon and follow the instructions to create a new wallet. To import an existing wallet, click on the “Import Wallet” option and enter the seed phrase or private key of your Cosmos wallet.
- Once you have set up your Cosmos wallet in Metamask, you can now send Cosmos to another wallet. To send Cosmos, click on the “Send” button in the Metamask interface.
- Enter the recipient’s Cosmos address in the provided field. Make sure to double-check the address to avoid sending funds to the wrong wallet.
- Enter the amount of Cosmos you want to send in the “Amount” field. You can also select the token from the dropdown menu.
- Review the transaction details and confirm the transaction. Metamask will prompt you to confirm the transaction by entering your password or using your preferred authentication method.
- After confirming the transaction, wait for the transaction to be processed and confirmed on the Cosmos blockchain. The time it takes for the transaction to be confirmed may vary depending on the network congestion.
- To receive Cosmos on Metamask, you simply need to provide your Cosmos address to the sender. You can find your Cosmos address by clicking on the account icon in the Metamask interface.
By following these steps, you can easily send and receive Cosmos on Metamask. Remember to always double-check the recipient’s address and review the transaction details before confirming the transaction. This will help ensure the security of your funds.
A Tutorial on Transferring Cosmos Tokens via Metamask Wallet
If you are new to the world of cryptocurrencies, you may have come across the term “Cosmos” and wondered what it is. Cosmos is a decentralized network of independent blockchains that can interoperate with each other. It aims to solve the scalability and interoperability issues faced by many blockchain projects.
In this tutorial, we will learn how to transfer Cosmos tokens using the Metamask wallet. Metamask is a popular browser extension wallet that allows users to manage their Ethereum and ERC-20 tokens. While Metamask was initially designed for Ethereum, it now supports other blockchains like Cosmos.
Step 1: Install Metamask and Create a Wallet
To get started, you need to install the Metamask extension on your browser. Go to the Metamask website and follow the instructions to add it to your browser.
Once installed, click on the Metamask icon in your browser’s toolbar and create a new wallet. Make sure to secure your wallet with a strong password and backup your seed phrase.
Step 2: Connect Metamask to the Cosmos Network

After creating your wallet, open Metamask and click on the network dropdown. Select the “Custom RPC” option and enter the following details:
| Network Name | New RPC URL | ChainID |
|---|---|---|
| Cosmos | https://lcd.terra.dev | 0 |
Click “Save” to connect Metamask to the Cosmos network.
Step 3: Add Cosmos Tokens to Metamask
Now that you are connected to the Cosmos network, it’s time to add your Cosmos tokens to Metamask. Click on the “Assets” tab in Metamask and then click on “Add Token” at the bottom.
Enter the token contract address and token symbol for your Cosmos tokens. You can find this information on the Cosmos blockchain explorer or from the project team. Click “Next” and then “Add Tokens” to complete the token addition process.
Step 4: Transfer Cosmos Tokens
With your Cosmos tokens added to Metamask, you are ready to transfer them. Click on the “Send” tab in Metamask and enter the recipient’s address, the amount of tokens you want to send, and any additional information required.
Review the transaction details and confirm the transaction. Metamask will prompt you to confirm the transfer and pay the associated transaction fee.
Once the transaction is confirmed, your Cosmos tokens will be transferred to the recipient’s address.
Congratulations! You have successfully transferred Cosmos tokens using the Metamask wallet. Remember to double-check the recipient’s address before confirming any transaction to avoid any loss of funds.
Can I add Cosmos to Metamask?
Yes, you can add Cosmos to Metamask by following these steps. First, open Metamask and click on the menu in the top right corner. Then, select “Add Token” and click on “Custom Token”. In the “Token Contract Address” field, enter the Cosmos token contract address (you can find this information on the Cosmos website or in a reputable token directory). Next, enter the token symbol (ATOM) and the number of decimals (6). Click on “Next” and then “Add Tokens” to complete the process.
What is the Cosmos token contract address?
The Cosmos token contract address is a unique identifier that is used to add the Cosmos token to your Metamask wallet. You can find this address on the Cosmos website or in a reputable token directory. It is important to ensure that you have the correct contract address to avoid any errors or loss of funds.
Can I use Metamask to store Cosmos?
Yes, you can use Metamask to store Cosmos. Metamask is a popular Ethereum wallet that also supports other blockchains, including Cosmos. By adding the Cosmos token to Metamask, you can securely store, send, and receive Cosmos in your wallet. Just make sure to follow the steps outlined in the tutorial to properly add Cosmos to Metamask.