
Metamask is a popular cryptocurrency wallet that allows users to securely store and manage their digital assets. By default, Metamask is set up to work with the Ethereum blockchain. However, with the rising popularity of Binance Smart Chain (BSC), many users are now looking to add their BSC addresses to Metamask in order to easily access and use Binance-based decentralized applications (dApps).
Adding your Binance Smart Chain address to Metamask is a straightforward process that can be done in just a few simple steps. By doing so, you’ll be able to seamlessly switch between Ethereum and Binance Smart Chain, and take advantage of the various dApps available on both blockchains.
To start, make sure you have the latest version of Metamask installed in your browser. Once you have Metamask up and running, follow these steps to add your Binance Smart Chain address:
Step 1: Open Metamask
Click on the Metamask icon in your browser’s toolbar to open the wallet. If you already have an Ethereum address connected to Metamask, make sure to switch networks to Binance Smart Chain. To do this, click on the network name at the top of the Metamask window, and select “Custom RPC”.
Step 2: Configure Binance Smart Chain (BSC) Network
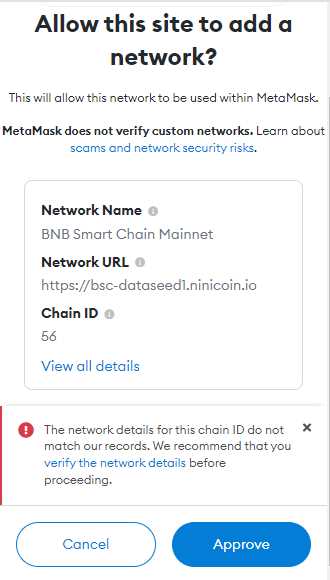
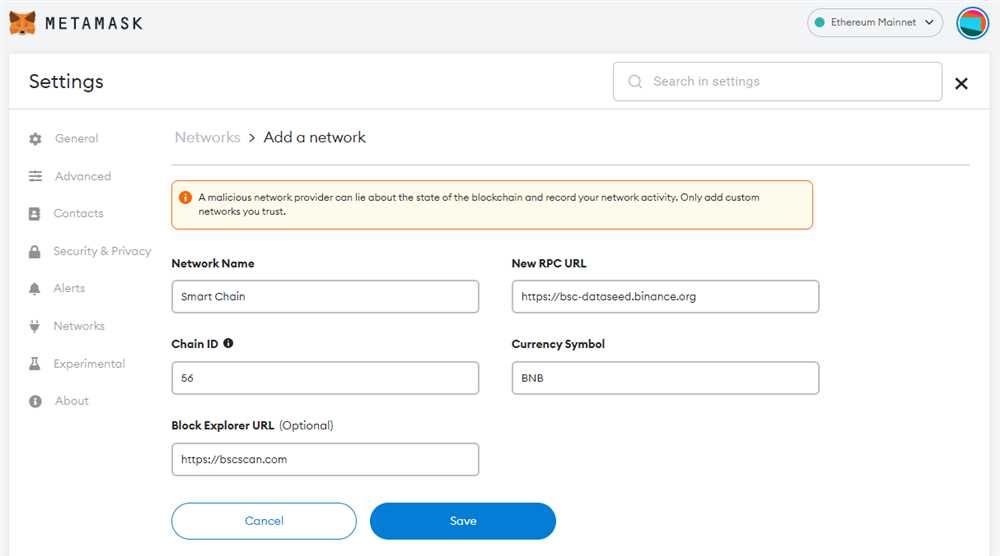
Once you’re on the Custom RPC screen, you’ll need to enter the details for the BSC network. Fill in the following information:
Network Name: Binance Smart Chain
New RPC URL: https://bsc-dataseed.binance.org/
Chain ID: 56
Symbol: BNB
Block Explorer URL: https://bscscan.com/
After filling in the details, click on “Save” to add the Binance Smart Chain network to your Metamask.
Step 3: Add BSC Wallet Address
Now that you have the Binance Smart Chain network set up, it’s time to add your BSC wallet address to Metamask. To do this, click on the account icon in the top right corner of the Metamask window, and select “Import Account”.
On the Import Account screen, paste your BSC wallet address into the field provided, and click on “Import”. Metamask will then import your BSC wallet, and you’ll see your Binance Smart Chain address listed under your accounts.
Step 4: Switch Between Networks
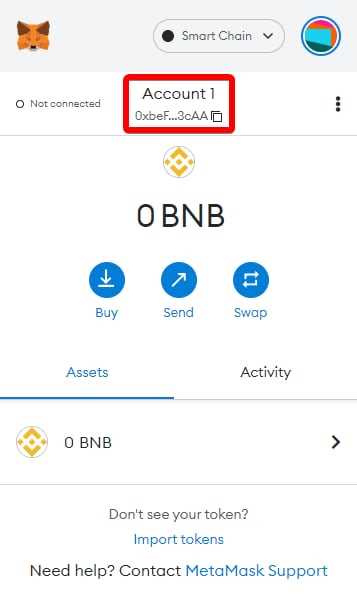
Congratulations! You’ve successfully added your Binance Smart Chain address to Metamask. Now, you can easily switch between Ethereum and Binance Smart Chain by simply selecting the desired network from the drop-down menu at the top of the Metamask window.
With your BSC address added to Metamask, you can now explore and engage with a growing ecosystem of Binance-based dApps and interact with the Binance Smart Chain blockchain using the security and convenience of Metamask.
Note: When using any decentralized application or conducting any financial transactions, always exercise caution and do your own research to ensure the safety of your funds.
Guide: Adding Binance Smart Chain Address to Metamask

In this guide, we will walk you through the process of adding your Binance Smart Chain address to your Metamask wallet. By adding your Binance Smart Chain address to Metamask, you will be able to interact with Binance Smart Chain decentralized applications (dApps) using the Metamask interface.
Step 1: Install and Set Up Metamask

- Install the Metamask extension for your preferred browser (Chrome, Firefox, or Brave).
- Set up a new Metamask wallet by following the on-screen instructions and creating a strong password.
- Agree to the terms and conditions and save your secret backup phrase in a safe place.
- Complete the wallet setup process by confirming your secret backup phrase.
Step 2: Switch to Binance Smart Chain Network
- Click on the Metamask extension icon in your browser’s toolbar to open the wallet.
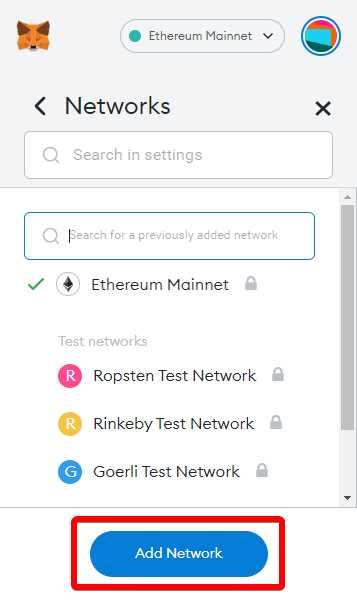
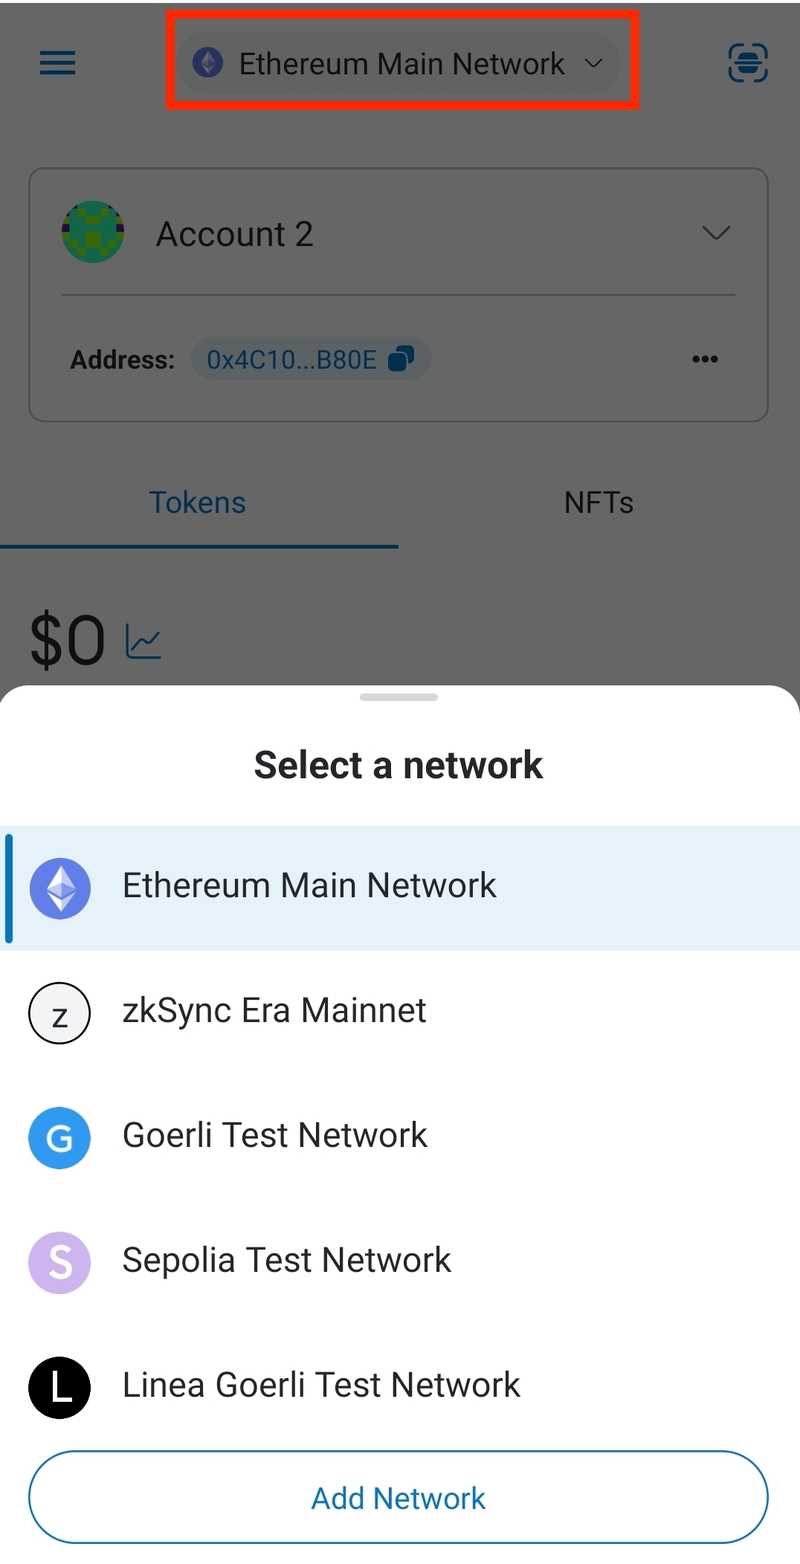
- Click on the current network name (e.g., “Ethereum Mainnet”) at the top of the Metamask window.
- In the network selection dropdown, scroll down and select “Custom RPC”.
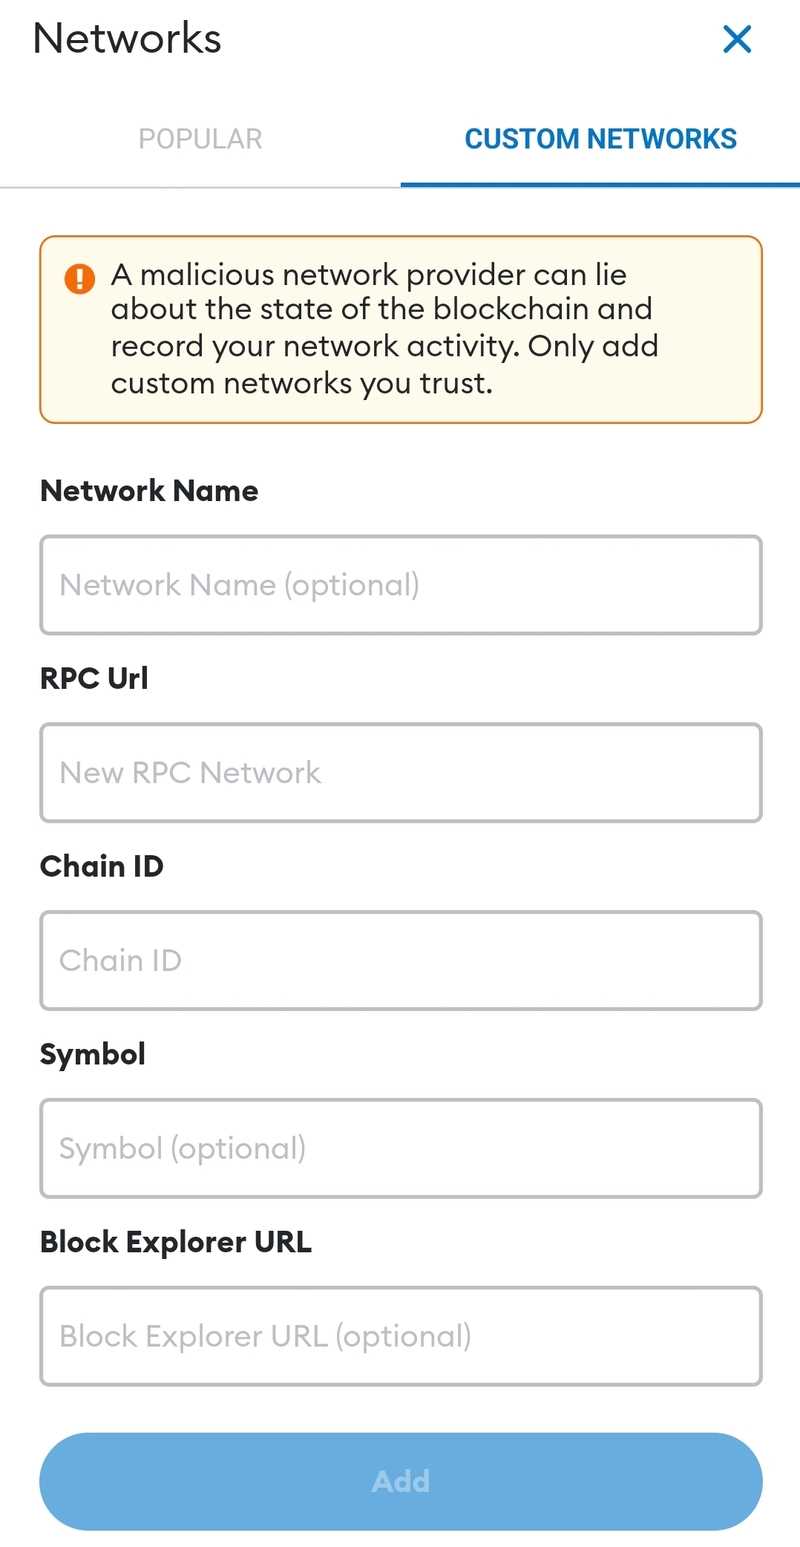
- Enter the following details to configure the Binance Smart Chain network:
- Network Name: Binance Smart Chain
- New RPC URL: https://bsc-dataseed1.binance.org/
- Chain ID: 56
- Symbol: BNB
- Block Explorer URL: https://bscscan.com
- Click “Save” to add the Binance Smart Chain network to Metamask.
Step 3: Import Binance Smart Chain Address

- Locate your Binance Smart Chain address. If you haven’t created one yet, go to the Binance website and follow their instructions to create a BSC wallet.
- Copy your Binance Smart Chain address to your clipboard.
- Click on the Metamask extension icon in your browser’s toolbar to open the wallet.
- Click on the account avatar icon at the top right corner of the Metamask window.
- Select “Import Account” from the dropdown menu.
- Paste your Binance Smart Chain address into the “Account Address” field.
- Click “Import” to add your Binance Smart Chain address to Metamask.
Congratulations! You have successfully added your Binance Smart Chain address to Metamask. Now you can use Metamask to interact with various Binance Smart Chain dApps and manage your Binance Smart Chain assets.
Step 1: Install Metamask Extension
To begin using the Binance Smart Chain address in Metamask, you first need to install the Metamask extension. Here’s how:
- Open your preferred web browser and go to the Metamask website.
- Click on the “Get Chrome extension” button, as it is compatible with most popular browsers.
- You will be redirected to the Chrome Web Store. Click on the “Add to Chrome” button to start the installation process.
- A pop-up window will appear asking for confirmation. Click on the “Add extension” button to proceed.
- Wait for the extension to finish installing. Once it’s done, you will see the Metamask fox icon added to your browser’s toolbar.
That’s it! You have successfully installed the Metamask extension. Now you can move on to the next step and add your Binance Smart Chain address to Metamask.
Step 2: Create Metamask Wallet
Once you have successfully installed the MetaMask extension in your browser, follow these steps to create a new wallet:
- Click on the MetaMask icon in the extension bar of your browser.
- A new tab will open with the MetaMask interface. Click on the “Get Started” button.
- You will see the terms of use. Read through them carefully, then click on the “Accept” button.
- Next, you will be asked to create a password for your wallet. Choose a strong, unique password and enter it in the designated field. Make sure to remember this password as it will be required to access your wallet.
- Once you have entered and confirmed your password, click on the “Create” button.
- You will be presented with a unique secret backup phrase. This phrase is extremely important and serves as a backup of your wallet. Write down this phrase on a piece of paper and store it in a safe place. Do not share this phrase with anyone as it can be used to access your wallet.
- After you have written down the backup phrase, click on the “Next” button.
- In the next step, you will be asked to verify your backup phrase. Select each word in the correct order to verify that you have saved it correctly. Once you have done this, click on the “Confirm” button.
- Congratulations! You have successfully created your MetaMask wallet. You can now use it to manage your Binance Smart Chain address and interact with decentralized applications (dApps).
Make sure to keep your wallet password and backup phrase secure. Losing access to your wallet can result in the permanent loss of your funds.
Step 3: Connect Metamask to Binance Smart Chain Network
Once you have added the Binance Smart Chain address to your Metamask wallet, the next step is to connect Metamask to the Binance Smart Chain network. Follow the instructions below:
| 1. | Open the Metamask extension on your browser. |
| 2. | Click on the network selection dropdown menu at the top of the extension. |
| 3. | Scroll down and click on “Custom RPC”. |
| 4. | In the “New Network” form, enter the following details: |
|
|
| 5. | Click on “Save” to add the Binance Smart Chain network to Metamask. |
| 6. | You have successfully connected Metamask to the Binance Smart Chain network. You can now switch between the Ethereum and Binance Smart Chain networks using the network selection dropdown menu in Metamask. |
Now that you have connected Metamask to the Binance Smart Chain network, you can start using your wallet to interact with Binance Smart Chain dApps and perform transactions on the network.
Step 4: Add Binance Smart Chain Address to Metamask
Once you have obtained your Binance Smart Chain address, follow the steps below to add it to Metamask:
1. Open Metamask Extension
If you haven’t installed Metamask, make sure to install it as a browser extension and open the Metamask wallet.
2. Switch Network
- Click on the network name (Ethereum Mainnet by default) at the top of the Metamask wallet.
- Scroll down and click on “Custom RPC”.
- Enter the following details:
- Network Name: Binance Smart Chain
- New RPC URL: https://bsc-dataseed.binance.org/
- Chain ID: 56
- Symbol: BNB
- Block Explorer URL: https://bscscan.com/
- Click on “Save”.
3. Add Binance Smart Chain Address
- Click on the account avatar at the top right corner of the wallet.
- Click on “Import Account”.
- Enter your Binance Smart Chain address and click on “Import”.
- Your Binance Smart Chain address will now be added as an account in Metamask.
You have successfully added your Binance Smart Chain address to Metamask. You can now use Metamask to interact with decentralized applications on the Binance Smart Chain network.
What is Binance Smart Chain?
Binance Smart Chain (BSC) is a blockchain platform developed by Binance, one of the largest cryptocurrency exchanges. It runs parallel to Binance Chain and allows users to build decentralized applications (dApps) and digital assets on its platform.
Why should I add my Binance Smart Chain address to Metamask?
Adding your Binance Smart Chain address to Metamask allows you to connect your Metamask wallet to the Binance Smart Chain network. This enables you to interact with dApps, trade tokens, and perform transactions on the Binance Smart Chain directly from your Metamask wallet.
Can I use the same address for both Ethereum and Binance Smart Chain on Metamask?
No, Ethereum and Binance Smart Chain have different network protocols and addresses. You will need to create a separate address for Binance Smart Chain on Metamask. However, you can import your existing Ethereum address to Binance Smart Chain using Metamask’s seed phrase or private key.
Is it safe to add my Binance Smart Chain address to Metamask?
As long as you download Metamask from the official website and keep your seed phrase or private key secure, adding your Binance Smart Chain address to Metamask is generally safe. However, it’s important to be cautious of phishing attempts and ensure that you are entering your information on the official Metamask website or extension.