
Metamask is a popular cryptocurrency wallet that allows users to interact with decentralized applications (dApps) on the Ethereum blockchain. With the recent rise in popularity of the Avalanche blockchain and its native token, AVAX, many users are eager to explore its potential and add support for Aurora, a bridge between Avalanche and Ethereum, to their Metamask wallets. In this step-by-step guide, we will walk you through the process of adding Aurora to your Metamask wallet, enabling you to seamlessly participate in the Avalanche ecosystem.
Step 1: Install Metamask and Create a Wallet
If you haven’t already, start by installing Metamask extension for your preferred web browser. Once installed, create a new wallet or import an existing one by following the on-screen prompts. Make sure to securely store your wallet’s seed phrase, as it will be needed for wallet recovery.
Step 2: Access Metamask Settings
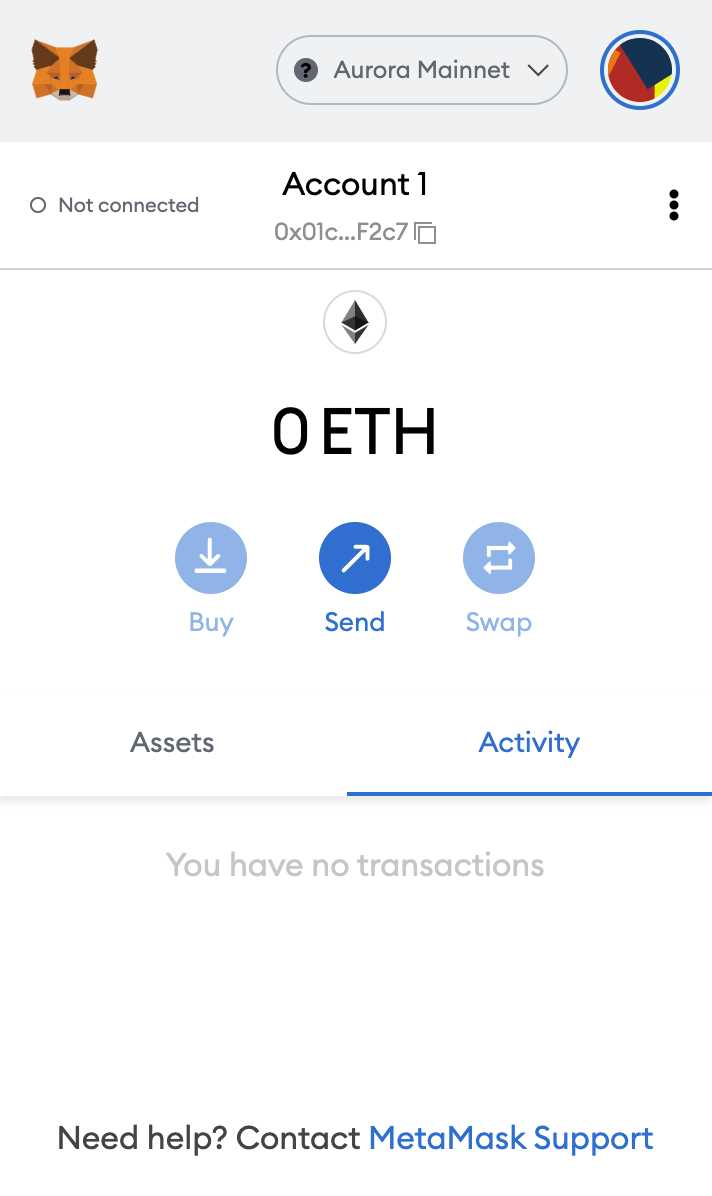
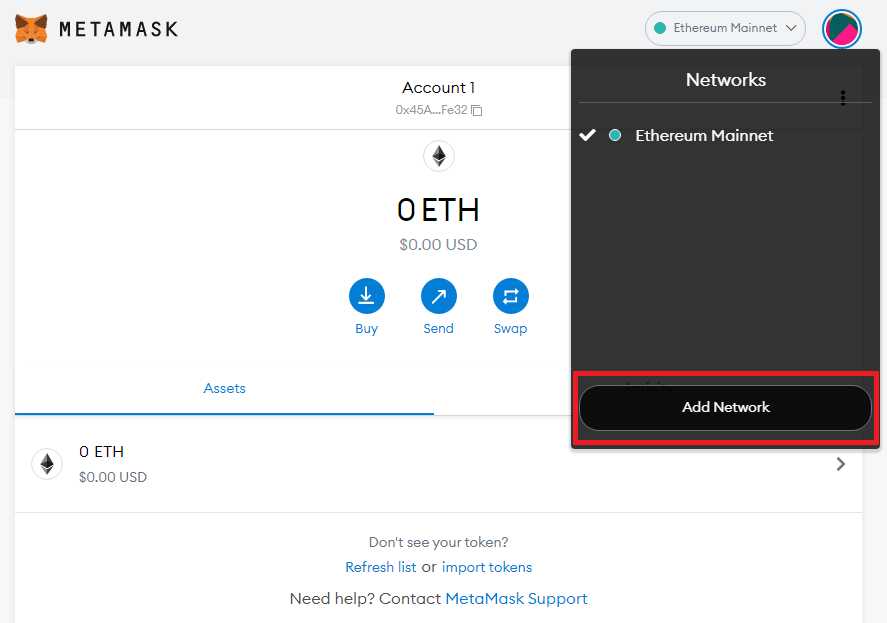
Once your wallet is set up, click on the Metamask extension icon in your browser’s toolbar to open the wallet interface. From there, click on the profile icon or your account address to open the dropdown menu, and then click on “Settings”.
Step 3: Add Custom Network
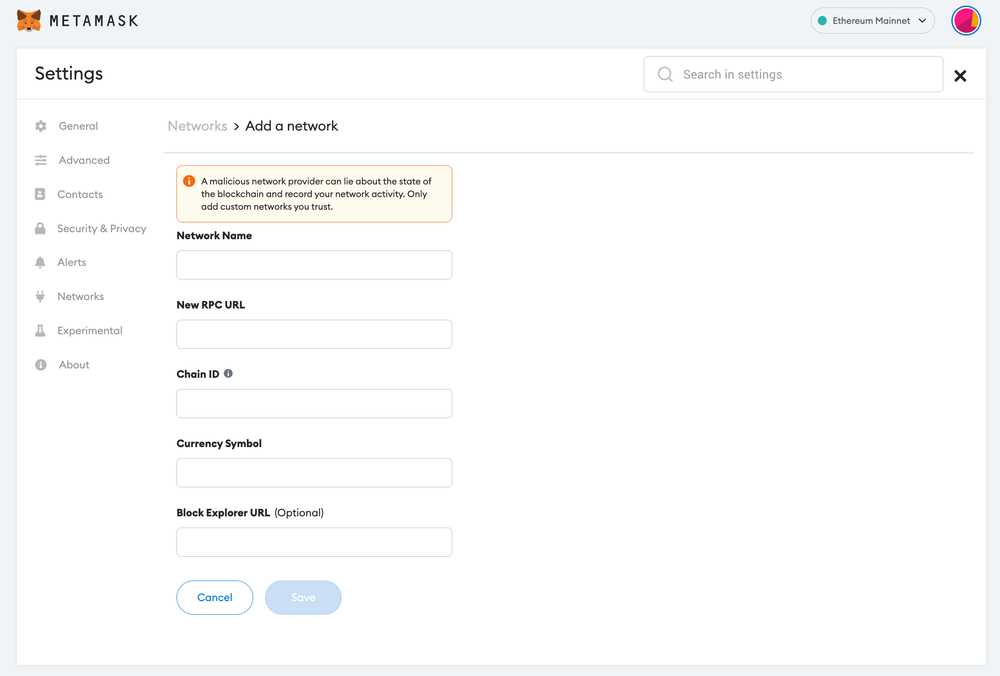
In the “Settings” menu, navigate to the “Networks” tab. Scroll down to the “Networks” section, and click on “Add Network” to add a custom network.
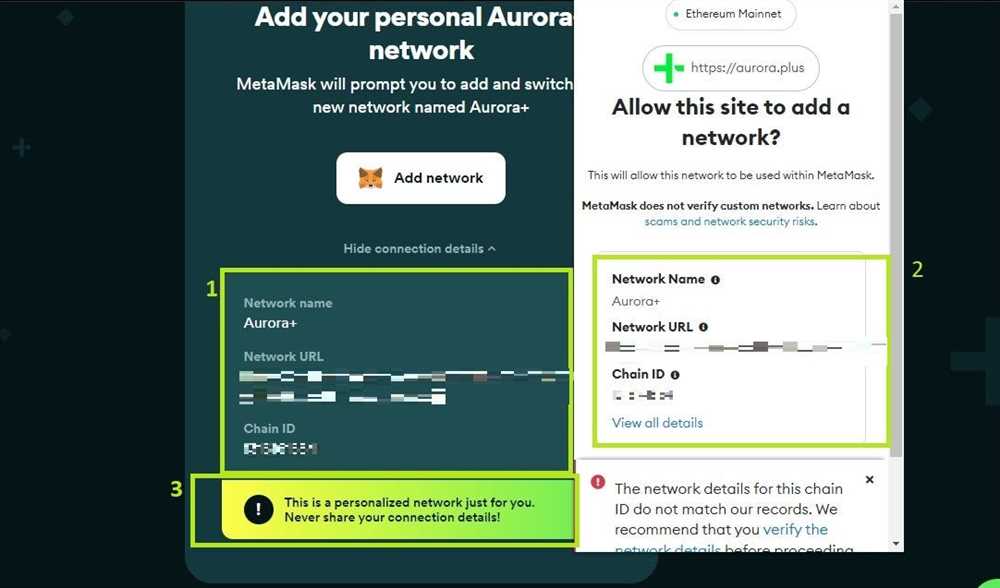
Step 4: Configure Aurora Network
In the “Add Network” form, fill in the following details to configure the Aurora network:
Network Name: Aurora
New RPC URL: https://beta.aurora.dev
Chain ID: 43114
Symbol: AETH
Step 5: Save and Connect
Click on “Save” to add the Aurora network to your Metamask wallet. Once the network is added, you can switch to the Aurora network by selecting it from the network dropdown menu located in the top-right corner of the Metamask interface. You are now ready to explore and interact with the Avalanche ecosystem using your Metamask wallet!
By following these simple steps, you can easily add Aurora to your Metamask wallet and start taking advantage of the exciting opportunities offered by the Avalanche blockchain. Whether you’re interested in decentralized finance (DeFi) applications, gaming, or other dApps, having access to both Ethereum and Avalanche networks through Metamask opens up a world of possibilities. Embrace the future of blockchain technology and get started with Aurora and Metamask today!
How to Add Aurora to Metamask
If you’re interested in accessing Aurora, the Ethereum scaling solution, through Metamask, this step-by-step guide will walk you through the process.
Step 1: Install Metamask
If you haven’t already, start by installing the Metamask browser extension on your preferred browser. Metamask is available for Chrome, Firefox, Brave, and other popular browsers.
Step 2: Create or Import a Wallet
Once Metamask is installed, launch the extension and either create a new wallet or import your existing wallet using the provided mnemonic phrase or JSON file.
Step 3: Network Selection
After setting up your wallet, click on the network dropdown on the top of the Metamask window and select “Custom RPC”.
Step 4: Add Aurora Network Details
In the “New RPC URL” field, enter the Aurora network details:
| Network Name | New RPC URL | Chain ID | Currency Symbol |
|---|---|---|---|
| Aurora | https://api.aurora.dev | 0x1d | AU |
Step 5: Save and Connect
Ensure that the correct network details are entered. Then, click “Save” to add Aurora to your Metamask network list. Lastly, select the Aurora network from the dropdown menu to connect to it.
That’s it! You have successfully added Aurora to your Metamask wallet. You can now utilize the benefits of the Aurora ecosystem, such as faster transaction speeds and lower fees, while still using the familiar Metamask interface.
A Step-by-Step Guide

Adding Aurora to your Metamask account is a simple process that can be done in just a few steps. Follow this guide to get started:
- Install and Set Up Metamask: If you don’t have Metamask installed on your browser, head to the official website and download the extension. Once installed, follow the setup instructions to create a new wallet or import an existing one.
- Access Metamask Settings: Open Metamask by clicking on the extension logo in your browser toolbar. This will open the wallet and display your account balance.
- Switch to Aurora Network: To add Aurora to your Metamask, you’ll need to switch to the Aurora Network. Click on the network selection dropdown and choose “Custom RPC.”
- Add Aurora Network Details: In the Custom RPC settings, enter the following details:
- Network Name: Enter “Aurora Network” or any other name you prefer.
- New RPC URL: Enter “https://rpc.aurora.dev/” as the RPC URL.
- Chain ID: Enter “0x2a” as the Chain ID.
- Symbol: Enter “AUR” as the Symbol.
- Block Explorer URL: Enter “https://explorer.aurora.dev/” as the Block Explorer URL.
- Save and Connect: After entering the necessary network details, click “Save” to add the Aurora Network to your Metamask. You should now see the new network listed in the network selection dropdown.
- Switch to Aurora Network: Finally, select the Aurora Network from the dropdown to connect to it. You are now ready to use Aurora with your Metamask!
By following these steps, you can easily add the Aurora Network to your Metamask and start taking advantage of its features and functionalities.
Please note that cryptocurrency investments carry risks, and it’s important to do thorough research before investing or engaging in any financial transactions.
Preparing Metamask for Aurora Network
Before you can add Aurora to Metamask, you need to make sure that your Metamask wallet is properly prepared for the Aurora Network. Here are the steps you need to follow:
1. Open the Metamask extension in your browser and make sure you are on the main Ethereum network.
2. Click on the network selection dropdown menu at the top of the Metamask interface and select “Custom RPC”.
3. In the “New Network” tab, you will see several fields where you can enter the details for the Aurora Network. Fill in the following information:
– Network Name: Aurora
– New RPC URL: https://aurora-url.com
– Chain ID: 1313161554
– Symbol: AUR
4. Click on the “Save” button to save the new network settings.
5. Once you have saved the network settings, Metamask will display “Aurora” as one of the network options in the dropdown menu. Select “Aurora” to switch to the Aurora Network.
Congratulations! You have successfully prepared Metamask for the Aurora Network. Now you can proceed to add Aurora to Metamask and start using its features.
What is Aurora Network
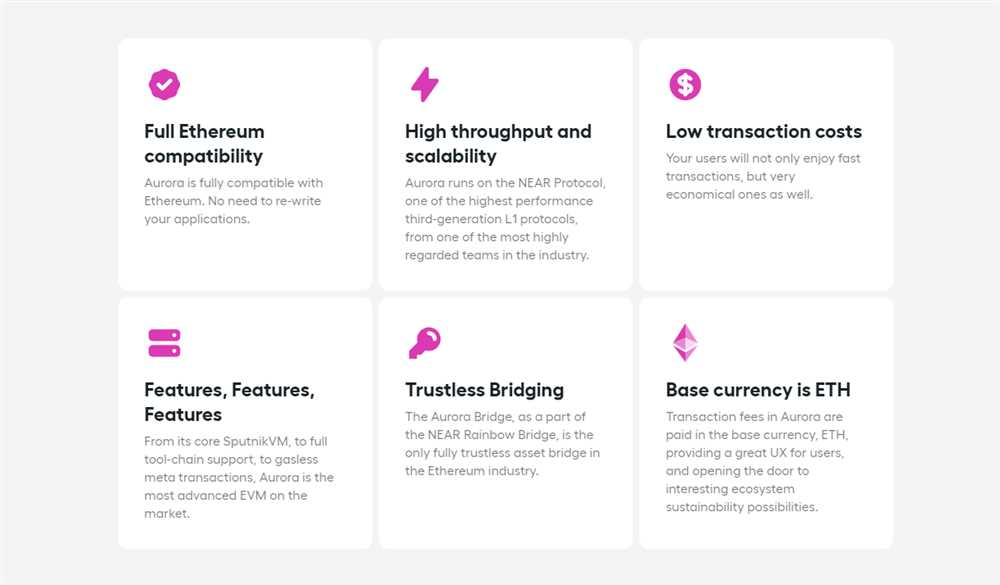
Aurora Network is a blockchain platform that aims to improve scalability and interoperability for decentralized applications (dApps). It is built on top of the Ethereum network and utilizes a unique consensus protocol called Avalanche, which allows for high throughput and low transaction fees.
The Aurora Network provides developers with a secure and efficient environment to build and deploy dApps. It offers smart contract functionality, enabling developers to create decentralized applications with self-executing contracts and automated transactions.
One key feature of the Aurora Network is its compatibility with the Ethereum Virtual Machine (EVM). This means that developers can deploy their existing Ethereum smart contracts on the Aurora Network without making any changes to their code.
The Aurora Network also supports cross-chain interoperability, allowing for seamless communication and value transfer between different blockchain networks. This interoperability opens up a wide range of possibilities for developers and users, as they can leverage the strengths of multiple blockchains.
Key Features of Aurora Network:
- Scalability: The Aurora Network is designed to handle a high volume of transactions, making it more scalable than the Ethereum network.
- Low Transaction Fees: The Avalanche consensus protocol used by the Aurora Network allows for faster and cheaper transactions compared to other blockchain networks.
- EVM Compatibility: Developers can leverage their existing Ethereum smart contracts on the Aurora Network without any modifications.
- Cross-Chain Interoperability: The Aurora Network allows for seamless communication and value transfer between different blockchain networks.
Overall, the Aurora Network aims to address the scalability and interoperability challenges faced by traditional blockchain networks, making it an attractive platform for developers looking to build decentralized applications.
Adding Aurora to Metamask
If you are using MetaMask as your Ethereum wallet, you can also add Aurora, a Layer 2 solution, to your wallet. This will allow you to enjoy faster and cheaper transactions on the Aurora blockchain.
Step 1: Install MetaMask
If you haven’t installed MetaMask already, you will need to do so before you can add Aurora. You can download MetaMask as a browser extension for popular browsers like Chrome, Firefox, and Brave.
Step 2: Create an Account or Import an Existing One
Once you have MetaMask installed, you will need to create a new Ethereum account or import an existing one. Make sure you keep your account’s seed phrase in a safe place as it will be required to access your wallet in the future.
Step 3: Switch to the Aurora Network
After setting up your MetaMask account, you will need to switch to the Aurora network. To do this, click on the Network dropdown menu on the top of your MetaMask extension and select “Custom RPC.”
Fill in the following details to connect to the Aurora network:
Network Name: Aurora
New RPC URL: https://aurora-rpc.aurora.dev
ChainID: 1313161554
Symbol: AUR
Block Explorer URL: https://explorer.aurora.dev
After filling in the details, click “Save” to connect to the Aurora network.
You should now see Aurora listed as the network you are connected to in your MetaMask extension.
Step 4: Test the Connection
You can now test the connection to the Aurora network. Try sending a small amount of AUR or performing a transaction to see if everything is working correctly. Make sure to have a small amount of ETH in your account as gas fees will still need to be paid in ETH on Layer 2.
Congratulations! You have successfully added Aurora to your MetaMask wallet. Now you can enjoy fast and affordable transactions on the Aurora blockchain.
What is Aurora?
Aurora is a layer 2 network built on top of the Ethereum blockchain that aims to solve Ethereum scalability issues.
Why should I add Aurora to Metamask?
Adding Aurora to Metamask allows you to interact with decentralized applications (dapps) on the Aurora network, which can offer faster and cheaper transactions compared to the Ethereum mainnet.
Are there any risks associated with adding Aurora to Metamask?
While adding Aurora to Metamask itself doesn’t come with significant risks, it’s important to note that interacting with any blockchain network involves certain risks. These risks include potential smart contract vulnerabilities, hacking risks, and the possibility of losing your funds if you make a mistake in your transactions. It’s important to exercise caution and do thorough research before using any blockchain network.