
Welcome to our comprehensive guide on how to set up and use Avax C-Chain on Metamask! If you’re interested in exploring the world of decentralized finance (DeFi) and want to take advantage of the Avalanche network, then this guide is perfect for you. We will walk you through the process of setting up your Metamask wallet to support the Avax C-Chain, allowing you to seamlessly interact with a wide range of applications and tokens on the Avalanche ecosystem.
Metamask is a popular web3 wallet that allows you to interact with decentralized applications (dApps) on various blockchain networks. With the recent integration of the Avalanche network, it has become even more powerful, providing users access to the thriving DeFi ecosystem on Avalanche. By setting up Avax C-Chain on Metamask, you can seamlessly transfer tokens, participate in yield farming, and explore other innovative financial services that Avalanche has to offer.
In this guide, we will cover the step-by-step process of setting up your Metamask wallet to support the Avax C-Chain. We will start with the basics, including installing the Metamask extension and creating a new wallet. Then, we will guide you through the process of adding the Avax C-Chain network to your Metamask wallet. Finally, we will show you how to transfer tokens and interact with dApps on the Avax C-Chain, giving you the tools to explore the exciting world of decentralized finance on Avalanche.
So, whether you’re a crypto enthusiast, a DeFi investor, or simply curious about the possibilities of blockchain technology, this guide will provide you with all the information you need to get started with Avax C-Chain on Metamask. Let’s dive in and unlock the potential of decentralized finance together!
What is Avax C-Chain?
The Avax C-Chain is a blockchain network that is built on the Avalanche platform. Avalanche is a decentralized platform that aims to provide a scalable and efficient infrastructure for decentralized applications (dApps) and digital assets. The Avax C-Chain is specifically designed for the creation and execution of smart contracts, similar to other popular blockchain networks like Ethereum.
One of the main features of the Avax C-Chain is its high throughput capacity, which allows for fast and efficient transaction processing. This is achieved through the use of a consensus protocol called Avalanche, which is based on a novel approach called probabilistic sampling. The protocol enables the network to reach consensus on transactions quickly, making it suitable for high-performance applications.
The Avax C-Chain also supports the Solidity programming language, which is widely used for developing smart contracts on other blockchain platforms like Ethereum. This makes it easy for developers to port their existing applications or create new ones on the Avax C-Chain, leveraging their existing knowledge and tools.
In addition to supporting smart contracts, the Avax C-Chain also has its own native cryptocurrency called AVAX. AVAX can be used for various purposes within the Avax ecosystem, such as paying for computational resources or participating in network governance.
Overall, the Avax C-Chain offers a robust and scalable infrastructure for building and running decentralized applications. It combines high throughput with compatibility with existing tools and languages, making it an attractive choice for developers and users alike.
Section 1: Setting Up Avax C-Chain on Metamask
Metamask is a popular Ethereum wallet that allows users to interact with decentralized applications (dApps) on the blockchain. In this guide, we will show you how to set up and use the Avalanche C-Chain on Metamask.
Step 1: Install Metamask
The first step is to install the Metamask browser extension. Metamask is available for Google Chrome, Firefox, and Brave browsers. Simply search for “Metamask” in your browser’s extension store and follow the installation instructions.
Step 2: Create or Import a Wallet
Once you have installed Metamask, you will be prompted to create a new wallet or import an existing one. If you are new to Metamask, click on “Create a Wallet” and follow the instructions to set up a new wallet. If you already have a Metamask wallet, click on “Import Wallet” and enter your seed phrase or private key to import it into Metamask.
Step 3: Connect to Avalanche Network
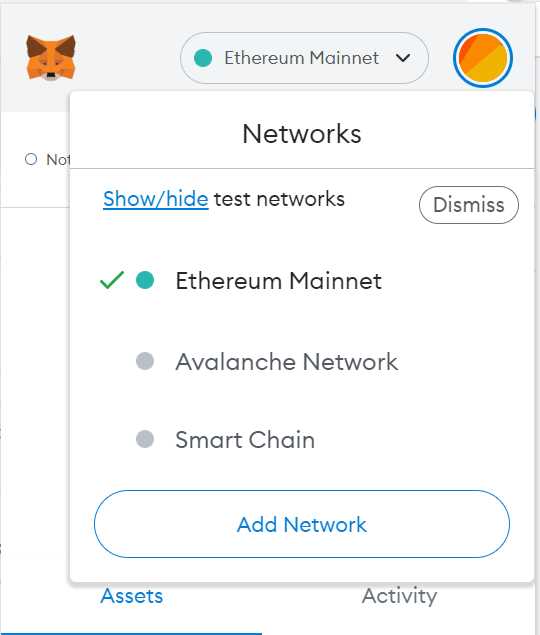
After setting up or importing your wallet, you will see the Metamask interface. To connect to the Avalanche C-Chain, click on the network dropdown menu at the top of the interface and select “Custom RPC.”
Step 4: Configure Avalanche Network
In the Custom RPC settings, you will need to enter the Avalanche C-Chain endpoint. The Avalanche C-Chain endpoint is “https://api.avax.network/ext/bc/C/rpc”. Enter this endpoint in the “New RPC URL” field and click “Save.”
Step 5: Switch to Avalanche Network
Once you have configured the Avalanche C-Chain endpoint, it will appear in the network dropdown menu. Select the Avalanche C-Chain network from the dropdown menu to switch to the Avalanche network.
Step 6: Add AVAX Token
To add the AVAX token to your Metamask wallet, click on the “Assets” tab and then click “Add Token.” In the “Token Contract Address” field, enter the AVAX token contract address, which is “0xb31f66aa3c1e785363f0875a1b74e27b85fd66c7”. Click “Next” and then “Add Tokens.” The AVAX token will now be visible in your Metamask wallet.
Congratulations! You have successfully set up the Avalanche C-Chain on Metamask. You can now use your Metamask wallet to interact with dApps on the Avalanche network.
| Step | Description |
|---|---|
| Step 1 | Install the Metamask browser extension |
| Step 2 | Create or import a wallet |
| Step 3 | Connect to Avalanche Network |
| Step 4 | Configure Avalanche Network |
| Step 5 | Switch to Avalanche Network |
| Step 6 | Add AVAX token |
Step 1: Install Metamask Extension

In order to set up and use Avax C-Chain on Metamask, the first step is to install the Metamask browser extension. Metamask is a cryptocurrency wallet and decentralized application (DApp) browser that allows you to interact with blockchain-based applications.
Here are the steps to install Metamask:
1. Install Metamask on Chrome or Firefox
- Go to the Chrome Web Store or Firefox Add-ons marketplace.
- Type “Metamask” in the search bar.
- Click on the “Add to Chrome” or “Add to Firefox” button.
- Click “Add extension” to confirm the installation.
2. Create a Metamask account
- Click on the Metamask extension icon in your browser toolbar.
- Click on “Get Started” on the welcome screen.
- Read and accept the terms of use.
- Create a new wallet by entering a strong password.
- Click “Create” to generate a new seed phrase.
- Write down the seed phrase and keep it in a safe place.
- Confirm the seed phrase to complete the wallet creation process.
3. Connect to the Avax network
- Click on the network selection dropdown within the Metamask extension.
- Click on “Custom RPC” to manually add a network.
- In the “Network Name” field, enter “Avax C-Chain”.
- In the “New RPC URL” field, enter “https://api.avax.network/ext/bc/C/rpc”.
- Click “Save” to add the Avax C-Chain network to Metamask.
Congratulations! You have successfully installed the Metamask extension and connected to the Avax C-Chain network. Now you can start using Avax C-Chain on Metamask to interact with decentralized applications and manage your Avax assets.
Step 2: Create or Import a Wallet
Now that you have set up the C-Chain network on your Metamask, the next step is to create or import a wallet. A wallet is a digital container that holds your cryptocurrency assets and allows you to interact with blockchain networks like Avax C-Chain.
If you already have a Metamask wallet, you can skip this step and simply import your existing wallet by following the instructions below. Otherwise, continue reading to learn how to create a new wallet.
Creating a New Wallet
To create a new wallet, follow these steps:
- Open the Metamask extension on your browser and click on the “Get Started” button to begin.
- You will be asked to set a password for your wallet. Choose a strong and unique password that you can remember easily.
- Once you have set your password, click on the “Create” button to proceed.
- You will then be shown a 12-word mnemonic phrase. This phrase serves as a backup for your wallet and can be used to restore your wallet in case you lose access to it. Write down the phrase in the correct order and store it in a safe place.
- After confirming your mnemonic phrase, your wallet will be successfully created.
Please note:
It is crucial to keep your mnemonic phrase safe and private. Never share it with anyone or store it digitally, as it can be used to access your wallet and steal your funds.
Importing an Existing Wallet
If you already have a Metamask wallet and want to import it, follow these instructions:
- Open the Metamask extension and click on the profile icon in the top-right corner.
- Select “Import Account” from the dropdown menu.
- You will be asked to enter your wallet’s private key, JSON file, or mnemonic phrase.
- Choose the appropriate option and follow the on-screen instructions to import your wallet.
Once you have either created a new wallet or imported your existing wallet, you are now ready to move on to the next step: connecting your wallet to the Avax C-Chain network.
Step 3: Connect Metamask to Avax C-Chain Network
Now that we have set up the Avax C-Chain network on Metamask, we need to connect our Metamask wallet to the Avax C-Chain network in order to start using it for transactions.
Option 1: Connecting to Avax C-Chain using the RPC URL
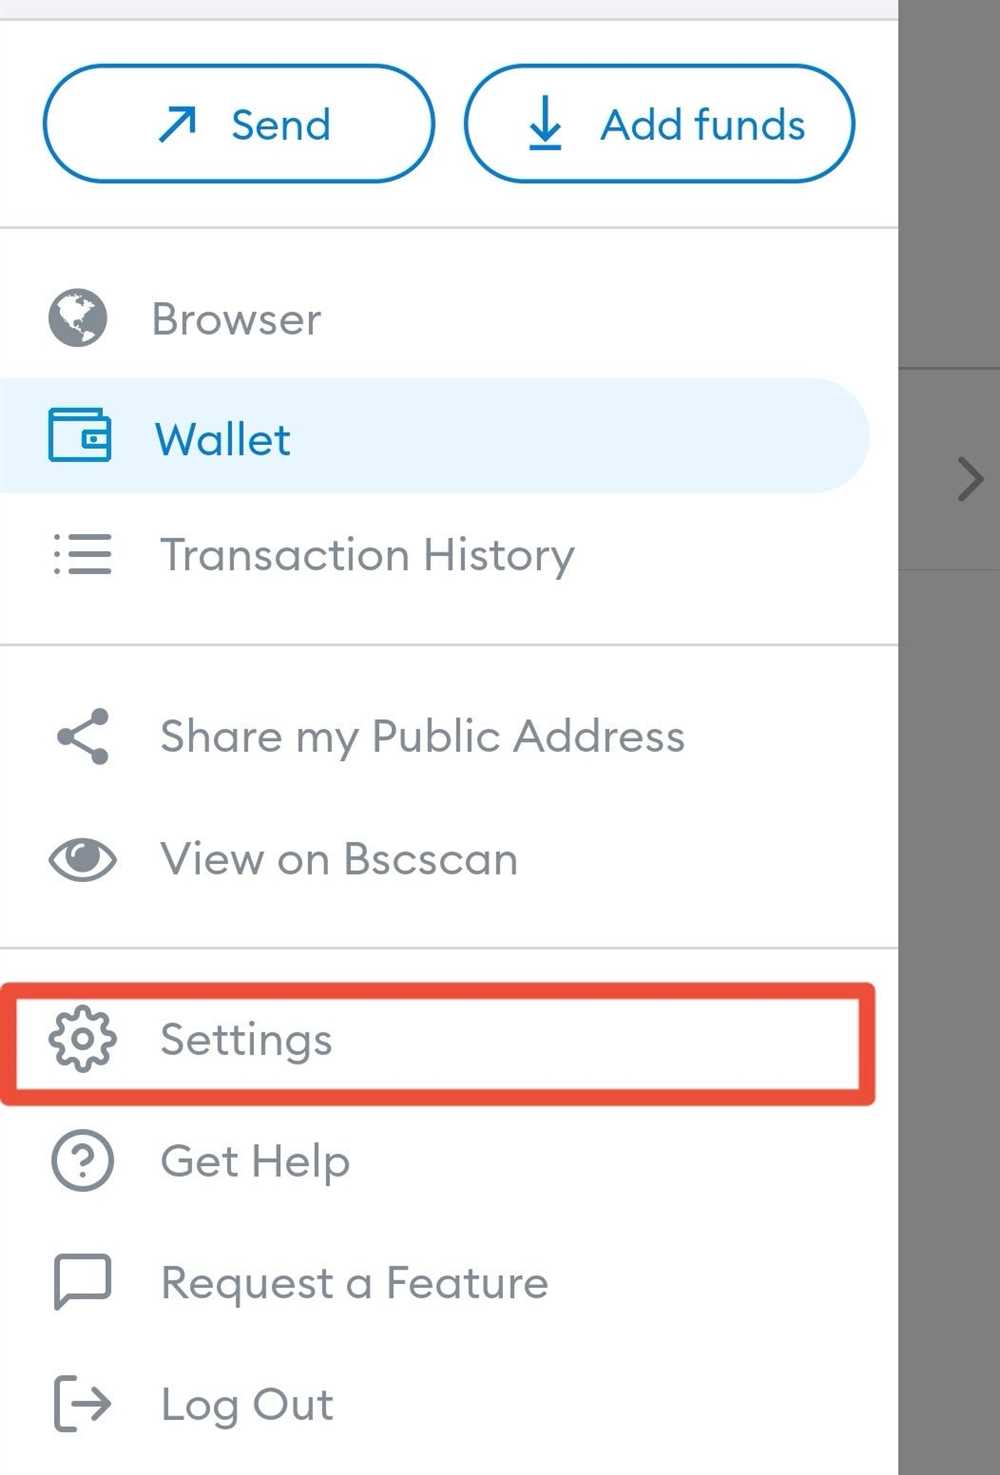
- Click on the network selection dropdown in the Metamask wallet.
- Scroll down and click on the “Custom RPC” option.
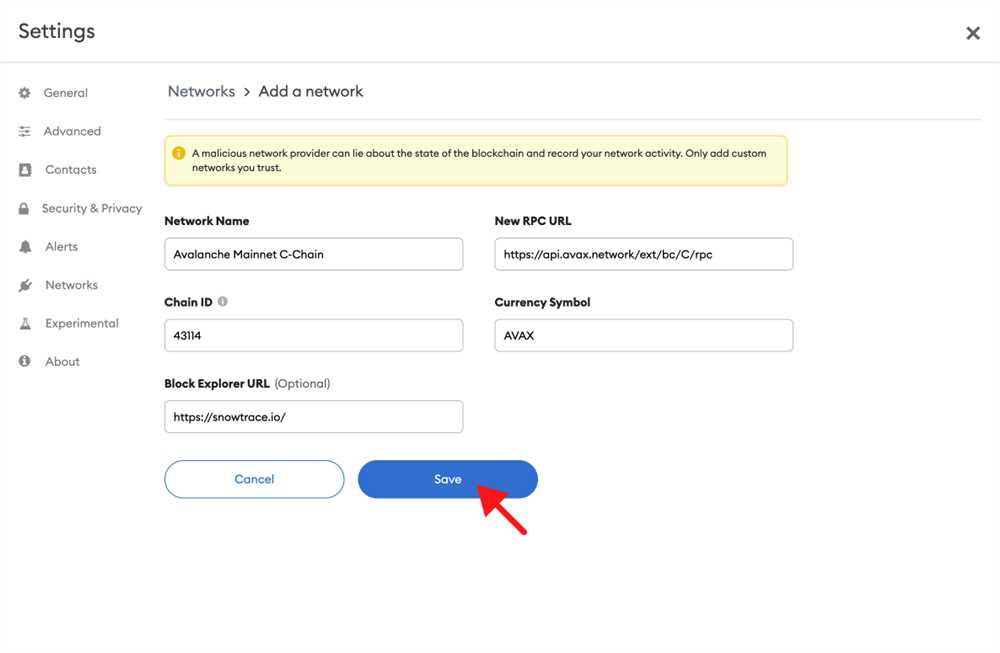
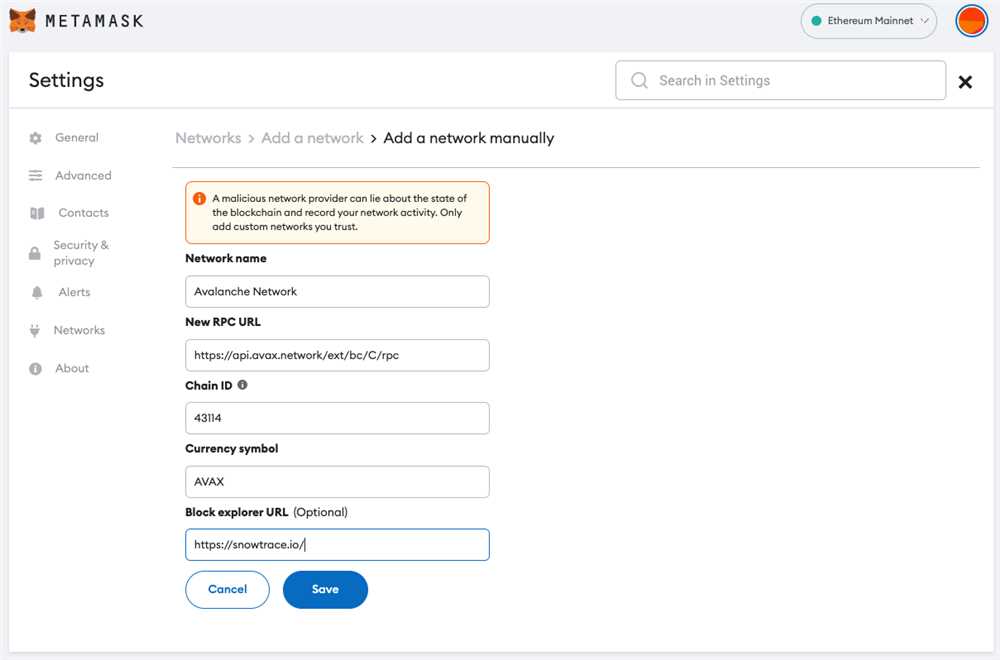
- In the “New Network” form, enter the following details:
- Network Name: Avax C-Chain
- New RPC URL: https://api.avax.network/ext/bc/C/rpc
- Chain ID: 43114
- Symbol (optional): AVAX
- Block Explorer URL (optional): https://cchain.explorer.avax.network/
- Click on the “Save” button to save the network configuration.
- Your Metamask wallet will now be connected to the Avax C-Chain network and you can start using it for transactions.
Option 2: Connecting to Avax C-Chain using the Chain ID
- Click on the network selection dropdown in the Metamask wallet.
- Scroll down and click on the “Custom RPC” option.
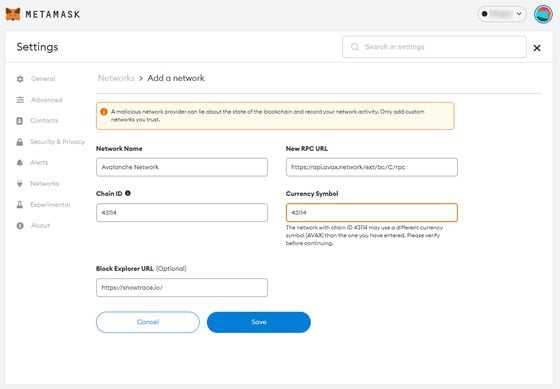
- In the “New Network” form, enter the following details:
- Network Name: Avax C-Chain
- New RPC URL (optional): https://api.avax.network/ext/bc/C/rpc
- Chain ID: 43114
- Symbol (optional): AVAX
- Block Explorer URL (optional): https://cchain.explorer.avax.network/
- Click on the “Save” button to save the network configuration.
- Your Metamask wallet will now be connected to the Avax C-Chain network and you can start using it for transactions.
Choose either option 1 or option 2 to connect your Metamask wallet to the Avax C-Chain network. Once connected, you will be able to send and receive AVAX tokens and interact with decentralized applications on the Avax C-Chain network.
Section 2: Funding Your Avax C-Chain Wallet
Before you can start using the Avax C-Chain on Metamask, you’ll need to fund your wallet with some AVAX tokens. Here’s a step-by-step guide on how to do it:
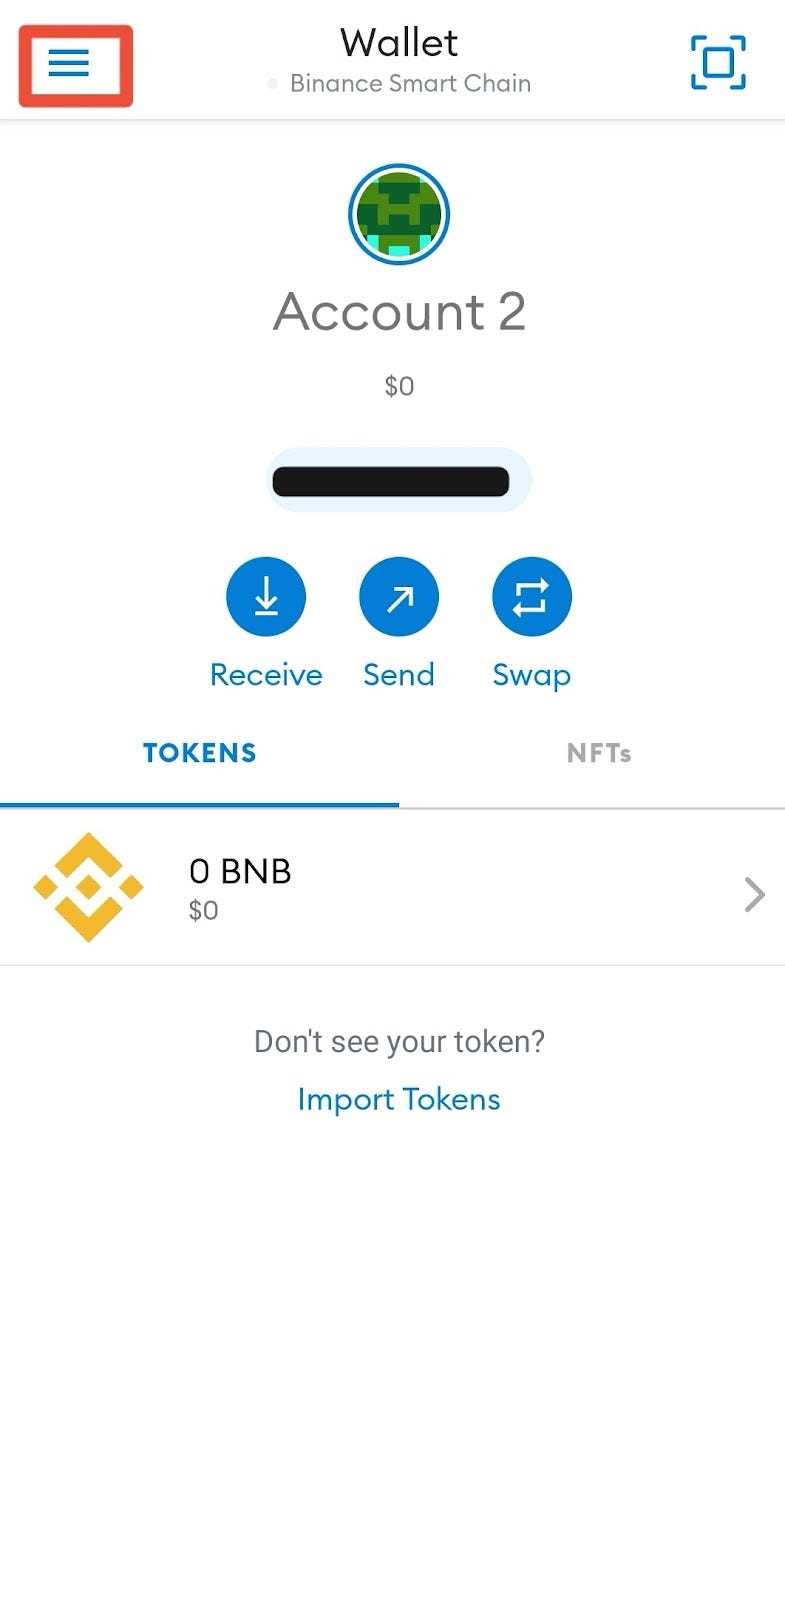
- Open your Metamask wallet and log in if needed.
- Select the Avax C-Chain network from the network selection dropdown in the top menu.
- Click on the “Assets” tab on the bottom menu.
- Click on the “Add Token” button.
- In the “Token Contract Address” field, enter the AVAX token contract address:
0xB31f66AA3C1e785363F0875A1B74E27b85FD66c7. - Click on the “Next” button.
- Metamask will automatically fill in the token symbol and decimal places. Click on the “Add Tokens” button.
- Your Avax C-Chain wallet is now ready to receive AVAX tokens. You can now proceed to fund your wallet.
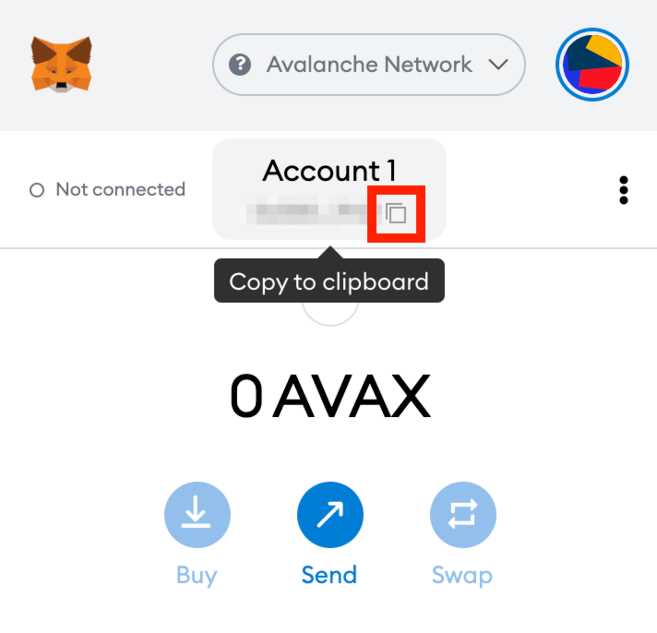
- Locate your Avax C-Chain wallet address by clicking on the “Account” icon in the top menu and selecting “Account Details”.
- Copy the wallet address to your clipboard.
- Go to your chosen exchange or wallet where you hold AVAX tokens.
- Initiate a withdrawal or send transaction and paste your Avax C-Chain wallet address as the recipient.
- Specify the amount of AVAX tokens you want to send and confirm the transaction.
- Wait for the transaction to be confirmed on the Avax C-Chain network.
- Once the transaction is confirmed, the AVAX tokens will be added to your Avax C-Chain wallet balance.
Now that your Avax C-Chain wallet is funded, you’re ready to start using it for transactions and interactions on the Avalanche network. Make sure you have enough AVAX tokens to cover any gas fees or transaction costs.
What is Avax C-Chain?
Avax C-Chain is a blockchain platform that allows for the creation and execution of decentralized applications (dApps). It is built on the Avalanche network and provides high scalability and low transaction fees.
How can I set up Avax C-Chain on Metamask?
To set up Avax C-Chain on Metamask, you need to add the Avax C-Chain network to Metamask. Open Metamask and click on the network selection dropdown. Then click on “Custom RPC” and enter the Avax C-Chain network details, including the RPC URL and chain ID. Once you have added the network, you can switch to Avax C-Chain in Metamask and start using it.
What are the benefits of using Avax C-Chain on Metamask?
Using Avax C-Chain on Metamask allows you to access and interact with decentralized applications (dApps) built on the Avax C-Chain network. It provides high scalability and low transaction fees, making it ideal for developers and users looking for efficient and cost-effective blockchain solutions. Additionally, Metamask provides a user-friendly interface for managing your Avax C-Chain assets and transactions.