
Welcome to the step-by-step guide on how to set up a BEP20 address in MetaMask! MetaMask is a popular digital wallet that allows users to manage their cryptocurrencies and access decentralized applications (dApps) built on the Ethereum blockchain. By setting up a BEP20 address in MetaMask, you will be able to securely store and transfer BEP20 tokens, which are tokens built on the Binance Smart Chain.
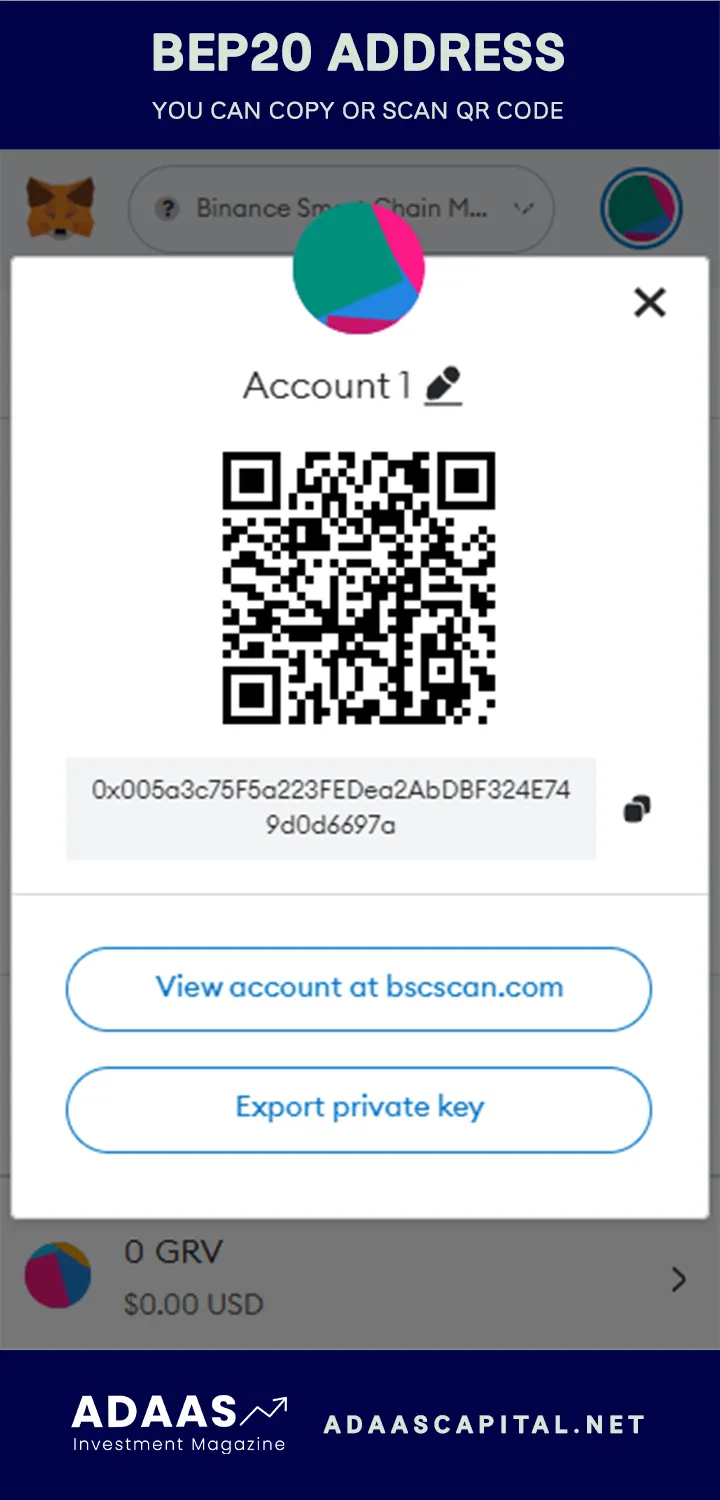
What is a BEP20 address?
A BEP20 address is a unique identifier used to send and receive BEP20 tokens on the Binance Smart Chain. Similar to an Ethereum address, a BEP20 address is a hexadecimal string consisting of 40 characters. It is important to note that a BEP20 address is different from a wallet address on other blockchains, so you will need to set up a specific BEP20 address if you want to interact with BEP20 tokens.
Now, let’s dive into the step-by-step process of setting up a BEP20 address in MetaMask:
Creating a MetaMask Wallet
To begin using MetaMask, you’ll need to create a wallet. Follow these step-by-step instructions to set up your MetaMask wallet:
Step 1: Install MetaMask
Visit the MetaMask website and download the extension for your preferred web browser. Once the extension is installed, you’ll see the MetaMask icon in your browser’s toolbar.
Step 2: Creating a New Wallet
- Click on the MetaMask icon in your browser’s toolbar.
- A popup window will appear. Click on “Create a Wallet” to begin the wallet creation process.
- You will be prompted to create a strong password for your wallet. Enter a secure password and make sure to remember it.
- Next, you will need to backup your wallet seed phrase. The seed phrase is a series of 12 random words that can be used to restore your wallet if you forget your password or lose access to your device. Write down the seed phrase and store it in a safe place.
- Confirm that you have saved your seed phrase by selecting the words in the correct order.
- Congratulations! Your MetaMask wallet has been successfully created.
Step 3: Adding Funds to Your Wallet
Now that you have a MetaMask wallet, you can add funds to it by purchasing or transferring cryptocurrencies to your wallet address. You can also connect your wallet to decentralized applications (DApps) to interact with various blockchain networks.
To view your wallet address or manage your wallet settings, click on the MetaMask icon in your browser’s toolbar and select the appropriate options.
We recommend familiarizing yourself with the features and security measures provided by MetaMask to ensure the safekeeping of your funds and personal information.
Connecting to the Binance Smart Chain
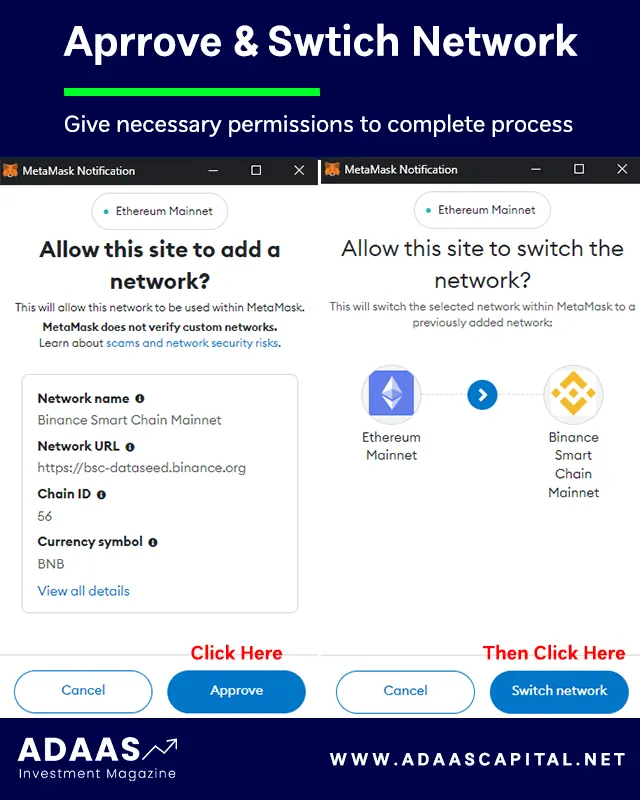
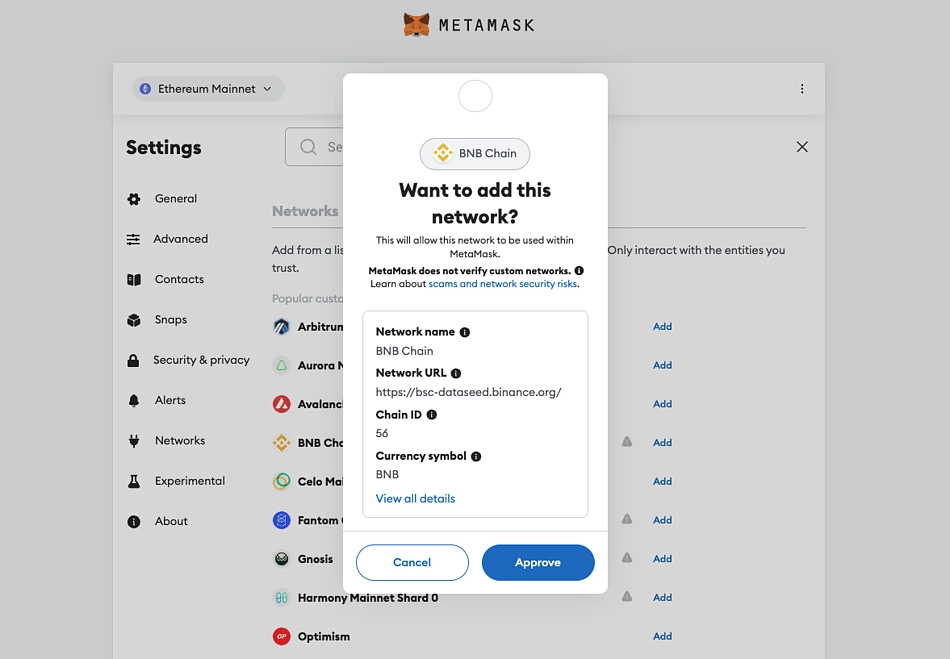
To connect MetaMask to the Binance Smart Chain, you will need to add the Binance Smart Chain network to your MetaMask wallet.
Follow these steps to connect to the Binance Smart Chain:
| Step 1: | Open MetaMask and click on the network selection dropdown located at the top of the window. |
| Step 2: | Scroll down to the bottom of the list and click on “Custom RPC”. |
| Step 3: | In the “New Network” form, enter the following details: |
| Network Name: Binance Smart Chain | |
| New RPC URL: https://bsc-dataseed.binance.org/ | |
| ChainID: 56 | |
| Symbol: BNB | |
| Block Explorer URL: https://bscscan.com | |
| Step 4: | Click on “Save” to add the Binance Smart Chain network to your MetaMask wallet. |
Once you have connected to the Binance Smart Chain, you will be able to interact with BEP20 tokens and use decentralized applications (DApps) that are built on the Binance Smart Chain.
Adding a BEP20 Token to MetaMask
After setting up your BEP20 address in MetaMask, you may want to add specific BEP20 tokens to your wallet. You can easily do this by following these steps:
- Open your MetaMask extension in your browser.
- Click on the “Menu” button in the top right corner of the MetaMask interface.
- Select “Add Token” from the dropdown menu.
- In the “Add Token” window, click on the “Custom Token” tab.
- Enter the contract address of the desired BEP20 token in the “Token Contract Address” field.
- MetaMask will automatically fetch and display the token symbol and decimals. Verify the information is correct.
- Click on the “Next” button to proceed.
- Review the token details, such as the symbol, name, and decimals, and click on the “Add Tokens” button.
- The BEP20 token will now be added to your MetaMask wallet, and you will be able to see your balance and conduct transactions with the token.
It is important to note that adding a BEP20 token to MetaMask simply displays the balance and enables you to transact with the token. It does not grant ownership or control over the token. Ensure that you are interacting with trusted tokens and contracts before adding them to your wallet.
What is a BEP20 address?
A BEP20 address is a unique identifier used in the Binance Smart Chain network. It is used to send, receive, and store BEP20 tokens.