
Are you new to the world of cryptocurrencies and want to learn how to transfer your Ethereum (ETH) from Coinbase to MetaMask? You’ve come to the right place! In this step-by-step guide, we will walk you through the process and help you navigate the world of decentralized finance.
Step 1: Set up your MetaMask wallet
If you don’t already have a MetaMask wallet, you’ll need to set one up. MetaMask is a free and secure browser extension that allows you to manage your Ethereum and interact with decentralized applications (dApps). Simply visit the MetaMask website and follow the instructions to create your wallet. Make sure to store your seed phrase in a safe place, as it will be your only way to recover your wallet if you forget your password.
Step 2: Connect your MetaMask wallet to your Coinbase account
Once your MetaMask wallet is set up, you’ll need to connect it to your Coinbase account. Open Coinbase and go to the “Settings” or “Account” section. Look for the option to add a new wallet and select MetaMask. You will need to authorize the connection by logging in to your MetaMask wallet and confirming the connection.
Step 3: Transfer ETH from Coinbase to your MetaMask wallet
Now that your MetaMask wallet is connected to Coinbase, you can transfer your ETH. Go to your Coinbase account and select the “Send” option. Enter the amount of ETH you want to transfer and paste your MetaMask wallet address in the recipient field. Double-check the address to ensure it is correct, as cryptocurrency transactions are irreversible.
Step 4: Confirm the transaction
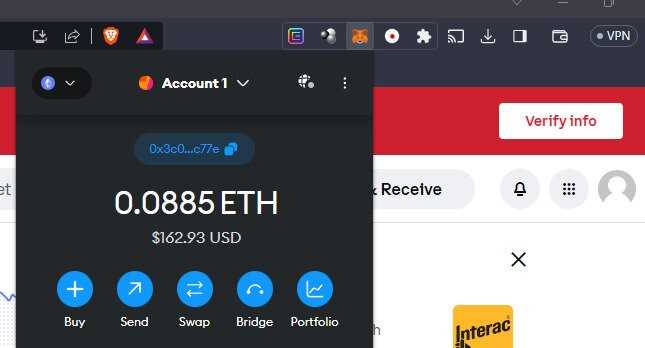
After confirming the transaction details, Coinbase will send you a notification to verify the transfer. Open your MetaMask wallet and check for the incoming transaction. Once you see the transaction, review the details and click “Confirm” to complete the transfer. The ETH should now appear in your MetaMask wallet.
Step 5: Start using your ETH on MetaMask
With your ETH now in your MetaMask wallet, you can start using it on various decentralized applications and participate in the world of decentralized finance. Whether you want to invest in other cryptocurrencies, participate in token sales, or use your ETH for other purposes, MetaMask provides you with the tools to do so securely and easily.
That’s it! You have successfully transferred your ETH from Coinbase to MetaMask. Remember to keep your wallet secure and stay informed about the latest trends and developments in the world of cryptocurrencies. Happy exploring!
A Step-by-Step Guide: Transferring ETH from Coinbase to MetaMask
Transferring ETH from Coinbase to MetaMask is a straightforward process that allows you to access and manage your Ethereum funds securely. Follow these steps to complete the transfer:
- Open your Coinbase account and log in.
- Once logged in, navigate to the “Accounts” tab and locate your ETH wallet.
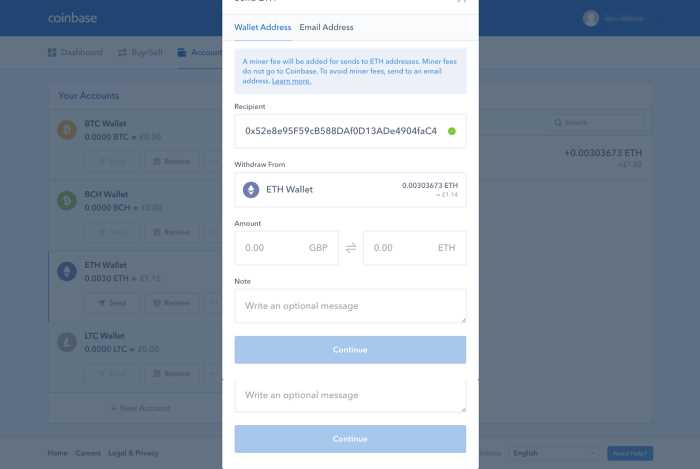
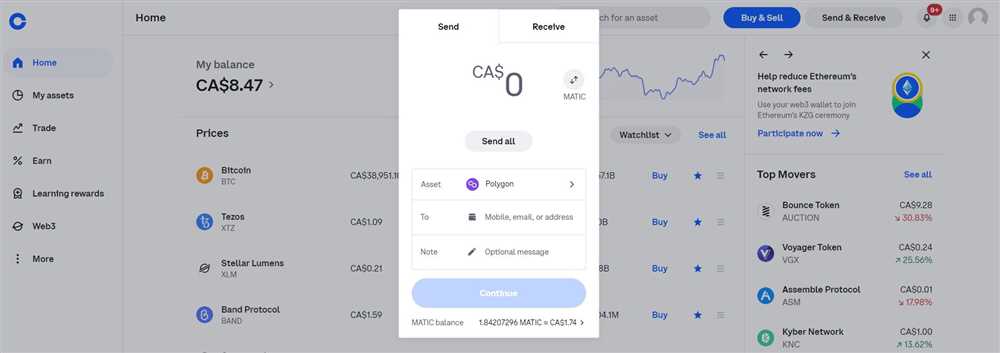
- Click on the “Send” button, which will open a new window.
- Copy your MetaMask ETH address. To do this, open the MetaMask extension in your browser, click on the account icon, and select the account you want to use. Then, click on the three-dot menu and choose “Copy Address to Clipboard”.
- Return to the Coinbase “Send” window and paste your MetaMask ETH address into the “Recipient” field.
- Double-check that the address is correct and verify that you are sending ETH to the correct MetaMask account. Pay attention to any warnings or notices Coinbase might show.
- Enter the amount of ETH you want to transfer. Coinbase might display the amount in your account’s fiat currency equivalent.
- Review the transaction details and make sure everything is correct.
- Click on the “Send” button to initiate the transfer. Coinbase might ask you to confirm the transaction via email or two-factor authentication.
- Wait for the transfer to be processed. This can take several minutes, depending on the current network congestion and the gas fees you have chosen.
- Once the transfer is completed, you can check your MetaMask account to confirm that the ETH has been successfully received.
By following these steps, you can easily transfer your ETH from Coinbase to your MetaMask wallet and start using your funds within the MetaMask ecosystem.
Create a MetaMask Wallet
To start transferring ETH from Coinbase to MetaMask, you will first need to create a MetaMask wallet. MetaMask is a popular cryptocurrency wallet and browser extension that allows you to interact with decentralized applications (dApps) on the Ethereum network.
Follow these steps to create a MetaMask wallet:
- Open the MetaMask website or browser extension and click on the “Get Started” button.
- Click on the “Create a Wallet” option.
- Read and accept the terms of use.
- Create a strong password for your MetaMask wallet.
- Click on the “Create” button.
- You will be presented with a set of secret backup phrases. It is important to write down these phrases and keep them in a safe place. They act as a backup for your wallet and can be used to restore access to your funds in case your computer or device is lost or stolen.
- Confirm the backup phrases by clicking on them in the correct order.
- Congratulations! You have now successfully created a MetaMask wallet.
Once your MetaMask wallet is set up, you can proceed with transferring ETH from Coinbase to MetaMask by following the steps outlined in the next sections.
Connect Your Coinbase Account

Before you can transfer ETH from Coinbase to MetaMask, you need to connect your Coinbase account to MetaMask by following these steps:
- Open the MetaMask extension in your browser and click on the account icon.
- Select “Connect Wallet” from the dropdown menu.
- In the Connect Wallet window, choose “Coinbase” as the wallet you want to connect.
- Click on the “Connect” button.
- You will be redirected to the Coinbase login page. Enter your Coinbase email and password and click “Sign In”.
- After successfully logging in, Coinbase will ask for your permission to connect with MetaMask. Click on the “Allow” button to grant permission.
- Your Coinbase account is now connected to MetaMask!
Now that your Coinbase account is linked to MetaMask, you can proceed to transfer ETH from Coinbase to MetaMask using the steps provided in the next section.
Transfer ETH from Coinbase
Transferring Ethereum (ETH) from Coinbase to MetaMask is a straightforward process that allows you to use your ETH in decentralized applications and interact with the Ethereum blockchain. To make the transfer, follow these step-by-step instructions:
Step 1: Create and log in to your MetaMask account
If you haven’t already, download and install the MetaMask browser extension for your preferred web browser. Once installed, open MetaMask and follow the prompts to create a new account or import an existing one. Make sure to securely save your seed phrase as it will be needed to recover your account if necessary. After creating your account, log in to MetaMask.
Step 2: Retrieve your MetaMask Ethereum address
After logging in to your MetaMask account, copy your Ethereum address. This address will be used to receive the ETH transferred from Coinbase.
Step 3: Log in to Coinbase and initiate the transfer
Open the Coinbase website or app and log in to your account. Navigate to the “Accounts” tab and select your Ethereum wallet. Click on the “Send” button to initiate a new transaction.
Fill in the recipient address field with your MetaMask Ethereum address that you copied earlier. Enter the amount of ETH you want to transfer, ensuring that you have enough funds to cover any transaction fees. Double-check the address to ensure it is correct, as sending ETH to the wrong address can result in permanent loss of funds.
Step 4: Confirm and complete the transfer
After verifying all the transaction details, click on the “Continue” or “Send” button to proceed with the transfer. Before the transaction can be finalized, Coinbase may require you to verify your identity or enter a two-factor authentication code, depending on your account settings.
Once the transfer is approved and confirmed, you will receive a notification from Coinbase. The ETH should now be on its way to your MetaMask wallet.
Step 5: Confirm the receipt of ETH in MetaMask
After a short period of time, the ETH transfer should be completed and show up in your MetaMask account. To verify the receipt, open MetaMask and navigate to the account that you sent the ETH to. You should see the transferred ETH balance reflected in your account.
Congratulations! You have successfully transferred ETH from Coinbase to MetaMask. Now you can use your ETH to interact with decentralized applications or perform other transactions on the Ethereum network.
Confirm the Receipt in MetaMask
Once you have transferred your ETH from Coinbase to your MetaMask wallet, you need to confirm the receipt in MetaMask. This step is crucial to ensure that your funds are successfully sent and received.
Follow these steps to confirm the receipt in MetaMask:
Step 1: Open MetaMask
Open the MetaMask extension or app on your device and make sure you are on the correct network (Ethereum Mainnet, if you are transferring ETH from Coinbase).
Step 2: Verify the Transaction
In MetaMask, click on the transactions tab to view your recent transactions. Look for the transaction that corresponds to the ETH transfer from Coinbase. It should display the amount of ETH transferred, the sender address (Coinbase), and the receiver address (your MetaMask wallet address).
Verify that the transaction details match your transfer from Coinbase. Make sure the amount is correct and the sender and receiver addresses are accurate. This is essential to confirm that the transaction has been successfully processed.
Step 3: Check the Confirmation Status
In the transactions tab, you will also see the confirmation status of the transaction. You want to ensure that the transaction has been confirmed on the Ethereum network. Depending on the network congestion, it may take some time for the transaction to be confirmed. Generally, a minimum of 12 confirmations is recommended to consider a transaction fully confirmed.
If the transaction has not been confirmed yet, you can wait for it to be processed by the Ethereum network. Alternatively, you may need to increase the gas fee (transaction fee) paid for the transaction to expedite the confirmation process.
Step 4: Verify the Receipt
Once the transaction is confirmed, you can consider the transfer complete. Your ETH has been successfully transferred from Coinbase to your MetaMask wallet.
Double-check your MetaMask wallet balance to ensure that the transferred ETH amount reflects in your wallet. If the balance has been updated, it means the transfer was successful.
Remember to securely store your recovery seed phrase and keep your MetaMask wallet private keys safe. This will help you protect your funds and ensure the security of your ETH holdings.
By following these steps, you can confirm the receipt of your transferred ETH in MetaMask and have peace of mind knowing that your funds are safely stored in your own wallet.