
If you’ve been exploring the world of cryptocurrencies, chances are you’ve come across Metamask. Metamask is a popular cryptocurrency wallet that allows users to securely store and manage their digital assets. One of the key features of Metamask is the ability to import tokens, which allows users to access and interact with a wide range of decentralized applications (dApps).
Importing tokens in Metamask is a straightforward process, but it can seem intimidating if you’re new to cryptocurrency. In this comprehensive guide, we’ll walk you through the step-by-step instructions for importing tokens in Metamask, so you can seamlessly integrate your favorite tokens into your wallet.
Step 1: Install and set up Metamask
The first step is to install and set up Metamask in your preferred web browser. To do this, simply visit the Metamask website and follow the instructions to add the extension to your browser. Once installed, open Metamask and create a new wallet or import an existing one using your seed phrase.
Note: It’s crucial to keep your seed phrase safe and never share it with anyone. This phrase is your key to accessing your wallet and funds, so be sure to store it in a secure place.
Step 2: Access the Metamask wallet
Once you’ve successfully set up Metamask, click on the Metamask extension in your browser’s toolbar to open the wallet. Enter your password and click “Unlock” to access your wallet dashboard.
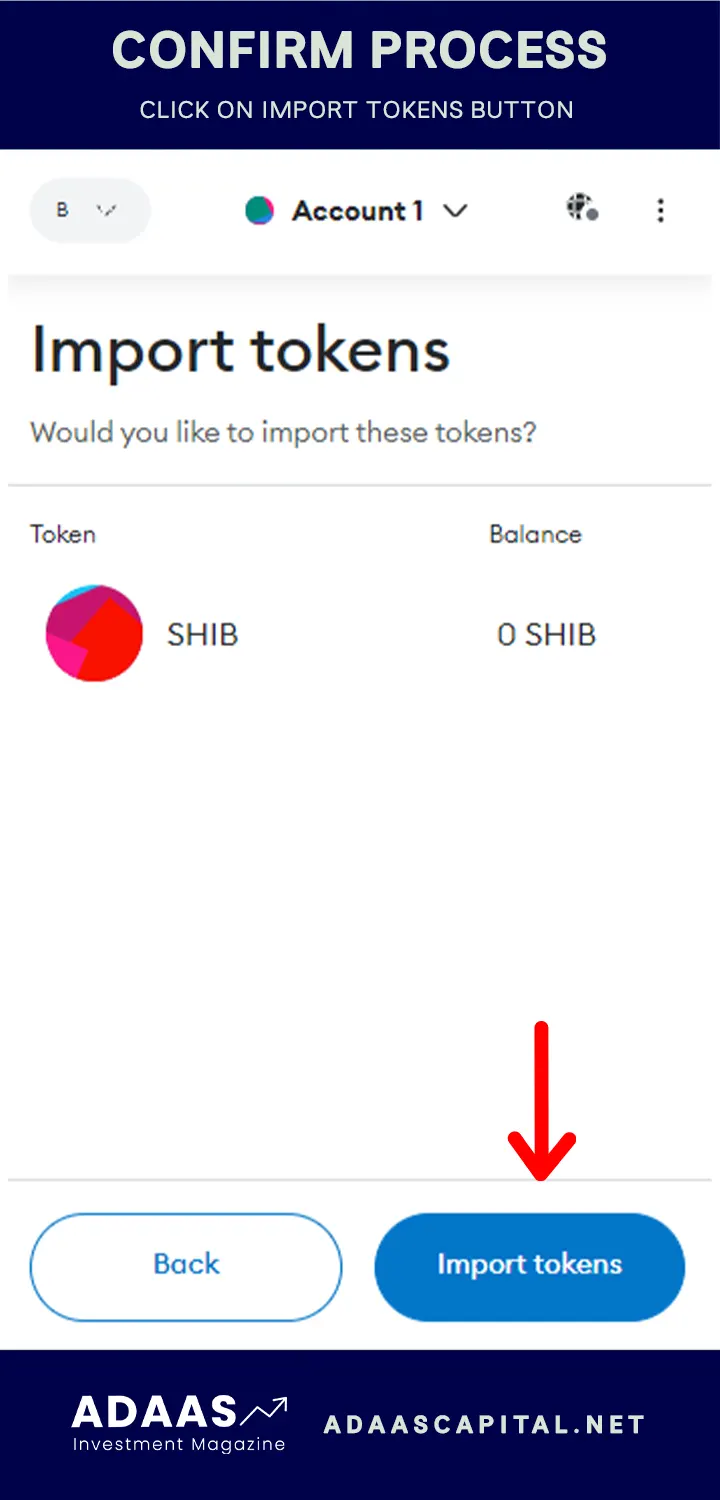
Step 3: Import tokens
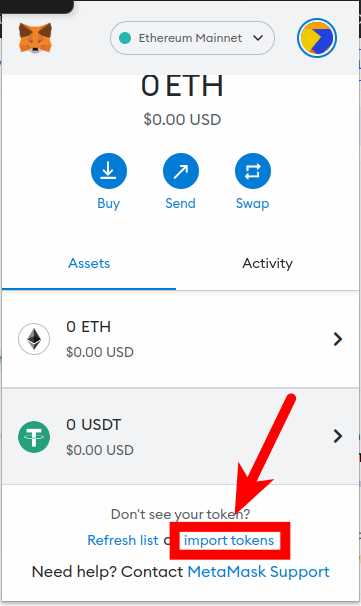
In the Metamask dashboard, locate and click on the “Assets” tab. Here, you’ll find a list of your current tokens. To import a new token, click on the “Add Token” button.
Metamask provides two options for importing tokens: by contract address or by searching for the token’s symbol. If you have the contract address, select the “Custom Token” tab and enter the address in the designated field. Alternatively, if you know the token’s symbol, select the “Search” tab and enter the symbol to search for the token.
Step 4: Confirm and import
After entering the contract address or searching for the token, Metamask will display the details of the token, including its name, symbol, and decimals. Review the information to ensure it matches the token you want to import, and then click on the “Next” button.
Metamask will ask you to confirm the token import. Double-check the details once again and click on the “Add Tokens” button to complete the import process. The token will now appear in your Metamask wallet, and you’ll be able to view and manage it alongside your other tokens.
Remember, when importing tokens, always ensure that you’re using the correct contract address or token symbol to avoid any issues or potential loss of funds.
That’s it! You have successfully imported tokens in Metamask. Now you can enjoy seamless integration with a wide range of dApps and access the full potential of your favorite tokens.
A comprehensive guide to importing tokens in Metamask
Metamask is a popular wallet for managing Ethereum and ERC-20 tokens, and one of its key features is the ability to add custom tokens to your wallet. In this guide, we will provide you with step-by-step instructions on how to seamlessly import tokens into your Metamask wallet.
Step 1: Open Metamask
The first step is to open the Metamask browser extension or mobile app. If you don’t have Metamask installed, you can download it from the official website and set up a new wallet.
Step 2: Access the wallet settings
Once you have Metamask open, click on the three horizontal lines in the top-right corner of the screen to access the wallet settings.
Step 3: Import tokens
In the wallet settings, you will see a menu on the left-hand side. Click on “Assets” to access the token management page. Here, you will find a list of all the tokens you currently have added to your wallet.
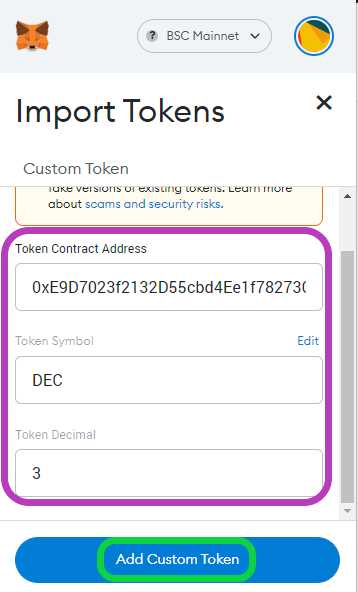
Step 4: Add a custom token
To add a custom token, click on the “Add Token” button. A new window will pop up with three fields: “Token Contract Address,” “Token Symbol,” and “Decimals of Precision.”
Step 5: Find token information
To fill in the token contract address, you will need to find the token information. This can usually be found on the project’s website or in a token listing service. Make sure to copy and paste the contract address correctly to avoid any errors.
Step 6: Fill in token details
After filling in the token contract address, the token symbol and decimals of precision will automatically be filled in if the token is recognized. If not, you will need to manually input this information based on the token’s specifications.
Step 7: Import the token
Once you have filled in all the necessary details, click on the “Next” button. Metamask will display a summary of the token details. Confirm the information and click on the “Add Tokens” button to import the token into your wallet.
And that’s it! You have successfully imported a custom token into your Metamask wallet. You can now view and manage your tokens from the “Assets” page in the wallet settings.
Remember to always exercise caution when adding custom tokens to your wallet and only import tokens from trusted sources. This will ensure the security of your funds and prevent any potential scams or fraudulent tokens from causing harm.
Step-by-step instructions for seamless integration
Integrating tokens into your Metamask wallet is an essential step in maximizing your experience with decentralized finance (DeFi). Follow this step-by-step guide to seamlessly import tokens into your Metamask wallet:
Step 1: Open Metamask
If you haven’t done so already, make sure you have Metamask installed in your preferred web browser. Launch the Metamask extension and create or import your wallet by following the necessary prompts.
Step 2: Locate the “Assets” Tab
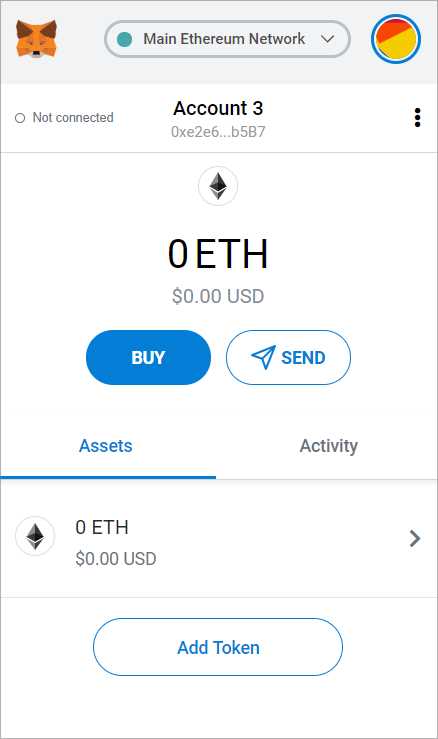
Once inside your Metamask wallet, navigate to the “Assets” tab. This is where you can manage and view the tokens associated with your wallet.
Step 3: Click on “Add Token”
In the “Assets” tab, you will find a button labeled “Add Token”. Click on it to initiate the token import process.
Step 4: Choose the Token Network
A pop-up window will appear, presenting you with two options: “Custom Token” or “Token List”. If the token you want to import is not listed on any popular token list, select “Custom Token”. If it is listed on a token list, select “Token List”.
Step 5: Enter Token Details
If you selected “Custom Token” in the previous step, you will need to manually enter the token details. This includes the contract address, token symbol, and decimal value. If you selected “Token List”, you will be presented with a list of available tokens to choose from. Select the desired token from the list.
Step 6: Confirm Token Import
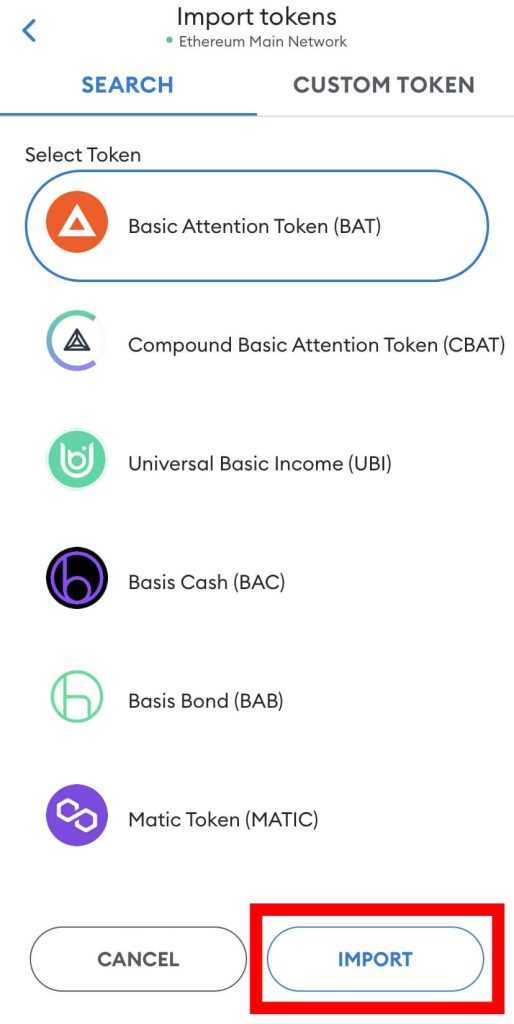
In this final step, review the token details and confirm the import by clicking on the “Next” button. Metamask will then fetch the token details and add the token to your wallet.
Once the import process is complete, you will be able to view and manage your imported tokens within your Metamask wallet. This seamless integration allows you to easily access and engage with a wide range of tokens within the DeFi ecosystem.
Note: It’s essential to double-check the token details during the import process to ensure that you are adding the correct token to your wallet.
By following these simple instructions, you can ensure a seamless integration of tokens into your Metamask wallet, enabling you to explore the full potential of the decentralized finance landscape.
Getting Started: Installing Metamask
To begin importing tokens in Metamask, you first need to install the Metamask extension on your web browser. Metamask is a browser extension that allows you to interact with decentralized applications (dApps) on the Ethereum blockchain.
Follow these step-by-step instructions to install Metamask:
- Open your web browser (e.g. Google Chrome, Mozilla Firefox, or Brave) and visit the official Metamask website at https://metamask.io/.
- Click on the “Get Chrome Extension” or “Get Firefox Extension” button, depending on your web browser.
- A new tab will open, directing you to the respective web store for your browser. Click on the “Add to Chrome” or “Add to Firefox” button to start the installation process.
- A pop-up window will appear on the top-right corner of your browser. Click on “Add extension” to confirm the installation.
- After the installation is complete, the Metamask fox logo will appear next to the address bar of your browser.
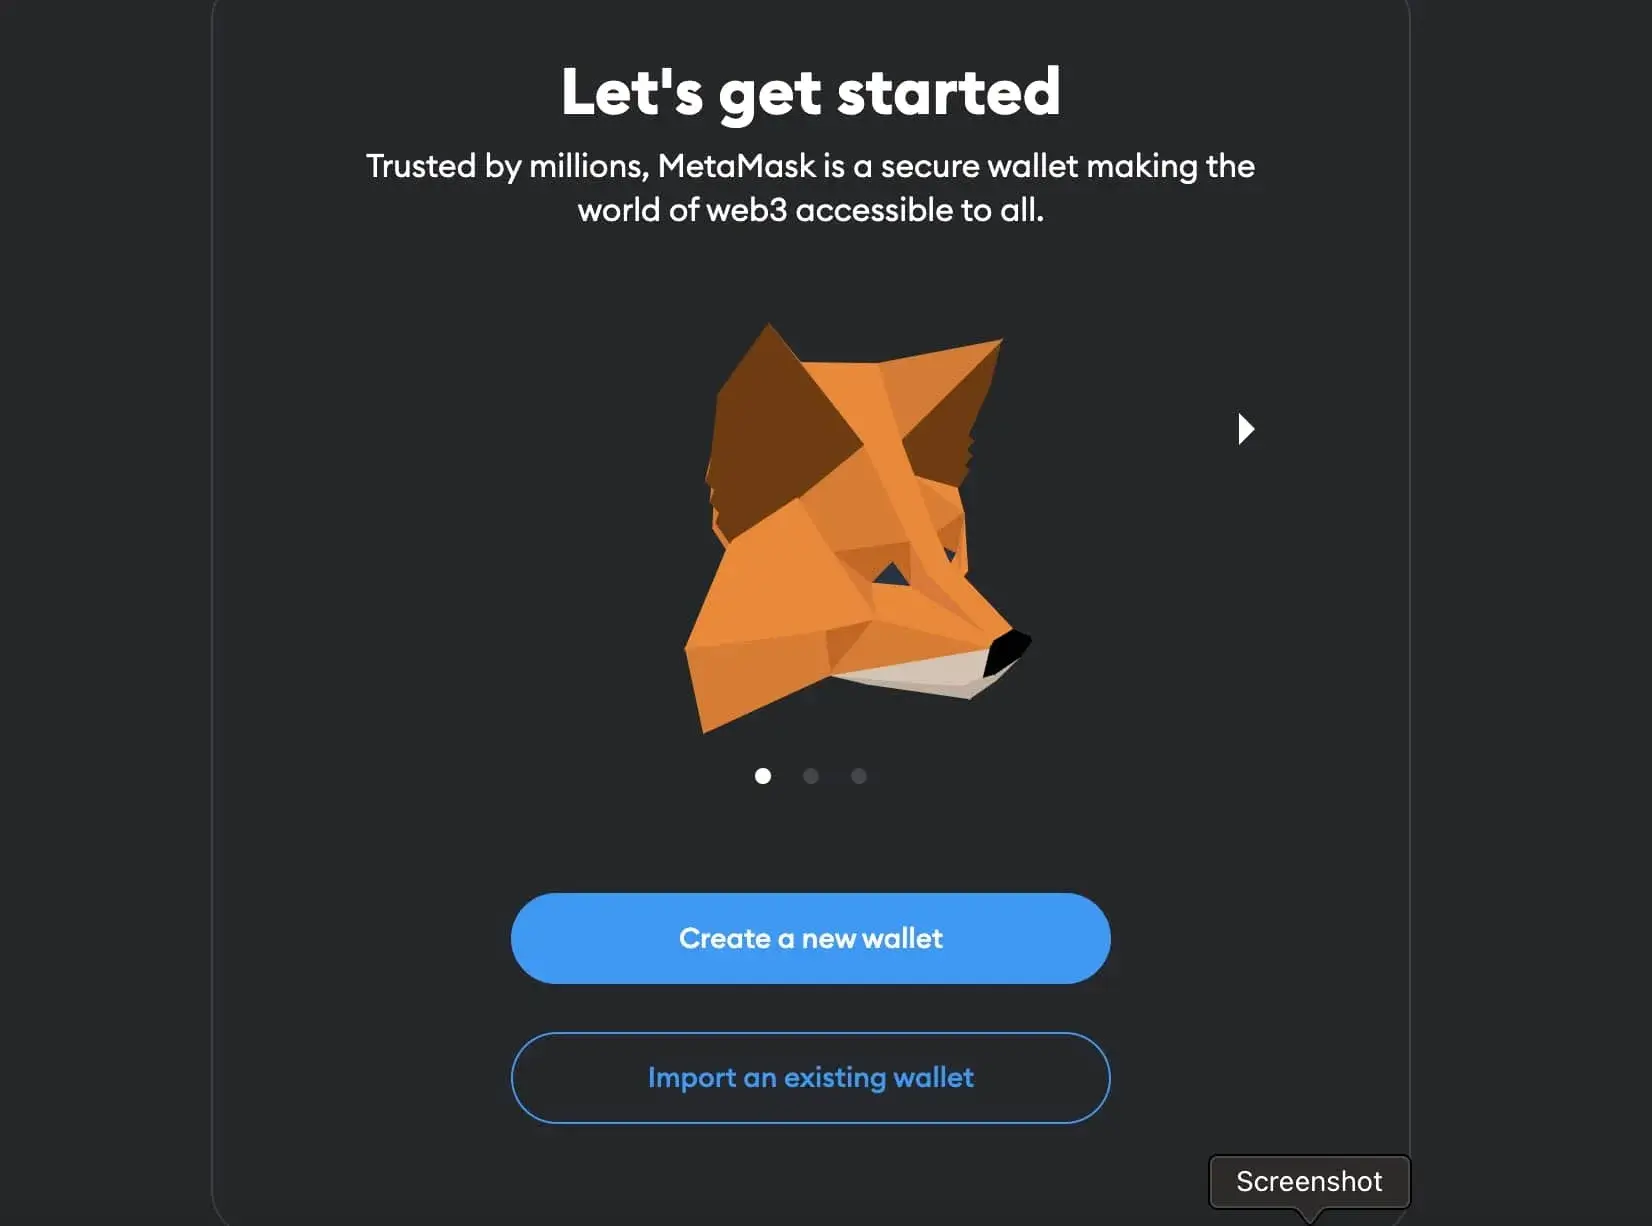
- Click on the Metamask fox logo, and then click on “Get Started” to create a new Metamask wallet. Follow the on-screen instructions to set up a password and create a new wallet.
- Once your wallet is created, you will be provided with a secret backup phrase. It is crucial to write down this backup phrase and keep it in a safe place, as it can be used to restore your wallet in case you lose access to your device.
- After confirming your backup phrase, your Metamask wallet will be created, and you will have access to your Ethereum address and account balance.
Now that you have installed Metamask, you are ready to import tokens into your wallet and seamlessly integrate with dApps on the Ethereum blockchain.
Download the Metamask extension
To begin importing tokens in Metamask, you will first need to download and install the Metamask extension. Follow the steps below to get started:
- Open your preferred web browser (Chrome, Firefox, Brave, etc.)
- Search for “Metamask” in your browser’s search engine or go directly to the official Metamask website.
- Click on the “Download” button located on the website.
- The website will automatically detect your browser and provide you with the correct extension version. Click on the “Install” button to begin the download.
- Once the extension is downloaded, you will see the Metamask icon appear in your browser’s toolbar.
- Click on the Metamask icon to open the extension.
- A welcome screen will appear. Click on the “Get Started” button.
- You will be prompted to import an existing wallet or create a new one. If you already have a wallet, select the import option and enter your seed phrase. Otherwise, select the create option and follow the on-screen instructions to generate a new wallet.
- After setting up your wallet, you will have successfully downloaded and installed the Metamask extension.
With the Metamask extension installed, you are now ready to import tokens and seamlessly integrate them into your wallet. Continue reading to learn how to import tokens step-by-step.
Create a new wallet or import an existing one
Before you can start importing tokens into Metamask, you need to have a wallet set up. You have two options: create a new wallet or import an existing one.
Create a New Wallet
To create a new wallet in Metamask, follow these steps:
- Open the Metamask extension in your browser.
- Click on the “Get Started” button.
- Click on the “Create a Wallet” option.
- Enter a strong password for your new wallet.
- Click on the “Create” button.
- Read and accept the terms of use.
- Click on the “I agree” button.
- Write down the secret backup phrase provided by Metamask. This is crucial for wallet recovery.
- Click on the “Next” button.
- Select the secret backup phrase words in the correct order to verify your backup.
- Click on the “Confirm” button.
Congratulations! You have successfully created a new wallet in Metamask. Make sure to store the secret backup phrase in a safe and secure place.
Import an Existing Wallet
If you already have a wallet and want to import it into Metamask, here’s how you can do it:
- Open the Metamask extension in your browser.
- Click on the account avatar located in the top-right corner.
- Select the “Import Account” option.
- Enter or paste your wallet’s private key or seed phrase.
- Click on the “Import” button.
That’s it! Your existing wallet is now imported into Metamask, and you can start using it to import tokens.
Please note that it’s essential to keep your wallet’s private key or seed phrase secure and confidential. Anyone with access to them can control your wallet and funds.
Set up a password and backup your wallet
Setting up a strong password is crucial for the security of your wallet. Follow these steps to set up a password and backup your wallet:
- Open the Metamask extension in your browser and click on the menu icon in the top right corner.
- Select “Settings” from the dropdown menu.
- Click on the “Security & Privacy” tab.
- Under the “Account 1” section, click on the “Set Password” button.
- Enter a strong password that includes a combination of uppercase and lowercase letters, numbers, and special characters.
- Confirm your password by re-entering it in the “Confirm Password” field.
- Click on the “Save” button to set your password.
- After setting up your password, it is crucial to back up your wallet to protect against losing access to your funds.
- In the same “Security & Privacy” tab, scroll down to the “Seed Phrase” section.
- Click on the “Reveal Backup Phrase” button.
- Write down the 12-word seed phrase provided by Metamask.
- Make multiple copies of this seed phrase and store them in secure locations, such as a safe or a password manager.
- Never share your seed phrase with anyone, as it can be used to access your wallet and steal your funds.
By setting up a strong password and backing up your wallet, you can ensure the security of your funds and have peace of mind while using Metamask for token importing and other transactions.
What is Metamask?
Metamask is a popular cryptocurrency wallet and browser extension that allows users to interact with decentralized applications (DApps) on the Ethereum blockchain.
What are the benefits of importing tokens in Metamask?
Importing tokens in Metamask allows users to easily manage and interact with their tokens within the wallet. It provides a seamless integration for accessing and using different tokens without the need for multiple wallet applications.
Are there any fees for importing tokens in Metamask?
No, there are no fees for importing tokens in Metamask. The process is free of charge and only requires the user to provide the necessary information for the token they want to import.
Is it possible to import tokens from other blockchains in Metamask?
No, Metamask currently only supports the Ethereum blockchain. You can only import tokens that are built on or compatible with Ethereum.