
Are you ready to explore the world of decentralized finance and take advantage of the incredible opportunities it offers? One essential tool that you’ll need in your arsenal is Metamask, a popular cryptocurrency wallet. In this step-by-step guide, we’ll walk you through the process of setting up Matic Network on Metamask, so you can start leveraging the benefits of this innovative blockchain solution.
Before we dive into the details, let’s understand why Matic Network is worth your attention. Matic Network is a Layer 2 scaling solution that aims to enhance the scalability and usability of Ethereum. By leveraging Matic Network, you can enjoy faster and cheaper transactions, allowing you to perform actions on the blockchain with lightning-fast speed and minimal fees.
To get started with Matic Network on Metamask, follow these simple steps:
- Open your Metamask wallet and ensure that you have a sufficient balance of Ethereum (ETH) to cover the gas fees.
- Click on the Metamask extension in your browser and navigate to your wallet.
- Once you’re in your wallet, click on the network dropdown menu and select “Custom RPC.”
- In the “Custom RPC” section, enter the following details:
- Network Name: Matic Mainnet
- New RPC URL: https://rpc-mainnet.maticvigil.com/
- Chain ID: 137
- Symbol: MATIC
- Block Explorer URL: https://explorer.matic.network/
- Click “Save” to add Matic Network to your Metamask.
That’s it! You’ve successfully set up Matic Network on Metamask. Now you can start exploring the world of decentralized applications (dApps) and take advantage of the improved scalability and efficiency that Matic Network offers.
Remember, always exercise caution and do thorough research before engaging with any decentralized finance platform. Happy exploring!
The Importance of Setting Up Matic Network on Metamask
As the popularity of decentralized finance (DeFi) continues to soar, it becomes increasingly important for users to have access to fast and cost-effective transaction solutions. One such solution is Matic Network, a layer 2 scaling solution that aims to provide scalability and a smooth user experience on the Ethereum network. In order to take advantage of the benefits offered by Matic Network, it is crucial to set it up on your Metamask wallet.
1. Enhanced Scalability
By setting up Matic Network on Metamask, you gain access to enhanced scalability. Transactions on the Ethereum network can be slow and costly, especially during times of high network congestion. Matic Network addresses this issue by enabling faster and more efficient transactions. With Matic, you can enjoy near-instant confirmations and significantly reduced transaction fees.
2. Diverse DApp Ecosystem
Matic Network has a rapidly growing ecosystem of decentralized applications (DApps) that offer various services such as gaming, decentralized exchanges, and lending platforms. By setting up Matic Network on Metamask, you can seamlessly interact with these DApps and enjoy a diverse range of services.
Whether you are an avid DeFi user or a casual blockchain enthusiast, setting up Matic Network on Metamask opens up a world of possibilities. Experience faster transactions, lower fees, and access to an ever-expanding ecosystem of DApps. Follow our step-by-step guide to set up Matic Network on Metamask and start exploring the exciting world of decentralized finance today!
Step 1: Installing and Setting Up Metamask
In order to use the Matic Network on Metamask, you will first need to install and set up the Metamask extension in your browser. Follow the steps below to get started:
1. Install Metamask
Go to the official Metamask website (https://metamask.io/) and download the extension for your preferred browser (Chrome, Firefox, or Brave).
Once the download is complete, follow the on-screen instructions to add Metamask to your browser.
2. Create a Metamask Account
After installing the Metamask extension, click on the Metamask icon in your browser toolbar to open it.
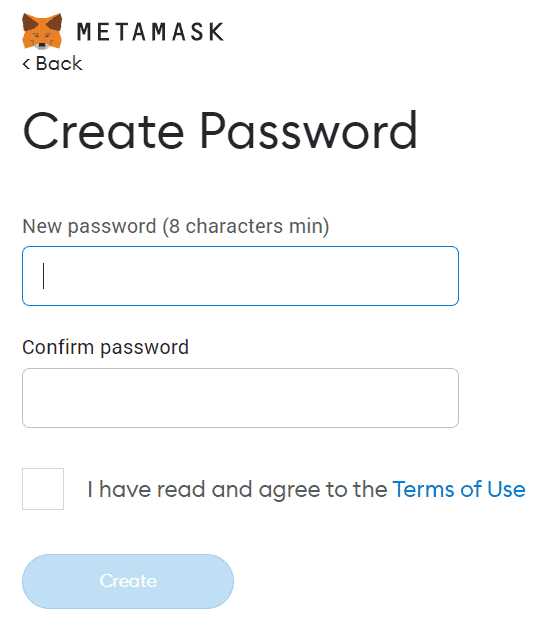
Click “Create a Wallet” to start the account creation process.
Follow the prompts to set up a new account by creating a strong password and accepting the terms of use.
Make sure to store your seed phrase in a safe place, as it will be necessary to recover your account if you ever lose access to your Metamask wallet.
3. Connect Metamask to Matic Network
Once you have set up your Metamask account, you need to connect it to the Matic Network to start using it.
In your Metamask wallet, click on the network dropdown (usually set to “Main Ethereum Network” by default) and select “Custom RPC”.
Enter the following information in the relevant fields:
| Network Name: | Matic Mainnet |
| New RPC URL: | https://rpc-mainnet.matic.network |
| Chain ID: | 137 |
| Symbol: | MATIC |
| Block Explorer URL: | https://explorer.matic.network/ |
Click “Save” to add the Matic Network to Metamask.
Congratulations! You have successfully installed and set up Metamask, and connected it to the Matic Network.
Step 2: Understanding Matic Network
Matic Network is a layer 2 scaling solution for Ethereum, designed to improve scalability and provide a better user experience for decentralized applications (dApps). By using Matic Network, dApps can process a higher volume of transactions at lower costs.
Benefits of Matic Network
There are several benefits to using Matic Network:
- Scalability: Matic Network allows dApps to scale by offloading transactions from the Ethereum mainchain to sidechains or layer 2 solutions. This reduces congestion and improves transaction speeds.
- Lower costs: By utilizing Matic Network, dApps can significantly reduce transaction fees for their users, making the overall user experience more affordable and accessible.
- Improved user experience: Matic Network provides a seamless experience for users, with faster transaction confirmations and a more responsive interface. This makes dApps built on Matic Network more user-friendly.
- Interoperability: Matic Network is designed to be compatible with existing Ethereum infrastructure and developer tools. This allows developers to easily migrate their dApps to Matic Network without significant changes to their codebase.
How Matic Network Works
Matic Network achieves scalability through a combination of sidechains, a decentralized network of Proof-of-Stake (PoS) validators, and the Plasma framework. These components work together to process transactions off-chain and periodically settle them on the Ethereum mainchain.
When a user interacts with a dApp on Matic Network, their transaction is initially processed on a sidechain, which has faster validation times and lower fees compared to the Ethereum mainchain. The sidechain acts as a temporary ledger, ensuring quick confirmation of transactions.
Periodically, the sidechain submits a summary of its state to the Ethereum mainchain. This summary, known as a checkpoint, contains a cryptographic proof of all transactions that occurred on the sidechain. The mainchain validators then verify the checkpoint and record it on the Ethereum mainchain, ensuring the security and immutability of the transactions.
In case of any disputes or fraudulent activity, users can always rely on the Ethereum mainchain for ultimate security and resolution.
By utilizing sidechains and the Plasma framework, Matic Network is able to process a higher volume of transactions while still leveraging the security and decentralization of the Ethereum mainchain.
Step 3: Adding Matic Network to Metamask
Once you have created your Matic account and installed Metamask, you can now proceed to add the Matic Network to your Metamask wallet. Follow the steps below:
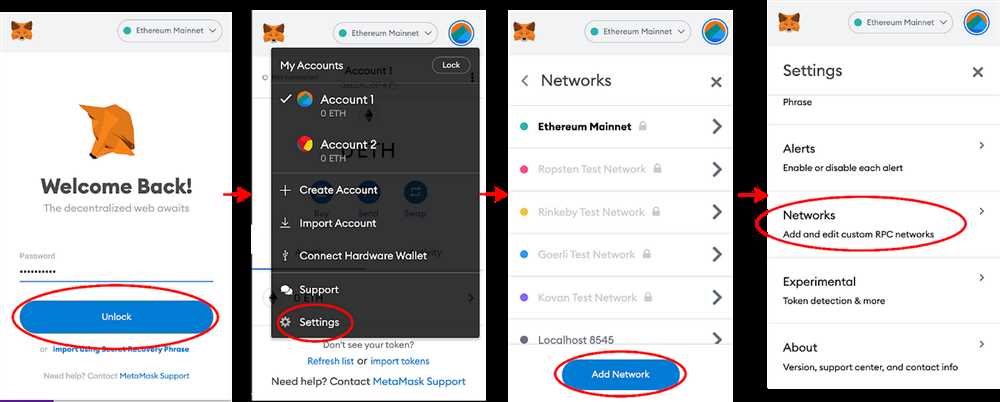
Step 1: Open Metamask
Open the Metamask extension on your preferred browser.
Step 2: Access Settings
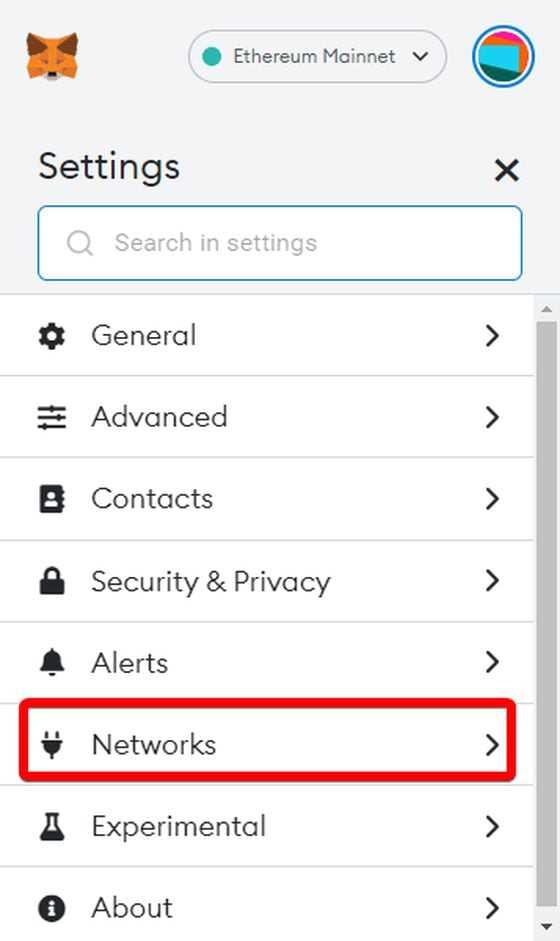
Click on the Metamask icon located at the top-right corner of your browser window. From the drop-down menu, select “Settings”.
Step 3: Networks
In the Settings menu, click on “Networks” which is located in the left sidebar.
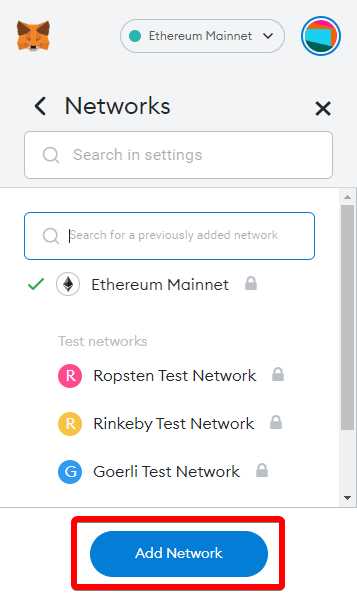
Step 4: Add Network
Scroll down to the Networks section and click on the “Add Network” button.
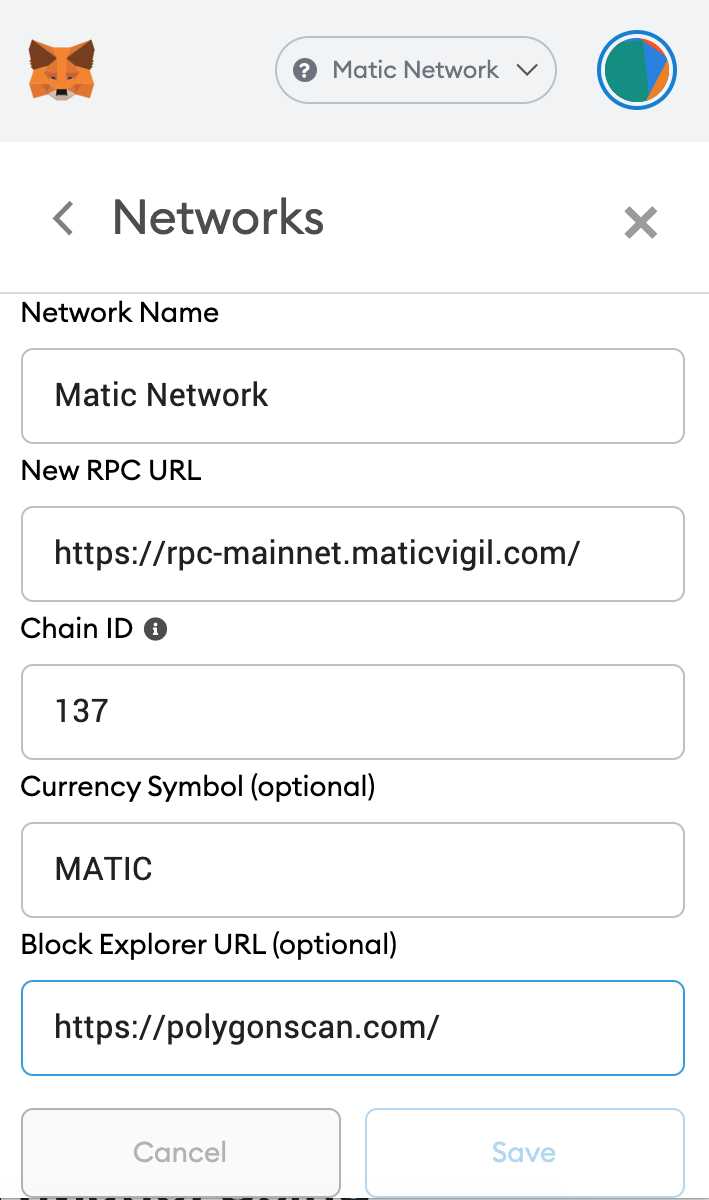
Step 5: Network Details
Fill in the following details to add the Matic Network:
| Network Name: | Matic Mainnet |
| New RPC URL: | https://rpc-mainnet.maticvigil.com/ |
| Chain ID: | 137 |
| Currency Symbol: | MATIC |
| Block Explorer URL: | https://explorer.matic.network/ |
Step 6: Save
Once you have filled in the details, click on the “Save” button. Metamask will now add the Matic Network to your wallet.
Congratulations! You have successfully added the Matic Network to your Metamask wallet. You can now start using the Matic Network to perform transactions and interact with dApps that are built on Matic.
Step 4: Transferring Funds to Matic Network
Once you have successfully set up the Matic Network on your Metamask wallet, the next step is to transfer funds to the Matic Network. This will allow you to take advantage of the fast and low-cost transactions that Matic Network offers.
1. Open your Metamask Wallet
Open your Metamask wallet by clicking on the Metamask extension in your browser’s toolbar. Enter your password to unlock your wallet, if prompted.
2. Switch to Matic Network
Click on the network selection dropdown on the top of the Metamask extension and select the Matic Mainnet network. This will switch your wallet to the Matic Network.
3. Add Matic Tokens
In order to transfer funds to the Matic Network, you will need to add Matic tokens to your wallet. To do this, click on the “Add Tokens” button on the bottom of the Metamask extension.
A new window will open with a search bar. Type “Matic” in the search bar and select “Matic Token (MATIC)”. Click on the “Next” button.
In the next window, click on the “Add Tokens” button to confirm the addition of Matic tokens to your wallet.
4. Transfer funds to Matic Network
Now that you have Matic tokens added to your wallet, you can proceed with transferring funds to the Matic Network. You can do this by clicking on the “Send” button on the Metamask extension.
Enter the recipient’s address in the “To” field. Make sure to double-check the address to ensure you are sending funds to the correct destination.
Enter the amount you wish to transfer in the “Amount” field. You can also select the transaction speed and fee that you are comfortable with.
Click on the “Next” button to proceed to the confirmation screen. Review the details of the transaction and click on the “Confirm” button to initiate the transfer.
5. Confirm the transfer
After clicking the “Confirm” button, Metamask will prompt you to confirm the transaction. Review the details once again to ensure everything is correct, and then click on the “Confirm” button to finalize the transfer.
Wait for the transaction to be confirmed on the Matic Network. Once confirmed, you will see the updated balance of Matic tokens in your wallet.
Congratulations! You have successfully transferred funds to the Matic Network. You can now take advantage of the fast and low-cost transactions offered by Matic Network.
Step 5: Using Matic Network with Metamask
Now that you have successfully set up and connected to the Matic Network on Metamask, it’s time to start using it. Here’s a step-by-step guide on how to use Matic Network with Metamask:
Sending Assets
1. Open the Metamask extension and make sure you are connected to the Matic Network.
2. Click on the “Send” button to initiate a transaction.
3. Enter the recipient’s address and the amount of assets you want to send.
4. Select the token you want to send from the drop-down menu.
5. Set the gas fee according to your preference and click on the “Next” button.
6. Review the transaction details and click on the “Confirm” button to send the assets.
Receiving Assets
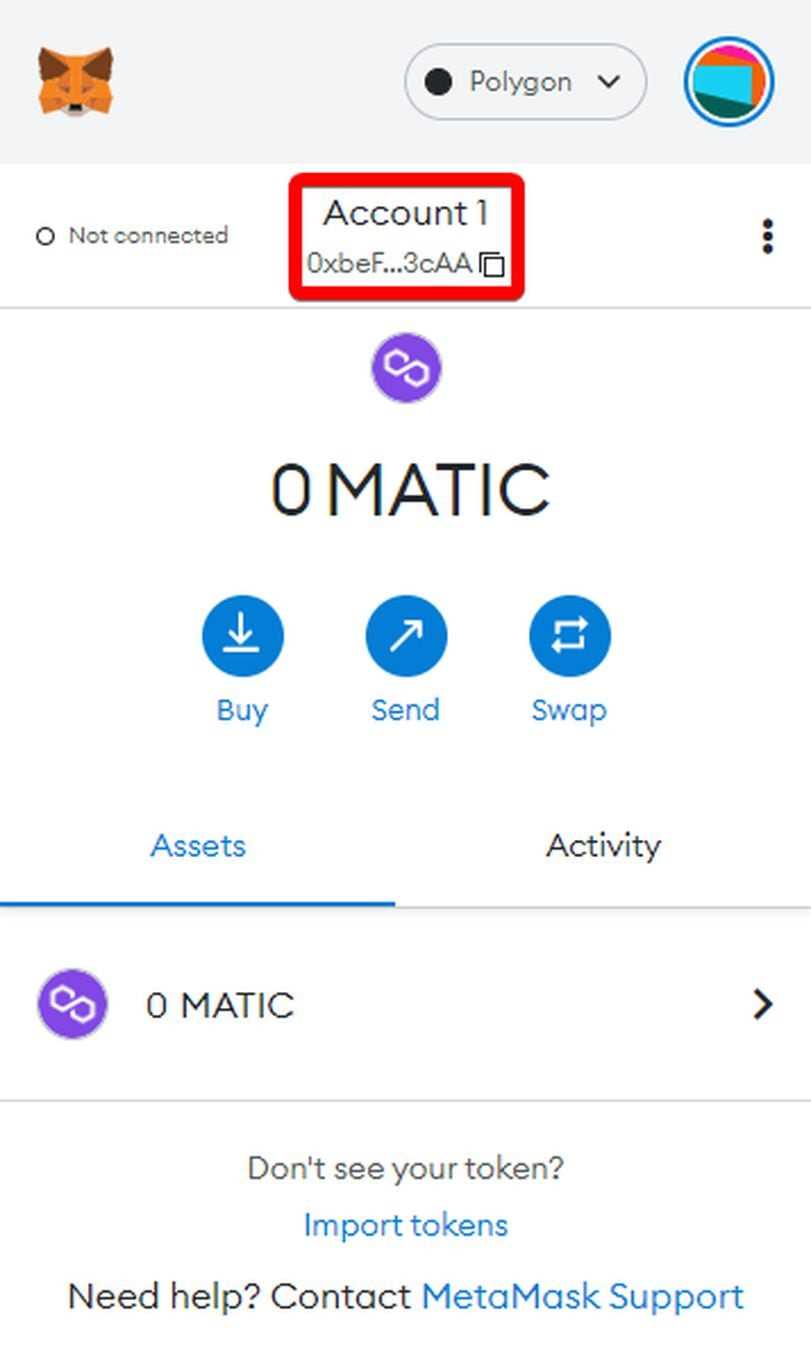
1. Open the Metamask extension and make sure you are connected to the Matic Network.
2. On the main Metamask screen, copy your Matic Network address.
3. Share your Matic Network address with the sender to receive assets.
4. Once the assets are sent to your Matic Network address, they will be visible in your Metamask wallet.
Switching Networks
1. Open the Metamask extension and click on the network selection dropdown.
2. Choose the network you want to switch to, for example, Ethereum Mainnet.
3. Metamask will prompt you to confirm the network switch. Click on the “Switch Network” button.
4. After switching networks, you can use your Metamask wallet on the selected network.
Congratulations! Now you know how to use Matic Network with Metamask. You can start exploring various decentralized applications (dApps) and interact with them using the Matic Network.
What is Matic Network?
Matic Network is a Layer 2 scaling solution for Ethereum that aims to provide faster and cheaper transactions.
Can I use Matic Network for all my Ethereum transactions?
No, Matic Network is a Layer 2 solution that is designed to work alongside the Ethereum mainnet. While it can be used for most transactions, there may be certain instances where you still need to use the Ethereum mainnet.