
If you are a crypto enthusiast looking to explore the world of decentralized finance (DeFi), you’ve probably heard of MetaMask. MetaMask is a popular cryptocurrency wallet and browser extension that allows users to interact with Ethereum and other Ethereum-based decentralized applications (dApps). One of the key features of MetaMask is the ability to store and manage your own cryptocurrency funds securely.
But what if you want to send Bitcoin, the world’s largest cryptocurrency, to your MetaMask wallet? This may seem like a daunting task at first, as MetaMask is primarily designed to work with Ethereum and ERC-20 tokens. However, with the right steps and tools, sending Bitcoin to MetaMask can be a straightforward process.
In this step-by-step guide, we will walk you through the process of sending Bitcoin to your MetaMask wallet. We will cover everything from setting up your MetaMask wallet to converting Bitcoin to an Ethereum-based token that can be stored in your MetaMask wallet. So grab your Bitcoin and let’s get started on this exciting journey into the world of MetaMask and decentralized finance!
Step 1: Setting up MetaMask Wallet
MetaMask is a popular cryptocurrency wallet that allows users to store, manage, and interact with their Ethereum-based tokens. Follow these steps to set up your MetaMask wallet:
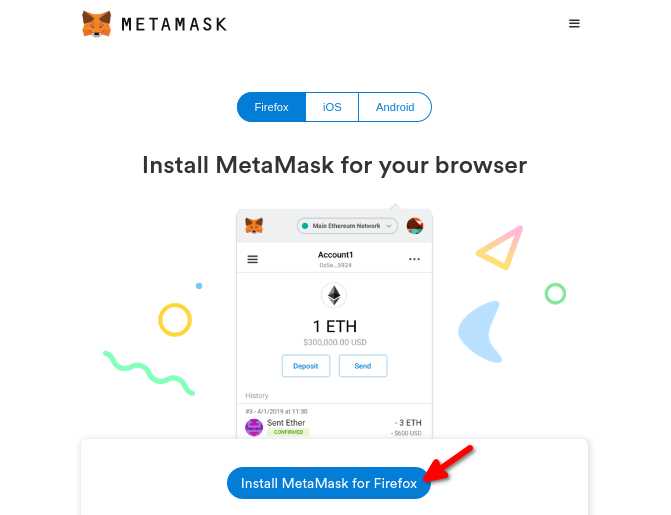
- Install the MetaMask extension: Start by installing the MetaMask browser extension from the official website or the extension marketplace. MetaMask is available for popular browsers such as Google Chrome, Mozilla Firefox, and Brave.
- Create a new wallet: Once the extension is installed, click on the MetaMask icon in your browser toolbar. A pop-up window will appear with the option to create a new wallet. Click on “Get Started” and follow the on-screen instructions to create a password and backup your wallet.
- Backup your seed phrase: MetaMask will provide you with a unique seed phrase consisting of 12 or 24 words. It is crucial to write down and store this seed phrase in a safe place. The seed phrase is the only way to recover your wallet if you forget your password or your device gets lost.
- Unlock your wallet: After setting up your wallet and backing up your seed phrase, you will need to unlock your wallet to access its features. Enter your password and click on “Unlock” to proceed.
- Connect to a network: By default, MetaMask is connected to the Ethereum mainnet. However, you can also connect to various other networks such as Ropsten, Kovan, or Rinkeby for testing purposes. Select your desired network from the drop-down menu at the top of the MetaMask window.
Now that your MetaMask wallet is set up and ready to use, you can proceed to the next step of sending Bitcoin to your MetaMask wallet.
Step 2: Obtaining the Bitcoin Address
Before you can send Bitcoin to your MetaMask wallet, you need to obtain your Bitcoin address. This address will serve as the destination for your Bitcoin transaction.
To obtain your Bitcoin address, follow these steps:
- Open your MetaMask wallet and make sure you are on the main dashboard.
- Click on the account icon located at the top right corner of the screen.
- A drop-down menu will appear. Click on “Account Details”.
- In the “Account Details” screen, you will see a list of your wallet addresses.
- Find the Bitcoin address and click on the copy button next to it to copy the address to your clipboard.
Now that you have obtained your Bitcoin address, you can proceed to the next step and send Bitcoin to your MetaMask wallet.
Step 3: Sending Bitcoin from your Wallet
Once you have loaded your Bitcoin into your MetaMask wallet, you may want to send it to another address or exchange. Follow these steps to successfully send Bitcoin from your wallet:
Step 1: Open your MetaMask wallet and make sure you are on the main screen.
Step 2: Click on the “Send” button located at the bottom of the screen. This will bring up the send transaction page.
Step 3: In the “Recipient” field, enter the Bitcoin address you want to send your funds to. Make sure to double-check the address to avoid any errors.
Step 4: Specify the amount of Bitcoin you want to send in the “Amount” field. MetaMask will automatically display your available balance, so you can easily confirm the amount you want to send.
Step 5: Review the transaction details and ensure everything is correct. Take note of any transaction fees that may be associated with the transaction.
Step 6: If you are satisfied with the transaction details, click the “Next” button to proceed.
Step 7: MetaMask will prompt you to confirm the transaction. Carefully review the details once again and make sure you are sending Bitcoin to the intended recipient.
Step 8: Enter your MetaMask wallet password or provide any other necessary authorization to confirm the transaction.
Step 9: After confirming the transaction, MetaMask will process it and broadcast it to the Bitcoin network. You can view the transaction on the blockchain explorer to track its progress.
Remember, once a Bitcoin transaction is confirmed on the blockchain, it cannot be reversed. Always double-check the recipient address and transaction details before proceeding.
By following these steps, you can confidently send Bitcoin from your MetaMask wallet to any desired address or exchange. Ensure proper security measures are in place and take caution when dealing with cryptocurrency transactions.
Step 4: Confirming the Transaction
After you have entered the recipient address and the amount you want to send, the next step is to confirm the transaction. This is an important step to ensure that you are sending the Bitcoin to the correct address and that you are comfortable with the transaction details.
1. Review the Transaction Details
Before confirming the transaction, it is crucial to carefully review the transaction details. Double-check the recipient address to ensure it is correct, as sending Bitcoin to an incorrect address can result in permanent loss of funds. Also, verify that the amount you want to send is accurate.
2. Check the Transaction Fee
When sending Bitcoin, there is often a transaction fee involved. This fee goes to the miners who confirm and validate the transaction on the blockchain. Make sure to check the transaction fee and ensure that you are comfortable with it. Higher fees generally result in faster confirmation times, while lower fees may cause delays in processing.
3. Approve and Send the Transaction
Once you have reviewed the transaction details and are satisfied with them, you can proceed to approve and send the transaction. Depending on the wallet or platform you are using, you may need to authenticate the transaction with a password, fingerprint, or other security measures.
After confirming the transaction, the Bitcoin will be sent from your wallet to the recipient address. The transaction will then be broadcasted to the Bitcoin network and included in a block for confirmation by miners.
It is important to note that once a Bitcoin transaction is confirmed, it is irreversible. You should only send Bitcoin to trusted addresses and thoroughly review the details before hitting the confirm button.
Step 5: Verifying the Bitcoin Transfer
Once you have sent your Bitcoin to your MetaMask wallet address, it is important to verify the transfer to ensure that it was successful. Here are the steps to verify the Bitcoin transfer:
- Open your MetaMask wallet extension in your web browser.
- Sign in to your MetaMask wallet using your password or preferred authentication method.
- Click on the account icon located at the top right corner of the MetaMask wallet interface.
- Select the account that you sent the Bitcoin to from the dropdown list. Each account has its own unique wallet address.
- In the account details section, you should see the transaction history for that account. Look for the Bitcoin transfer transaction.
- Click on the transaction to view its details.
- Verify that the amount and recipient address match the Bitcoin transfer you initiated.
- You can also click on the transaction ID to view the transaction on a blockchain explorer for further verification.
- If everything matches and the transaction has been confirmed on the blockchain, congratulations! Your Bitcoin transfer to your MetaMask wallet was successful.
Verifying the Bitcoin transfer is an important step to ensure that your funds have been securely transferred to your MetaMask wallet. It allows you to double-check the transaction details and confirm that the transfer was completed successfully. Once you have verified the transfer, you can confidently use your Bitcoin within the MetaMask wallet for various decentralized applications and token swaps.
What is MetaMask?
MetaMask is a browser extension that acts as a cryptocurrency wallet. It allows users to interact with decentralized applications (dApps) on the Ethereum network.
Can I use MetaMask with other cryptocurrencies?
Yes, MetaMask primarily supports Ethereum and ERC-20 tokens. However, it also allows you to connect to other networks such as Binance Smart Chain. Additionally, you can use MetaMask with other cryptocurrencies through decentralized exchanges or bridge platforms.