
Metamask is a popular cryptocurrency wallet and browser extension that allows users to interact with decentralized applications (dApps) on the Ethereum blockchain. One of its key features is the ability to connect to different networks, such as the Ethereum Mainnet, Testnets, and custom networks. This guide will walk you through the process of adding and removing networks on Metamask, providing you with the knowledge you need to navigate the vast network landscape.
Adding a network on Metamask is a straightforward process. Simply open the Metamask extension in your browser and click on the network dropdown menu. From there, select “Custom RPC” to add a custom network. You will need to provide the network’s name, URL, symbol, and chain ID. Once you have entered all the necessary information, click on “Save” to add the network. Metamask will now display your newly added network in the network dropdown menu, allowing you to seamlessly switch between networks.
Removing a network on Metamask is just as easy. To remove a network, go to the network dropdown menu and select “Custom RPC.” In the custom networks list, find the network you want to remove and click on the three-dot menu next to it. From the dropdown menu, select “Remove” to delete the network from Metamask. It’s important to note that removing a network will also delete all the associated accounts, transactions, and dApp connections for that network. Therefore, it’s advisable to double-check your decision before proceeding.
In conclusion, knowing how to add and remove networks on Metamask is crucial for any user looking to explore the world of decentralized finance and interact with various dApps. By following this essential guide, you can easily connect to different networks, manage your cryptocurrency holdings, and stay up-to-date with the latest developments in the blockchain ecosystem. So go ahead and start expanding your network horizons with Metamask!
What is Metamask?

Metamask is a browser extension that serves as a digital wallet for interacting with the Ethereum blockchain. It allows users to securely store and manage their cryptocurrency funds, as well as interact with decentralized applications (dApps) and smart contracts.
With Metamask, users can create multiple Ethereum accounts and easily switch between them. Each account has a unique private key, which is necessary for signing transactions. Metamask also generates a unique 12-word seed phrase, which can be used to restore the wallet in case of loss or theft.
Key Features of Metamask:

- Ethereum Wallet: Metamask provides a secure and user-friendly wallet for managing Ethereum and ERC-20 tokens.
- Browser Integration: Metamask seamlessly integrates with popular browsers like Google Chrome and Firefox.
- dApp Integration: Metamask allows users to access and interact with decentralized applications directly from their browser.
- Transaction Signing: Metamask securely signs transactions using the user’s private key.
- Network Customization: Metamask allows users to add and remove networks, enabling access to different Ethereum-based networks.
Metamask is widely used by developers, traders, and cryptocurrency enthusiasts to securely manage their Ethereum-based assets and participate in the decentralized finance (DeFi) ecosystem. Its user-friendly interface and comprehensive feature set make it a popular choice for those seeking a secure and convenient way to interact with the Ethereum blockchain.
| Advantages | Disadvantages |
|---|---|
| Securely manages private keys | Relies on browser extension |
| Easy integration with dApps | Potential for phishing attacks |
| Allows for multiple accounts | Limited functionality on mobile |
Why Adding and Removing Networks on Metamask is Important
Metamask is a popular Ethereum wallet and browser extension that allows users to interact with decentralized applications (dApps) on the Ethereum network. It supports multiple networks, including the Ethereum mainnet, testnets, and custom networks. Adding and removing networks on Metamask is an important functionality that users should be familiar with for several reasons.
Ease of Access and Efficiency

By adding networks on Metamask, users can easily access and interact with dApps that are built on networks other than the Ethereum mainnet. This allows users to explore and utilize the full potential of the Ethereum ecosystem. Adding custom networks also enables developers to test their dApps on different networks, ensuring compatibility and functionality.
Removing networks that are no longer needed can help declutter the Metamask interface and improve efficiency. It reduces the chances of mistakenly selecting the wrong network when interacting with a dApp or conducting transactions, minimizing the risk of errors and potential losses.
Ensuring Network Security

The ability to add and remove networks on Metamask is crucial for network security. New networks may emerge over time, and users need to stay informed and vigilant about the networks they connect to. Adding a network without proper research and verification can expose users to potential scams or security risks.
Removing unwanted or suspicious networks is essential to maintain the security and integrity of users’ digital assets and personal information. It ensures that users only connect to trustworthy and legitimate networks, reducing the risk of falling victim to phishing attacks or malicious activities.
| Benefits of Adding and Removing Networks: |
|---|
| 1. Easy access to dApps on various networks. |
| 2. Efficient interface and reduced risk of errors. |
| 3. Enhanced network security and protection against scams. |
Overall, adding and removing networks on Metamask is a critical feature that empowers users to navigate the Ethereum ecosystem safely and efficiently. By understanding the importance of this functionality, users can make informed decisions and protect their assets and privacy.
Adding Networks on Metamask
Metamask is a popular cryptocurrency wallet and browser extension that allows users to securely manage their Ethereum-based assets and interact with decentralized applications (DApps) on the Ethereum network. By default, Metamask supports the Ethereum mainnet, but it also allows users to add custom networks to their wallet.
Adding a network on Metamask involves specifying the network’s details, including the network name, RPC URL, chain ID, symbol, and block explorer URL. To add a network, follow these steps:
Step 1: Open Metamask
First, open your Metamask wallet by clicking on the extension icon in your browser’s toolbar. If you don’t have Metamask installed, you can download it from the official website and create a new wallet.
Step 2: Access Network Settings
Once you have your Metamask wallet open, click on the network selector at the top of the interface. This will bring up a dropdown menu with a list of available networks. At the bottom of the menu, click “Custom RPC” to access the network settings.
Step 3: Add Network Details
In the network settings, you will see a form where you can enter the details of the network you want to add. Fill in the following information:
| Network Name: | The name of the network you are adding, e.g., “My Custom Network”. |
| New RPC URL: | The RPC URL for the network. This is an endpoint that allows Metamask to connect to the network. |
| Chain ID: | The unique identifier for the network. Make sure this is correct for the network you are adding. |
| Symbol: | The symbol or ticker for the network’s native currency, e.g., “ETH”. |
| Block Explorer URL: | The URL of a block explorer for the network. This is optional, but it can be useful for viewing transaction history. |
Once you have entered the network details, click “Save” to add the network to your Metamask wallet. You should now see the newly added network in the network selector dropdown.
That’s it! You have successfully added a custom network to your Metamask wallet. You can now switch between different networks and interact with DApps and assets on those networks.
Step 1: Open Metamask
To begin adding or removing networks on Metamask, you need to first open the Metamask extension in your browser. Look for the Metamask icon, usually located at the top-right corner of your browser window. It is a small fox icon.
Click on the Metamask icon to open the extension. A pop-up window will appear, displaying your current wallet balance and recent transactions.
If you haven’t connected your wallet to Metamask yet, you will need to create a new wallet or import an existing one. Follow the on-screen instructions to set up your wallet.
Once you have opened Metamask and connected your wallet, you are ready to proceed to the next step of adding or removing networks.
Note: The process of opening Metamask may vary slightly depending on the browser you are using. However, most browsers will have the Metamask icon at the top-right corner of the window.
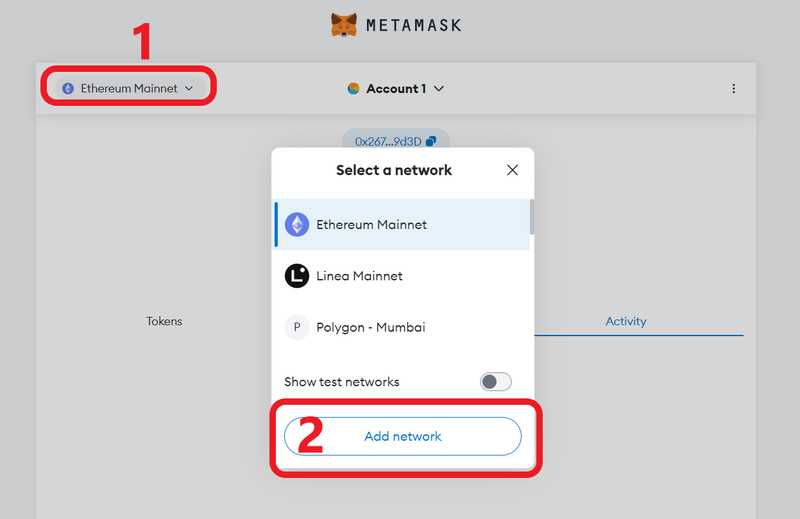
Step 2: Click on Networks
After opening your MetaMask extension, look for the icon in the top right corner of your browser. It will appear as a small fox face, or a colorful circle, depending on the version you are using. Click on this icon to open the MetaMask settings.
Once the settings page is open, locate and click on the “Networks” tab. This tab is where you can manage and add new networks to your MetaMask wallet.
When you click on the “Networks” tab, you will see a list of networks that are already added to your wallet. These include Ethereum Mainnet, Ropsten Test Network, and other popular networks.
If you want to remove a network from your wallet, simply click on the network name to expand its details, and then click on the “Remove” button. Please note that removing a network from your wallet will delete any tokens or assets associated with that network.
To add a new network, click on the “Add Network” button located at the bottom of the networks list. This will open a form where you can enter the details of the network you want to add. Make sure to provide accurate information, including the network name, RPC URL, chain ID, and symbol.
Once you have added a new network, it will appear in the list of networks on your MetaMask wallet. You can then select this network as your active network by clicking on the network name. When a network is selected, any transactions or interactions you make with MetaMask will use that network’s settings and parameters.
By properly managing your networks on MetaMask, you can easily switch between different blockchain networks and access various decentralized applications and services.
Step 3: Add Custom Network
Adding a custom network to MetaMask allows you to connect to a specific blockchain network that is not listed by default. This can be useful if you want to interact with a new blockchain or a test network.
To add a custom network, follow these steps:
- Open your MetaMask extension or application, and click on the network dropdown menu.
- Select “Custom RPC” from the list of options.
- In the “New RPC URL” field, enter the URL of the network you want to connect to. Make sure you have the correct URL provided by the network.
- Set the chain ID if necessary. This is typically an integer value that identifies the network. Consult the documentation or network provider for the correct chain ID.
- Specify a nickname for the network to help you identify it easily.
- Click on “Save” to add the custom network to MetaMask.
Once the custom network is added, you can switch to it by selecting it from the network dropdown menu. You will then be able to interact with the added network in MetaMask, including sending and receiving transactions and interacting with decentralized applications.
Step 4: Enter Network Information
Once you have clicked on the “Networks” tab, you will see an option to add a new network. Click on the “Add Network” button to proceed.
A new window will appear where you can enter the details for your custom network. Fill in the following information:
| Field | Description |
|---|---|
| Network Name | Enter a name for your custom network. This can be anything you want, but it is recommended to choose a name that is descriptive and easy to remember. |
| New RPC URL | Enter the RPC URL for your custom network. This URL is provided by the network provider and is used to connect to the network. |
| Chain ID | Enter the chain ID for your custom network. The chain ID is a unique identifier for the network and helps to differentiate it from other networks. |
| Symbol | Enter the symbol for the network’s native currency. This can be the symbol of an existing cryptocurrency or a new symbol if you are creating a custom network. |
After filling in the required information, click on the “Save” button to add your custom network to Metamask. You can now switch to your custom network by clicking on the network dropdown in the top right corner and selecting your network from the list.
What is Metamask?
Metamask is a cryptocurrency wallet and browser extension that allows users to manage their digital assets and interact with decentralized applications (DApps) on the Ethereum blockchain.
How can I add a network to Metamask?
To add a network to Metamask, click on the network dropdown and select the “Custom RPC” option. Then, enter the network details such as the network name, RPC URL, chain ID, symbol, and block explorer URL. Finally, click “Save” to add the network to Metamask.
Can I remove a network from Metamask?
Yes, you can remove a network from Metamask. Simply click on the network dropdown, hover over the network you want to remove, and click on the three-dot menu icon. Then, select the “Remove” option to remove the network from Metamask.