
Are you looking to diversify your cryptocurrency portfolio? Adding the Bitcoin network to your Metamask wallet is a great way to expand your options and take advantage of the most popular cryptocurrency in the world. In this step-by-step guide, we will walk you through the process of adding the Bitcoin network to your Metamask wallet.
Step 1: Install Metamask Wallet
If you haven’t already, the first step is to install the Metamask wallet extension on your preferred web browser. Metamask is a popular Ethereum wallet that also supports other networks, including Bitcoin. Simply search for Metamask on your browser’s extension store and follow the installation instructions.
Step 2: Create or Import a Wallet
Once Metamask is installed, open the extension and create a new wallet or import an existing one. If you are creating a new wallet, make sure to securely store your seed phrase, as it is the only way to recover your wallet in case of loss or theft. If you are importing an existing wallet, simply follow the instructions in Metamask to import it.
Step 3: Access the Network Settings
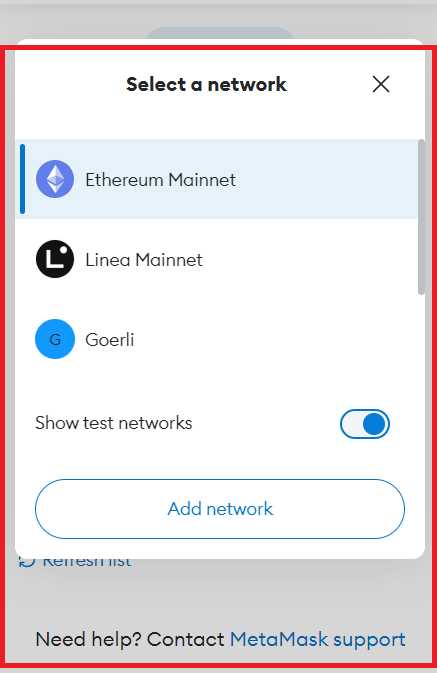
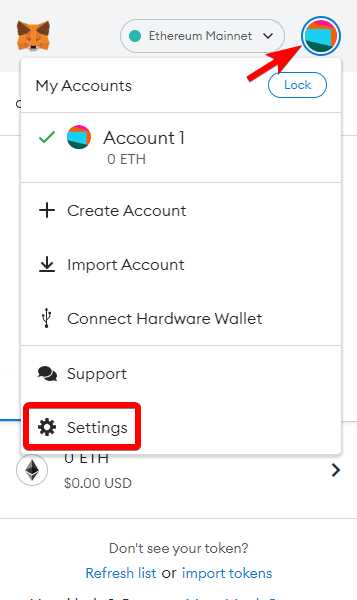
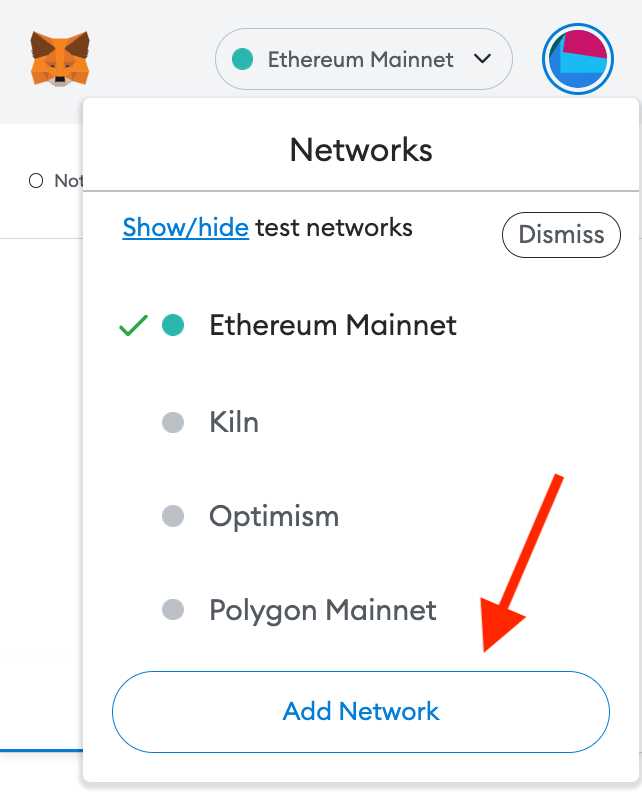
With your wallet set up, the next step is to access the network settings in Metamask. This can usually be done by clicking on the network name in the top right corner of the Metamask extension. Once you access the network settings, you will see a list of available networks.
Step 4: Add the Bitcoin Network
To add the Bitcoin network, click on the “Custom RPC” option in the network settings. Here, you will need to enter the details of the Bitcoin network, including the URL, chain ID, symbol, and block explorer. The URL for the Bitcoin network varies depending on the provider you choose, so make sure to find a reliable source for this information.
Once you have entered all the necessary details, click “Save” to add the Bitcoin network to your Metamask wallet. You may need to switch to the Bitcoin network manually by selecting it from the network dropdown menu in Metamask.
Congratulations!
You have successfully added the Bitcoin network to your Metamask wallet. Now you can enjoy the benefits of using Bitcoin within the Metamask ecosystem, including seamless transactions and access to decentralized applications.
Please note that while Metamask supports the Bitcoin network, it is primarily an Ethereum wallet. If you are looking for a wallet specifically designed for Bitcoin, there are other options available in the market.
How to Add the Bitcoin Network to Your Metamask Wallet
If you are a user of Metamask, a popular Ethereum wallet, you may be interested in adding support for the Bitcoin network as well. By adding the Bitcoin network to your Metamask wallet, you can manage your Bitcoin holdings alongside your Ethereum assets.
Here is a step-by-step guide to help you add the Bitcoin network to your Metamask wallet:
- Open your Metamask wallet and click on the network selection dropdown.
- Scroll down to the bottom and click on “Custom RPC”.
- In the “New Network” screen, enter the following details:
- Network Name: Bitcoin
- New RPC URL: enter_a_valid_bitcoin_rpc_url
- Chain ID: enter_a_chain_id
- Symbol: BTC
- Block Explorer URL: enter_a_valid_bitcoin_block_explorer_url
- Click on “Save” to add the new network to your Metamask wallet.
- Your Metamask wallet is now connected to the Bitcoin network. You can view your Bitcoin balance, send and receive BTC, and interact with Bitcoin dapps.
It is important to note that adding the Bitcoin network to your Metamask wallet does not mean that you can actually store or transfer BTC within the wallet. Metamask itself is an Ethereum-based wallet, and for Bitcoin transactions, you will still need to use a separate Bitcoin wallet.
However, by adding the Bitcoin network to your Metamask wallet, you can conveniently track the value of your Bitcoin holdings alongside your Ethereum assets, all in one interface.
So go ahead and add the Bitcoin network to your Metamask wallet to get a comprehensive view of your digital assets!
Step 1: Install the Metamask Extension
To get started with adding the Bitcoin network to your Metamask wallet, you will need to install the Metamask extension. Follow these steps to install it:
| 1. Open your preferred web browser and go to the Metamask website. |
| 2. Click on the “Download” button to initiate the download. |
| 3. After the download is complete, click on the file to install the extension. |
| 4. Follow the on-screen instructions to complete the installation process. |
| 5. Once the installation is finished, you will see the Metamask extension icon added to your browser’s toolbar. |
Congratulations! You have successfully installed the Metamask extension. Now you can proceed to the next step and add the Bitcoin network to your wallet.
Step 2: Create a New Wallet

Once you have installed the Metamask extension in your web browser, it’s time to create a new wallet to store your Bitcoin network. Follow these steps to create a new wallet:
1. Open Metamask Extension
Click on the Metamask extension icon in your browser’s toolbar to open the extension. If you don’t see the icon, click on the puzzle piece and then click on the Metamask icon.
2. Set a Strong Password
Set a strong password for your wallet. Make sure to use a combination of uppercase and lowercase letters, numbers, and special characters. This will help protect your wallet from unauthorized access.
3. Save Your Secret Backup Phrase
Metamask will generate a secret backup phrase consisting of 12 unique words. It’s important to write down this backup phrase and store it in a safe place. This backup phrase is essential for recovering your wallet in case you lose access to your device or forget your password.
4. Confirm Your Backup Phrase
After writing down your secret backup phrase, Metamask will ask you to confirm it. This step ensures that you have correctly written down the backup phrase and have access to it.
5. Complete Setup and Security

Finally, confirm that you have saved your secret backup phrase, agree to the terms of service, and complete the setup process. You can also enable additional security features like a lock timeout and biometric authentication if your device supports it.
Congratulations! You have successfully created a new wallet in Metamask to store your Bitcoin network.
Step 3: Add the Bitcoin Network
Now that you have installed the MetaMask wallet and logged into your account, the next step is to add the Bitcoin network to your wallet. This will enable you to send, receive, and manage Bitcoin directly from your MetaMask wallet.
Here is how you can add the Bitcoin network:
- Click on the MetaMask extension icon in your browser toolbar to open the wallet.
- In the MetaMask wallet, click on the network selector dropdown. This is located at the top of the wallet and displays the currently selected network, such as “Main Ethereum Network”.
- Scroll down in the network selector dropdown and click on “Custom RPC”.
- In the “New Network” section that appears, you need to enter the following details:
- In the “Network Name” field, enter “Bitcoin” or any other name you prefer for this network.
- In the “New RPC URL” field, enter the RPC URL for the Bitcoin network. You can find this information from reliable sources or Bitcoin service providers.
- Leave the “Chain ID” field empty.
- Enter the currency symbol for Bitcoin in the “Symbol” field. This is usually “BTC”.
- Enter the currency decimals for Bitcoin in the “Decimals” field. This is usually 8.
- After entering the details, click on “Save” to add the Bitcoin network to your MetaMask wallet.
- Once added, you will see the Bitcoin network listed in the network selector dropdown.
- You can now switch to the Bitcoin network by selecting it from the network selector dropdown.
By adding the Bitcoin network to your MetaMask wallet, you can now easily manage your Bitcoin holdings alongside your other digital assets. Make sure to double-check the network details to ensure you are connecting to the correct Bitcoin network.
Step 4: Connect Your Wallet to a Bitcoin Site or App
Now that you have successfully added the Bitcoin network to your Metamask wallet, the next step is to connect your wallet to a Bitcoin site or app in order to start using it.
Option 1: Connecting to a Bitcoin Wallet App

If you prefer to manage your Bitcoin through a dedicated wallet app, you can connect your Metamask wallet to it by following these steps:
- Open your Bitcoin wallet app and navigate to the settings or options menu.
- Look for the option to import or connect an existing wallet.
- Choose the Metamask option from the list of supported wallets.
- A QR code or a recovery phrase may be displayed on your screen. Follow the instructions provided by the app to complete the connection process.
- Once your wallet is successfully connected, you should be able to view and manage your Bitcoin holdings through the app.
Option 2: Connecting to a Bitcoin Site
Alternatively, you can connect your Metamask wallet to a Bitcoin site or platform that allows you to buy, sell, or exchange Bitcoin. Here’s how:
- Open your preferred Bitcoin site or platform in a web browser.
- Look for the option to connect or link a wallet.
- Choose the Metamask option from the provided wallet options.
- A prompt may appear asking you to authorize the connection between your wallet and the site. Click “Allow” or “Confirm” to proceed.
- Once the connection is established, you should be able to access your Bitcoin wallet and perform various actions on the site.
Remember to exercise caution when connecting your wallet to any third-party app or site. Ensure that the app or site is reputable and trustworthy to avoid any potential security risks.
What is Metamask?
Metamask is a cryptocurrency wallet and browser extension that allows users to interact with decentralized applications (DApps) on the Ethereum network.
How can I add the Bitcoin network to my Metamask wallet?
To add the Bitcoin network to your Metamask wallet, you need to install a third-party extension called “Metamask Bitcoin”. Once installed, you can connect to the Bitcoin network by selecting the “BTC” network in your Metamask wallet settings.
Is it possible to use Bitcoin with Metamask?
Yes, it is possible to use Bitcoin with Metamask by adding the Bitcoin network to your wallet. This allows you to interact with decentralized applications on the Bitcoin network using your Metamask account.
Are there any fees associated with using the Bitcoin network on Metamask?
Yes, there are fees associated with using the Bitcoin network on Metamask. These fees are paid to miners for processing and confirming Bitcoin transactions on the network. The fee amount varies depending on the network congestion and transaction size.