
If you’re new to the world of cryptocurrency and decentralized finance (DeFi), you may have heard about the Polygon network and the USDC stablecoin. Polygon is a layer 2 scaling solution for Ethereum, while USDC is a popular stablecoin backed by the US dollar. Together, they provide a seamless and efficient way to transact and store value on the blockchain.
In this step-by-step guide, we will walk you through the process of setting up MetaMask, a popular Ethereum wallet, to use USDC on the Polygon network. By the end of this guide, you will be able to send, receive, and store USDC on Polygon securely and confidently.
To get started, make sure you have MetaMask installed and set up on your preferred web browser. Once installed, create a new wallet or import an existing one. Make sure to securely back up your seed phrase, as this is the only way to recover your wallet if something goes wrong.
With MetaMask set up, it’s time to connect to the Polygon network. Click on the network name at the top of the MetaMask popup and select “Custom RPC.” In the “New RPC URL” field, enter “https://rpc-mainnet.matic.network” and click “Save.” You are now connected to the Polygon network!
Now it’s time to add USDC to your MetaMask wallet. Click on the “Add Token” button and select “Custom Token.” In the token contract address field, enter “0x2791Bca1f2de4661ED88A30C99A7a9449Aa84174,” and the token symbol and decimals should automatically populate. Click “Next” and then “Add Tokens” to complete the process. You now have USDC in your MetaMask wallet on the Polygon network!
With USDC in your wallet, you can now send and receive it just like any other cryptocurrency. Simply click on the “Send” or “Receive” button, enter the recipient’s address or scan their QR code, and specify the amount you wish to send or request. Confirm the transaction details and click “Submit” to finalize the transaction. Transactions on Polygon are generally faster and cheaper compared to the Ethereum mainnet.
Remember to always double-check the recipient’s address before sending any funds, as transactions on the blockchain are irreversible. Additionally, stay up to date with the latest security practices and be cautious of phishing attempts or scams.
In conclusion, using USDC on Polygon with MetaMask provides a user-friendly and secure way to participate in the world of DeFi. By following this step-by-step guide, you can confidently navigate the world of cryptocurrencies, transact with USDC on Polygon, and explore the exciting possibilities of decentralized finance.
Setting Up MetaMask

To start using USDC on Polygon with MetaMask, you’ll first need to set up and connect your MetaMask wallet to the Polygon network. Follow these steps to get started:
Step 1: Install the MetaMask Extension
If you don’t have MetaMask installed, you’ll need to install it as a browser extension. MetaMask is available for Chrome, Firefox, Brave, and other popular browsers. Simply search for “MetaMask” in your browser’s extension marketplace and follow the installation instructions.
Step 2: Create or Import a MetaMask Wallet
Once you have MetaMask installed, open the extension and click on “Get Started”. You’ll be prompted to create a new wallet or import an existing one. If you don’t have a MetaMask wallet yet, select “Create a Wallet” and follow the steps to set up your wallet. If you already have a MetaMask wallet, select “Import Wallet” and enter your seed phrase or private key to import it.
Note: It’s important to keep your seed phrase or private key secure and never share it with anyone.
Step 3: Connect to the Polygon Network
After setting up your MetaMask wallet, you’ll need to connect it to the Polygon network. To do this, click on the network selection dropdown at the top of the MetaMask extension and select “Custom RPC”.
Enter the following details to connect to the Polygon network:
- Network Name: Polygon
- New RPC URL: https://rpc-mainnet.matic.network
- Chain ID: 137
- Symbol: MATIC
- Block Explorer URL: https://polygonscan.com/
Once you’ve entered the details, click on “Save” to connect to the Polygon network.
Note: Make sure you’re connected to the correct network to avoid any potential loss of funds or transactions on the wrong network.
With MetaMask set up and connected to the Polygon network, you’re now ready to start using USDC on Polygon.
Adding the Polygon Network to MetaMask
To use USDC on the Polygon network, you’ll need to add the Polygon network to your MetaMask wallet. Here’s a step-by-step guide to help you do that:
Step 1: Open your MetaMask wallet by clicking on the extension in your browser.
Step 2: Click on the network selection dropdown located at the top of the MetaMask window.
Step 3: Scroll down and click on “Custom RPC” at the bottom of the list.
Step 4: In the “Custom RPC” settings, enter the following information:
Network Name: Polygon
New RPC URL: https://rpc-mainnet.matic.network
Chain ID: 137
Symbol: MATIC
Block Explorer URL: https://explorer-mainnet.maticvigil.com/
Step 5: Click on “Save” to add the Polygon network to your MetaMask wallet.
Once you’ve completed these steps, you should see the Polygon network listed in the network selection dropdown. Now you can easily switch between Ethereum and Polygon to access and use USDC on the Polygon network.
Obtaining USDC Tokens

In order to use USDC on the Polygon network with MetaMask, you will need to obtain USDC tokens. Here are the steps to acquire USDC:
- Create an account on a cryptocurrency exchange that supports USDC.
- Complete the necessary verification steps to enable trading on the exchange.
- Deposit funds into your exchange account.
- Search for USDC in the list of available cryptocurrencies on the exchange.
- Initiate a purchase or trade for USDC using your deposited funds.
- Once the transaction is complete, you will have USDC tokens in your exchange account.
- Withdraw the USDC tokens from the exchange to your MetaMask wallet address.
Now that you have obtained USDC tokens, you can proceed to use them on the Polygon network with MetaMask.
Depositing USDC onto Polygon
To start using USDC on the Polygon network with MetaMask, you will first need to deposit your USDC tokens onto the Polygon network. Here is a step-by-step guide on how to do it:
- Open your MetaMask wallet and make sure you are connected to the Ethereum Mainnet.
- Click on the MetaMask extension and select the network dropdown menu. Choose the “Polygon Mainnet” network.
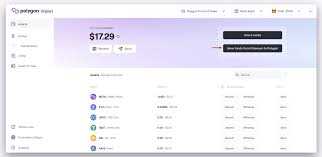
- Once you are on the Polygon Mainnet, click on the “Assets” tab.
- In the “Assets” tab, click on “Add Token” and select “Custom Token”.
- Copy and paste the USDC token contract address for the Polygon network:
0x... (insert USDC token contract address for Polygon network here). - Click on “Next” and MetaMask will automatically detect the token symbol and decimal places.
- Click on “Add Tokens” to confirm the addition of USDC to your MetaMask wallet on the Polygon network.
- Now that you have USDC in your MetaMask wallet on the Polygon network, you can proceed to use it for various purposes such as trading, providing liquidity, or paying for transactions.
By following these steps, you will be able to deposit your USDC tokens onto the Polygon network and use them seamlessly with MetaMask. Make sure to always double-check the token contract address when adding tokens to MetaMask to avoid any potential scams or losses.
Transferring USDC on Polygon
Once you have set up USDC on Polygon using MetaMask, you can easily transfer your USDC to other wallets and addresses on the Polygon network. Here’s a step-by-step guide on how to transfer USDC on Polygon:
- Connect Your Wallet: Open your MetaMask extension or mobile app and make sure it is connected to the Polygon Network. You can do this by clicking on the network selection dropdown and choosing “Polygon Mainnet”.
- Open the USDC Token: In MetaMask, click on the “Assets” tab and search for USDC. Click on USDC and it will open the token details.
- Click on “Send”: On the token details page, click on the “Send” button.
- Enter the Recipient Address: In the recipient address field, enter the address where you want to send your USDC. Make sure to double-check the address to avoid any errors.
- Enter the Amount: In the amount field, enter the exact amount of USDC you want to transfer. Take note of any network fees that may apply to the transaction.
- Add a Note (Optional): If you want to include a note with the transaction, you can enter it in the optional note field.
- Review and Confirm: Double-check all the details of the transaction, including the recipient address and the amount. Once you are sure everything is correct, click on the “Next” button.
- Confirm the Transaction: MetaMask will open a popup window asking you to confirm the transaction. Review the gas fees and click on the “Confirm” button to proceed with the transfer.
- Wait for Confirmation: After confirming the transaction, you will need to wait for the network to process it. This may take a few moments, so be patient.
- Transaction Complete: Once the transaction is confirmed, you will see a confirmation message in MetaMask. You can also view the transaction details on a block explorer like PolygonScan.
That’s it! You have successfully transferred your USDC on the Polygon Network using MetaMask. Remember to always check and verify the recipient address to avoid any mistakes or loss of funds.
What is USDC?
USDC stands for USD Coin, which is a stablecoin pegged to the US dollar. It is a digital asset that can be used for transactions and transfers on the blockchain.