
Ethereum is a decentralized platform that allows developers to build and deploy smart contracts. The Ethereum network consists of multiple interconnected computers, or nodes, which store and update a shared database called the blockchain. In order to ensure the stability and security of the network, developers often test their applications on a separate test network before deploying them to the main Ethereum network.
One popular test network for Ethereum is the Goerli testnet. The Goerli testnet is a fully functional replica of the Ethereum mainnet, but it uses test ETH (called GETH) instead of real ETH. This allows developers to test their applications without the risk of losing real funds. In this article, we will explain how to set up and use the Goerli testnet on the Metamask wallet extension.
Metamask is a popular Ethereum wallet and browser extension that allows users to interact with decentralized applications (DApps) on the Ethereum network. To use the Goerli testnet on Metamask, follow these steps:
- Install and open the Metamask extension in your web browser.
- Create a new Ethereum wallet or import an existing one.
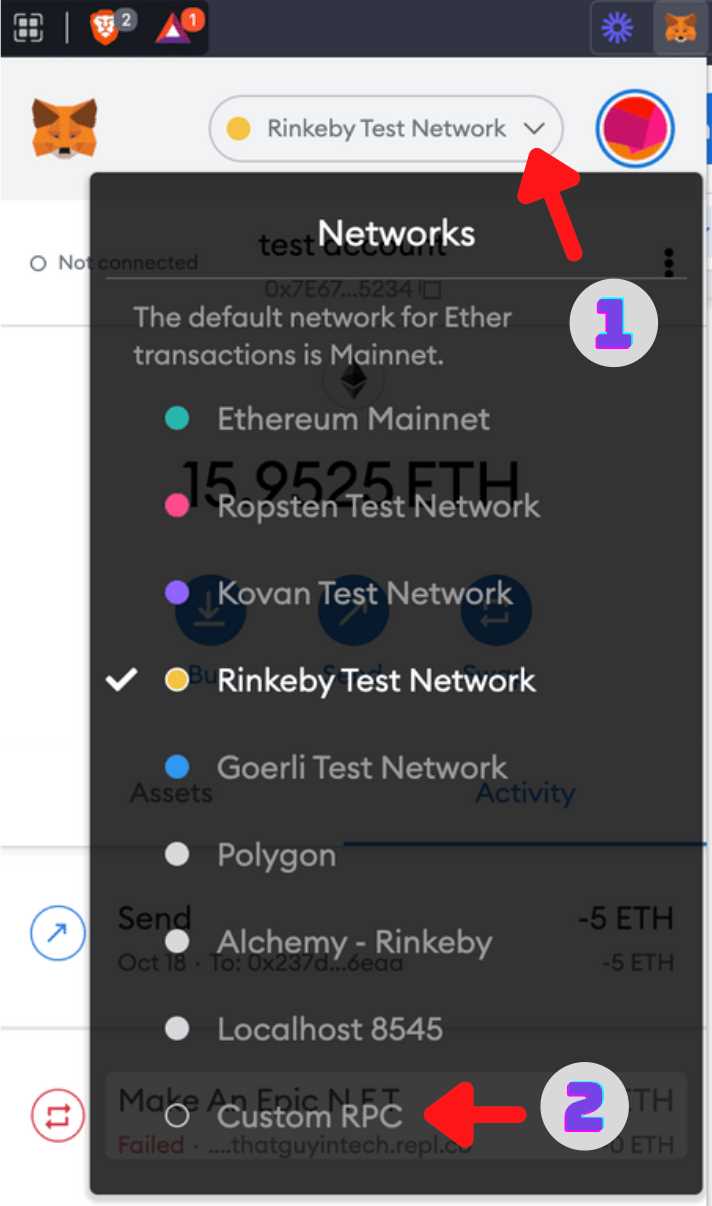
- Click on the network dropdown menu in the top center of the Metamask window.
- Select “Custom RPC” from the dropdown list.
- In the “New RPC URL” field, enter the following URL: https://rpc.goerli.mudit.blog/
- Click “Save” to add the Goerli testnet to your Metamask wallet.
Once you have successfully added the Goerli testnet to your Metamask wallet, you can start using it for testing your Ethereum applications. Make sure to switch to the Goerli network before interacting with any DApps or sending test transactions.
In conclusion, the Goerli testnet is a valuable tool for developers to test their Ethereum applications before deploying them to the mainnet. By following the steps outlined in this article, you can easily set up and use the Goerli testnet on the Metamask wallet, allowing you to safely and efficiently test your applications without risking real funds.
Getting Started with Goerli Testnet
If you are interested in testing and developing on the Ethereum network without using real Ether, Goerli Testnet is the perfect option for you. This guide will walk you through the steps on how to use Goerli Testnet on Metamask, a popular Ethereum wallet.
Step 1: Install Metamask
First, make sure you have the Metamask wallet extension installed on your preferred browser. You can find Metamask on the Chrome Web Store, Firefox Add-ons, or by visiting the official Metamask website.
Step 2: Create a New Wallet
After installing Metamask, open the extension and create a new wallet by following the setup instructions. Make sure to securely save your recovery phrase, as it will be needed to access your wallet in the future.
Step 3: Switch to Goerli Testnet
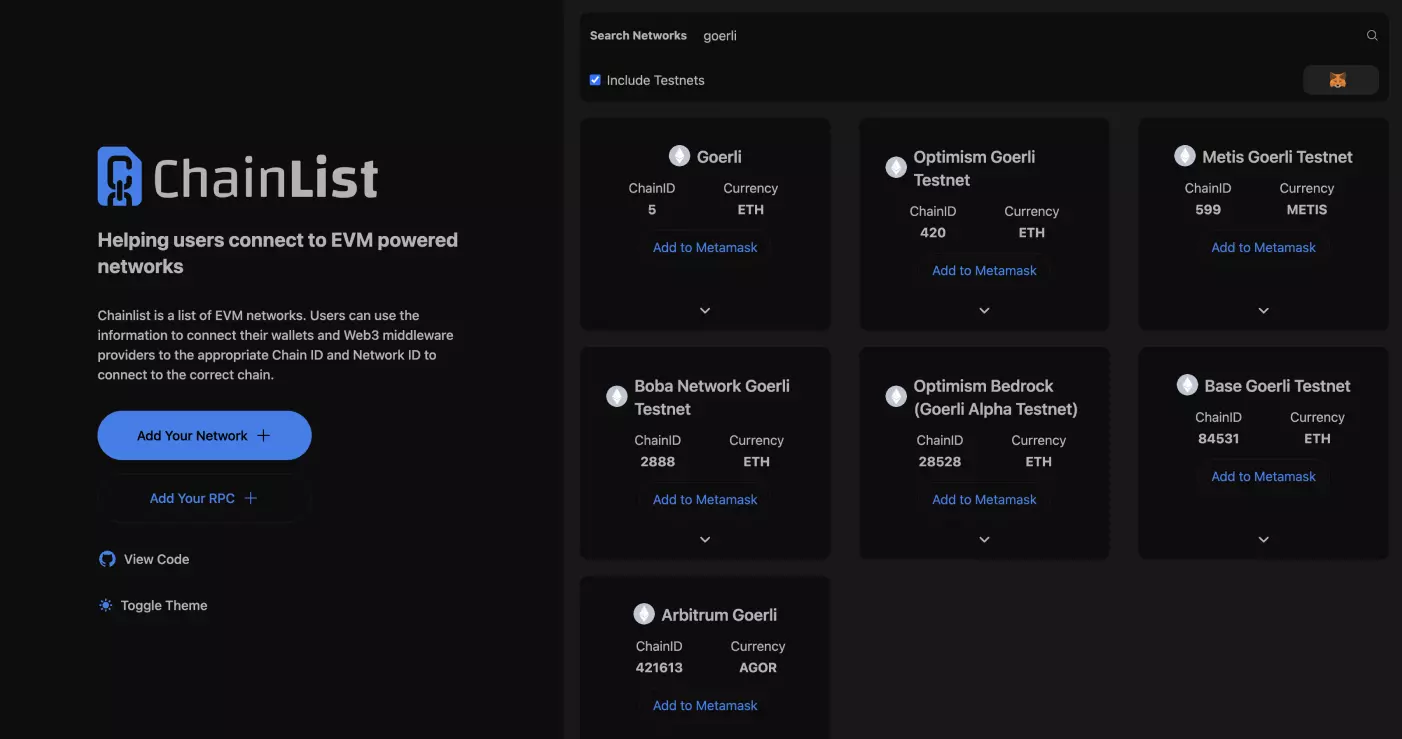
Once your wallet is created, click on the Metamask extension icon and select “Settings”. In the settings menu, select “Networks” and then click on “Add Network”. Fill in the following details:
Network Name: Goerli Testnet
New RPC URL: https://rpc.goerli.mudit.blog
ChainID: 5
Symbol (optional): ETH
After filling in the details, click on “Save” to add the Goerli Testnet to your Metamask wallet.
Step 4: Get Test Ether
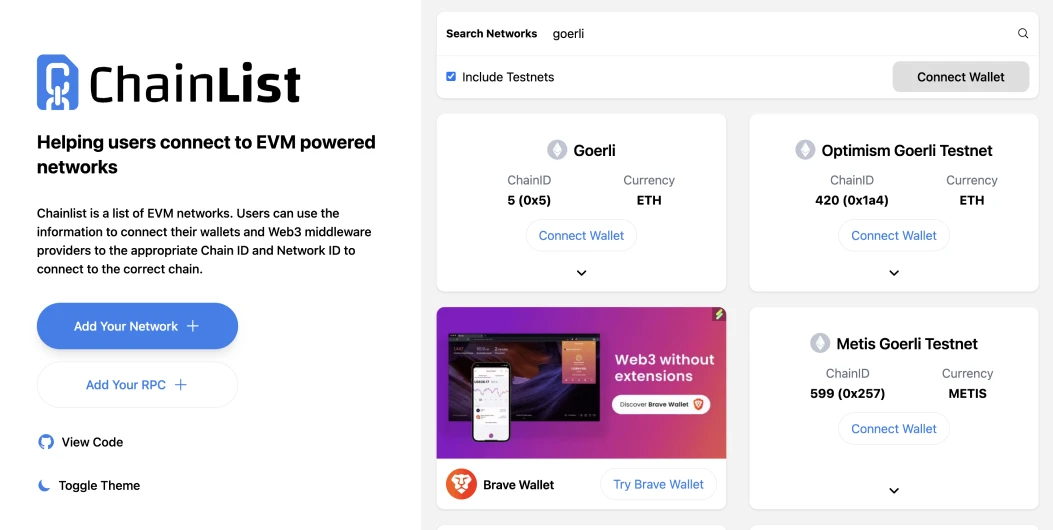
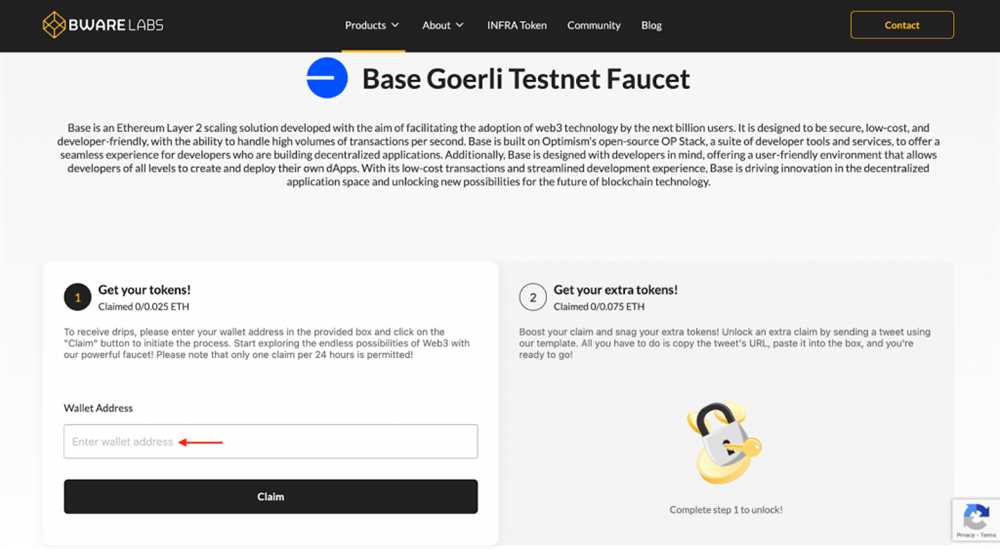
In order to use the Goerli Testnet, you will need some test Ether. You can obtain test Ether from various faucets that are available online. Simply search for “Goerli Testnet faucet” and follow the instructions on the faucet website to receive test Ether to your Metamask wallet.
Step 5: Start Testing
Now that you have set up your Metamask wallet and obtained test Ether, you are ready to start testing on the Goerli Testnet. You can use this test network to interact with decentralized applications (dApps), test smart contracts, and perform other development-related tasks without using real funds.
Note: It’s important to remember that the Goerli Testnet is a separate network from the Ethereum mainnet, and any transactions or interactions made on the Goerli Testnet will not affect your real Ether balance or transactions on the Ethereum mainnet.
With these steps, you should now be able to get started with the Goerli Testnet on Metamask. Happy testing and developing!
Step-by-Step Guide to Using Goerli Testnet on Metamask
In this guide, we will walk you through the step-by-step process of setting up and using the Goerli Testnet on Metamask for Ethereum network testing.
Step 1: Install and Set Up Metamask
If you haven’t already, install the Metamask extension for your browser and create a new account. Follow the on-screen instructions to set up your account and securely store your recovery phrase.
Step 2: Accessing the Metamask Network Menu
Once you have Metamask installed and set up, click on the Metamask extension icon in your browser to open the interface. From the interface, click on the network selection dropdown menu (usually displaying “Main Ethereum Network”) and select “Custom RPC”.
Step 3: Adding Goerli Testnet to Metamask
In the “New RPC URL” field, enter the RPC endpoint URL for the Goerli Testnet: https://rpc.goerli.mudit.blog/
Step 4: Configuring Goerli Testnet on Metamask
After adding the Goerli Testnet URL, you will see a new network option titled “Goerli Testnet” in the network selection dropdown menu. Select this option to switch to the Goerli Testnet.
Step 5: Obtaining Testnet Ether (GOETH)
To obtain GOETH for testing on the Goerli Testnet, you can use a faucet. Open a web browser and search for “Goerli faucet” to find available options. Follow the instructions on the faucet website to obtain GOETH by providing your Goerli Testnet address.
Step 6: Testing Transactions on Goerli Testnet
With GOETH in your Goerli Testnet account, you can now interact with decentralized applications (dApps) and test transactions on the Goerli Testnet. Simply navigate to the desired dApp and follow the normal process for transactions as you would on the main Ethereum network.
Step 7: Monitoring Testnet Activity
To monitor your transactions and activities on the Goerli Testnet, you can use block explorers like Goerli Etherscan. Enter your transaction hash or account address to view details and track the progress of your testnet activities.
Step 8: Resetting to Main Ethereum Network
If you want to switch back to the main Ethereum network, simply repeat steps 2 and 3, but enter the RPC endpoint URL for the main Ethereum network. Select the main Ethereum network option from the network selection dropdown menu.
That’s it! Now you know how to set up and use the Goerli Testnet on Metamask for Ethereum network testing. Happy testing!
Why Use Goerli Testnet for Ethereum Network Testing?
When developing and testing applications on the Ethereum network, it is crucial to use a testnet to ensure that your code functions as expected and does not risk real funds or interact with the mainnet. The Goerli testnet provides a safe and reliable environment for developers to test their smart contracts, dApps, and other applications before deploying them onto the main Ethereum network.
1. Realistic Testing Environment
Goerli testnet closely replicates the functionality and behavior of the Ethereum mainnet. This allows developers to test their applications in an environment that closely resembles the production network, ensuring that they can identify and fix any issues or vulnerabilities before going live.
2. Scalability and Performance Testing
The Goerli testnet is designed to handle a significant amount of network activity, allowing developers to test the scalability and performance of their applications under different conditions. By using Goerli, developers can simulate high network loads, transaction volumes, and various scenarios to assess how their applications perform, scale, and handle congestion.
By utilizing the Goerli testnet for scalability and performance testing, developers can optimize and fine-tune their applications to ensure they can handle real-world usage without experiencing bottlenecks or failures.
Overall, utilizing the Goerli testnet provides developers with a safe, realistic, and efficient environment to test and refine their Ethereum applications, ensuring they are robust, secure, and performant before deploying them on the Ethereum mainnet.
Setting Up Metamask for Goerli Testnet
If you are looking to test out your Ethereum applications without spending real Ether, you can use the Goerli Testnet on Metamask. Goerli is a popular test network that is fully compatible with Ethereum’s main network. This guide will walk you through the steps of setting up Metamask for using Goerli Testnet.
Step 1: Install Metamask Extension
If you haven’t already, install the Metamask browser extension on your preferred browser. Metamask is available for Chrome, Firefox, and Brave browsers.
Step 2: Create or Import an Ethereum Wallet
Open the Metamask extension and follow the prompts to create a new Ethereum wallet or import an existing one. Make sure to securely store your seed phrase or private keys, as they are the only way to access your wallet.
Step 3: Connect Metamask to the Goerli Testnet
Once you have your wallet set up, click on the network dropdown in the Metamask extension, and select “Custom RPC”.
In the “New RPC URL” field, enter the following URL to connect to the Goerli Testnet: https://rpc.goerli.mudit.blog/
Step 4: Save and Switch to Goerli Testnet
After entering the Goerli Testnet RPC URL, click “Save”. Metamask should now be connected to the Goerli Testnet.
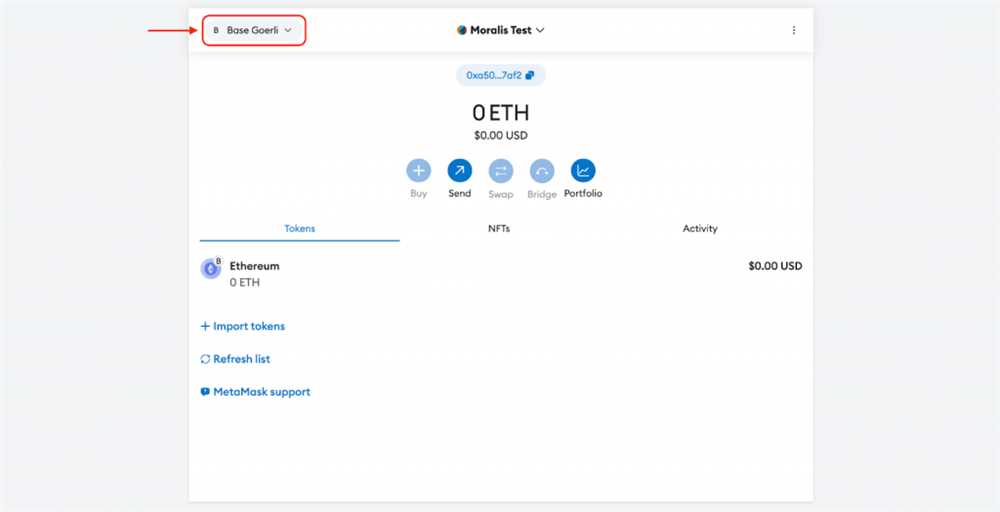
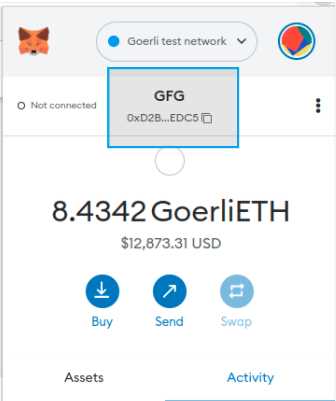
To switch to the Goerli Testnet, click on the network dropdown and select “Goerli Test Network”.
Step 5: Obtain Test Ether
In order to interact with the Goerli Testnet and test your Ethereum applications, you will need some test Ether. You can obtain test Ether for free from various faucet websites dedicated to providing testnet Ether. Simply search online for “Goerli Testnet faucet” and follow the instructions on the website to obtain test Ether.
Once you have completed these steps, you are ready to start testing your Ethereum applications on the Goerli Testnet using Metamask. Remember, the Goerli Testnet is separate from the Ethereum main network, so any actions or transactions you perform on the Goerli Testnet will not impact your real Ethereum wallet or accounts.
Interacting with the Goerli Testnet on Metamask
To start interacting with the Goerli Testnet on Metamask, you first need to ensure that you have the Metamask browser extension installed and set up on your browser. Once you have Metamask installed, follow these steps:
Step 1: Connect Metamask to the Goerli Testnet
Launch the Metamask extension on your browser and click on the Metamask logo. If you haven’t set up Metamask before, you will need to create a new wallet or import an existing one. Once you have access to your Metamask wallet, locate the network dropdown menu at the top of the Metamask pop-up window. Click on it and scroll down to find “Custom RPC”.
Click on “Custom RPC” to open the network settings. In the “New RPC URL” field, enter the Goerli Testnet endpoint – https://rpc.goerli.mudit.blog/. You can optionally give the network a name, such as “Goerli Testnet”. Click on “Save” to add the network.
Step 2: Get Goerli Testnet Ether
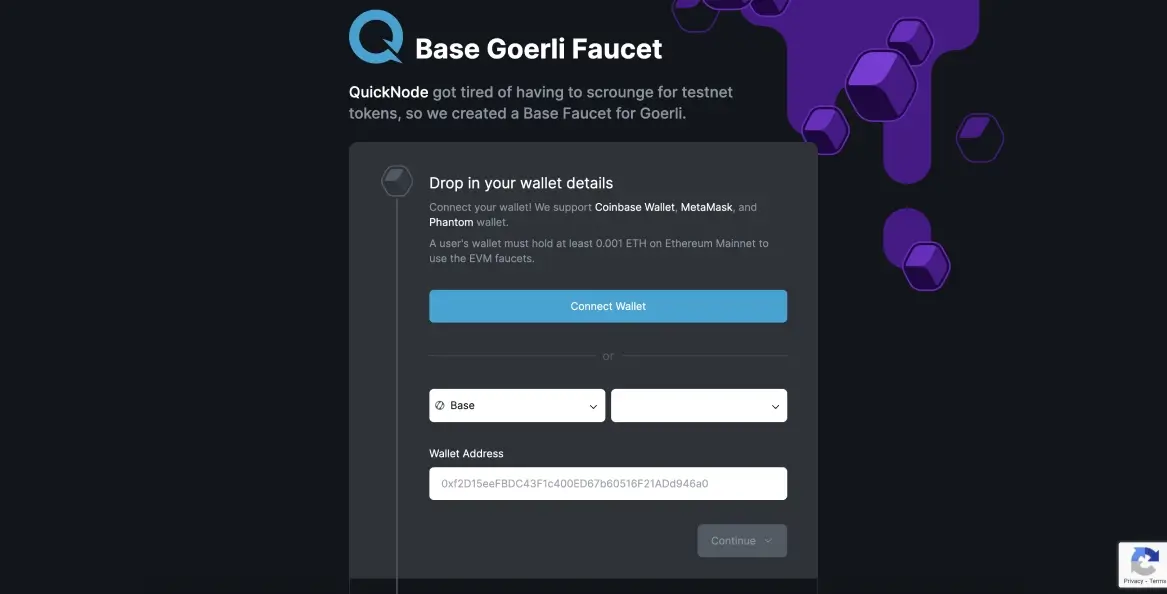
In order to perform transactions on the Goerli Testnet, you will need some Goerli Ether (GTH). Unlike the main Ethereum network, Goerli Ether has no monetary value and can be obtained for free from various faucets. A popular faucet is the Goerli Testnet Faucet, which can be accessed by searching for it online.
Copy your Metamask account address by clicking on the account button in the top right corner of the Metamask pop-up window and selecting “Copy Address to clipboard”. Open the Goerli Testnet Faucet in your browser and follow the instructions to paste your Metamask account address and obtain Goerli Ether.
Step 3: Start Testing on the Goerli Testnet
Now that you have the Goerli Testnet connected on Metamask and some Goerli Ether in your account, you can start testing your Ethereum applications or performing transactions. When you perform transactions on the Goerli Testnet, they will not affect your main Ethereum network balance or assets.
Simply select the Goerli Testnet network from the network dropdown menu in Metamask, and you’re ready to interact with smart contracts, send transactions, or test any other functionality you need.
Note: Remember that Goerli Testnet Ether has no real value and is used solely for testing and development purposes. Do not try to exchange Goerli Testnet Ether for real Ethereum or any other cryptocurrencies.
What is the Goerli testnet?
The Goerli testnet is a testing environment for the Ethereum network. It is designed for developers and users who want to test their applications or transactions without using real ETH. It allows them to experiment and identify any issues or bugs before deploying their projects on the mainnet.
Why should I use the Goerli testnet for Ethereum network testing?
You should use the Goerli testnet for Ethereum network testing because it provides a safe and isolated environment for your testing purposes. It allows you to experiment and deploy smart contracts, dApps, or transactions without using real ETH on the mainnet. This helps you avoid any potential financial risks and allows you to identify and fix any issues or bugs before launching your projects live.