
If you’re looking to enter the world of decentralized finance (DeFi) and explore the exciting opportunities on the Avalanche network, one of the first things you’ll need is a wallet. And one of the most popular and user-friendly wallets out there is Metamask.
Metamask is a browser extension that allows you to interact with Ethereum-based decentralized applications (dApps) and securely store your digital assets. However, it’s worth noting that with recent updates, Metamask now also supports the Avalanche network, opening up a whole new realm of possibilities.
Setting up a wallet with Metamask is a breeze, and this guide will walk you through the process step by step. Whether you’re a seasoned crypto enthusiast or a newcomer to the world of blockchain, you’ll find this guide helpful in getting started with Avalanche and Metamask.
Step 1: Install Metamask
The first step is to install the Metamask extension on your preferred web browser. Metamask supports several browsers, including Google Chrome, Firefox, and Brave. Simply navigate to the browser’s extension marketplace, search for Metamask, and click on the “Add to Chrome” (or equivalent) button to install it.
Step 2: Create a New Wallet
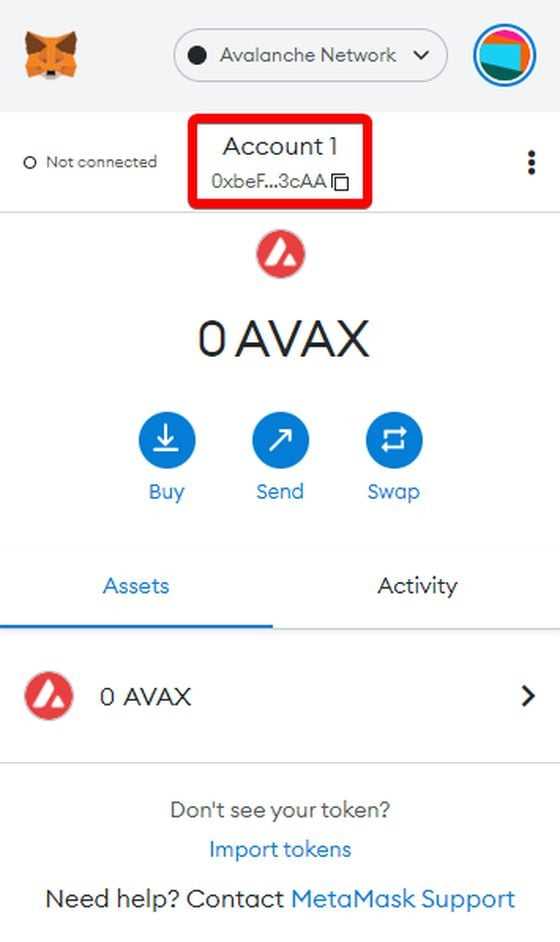
Once Metamask is installed, you’ll see its icon in your browser’s toolbar. Click on the icon, and a new tab will open, displaying the Metamask interface. From here, click on the “Create a Wallet” button to start the wallet creation process.
Step 3: Set Up a Password
Next, you’ll be prompted to set up a password for your wallet. Be sure to choose a strong, unique password that you haven’t used elsewhere. Remember to store it in a safe place, as it will be needed to access your wallet in the future.
Step 4: Backup Your Seed Phrase
After setting up a password, Metamask will generate a seed phrase for you. This seed phrase is crucial, as it can be used to recover your wallet in case you forget your password or lose access to your device. Write down the seed phrase on a piece of paper and store it securely. Do not take a screenshot or store it digitally, as this could pose a security risk.
Step 5: Confirm Your Seed Phrase
In the next step, Metamask will ask you to confirm your seed phrase. You’ll need to select the words from the list in the correct order to proceed. This is an important security measure to ensure that you’ve correctly written down your seed phrase.
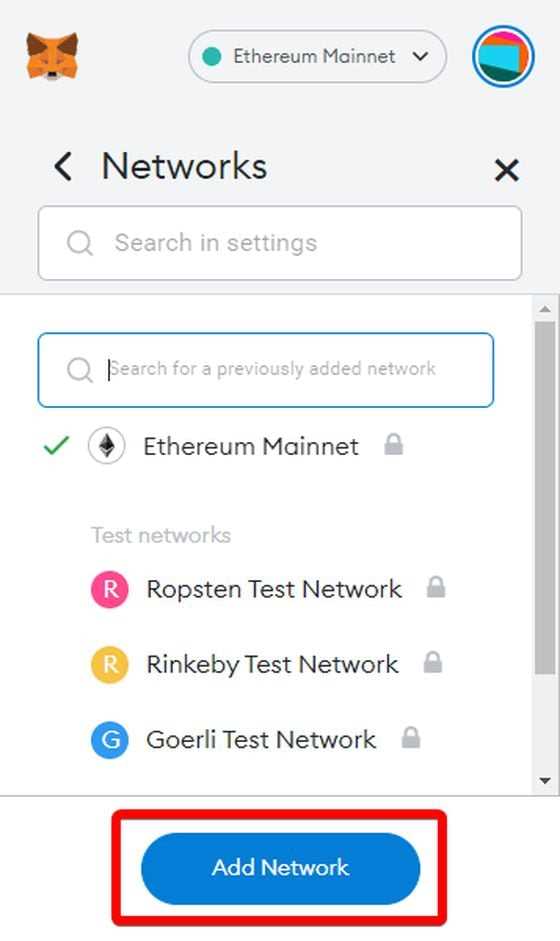
Step 6: Connect to the Avalanche Network
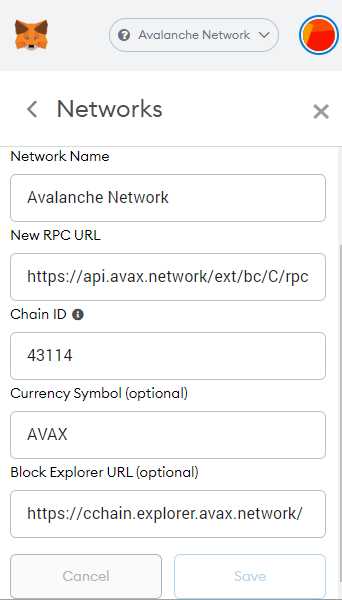
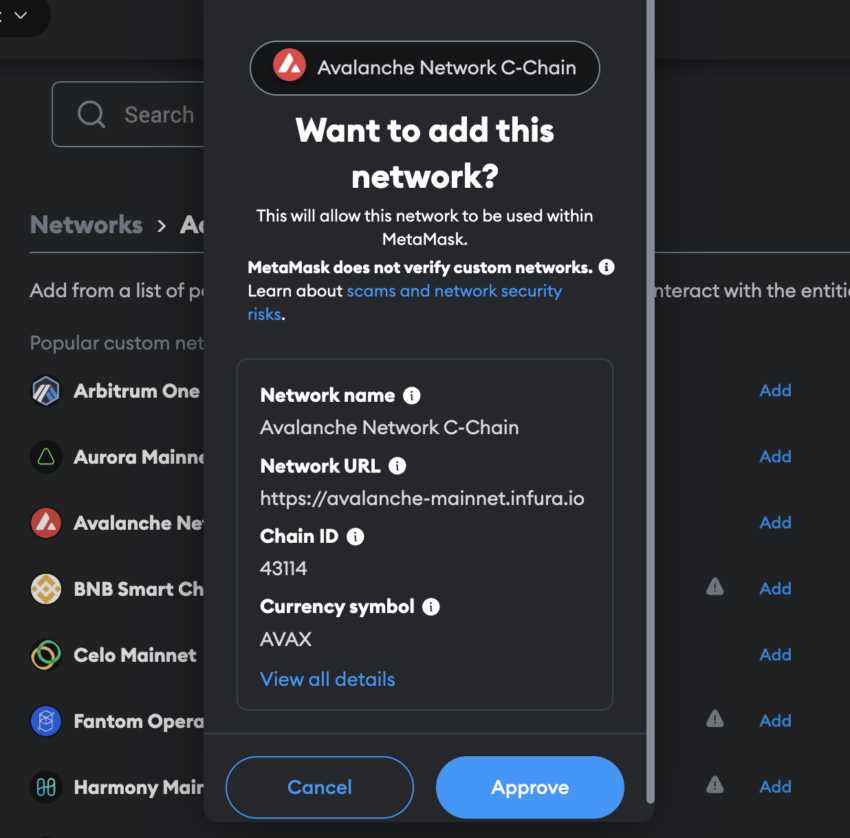
Now that your wallet is set up and secured, it’s time to connect it to the Avalanche network. To do this, click on the network dropdown menu in the Metamask interface and select “Custom RPC”. In the “New Network” tab, enter the Avalanche network’s information, including the network name, RPC URL, chain ID, and symbol. Once you’ve entered the required information, click on the “Save” button to add the Avalanche network to your Metamask wallet.
Step 7: Import Your Wallet (Optional)
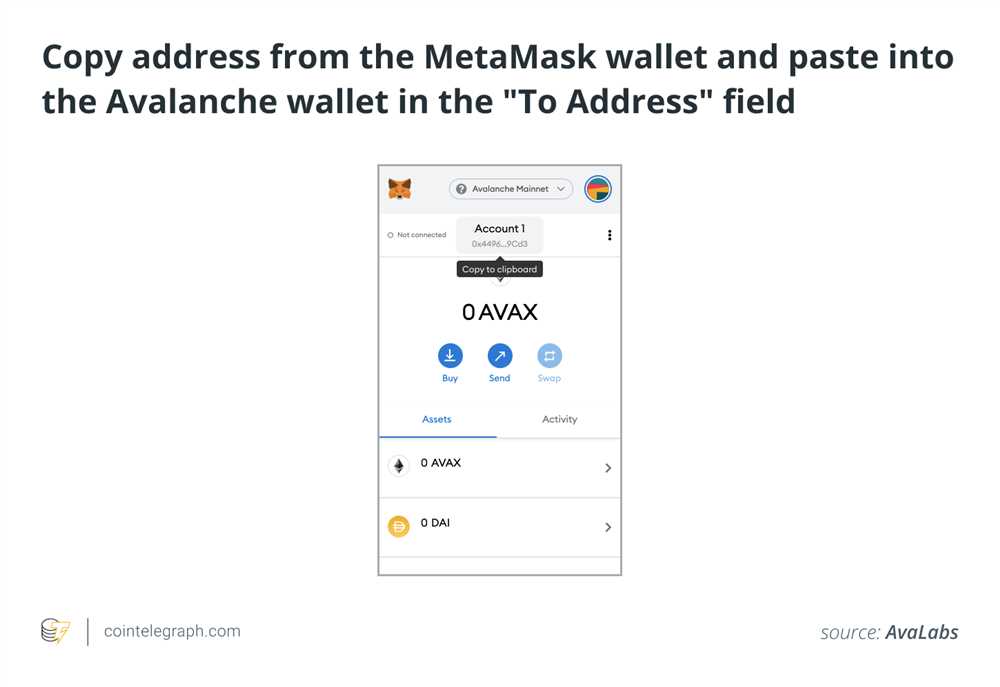
If you already have an existing wallet with funds on the Avalanche network, you can import it into Metamask instead of creating a new wallet. To do this, click on the Metamask icon in your browser’s toolbar, select “Import Wallet”, and follow the instructions to import your wallet using your seed phrase or private key.
Now that your wallet is set up and connected to the Avalanche network, you’re ready to start exploring the exciting world of decentralized finance. Whether you’re interested in yield farming, liquidity mining, or participating in decentralized exchanges, Metamask and Avalanche provide a powerful combination that can unlock a wealth of opportunities for you.
Unlocking the Power of Avalanche
Avalanche is a revolutionary blockchain platform that aims to overcome the scalability and speed limitations of traditional blockchains. By utilizing a unique consensus mechanism called Avalanche, this platform enables fast and secure transactions at a fraction of the cost.
With its advanced features and strong community support, Avalanche has gained traction as a powerful decentralized finance (DeFi) platform. To fully harness the capabilities of Avalanche, setting up a wallet with Metamask is crucial.
Why Choose Avalanche?
Avalanche offers several key advantages that make it an attractive choice for developers and users alike. These include:
- Scalability: Avalanche can handle thousands of transactions per second, making it one of the fastest blockchain platforms available.
- Interoperability: Avalanche is built to seamlessly interact with other blockchains, allowing for the easy transfer of assets and data across different networks.
- Low Fees: Transactions on Avalanche are significantly cheaper compared to other popular blockchains, making it ideal for microtransactions and everyday use.
- Decentralization: Avalanche’s consensus mechanism ensures that power is distributed among a large number of validators, enhancing the platform’s security and resilience against attacks.
Setting Up a Wallet with Metamask
To get started with Avalanche, follow these steps to set up a wallet with Metamask:
- Install the Metamask extension in your web browser.
- Open Metamask and create a new account.
- Set up a strong password and securely store your seed phrase, as this will be used to recover your wallet if needed.
- Connect Metamask to Avalanche by adding the Avalanche network to your network list.
- Import your Avalanche wallet using the seed phrase provided during the wallet creation process.
- You’re now ready to start using your Avalanche wallet with Metamask!
Once your wallet is set up, you can explore the features and functionalities of Avalanche, such as participating in decentralized applications (dApps), staking, and swapping tokens. Remember to always exercise caution and do thorough research before engaging with any new project or DeFi platform.
Unlocking the power of Avalanche with Metamask opens up a world of possibilities in the decentralized finance space. As more developers and users embrace this innovative platform, Avalanche has the potential to revolutionize the way we transact and interact with blockchain technology.
Setting Up a Wallet with Metamask
Metamask is a popular and user-friendly web wallet that allows users to manage their cryptocurrencies and interact with decentralized applications (dApps) on the Ethereum network and other compatible blockchains like Avalanche. Setting up a wallet with Metamask is quick and easy, and in this guide, we’ll walk you through the process step by step.
Step 1: Install Metamask Extension
The first step is to install the Metamask extension in your web browser. Metamask is available for Chrome, Firefox, and Brave browsers. Simply go to your browser’s extension store and search for “Metamask.” Click on the Metamask extension and follow the instructions to add it to your browser.
Step 2: Create a New Wallet
After installing Metamask, click on the Metamask icon in your browser’s toolbar. You will be prompted to create a new wallet. Click on “Create a Wallet” and follow the instructions to set up a password for your wallet. Make sure to choose a strong, unique password and keep it securely stored.
Step 3: Backup Your Wallet
Once your wallet is created, Metamask will display a seed phrase. This seed phrase is a set of 12 or 24 words that can be used to restore access to your wallet if you forget your password or lose your device. It is crucial to write down and securely store this seed phrase in a safe place. Never share your seed phrase with anyone.
Click on “Next” and you will be asked to verify your seed phrase by selecting the correct words in the correct order. This is a security measure to ensure that you have properly backed up your wallet. Once you have verified your seed phrase, your wallet setup is complete.
Step 4: Connect to Avalanche Network
By default, Metamask is connected to the Ethereum network. To interact with Avalanche, you need to add the Avalanche network to Metamask. Click on the network dropdown on the top of the Metamask window and select “Custom RPC.” In the RPC URL field, enter the Avalanche network’s RPC URL, which can be found in the Avalanche documentation. Fill in the other required fields and click on “Save.”
Your Metamask wallet is now connected to the Avalanche network, and you can start managing your Avalanche assets and interacting with Avalanche dApps.
Setting up a wallet with Metamask is a straightforward process that allows you to securely store and manage your cryptocurrencies. By following these steps, you will be able to set up a Metamask wallet and start exploring the exciting world of Avalanche.
The Benefits of Avalanche
Avalanche is a revolutionary blockchain platform that offers several unique benefits over other blockchain networks. Here are some of the key advantages of using Avalanche:
Highly Scalable
Avalanche is designed to handle a large number of transactions per second, making it highly scalable. This allows for fast and efficient processing of transactions, even during peak demand periods.
Low Fees
Compared to other blockchain platforms, Avalanche offers significantly lower transaction fees. This is achieved through its unique consensus mechanism, which allows for low-cost transaction processing.
Fast Transaction Speed
Avalanche boasts extremely fast transaction speeds, with confirmation times as low as a few seconds. This makes it ideal for real-time applications, such as decentralized finance (DeFi) and gaming.
Interoperability
Avalanche is built with interoperability in mind, allowing developers to easily build and connect applications across different blockchain networks. This enables seamless integration and communication between various blockchain platforms.
In addition to these benefits, Avalanche also offers strong security measures, decentralization, and a robust ecosystem of applications and developers. These factors make Avalanche an attractive choice for individuals and organizations looking to leverage the power of blockchain technology.
Step-by-Step Guide to Setting Up Your Metamask Wallet
Setting up your Metamask wallet is a simple process that allows you to securely store and manage your cryptocurrency assets. Follow the step-by-step guide below to get started:
|
Step 1: Download the Metamask extension from the official website. It is available for Chrome, Firefox, and Brave browsers. |
|
Step 2: Once the extension is installed, click on the Metamask icon in your browser’s toolbar to open the wallet. |
|
Step 3: Click on “Create a Wallet” to start the setup process. |
|
Step 4: Read and accept the terms of use for Metamask. |
|
Step 5: Create a strong password for your wallet. Make sure it is unique and not used for any other accounts. |
|
Step 6: Write down the secret backup phrase provided by Metamask. This phrase is essential for recovering your wallet in case you forget your password or lose access to your device. |
|
Step 7: Confirm your backup phrase by selecting the words in the correct order. |
|
Step 8: Set up a unique username for your wallet if desired. This username can be used by others to send funds to your wallet. |
|
Step 9: Choose the main network you want to use with your Metamask wallet. You can select the Ethereum mainnet or any other supported network. |
|
Step 10: Congratulations! Your Metamask wallet is now set up and ready to use. You can start sending, receiving, and managing your cryptocurrency assets. |
Remember to always keep your wallet password and backup phrase safe and secure. Never share them with anyone and consider using additional security measures such as two-factor authentication for added protection.
What is Avalanche?
Avalanche is a decentralized platform that aims to provide fast, secure, and scalable smart contract solutions. It is built on a unique consensus protocol called Avalanche, which allows for high throughput and low fees.
How does Metamask work with Avalanche?
Metamask is a popular wallet application that allows users to securely manage their cryptocurrencies. To set up Metamask with Avalanche, you need to add the Avalanche network to your wallet. You can do this by clicking on the network dropdown in Metamask and selecting “Custom RPC”. Then, you can enter the Avalanche network details to connect your wallet to Avalanche.
What are the advantages of using Avalanche?
Avalanche offers several advantages over other blockchain platforms. It has fast transaction confirmation times, allowing for quick and efficient transactions. It also has low fees, making it cost-effective for users. Additionally, Avalanche is highly scalable, meaning it can handle a large number of transactions without slowing down.