
Are you looking to transfer your Ethereum from Coinbase to MetaMask? Look no further! In this comprehensive guide, we will walk you through the step-by-step process of transferring your Ethereum from Coinbase, one of the most popular cryptocurrency exchanges, to MetaMask, a widely used Ethereum wallet and browser extension.
MetaMask is a powerful tool that allows users to securely store, manage, and interact with Ethereum, ERC-20 tokens, and decentralized applications (dApps). By transferring your Ethereum to MetaMask, you gain full control over your funds and can easily participate in the growing decentralized finance (DeFi) ecosystem.
The process of transferring Ethereum from Coinbase to MetaMask may seem daunting at first, but with our detailed instructions and screenshots, you will be able to complete the transfer in no time. Before we begin, make sure you have both Coinbase and MetaMask accounts set up and ready to go. Once you have everything prepared, let’s dive into the step-by-step guide!
Note: This guide is specifically for transferring Ethereum from Coinbase to MetaMask. The process for transferring other cryptocurrencies or tokens may differ.
Step 1: Open Coinbase and log in to your account. If you don’t have an account yet, sign up for one and complete the verification process.
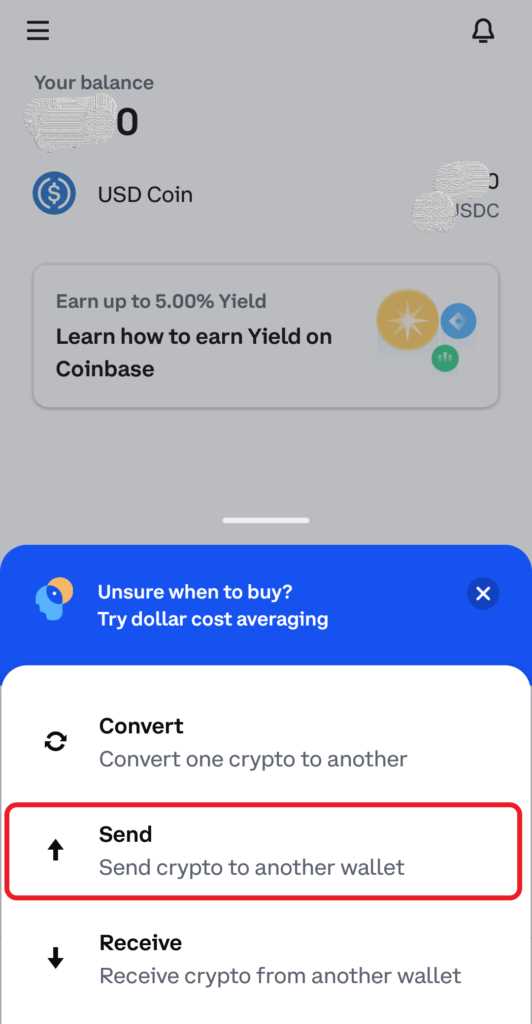
Step 2: Navigate to the “Accounts” page and select your Ethereum wallet. If you don’t have an Ethereum wallet, you will need to create one.
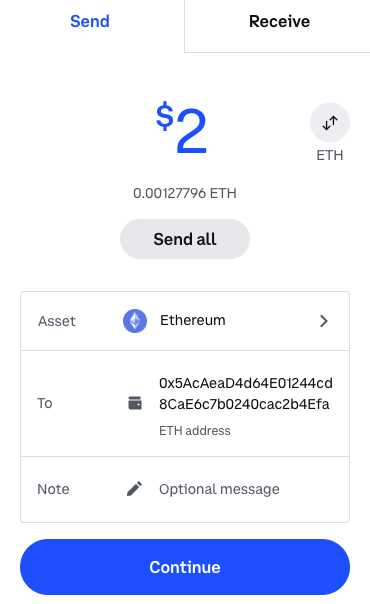
Step 3: Click on the “Send” button to initiate a transfer. Make sure to double-check the recipient address to ensure it is the correct MetaMask address. It is recommended to copy and paste the address to avoid any errors.
Step 4: Enter the amount of Ethereum you wish to transfer. You can choose to send the full balance or a specific amount. Keep in mind that there may be transaction fees associated with the transfer.
Step 5: Review the details of your transfer, including the recipient address and the amount of Ethereum. Once you are satisfied, click on the “Send” button to initiate the transfer.
Step 6: Wait for the transaction to be confirmed on the Ethereum network. This can take a few minutes to several hours, depending on network congestion and other factors. You can track the progress of your transfer using the transaction ID provided by Coinbase.
Step 7: Open MetaMask and log in to your account. If you don’t have MetaMask installed, you can download it from the official website and set it up by following the instructions.
Step 8: Once you are logged in to MetaMask, you should see your Ethereum balance updated to reflect the transferred amount. Congratulations, you have successfully transferred Ethereum from Coinbase to MetaMask!
Now that your Ethereum is safely stored in MetaMask, you can use it to interact with dApps, participate in DeFi projects, or simply hold it as an investment. Make sure to keep your MetaMask account secure by using a strong password and enabling two-factor authentication. Happy exploring!
Easy Steps to Transfer Ethereum from Coinbase to MetaMask
Transferring Ethereum from Coinbase to MetaMask is a simple process that allows you to have more control over your cryptocurrency and participate in decentralized applications (dapps) on the Ethereum network. Follow these easy steps to successfully transfer your Ethereum.
Step 1: Install and Set Up MetaMask
Before you can transfer Ethereum from Coinbase to MetaMask, you need to install the MetaMask extension and create a new wallet. Visit the MetaMask website and download the extension for your preferred browser. Once installed, follow the prompts to set up a new wallet by choosing a secure password and creating a backup phrase.
Step 2: Generate Your MetaMask Ethereum Address
After setting up your MetaMask wallet, you will be provided with a unique Ethereum address. This address will act as your destination for the Ethereum you transfer from Coinbase. To locate your Ethereum address, click on the MetaMask extension icon in your browser’s toolbar and navigate to the “Account” section. Copy the Ethereum address.
Step 3: Log In to Your Coinbase Account
Next, log in to your Coinbase account using your login credentials. If you don’t already have an account, sign up for one on the Coinbase website. Once logged in, navigate to the “Accounts” tab.
Step 4: Initiate the Ethereum Transfer
In the “Accounts” tab, locate your Ethereum wallet and click on the “Send” button. Paste the MetaMask Ethereum address (that you copied in Step 2) into the “Recipient” field. Make sure the address is correct to avoid any loss of funds. Enter the amount of Ethereum you want to transfer and review the transaction details.
Step 5: Confirm the Transfer
After verifying the transaction details, click on the “Send” button to initiate the transfer. Coinbase may require you to complete additional security steps, such as two-factor authentication, to confirm the transaction. Once confirmed, your Ethereum will be sent to your MetaMask wallet.
Step 6: Check Your MetaMask Wallet
After a few minutes, check your MetaMask wallet to ensure that the Ethereum transfer from Coinbase was successful. You should see the Ethereum balance updated in your MetaMask wallet, reflecting the amount you transferred.
Now that you have successfully transferred Ethereum from Coinbase to MetaMask, you can start using your Ethereum to interact with various decentralized applications and participate in the exciting world of decentralized finance.
Set up MetaMask Wallet
MetaMask is a popular Ethereum wallet and browser extension that allows you to manage your Ethereum assets and interact with decentralized applications (dApps) on the Ethereum blockchain. Follow the steps below to set up your MetaMask Wallet:
Step 1: Install MetaMask Extension
Start by installing the MetaMask browser extension. It is available for Chrome, Firefox, and Brave browsers. Go to the official MetaMask website or search for “MetaMask” in your browser’s extension store, and follow the instructions to install it.
Step 2: Create a New Wallet
Once you have installed the MetaMask extension, click on the MetaMask icon in your browser’s toolbar. A new tab will open with the MetaMask interface.
If this is your first time using MetaMask, click on “Get Started”. Then, click on “Create a Wallet”.
Set a strong password for your wallet and click “Create” to proceed. Make sure to securely store your password, as it cannot be recovered if lost.
Step 3: Backup your Seed Phrase
After creating your wallet, you will be given a unique seed phrase that acts as a backup for your wallet. This phrase consists of 12 or 24 words. It is crucial to write down this seed phrase and store it in a safe place. Your seed phrase can be used to restore your wallet if you ever lose access to it.
Important: Never share your seed phrase with anyone or enter it on any website other than the official MetaMask website.
Step 4: Confirm your Seed Phrase
After writing down your seed phrase, MetaMask will ask you to confirm the words in a specific order. This step is vital, as it ensures that you have correctly recorded your seed phrase. Select the words in the correct order and click “Confirm” to proceed.
Step 5: Connect to a Network
Once you have confirmed your seed phrase, MetaMask will prompt you to choose a network. Make sure to select the Ethereum Mainnet if you want to transfer Ethereum from Coinbase to MetaMask.
That’s it! Your MetaMask wallet is now set up, and you are ready to transfer Ethereum from Coinbase to MetaMask. Make sure to keep your wallet secure and never share your private key or seed phrase with anyone.
Generate Ethereum Wallet Address
Before you can transfer Ethereum from Coinbase to MetaMask, you will need to generate an Ethereum wallet address in MetaMask. Here’s how you can do it:
- Make sure you have MetaMask installed on your web browser. If you don’t have it installed, you can download and install it from the MetaMask website.
- Open MetaMask and click on the extension icon in your browser toolbar.
- If you already have a MetaMask account, you can import it using your seed phrase or private key. Otherwise, click on “Create a Wallet” to create a new MetaMask account.
- Set a strong password for your MetaMask account to ensure its security. Make sure to remember your password or store it securely.
- Agree to the MetaMask terms of service and privacy policy.
- MetaMask will now generate a seed phrase for your Ethereum wallet. This seed phrase is a unique combination of words that can be used to recover your wallet in case you ever lose access to your MetaMask account. Make sure to write down and store the seed phrase in a safe place.
- Confirm your seed phrase by selecting the words in the correct order, as prompted by MetaMask.
- Your Ethereum wallet address will now be generated by MetaMask.
- You can copy your wallet address by clicking on the address or the copy button next to it.
Once you have generated your Ethereum wallet address in MetaMask, you can use it to transfer Ethereum from Coinbase to MetaMask using the steps mentioned in this guide.
Secure Your MetaMask Account
Securing your MetaMask account is essential to protect your Ethereum and other digital assets. Here are some important steps to follow:
1. Use a Strong Password
First and foremost, create a strong password for your MetaMask account. Avoid using common words or personal information that can be easily guessed. Instead, opt for a combination of uppercase and lowercase letters, numbers, and special characters.
2. Enable Two-Factor Authentication (2FA)
Enabling two-factor authentication adds an extra layer of security to your MetaMask account. Consider using a widely supported authenticator app, such as Google Authenticator or Authy, to generate the required verification codes.
3. Be Cautious of Phishing Attempts
Always be vigilant and cautious of phishing attempts. Scammers may try to impersonate MetaMask and trick you into revealing your account details. To avoid falling victim to phishing attacks, make sure to never enter your MetaMask seed phrase or private key on suspicious websites or share them with anyone.
Additionally, remember that MetaMask will never ask for your private key or seed phrase via email or social media platforms.
4. Keep Your Software Updated
Regularly update your MetaMask software to ensure you have the latest security patches and features. Developers often release updates to address vulnerabilities and enhance the overall security of the application.
5. Use Hardware Wallet Integration
Consider utilizing hardware wallet integration with MetaMask for an added layer of security. Hardware wallets, such as Ledger or Trezor, store your private keys offline, significantly reducing the risk of hacking or unauthorized access.
By following these steps, you can enhance the security of your MetaMask account and protect your Ethereum and other digital assets from potential threats.
Transfer Ethereum from Coinbase to MetaMask
If you are using Coinbase and want to use the MetaMask wallet to manage your Ethereum, you can easily transfer your Ethereum from Coinbase to MetaMask. Here is a step-by-step guide on how to do it:
Step 1: Open Coinbase and MetaMask
Make sure you have both Coinbase and MetaMask accounts set up and opened in separate tabs or windows of your browser.
Step 2: Copy your MetaMask wallet address
In your MetaMask wallet, copy your Ethereum wallet address. You can find this address by clicking on the account name and selecting “Copy address to clipboard” option.
Step 3: Go to Coinbase
In your Coinbase account, navigate to the “Accounts” tab and find your Ethereum wallet.
Step 4: Withdraw Ethereum from Coinbase
Click on the “Send” button next to your Ethereum wallet on Coinbase. Paste your MetaMask wallet address into the recipient field. Enter the amount of Ethereum you want to transfer and click on the “Send” button to initiate the transfer.
Step 5: Confirm the transfer
Review the details of your transfer on Coinbase and click on the “Confirm” button to complete the transfer.
Step 6: Wait for the transfer to complete
Once the transfer is initiated, you will need to wait for the Ethereum network to confirm the transaction. This typically takes a few minutes. You can track the progress of the transfer on both Coinbase and MetaMask.
Step 7: Check your MetaMask balance
After the transfer is completed, check your MetaMask wallet to ensure that the Ethereum has been successfully transferred. Your Ethereum balance should now reflect the transferred amount.
That’s it! You have successfully transferred Ethereum from Coinbase to MetaMask. You can now use MetaMask to manage and interact with your Ethereum assets.
Confirm and Verify Transaction
Once you have completed the previous steps and initiated the transaction to transfer Ethereum from Coinbase to MetaMask, you will need to confirm and verify the transaction.
1. Check the Transaction Details
Before confirming the transaction, make sure to review the details carefully. Verify the amount of Ethereum being transferred, as well as the recipient address. Ensure that all the information is correct to avoid any potential mistakes.
2. Confirm the Transaction
After reviewing the transaction details, click on the “Confirm” or “Send” button in MetaMask to proceed with the transfer. A pop-up or notification may appear asking for confirmation. Click “Confirm” to proceed with the transaction.
It is important to note that the transaction fee will be deducted from your Coinbase account when confirming the transaction.
3. Wait for Confirmation
After confirming the transaction, you will need to wait for it to be included in a block on the Ethereum blockchain. The confirmation time can vary depending on network congestion and the amount of transaction fees paid. You can track the status of your transaction on the blockchain explorer using the transaction hash or the recipient address.
Once the transaction is confirmed, the Ethereum will be transferred from Coinbase to your MetaMask wallet, and you will be able to see the updated balance in MetaMask.
It is advisable to double-check the transaction on both Coinbase and MetaMask to ensure that the transfer has been successfully completed.
Is it possible to transfer Ethereum from Coinbase to MetaMask?
Yes, it is possible to transfer Ethereum from Coinbase to MetaMask. In fact, it is a fairly straightforward process that involves a few simple steps.
What is MetaMask?
MetaMask is a cryptocurrency wallet that allows users to manage their Ethereum-based tokens and interact with decentralized applications (dapps) on the Ethereum blockchain.
How do I connect MetaMask to Coinbase?
To connect MetaMask to Coinbase, you first need to install the MetaMask extension on your web browser. Once installed, you can import your existing wallet or create a new one. From there, you can find your Ethereum address and use it to transfer Ethereum from Coinbase to MetaMask.
Are there any fees involved in transferring Ethereum from Coinbase to MetaMask?
Yes, there may be fees involved in transferring Ethereum from Coinbase to MetaMask. Coinbase charges a network fee for withdrawals, and MetaMask also charges a small fee for each transaction. The fees may vary depending on network congestion and other factors.