
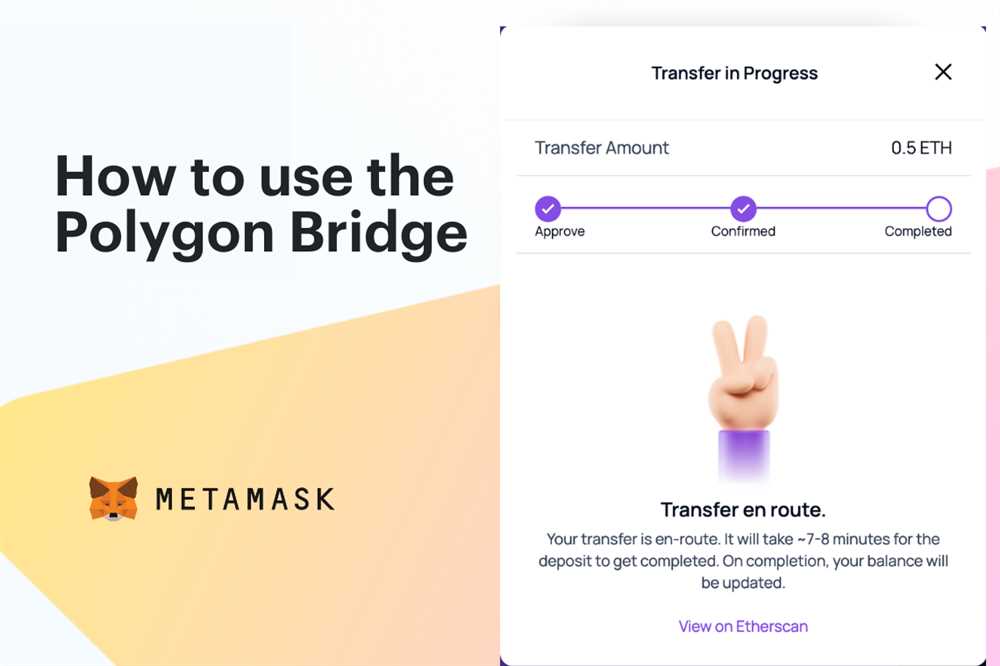
Are you tired of being limited by the network your funds are on? With the help of Metamask, you can now transfer your funds between different networks with ease. Whether you want to move your funds from Ethereum to Binance Smart Chain, or from any other network, this step-by-step guide will walk you through the process.
Metamask is a popular wallet and browser extension that allows users to interact with decentralized applications (DApps) and store their cryptocurrencies securely. It supports multiple networks, making it an ideal choice for those who want to move their funds between different environments.
In this guide, we will cover the steps required to transfer your funds between networks using Metamask. Please note that before you proceed, you should have Metamask installed and set up on your browser, and have funds in your wallet that you want to transfer.
So, let’s get started and learn how to transfer funds between networks using Metamask!
What is Metamask?
Metamask is a popular cryptocurrency wallet and browser extension that allows users to securely store, manage, and interact with their Ethereum-based digital assets. It functions as a bridge between your web browser and the Ethereum blockchain, enabling you to access decentralized applications (dApps), manage your Ethereum accounts, and execute transactions without the need for a full Ethereum node on your computer.
With Metamask, you can create and import Ethereum accounts, view and manage your transaction history, send and receive Ether (ETH), and interact with smart contracts on the Ethereum network. It provides a user-friendly interface and integrates seamlessly with popular web browsers like Google Chrome and Mozilla Firefox.
Metamask also provides users with a unique wallet seed phrase, which is a series of words that can be used to restore their wallet in case of loss or theft. This seed phrase should be kept secure and private, as anyone who has access to it can gain control of the associated accounts.
Key Features of Metamask
Here are some key features of Metamask:
- Secure Storage: Metamask uses encrypted storage to keep your private keys and assets safe from unauthorized access.
- Account Management: You can create multiple Ethereum accounts, import existing accounts, and easily switch between them.
- Transaction Management: Metamask allows you to view and manage your transaction history, including pending and completed transactions.
- Interaction with dApps: You can seamlessly connect your wallet to decentralized applications (dApps) and interact with them directly from your browser.
- Customizable Gas Fees: Metamask lets you set custom gas fees for your transactions, allowing you to prioritize speed or cost.
Overall, Metamask is a powerful tool for Ethereum users, providing a user-friendly and secure way to manage their digital assets and interact with the Ethereum network.
Metamask: A Digital Wallet for Ethereum and Beyond
Metamask is a popular digital wallet that allows users to securely manage their Ethereum and other compatible blockchain assets. It allows users to interact with decentralized applications (DApps) and provides a seamless experience for accessing and managing cryptocurrency funds.
With Metamask, users can easily create and manage multiple Ethereum accounts, securely store private keys, and send or receive Ethereum and other supported tokens. It acts as a bridge between the traditional internet and the decentralized web, making it easier for users to access and use blockchain-based services.
Metamask is a browser extension that can be installed on popular web browsers like Chrome, Firefox, and Brave. Once installed, users can connect their wallet to various decentralized applications and interact with them directly from their browser, without the need for a separate client or software.
In addition to its features as a digital wallet, Metamask also provides a powerful development environment for developers. It offers a built-in Ethereum blockchain explorer, a detailed transaction history, and various tools for debugging and testing smart contracts.
Metamask supports not only the Ethereum mainnet but also multiple testnets, such as Ropsten, Kovan, and Rinkeby. This allows developers and users to test and experiment with DApps without using real Ether or affecting the main Ethereum network.
As the Ethereum ecosystem continues to expand, Metamask is constantly evolving to support new features and protocols. It has become a trusted and essential tool for Ethereum users and developers alike, providing a secure and user-friendly way to interact with the decentralized web.
Whether you are a casual user or a blockchain developer, Metamask is a must-have tool that simplifies and enhances your Ethereum experience.
How to Transfer Funds Between Networks with Metamask

If you use Metamask as your Ethereum wallet, you may sometimes need to transfer funds between different networks, such as the Ethereum mainnet and test networks like Ropsten or Kovan. This guide will walk you through the steps to transfer funds between networks using Metamask.
Step 1: Connect to the Desired Network
The first step is to make sure you are connected to the network you want to transfer funds from. Open your Metamask wallet extension and click on the network selection dropdown menu. Choose the network you are currently using, or switch to the desired network from the list.
Step 2: Obtain Some Test Ether
If you are transferring funds from a test network, you will need some test Ether in your wallet. Test Ether is different from the mainnet Ether and can be obtained through faucets or testnet faucets. These faucets allow you to obtain a certain amount of test Ether for free.
Step 3: Get the Recipient Address
Next, you need to obtain the recipient’s address on the target network. This address will be used to send the funds to the desired recipient. Make sure you have the correct address to avoid any complications or loss of funds.
Step 4: Add the Custom Network
To transfer funds between networks, you need to add the custom network you want to transfer funds to. Click on the network selection dropdown and choose “Custom RPC”. Fill in the network details including the network name, RPC URL, and chain ID. These details can usually be found in documentation or official sources related to the desired network.
Step 5: Switch to the New Network
After adding the custom network, switch to that network from the network selection dropdown. You should see the network name you added in the list of available networks. Select it to switch to the new network.
Step 6: Initiate the Transfer

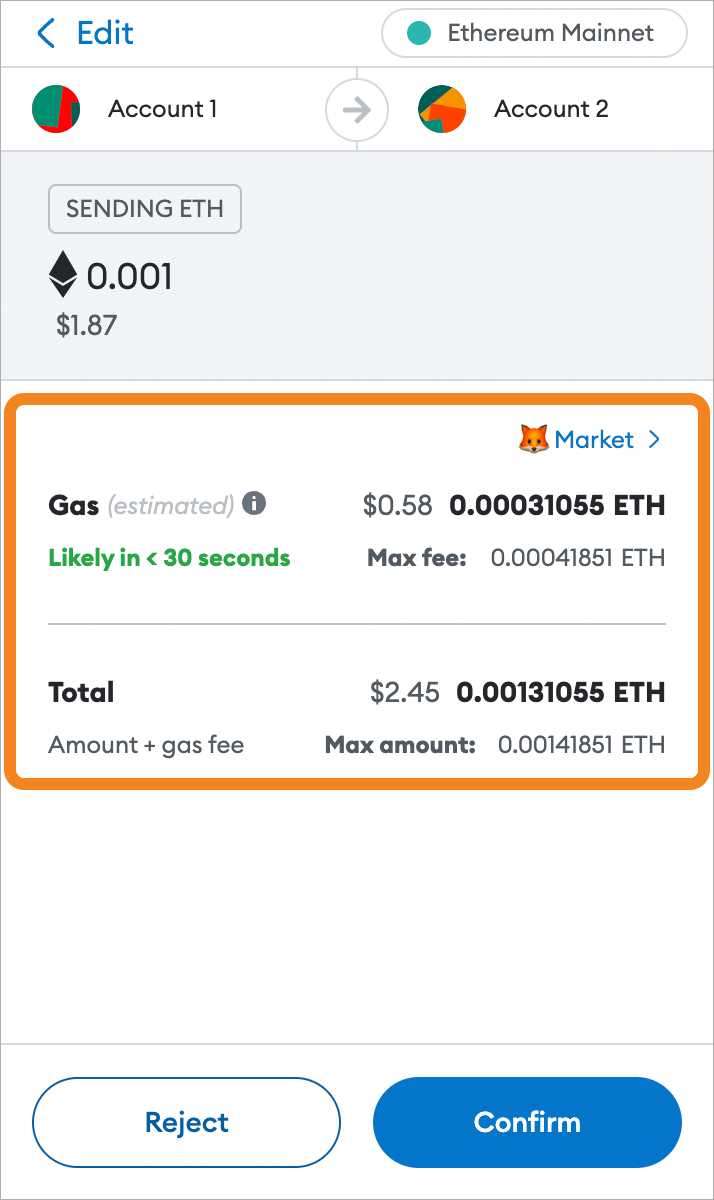
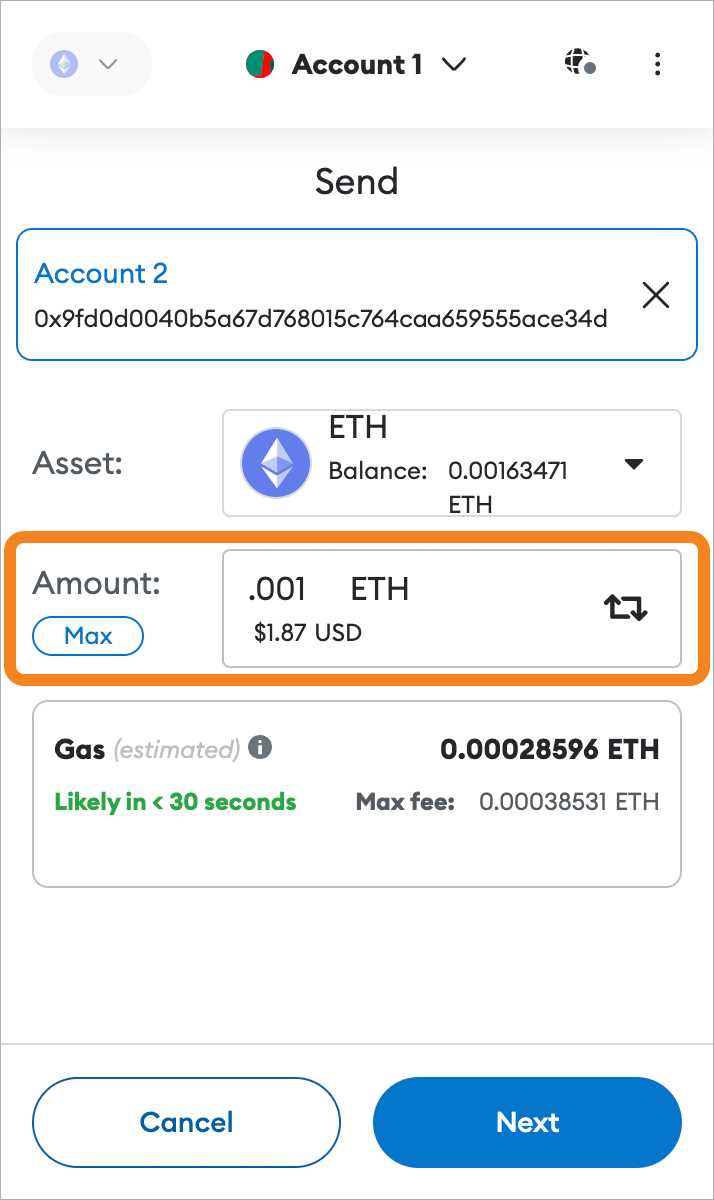
Now that you are connected to the new network, you can initiate the transfer. Open the “Send” tab in your Metamask wallet and enter the recipient’s address in the “To” field. Specify the amount you want to transfer and choose the gas fee for the transaction. Review the details and confirm the transfer.
It’s important to double-check all the details before confirming the transfer to ensure you are sending funds to the correct address on the intended network. Once the transfer is confirmed, the funds will be sent to the recipient’s address on the new network.
Remember to switch back to the original network if you want to continue using it for other transactions or interactions. You can switch networks at any time by following the same steps outlined in Step 1 and Step 5.
By following these steps, you can easily transfer funds between different networks using Metamask and ensure your transactions are successful and secure.
A Step-by-Step Guide to Cross-Network Transactions

Transferring funds between different blockchain networks can be a complex process, but with the help of Metamask, it becomes much simpler. In this step-by-step guide, we will walk you through the process of making cross-network transactions using Metamask.
Step 1: Install and Set Up Metamask
If you haven’t already, start by installing Metamask on your browser and creating a new wallet. Follow the instructions provided by Metamask to set up your wallet and securely store your recovery phrase.
Step 2: Connect Metamask to the Sending Network
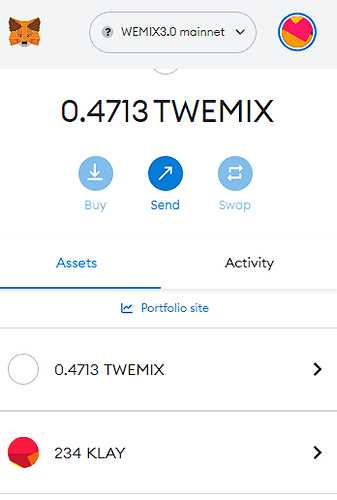
To transfer funds from one network to another, you need to connect Metamask to the network where your funds are currently held. Open Metamask and click on the network dropdown menu. Select the network that corresponds to the blockchain where your funds are located.
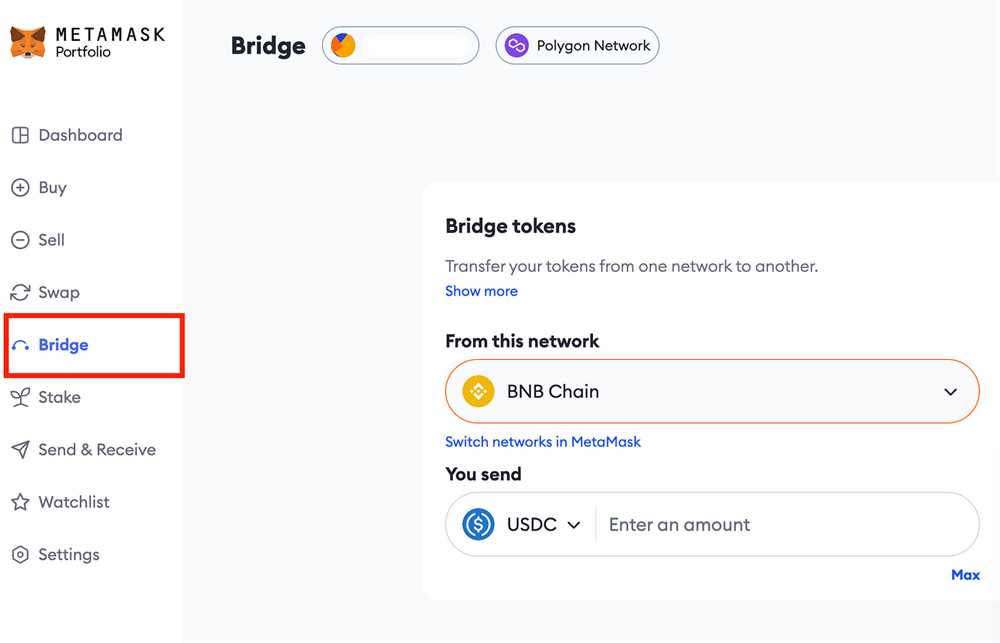
Step 3: Add the Receiving Network to Metamask
Next, you’ll need to add the network where you want to send your funds. Click on the network dropdown menu again and select “Custom RPC”. Enter the necessary details, such as the network name, RPC URL, chain ID, symbol, and block explorer URL. Once you’ve entered all the information, save the network to Metamask.
Step 4: Switch Networks
Now that you have both the sending and receiving networks added to Metamask, you can easily switch between them. Select the desired network from the network dropdown menu to switch between networks.
Step 5: Transfer Funds
With Metamask connected to the sending network, navigate to the wallet or dApp where your funds are located. Initiate the transfer by entering the recipient’s address, the amount you want to send, and any other required information. Approve the transaction and confirm it through Metamask.
Step 6: Wait for Confirmation
After confirming the transaction, you’ll need to wait for it to be confirmed on the sending network. This can take some time depending on network congestion and gas fees.
Step 7: Check the Receiving Network
Once the transaction is confirmed on the sending network, you can switch Metamask to the receiving network to check if the funds have been successfully transferred. Select the receiving network from the network dropdown menu and navigate to your wallet or dApp.
Step 8: Confirm the Transfer
If the funds have arrived successfully, you should see them in your wallet or dApp on the receiving network. Verify the balance and any other relevant details to confirm that the transfer was completed successfully.
Remember to always double-check the recipient’s address and any other details before initiating a transfer. Cross-network transactions can be irreversible, so it’s important to take extra care to ensure accuracy.
By following these step-by-step instructions, you can easily transfer funds between networks using Metamask. Whether you’re migrating your assets or exploring new dApps, Metamask provides a seamless experience for cross-network transactions.
Tips for Safe and Secure Transfers with Metamask
When transferring funds between networks using Metamask, it’s important to take precautions to ensure the safety and security of your transactions. Here are some tips to help you secure your transfers:
1. Double-check wallet addresses
Before initiating a transfer, always double-check the wallet addresses you are using. Make sure the addresses belong to the intended recipient and are correct. One small mistake in the address can result in the loss of your funds.
2. Use trusted sources
When downloading and installing Metamask, only use trusted sources such as the official website or reputable app stores. Avoid downloading Metamask from unknown sources, as it may contain malicious code that can compromise the security of your transfers.
3. Keep your wallet secure
Protect your Metamask wallet with a strong password and enable two-factor authentication for an extra layer of security. Keep your password and recovery phrase confidential and never share it with anyone. Regularly update your password and ensure your computer is protected with robust antivirus software.
4. Verify transaction details
Before confirming a transfer, carefully review all transaction details, including the amount, gas fee, and network selected. Ensure everything aligns with your intentions and expectations. If something seems suspicious or unfamiliar, cancel the transaction and investigate further.
5. Be cautious with third-party websites and applications
Exercise caution when interacting with third-party websites or applications that integrate with Metamask. Always verify the legitimacy and trustworthiness of these websites or applications before entering your wallet credentials or authorizing transactions.
By following these tips, you can enhance the safety and security of your transfers with Metamask. Remember to stay vigilant and take proactive measures to protect your funds from potential risks and threats.
Can I transfer funds between different cryptocurrency networks using Metamask?
Yes, you can transfer funds between different cryptocurrency networks using Metamask. Metamask supports various networks, including Ethereum, Binance Smart Chain, and others. To transfer funds between networks, you need to connect to the network you currently have funds on, enter the recipient’s wallet address on the desired network, and specify the amount of funds you want to transfer. Metamask will then facilitate the transfer between the networks.
Are there any fees for transferring funds between networks with Metamask?
Yes, there are fees for transferring funds between networks with Metamask. These fees, often referred to as gas fees, are required to execute and validate transactions on the blockchain networks. The fee amount can vary depending on the network you are using and the current network congestion. Metamask provides a fee estimation feature that allows you to adjust the gas fees according to your preference: you can choose a higher fee to speed up the transaction or a lower fee if you are willing to wait longer for the transaction to be processed.
What happens if I enter the wrong wallet address when transferring funds with Metamask?
If you enter the wrong wallet address when transferring funds with Metamask, the funds will be sent to the address you specified. However, it is important to note that cryptocurrency transactions are irreversible, meaning that once the funds are sent, they cannot be easily recovered. Therefore, it is essential to double-check the recipient’s wallet address before confirming the transaction to avoid any potential loss of funds. If you accidentally send funds to the wrong address, you should reach out to the owner of that address and explain the situation, but there is no guarantee that you will be able to retrieve the funds.