
If you’re a cryptocurrency enthusiast, chances are you’ve heard of both Coinbase and MetaMask. Coinbase is a popular exchange platform that allows users to buy, sell, and store various cryptocurrencies, while MetaMask is a digital wallet that enables users to interact with decentralized applications (dApps) on the Ethereum network. If you’re looking to transfer your Ethereum from Coinbase to MetaMask, you’re in luck! In this article, we’ll provide you with simple instructions on how to do just that.
Transferring Ethereum from Coinbase to MetaMask is a straightforward process that can be completed in just a few easy steps. To begin, you’ll need to ensure that you have both a Coinbase account and the MetaMask extension installed in your web browser. Once you have everything set up, you can proceed with the following instructions.
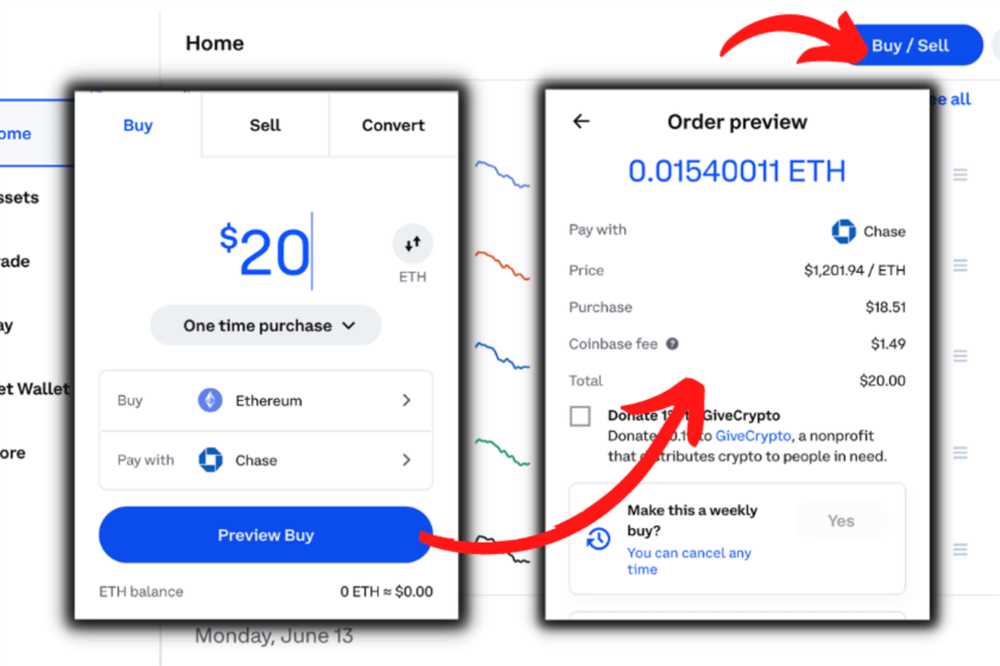
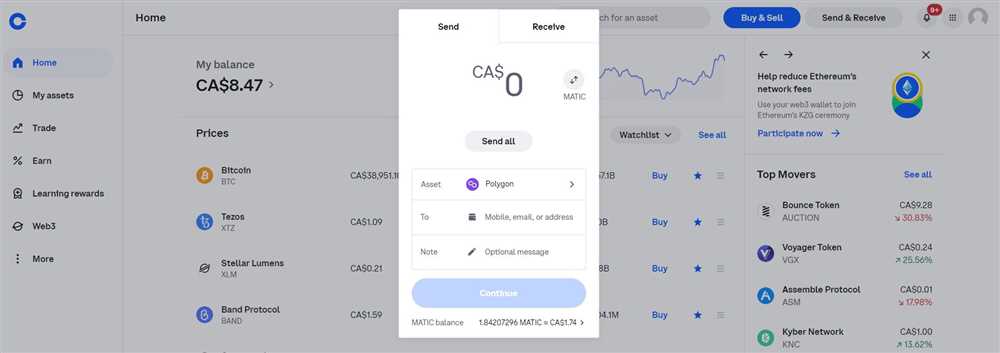
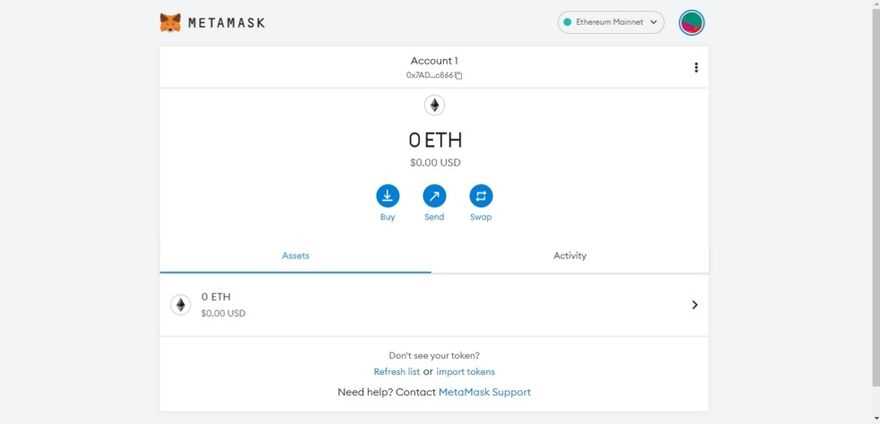
Step 1: Log in to your Coinbase account and navigate to the “Accounts” tab. Here, you’ll see a list of all the cryptocurrencies you currently own. Locate your Ethereum wallet and click on the “Send” button next to it. This will initiate the transfer process.
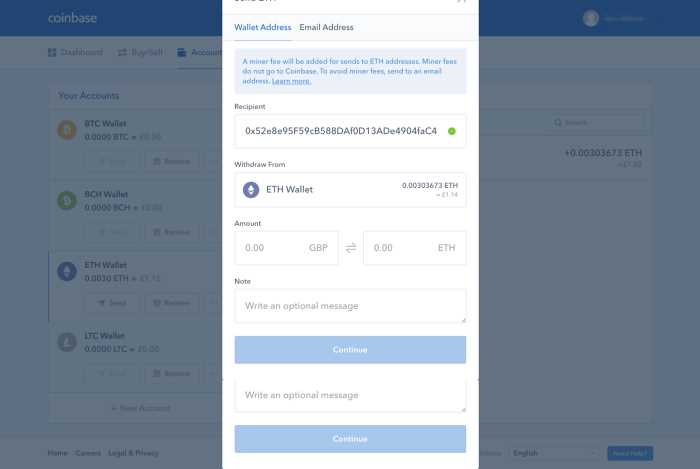
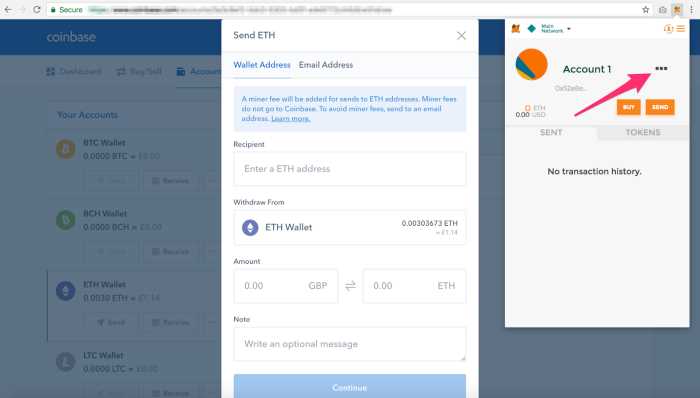
Step 2: A new window will appear, prompting you to enter the recipient’s address. This is where you’ll need to provide your MetaMask wallet address. To find your MetaMask wallet address, open the MetaMask extension and click on the account icon. From the account menu, select the option that says “Copy Address to Clipboard”.
Step 3: After you’ve copied your MetaMask wallet address, return to the Coinbase window and paste it into the recipient’s address field. Double-check that the address is correct, as any mistakes could result in a lost transfer. Once you’ve verified the address, confirm the transaction details and click on the “Send Now” button. Coinbase will then process your request and initiate the transfer.
That’s it! You’ve successfully transferred Ethereum from Coinbase to MetaMask. It’s important to note that while the transfer itself is quick and easy, the actual transaction time may vary depending on network congestion. Once the transfer is complete, you can view your Ethereum balance in your MetaMask wallet and use it to interact with various dApps on the Ethereum network.
Transferring Ethereum from Coinbase to MetaMask opens up a world of possibilities for decentralized finance and blockchain-based applications. Whether you’re looking to participate in decentralized exchanges, lend or borrow cryptocurrencies, or engage in other Ethereum-based activities, having your Ethereum in MetaMask gives you the flexibility and control you need. So why wait? Follow these simple instructions and start exploring the world of decentralized finance today!
Step-by-Step Guide: Transfer Ethereum from Coinbase to MetaMask
To transfer Ethereum from Coinbase to MetaMask, follow the step-by-step guide below:
Step 1: Set Up a MetaMask Wallet
- Install the MetaMask extension in your web browser.
- Open MetaMask and create a new wallet by following the instructions provided.
- Set your desired password and save your seed phrase in a safe place.
- Complete the setup process and you will have your MetaMask wallet ready to use.
Step 2: Obtain Your MetaMask Address
- Open MetaMask and click on the account icon located at the top right corner.
- Copy your Ethereum address by clicking on the copy icon next to it.
Step 3: Log into Coinbase
- Open Coinbase and sign in to your account.
Step 4: Initiate the Ethereum Transfer
- Click on the “Accounts” tab located at the top of the Coinbase dashboard.
- Select your Ethereum wallet from the list of accounts.
- Click on the “Send” button.
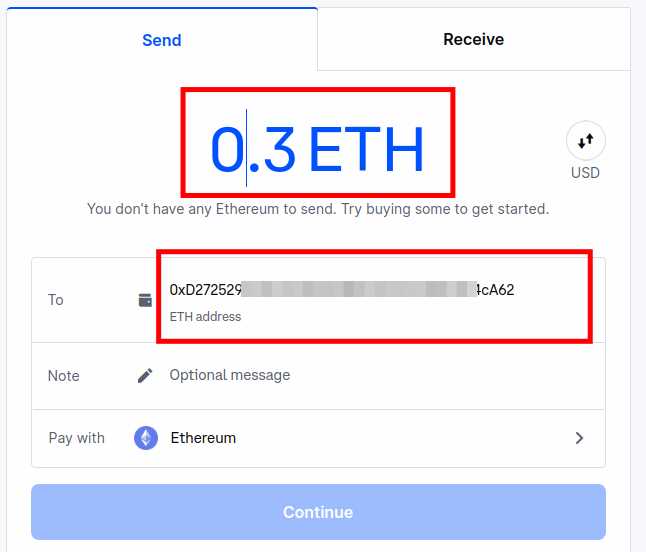
- Paste your MetaMask address into the recipient address field.
- Enter the amount of Ethereum you want to transfer.
- Review the transaction details and click on the “Send” button to initiate the transfer.
Note: Ensure that you have enough Ethereum in your Coinbase wallet to cover the transaction fees.
Step 5: Confirm the Transfer in MetaMask
- Switch back to the MetaMask tab in your web browser.
- Wait for the transaction to appear in your MetaMask wallet.
- Review the transaction details to ensure everything is correct.
- Click on the “Confirm” button to complete the transfer.
Once the transfer is confirmed, you will see the Ethereum balance in your MetaMask wallet.
Congratulations! You have successfully transferred Ethereum from Coinbase to MetaMask.
Create MetaMask Wallet
To transfer Ethereum from Coinbase to MetaMask, you’ll need to have a MetaMask wallet. If you don’t already have one, follow the steps below to create your MetaMask wallet:
- Install the MetaMask browser extension on your preferred browser (Chrome, Firefox, or Brave).
- Click on the MetaMask extension icon in your browser’s toolbar to open the MetaMask window.
- Click on the “Get Started” button to begin the wallet creation process.
- You can choose to import an existing wallet or create a new one. To create a new wallet, click on the “Create a Wallet” button.
- Set a strong password for your MetaMask wallet. Make sure to use a combination of upper and lowercase letters, numbers, and special characters.
- Click on the “Create” button to create your MetaMask wallet.
- Next, you will be shown a secret backup phrase. It is crucial to write down this backup phrase and keep it in a secure place. This backup phrase is the only way to recover your wallet if you forget your password or lose access to your device.
- After writing down your backup phrase, click on the “Next” button.
- You will then be asked to verify your backup phrase by selecting the correct words in the correct order. This step helps ensure that you have properly saved your backup phrase.
- Once you have verified your backup phrase, your MetaMask wallet will be created, and you will have access to your Ethereum address.
Congratulations! You have successfully created your MetaMask wallet. Now you can proceed with transferring Ethereum from Coinbase to MetaMask.
Generate Ethereum Address
In order to transfer Ethereum from Coinbase to MetaMask, you will need to generate an Ethereum address in your MetaMask wallet. Here are the steps to do so:
Step 1: Install MetaMask: If you haven’t already installed the MetaMask extension, you can do so by visiting the official MetaMask website and following the installation instructions for your preferred browser.
Step 2: Create a MetaMask Account: After installing MetaMask, click on the extension icon and follow the prompts to create a new MetaMask account. Make sure to securely store your seed phrase as it will be needed to restore your wallet in case of loss or theft.
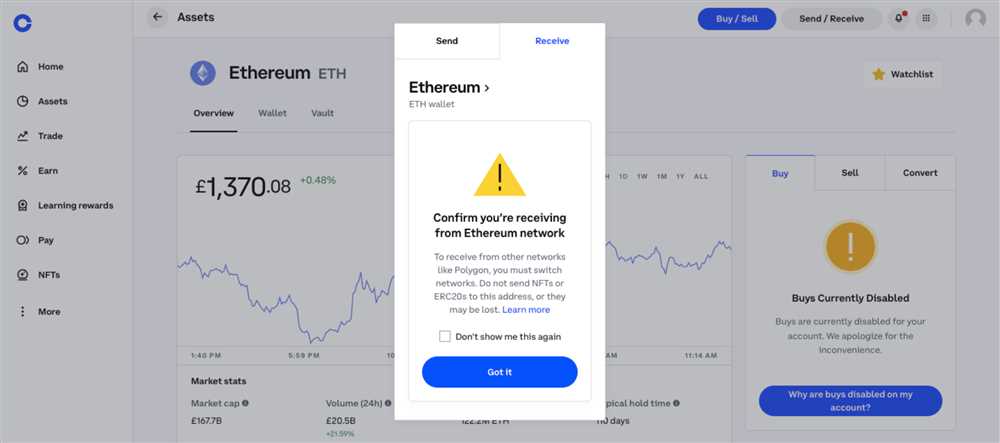
Step 3: Access Your Ethereum Address: Once your MetaMask account is created, you can access your Ethereum address by clicking on the account icon and selecting “Copy Address” or by clicking on the ellipsis (…) and selecting “Copy Address to Clipboard.”
Step 4: Share Ethereum Address with Coinbase: Go to your Coinbase account and navigate to the “Send/Request” tab. Paste your MetaMask Ethereum address into the recipient address field and specify the amount of Ethereum you wish to transfer. Double-check that the recipient address is correct before proceeding.
Step 5: Confirm and Complete the Transfer: After reviewing the details, click on the “Send” or “Transfer” button to initiate the transfer from Coinbase to your MetaMask wallet. Coinbase may ask for additional verification before processing the transaction.
Note: It is recommended to start with a small transfer to ensure everything is working correctly before transferring larger amounts.
By following these steps, you will be able to generate an Ethereum address in your MetaMask wallet and successfully transfer Ethereum from Coinbase.
Copy Ethereum Address from MetaMask
To transfer Ethereum from Coinbase to MetaMask, you will need to copy your Ethereum address from MetaMask.
Follow these steps to copy your Ethereum address from MetaMask:
Step 1: Open MetaMask Wallet
Launch the MetaMask wallet extension on your web browser.
Step 2: Access Your Ethereum Address
Click on the MetaMask extension icon in your browser’s toolbar. This will open the MetaMask wallet.
In the MetaMask wallet, locate your Ethereum address. It will be displayed on the main screen next to the account name.
Step 3: Copy Your Ethereum Address
Click on the Ethereum address to copy it to your clipboard. Alternatively, you can click on the “Copy” button next to the address.
You have now successfully copied your Ethereum address from MetaMask.
Keep your Ethereum address handy as you will need it to transfer Ethereum from Coinbase to MetaMask.
Transfer Ethereum from Coinbase to MetaMask
MetaMask is a popular Ethereum wallet and browser extension that allows users to securely store and manage their Ethereum assets. If you have Ethereum stored on Coinbase and want to transfer it to your MetaMask wallet, follow these simple instructions.
Step 1: Open MetaMask and Generate an Ethereum Address
If you haven’t installed MetaMask yet, you can download it as a browser extension for Chrome, Firefox, or Brave browsers. Once installed, open MetaMask and create a new wallet or import an existing one. Make sure you have a sufficient amount of ETH in your Coinbase account to transfer to MetaMask.
Step 2: Copy your MetaMask Ethereum Address
After setting up your MetaMask wallet, navigate to the “Account Details” section and copy your Ethereum address. This address will be used to receive the transferred funds from Coinbase to MetaMask.
Step 3: Log into your Coinbase account and initiate the transfer
Log into your Coinbase account and navigate to the “Accounts” tab. Select your Ethereum wallet and click on the “Send” button. Paste your MetaMask Ethereum address into the recipient field and enter the amount you wish to transfer. Double-check the address to ensure accuracy.
Step 4: Confirm the transaction and wait for confirmation
Review the details of your transaction on Coinbase and click on the “Confirm” button to initiate the transfer. It may take a few minutes for the transaction to be confirmed on the Ethereum network. You can track the progress of the transfer by searching for your MetaMask address on an Ethereum blockchain explorer.
Once the transfer is confirmed, you will see the ETH balance reflected in your MetaMask wallet. You can now use these funds for various Ethereum-based transactions and interactions within the MetaMask ecosystem.
Remember to always exercise caution when transferring funds between wallets and double-check the recipient address to avoid any mistakes or loss of funds. It is a good practice to start with a small test transfer before moving larger amounts.
What is Coinbase?
Coinbase is a popular cryptocurrency exchange platform where you can buy, sell, and store various digital currencies, including Ethereum.
What is MetaMask?
MetaMask is a digital wallet that allows you to manage and interact with decentralized applications (dApps) on the Ethereum blockchain. It is available as a browser extension for Google Chrome, Firefox, and Brave.