
Welcome to our step-by-step tutorial on how to transfer tokens to your Metamask wallet. Metamask is a popular Ethereum wallet that allows users to securely store and manage their digital assets. In this tutorial, we will guide you through the process of transferring tokens to your Metamask wallet in a few simple steps.
Step 1: Install Metamask
If you haven’t already done so, the first step is to install the Metamask extension in your web browser. Metamask is available for Chrome, Firefox, Brave, and Edge browsers. Simply go to the respective extension store and search for “Metamask”. Click on the “Add to Chrome” button and follow the installation prompts.
Step 2: Create or Import a Wallet
Once Metamask is installed, click on the extension icon in your browser toolbar. You will be prompted to either create a new wallet or import an existing one. If you don’t have a wallet yet, select “Create a Wallet” and follow the steps to set up a password and obtain your wallet seed phrase. If you already have a Metamask wallet or a wallet from another platform, choose “Import Wallet” and enter your seed phrase or private key.
Step 3: Connect to Ethereum Network
After creating or importing your wallet, you need to connect your Metamask wallet to the Ethereum network. Click on the network dropdown on the top of the Metamask extension and select “Ethereum Mainnet” if it’s not already selected. This will ensure that you are using the main Ethereum network for your token transfers.
Step 4: Receive Tokens
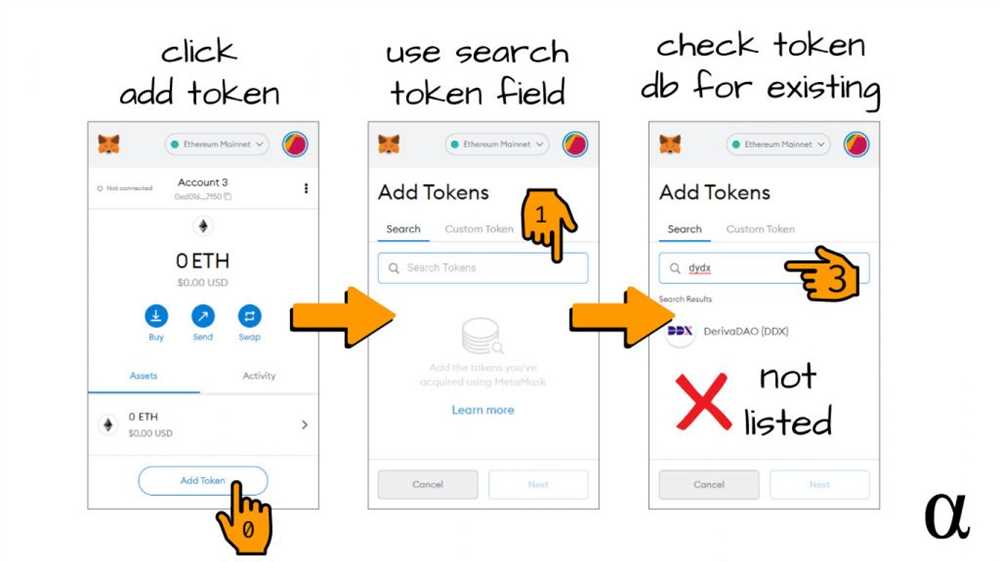
Now that you have set up and connected your wallet, it’s time to receive tokens. You will need the token address from the sender. Ask the sender to provide you with the token address (a long string of letters and numbers). Once you have the token address, click on the “Assets” tab in your Metamask wallet and select “Add Token”. Paste the token address into the input field and click “Next” to add the token to your wallet.
Step 5: Transfer Tokens
Finally, it’s time to transfer tokens to your Metamask wallet. To initiate a token transfer, click on the “Send” button in your Metamask wallet interface. Enter the recipient’s wallet address, the amount of tokens you want to send, and any additional details required (such as a memo or a specific gas fee). Review the transaction details and click “Confirm” to initiate the token transfer. After confirming the transaction in Metamask, wait for the transaction to be processed on the Ethereum network.
Congratulations! You have successfully transferred tokens to your Metamask wallet. Remember to always double-check the recipient’s wallet address and review the transaction details before confirming the transfer. Metamask makes it easy and secure to manage your tokens, and now you can start exploring the decentralized world of Ethereum!
Overview of Transferring Tokens to Metamask Wallet

Transferring tokens to a MetaMask wallet is a simple process that allows you to securely store and manage your tokens using the popular Ethereum wallet extension. Whether you are receiving tokens from someone else or sending tokens from another wallet, this step-by-step tutorial will guide you through the process and ensure a successful transfer.
Requirements
- An active Ethereum account with a MetaMask wallet installed and set up.
- The token you want to transfer must be compatible with MetaMask. Most ERC-20 tokens are supported.
- The wallet or exchange where the tokens are currently stored.
Step 1: Accessing MetaMask Wallet
Open your web browser and ensure that the MetaMask extension is installed and properly logged in. The MetaMask icon should appear in your browser’s toolbar.
Step 2: Choosing the Token
From the MetaMask wallet interface, click on the tokens tab. Here, you will see a list of all the tokens you currently hold in your wallet. If the token you want to transfer is not listed, you may need to add it manually using the “Add Token” button.
Step 3: Initiating the Transfer
Once you have selected the token you wish to transfer, click on the “Send” button. This will open a new transaction window where you can enter the recipient’s address, the amount of tokens you want to transfer, and optional data if required by the token contract.
Step 4: Confirming the Transfer
Double-check all the details of the transaction, including the recipient’s address and the amount of tokens to be transferred. Once you are certain everything is correct, click on the “Next” button to proceed.
Step 5: Authorizing the Transfer
You will be prompted to review and confirm the transaction in your MetaMask wallet. Carefully review the transaction details and click on the “Confirm” button to authorize the transfer.
Step 6: Verifying the Transfer
After confirming the transfer, you can verify the status of the transaction on the Ethereum blockchain. Use a blockchain explorer like Etherscan to search for the transaction ID or the recipient’s address to view the transfer details.
That’s it! You have successfully transferred tokens to your MetaMask wallet. Remember to keep your wallet and private keys secure to ensure the safety of your tokens.
Step 1: Install and Set Up Metamask Wallet
Before you can transfer tokens to your Metamask wallet, you’ll need to install and set up the wallet itself. Metamask is a popular browser extension wallet that allows you to securely store and manage your Ethereum tokens.
Here’s how you can install and set up Metamask:
- Open your preferred web browser and navigate to the Metamask website.
- Click on the “Get Chrome Extension” button if you’re using Google Chrome, or “Get Firefox Extension” if you’re using Mozilla Firefox.
- Follow the prompts to add the extension to your browser.
- Once the extension is installed, you’ll see the Metamask icon in the top right corner of your browser. Click on it to open the Metamask pop-up.
- Click on “Create a Wallet” to start setting up your Metamask wallet.
- You’ll be asked to create a strong password for your wallet. Make sure to choose a password that is unique and secure.
- Read and accept the terms of use and privacy policy.
- Click on “Create” to generate your wallet.
- You’ll then be shown a list of randomly generated words, known as a seed phrase. Write down these words in the exact order and keep them somewhere safe. This seed phrase can be used to restore your wallet in case you forget your password.
- Confirm your seed phrase by typing the words in the correct order when prompted.
- Your Metamask wallet is now set up and ready to use! You can now see your Ethereum address and balance within the Metamask pop-up.
Now that you have your Metamask wallet set up, you can proceed to the next step to learn how to transfer tokens to it.
Step 2: Obtain the Token Address
Once you have set up your MetaMask wallet, the next step is to obtain the token address of the specific token you want to transfer. The token address is a unique identifier that distinguishes one token from another on the blockchain.
1. Visit the Token’s Website
Start by visiting the official website of the token you want to transfer. Most tokens will have a website that provides information about the token and its project. This information can usually be found in the token’s whitepaper or on the token’s official website.
2. Find the Token Address
Once you are on the token’s website, search for the token address. This information is usually located on the token’s homepage, FAQ section, or in the token’s smart contract. Look for terms like “token contract address” or “token address”.
Typically, the token address is a long string of alphanumeric characters that starts with “0x”. It may look something like this: “0x1aE0EA34a72D944a8C6Ad2294B3e18e9D29D79b9”.
Important: Make sure to copy the token address accurately, as even a minor mistake can result in the loss of your tokens.
3. Double-check the Token Address
Before proceeding with the token transfer, double-check the token address you have copied. You can use an Ethereum blockchain explorer like Etherscan or Binance Smart Chain explorer to verify the authenticity of the token address.
Pro tip: You can also paste the token address into the search bar of your MetaMask wallet to verify its authenticity.
Once you have obtained and verified the token address, you are ready to proceed to the next step: transferring the tokens to your MetaMask wallet.
Step 3: Add Token to Metamask Wallet
After successfully transferring tokens to your Metamask wallet, the next step is to add the token to your wallet’s list of assets. This will allow you to track and manage the token directly from your Metamask interface.
To add a token to your Metamask wallet, follow these steps:
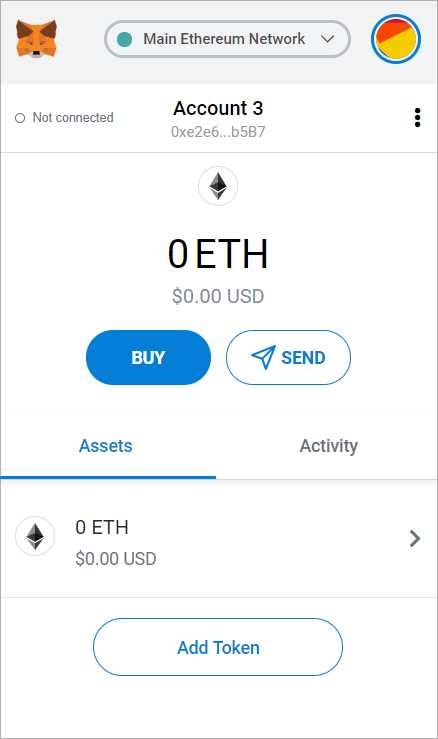
- Open the Metamask extension and make sure you are on the main wallet screen.
- Click on the “Assets” tab at the top of the screen.
- Scroll down to the bottom of the Assets list and click on the “Add Token” button.
- Choose the “Custom Token” tab if the token you want to add is not listed on the “Tokens” tab.
- Enter the token contract address in the “Token Contract Address” field.
- Metamask should automatically populate the “Token Symbol” and “Decimals of Precision” fields. If not, you can find this information on the token’s website or by searching for the token on a blockchain explorer.
- Click on the “Next” button.
- Review the token information and click on the “Add Tokens” button to confirm.
Once you have completed these steps, the token should appear in your Metamask wallet’s list of assets. You can now view your token balance, transfer tokens, and perform other actions directly from your wallet.
Step 4: Transfer Tokens to Metamask Wallet
Now that you have connected your Metamask wallet to the token exchange platform, it’s time to transfer your tokens to your wallet. Here’s how:
- Go to the wallet section of the token exchange platform and locate the option to “Deposit” or “Transfer” tokens.
- Select the token you want to transfer from the dropdown menu.
- Enter the amount of tokens you wish to transfer.
- Double-check the recipient address to ensure it matches your Metamask wallet address.
- Click on the “Transfer” or “Deposit” button to initiate the transfer.
- Confirm the transaction details on Metamask by reviewing the gas fee and token amount.
- Click on the “Confirm” button to proceed with the transfer.
- Wait for the transaction to be confirmed on the blockchain. This may take a few minutes.
- Once the transaction is confirmed, you will see the transferred tokens in your Metamask wallet.
It’s important to note that the transfer process may vary slightly depending on the token exchange platform you are using. However, the general steps mentioned above should be applicable in most cases. Always double-check the transaction details before confirming the transfer to ensure the accuracy of the recipient address and token amount.
What is Metamask Wallet?
Metamask Wallet is a browser extension that allows users to manage their cryptocurrencies and interact with decentralized applications (DApps) on the Ethereum blockchain.
How do I install Metamask Wallet?
To install Metamask Wallet, follow these steps: 1) Visit the Metamask website. 2) Click on the “Download” button. 3) Choose your browser and click “Install” to add the extension. 4) Create a new wallet and write down the seed phrase. 5) Set up a password, and you’re done!
What are tokens?
Tokens are digital assets that can represent assets like loyalty points, cryptocurrency, or any other fungible or non-fungible item. They are built on top of existing blockchain protocols, such as Ethereum, and can be transferred between individuals or used within a specific application or ecosystem.
How can I transfer tokens to my Metamask Wallet?
To transfer tokens to your Metamask Wallet, follow these steps: 1) Copy your wallet address from Metamask. 2) Go to the platform or exchange where you hold the tokens. 3) Initiate a withdrawal or transfer of the tokens. 4) Paste your Metamask wallet address as the destination address. 5) Confirm the transfer and wait for the tokens to appear in your Metamask Wallet.
Are there any fees associated with transferring tokens to Metamask Wallet?
Yes, there are usually fees associated with transferring tokens to Metamask Wallet. These fees are determined by the network congestion and are paid to the miners who process the transactions. The fee amount can vary depending on the token being transferred and the desired transaction speed.