
Are you new to the world of cryptocurrencies and eager to start trading on Binance using Metamask? Look no further! In this step-by-step guide, we will walk you through the entire process, from setting up your Metamask wallet to making your first trade on Binance.
Metamask is a popular browser extension wallet that allows you to manage your Ethereum-based assets and interact with decentralized applications (dApps). Binance, on the other hand, is one of the leading cryptocurrency exchanges in the world, renowned for its extensive selection of trading pairs and advanced features.
To get started, you will first need to install the Metamask extension in your preferred web browser. Once installed, create a new wallet or import an existing one by following the on-screen instructions. Make sure to securely back up your seed phrase, as this will be crucial for regaining access to your wallet in case of loss or theft.
After setting up your wallet, it’s time to connect it to the Binance exchange. Log in to your Binance account and navigate to the “Wallet” section. From there, select “Metamask” as your preferred wallet option and follow the steps to authorize the connection between Binance and Metamask.
How to Connect Binance and Metamask
Connecting your Binance account and Metamask wallet is a straightforward process that allows you to easily trade and interact with decentralized applications (dapps) on the Binance platform. Follow the steps below to establish the connection:
Step 1: Install Metamask and Create a Wallet
If you don’t have Metamask installed, download and install the browser extension for your preferred browser. Once installed, open Metamask and create a new wallet by following the on-screen instructions.
Step 2: Set Up Binance Chain Network
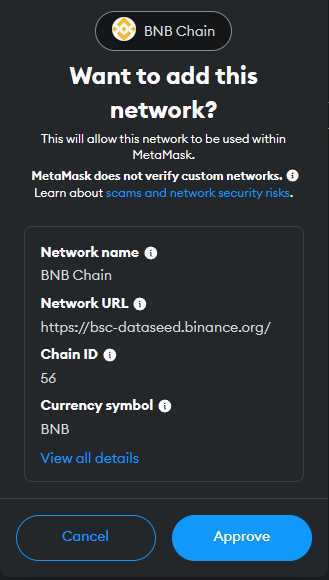
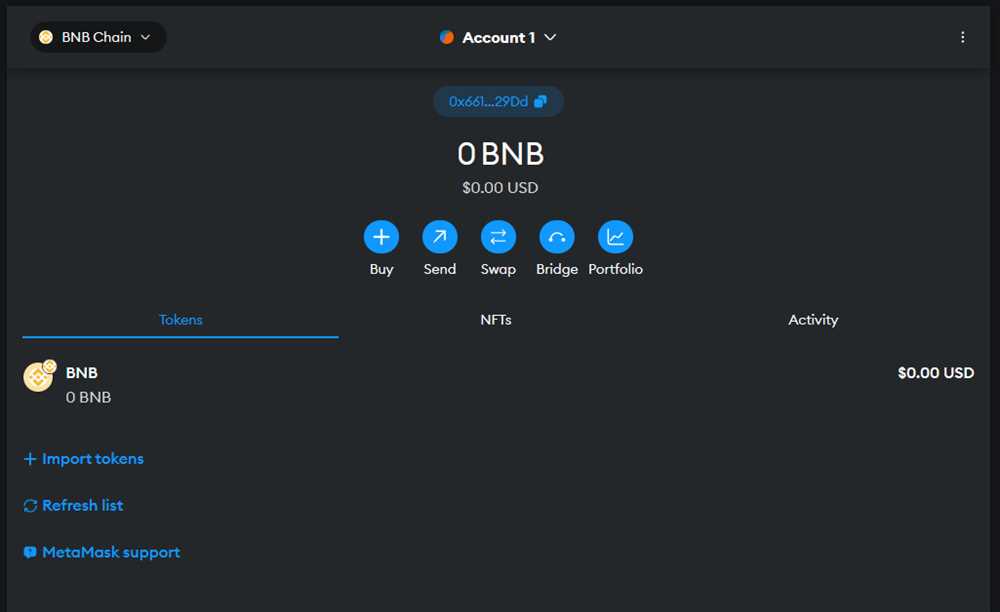
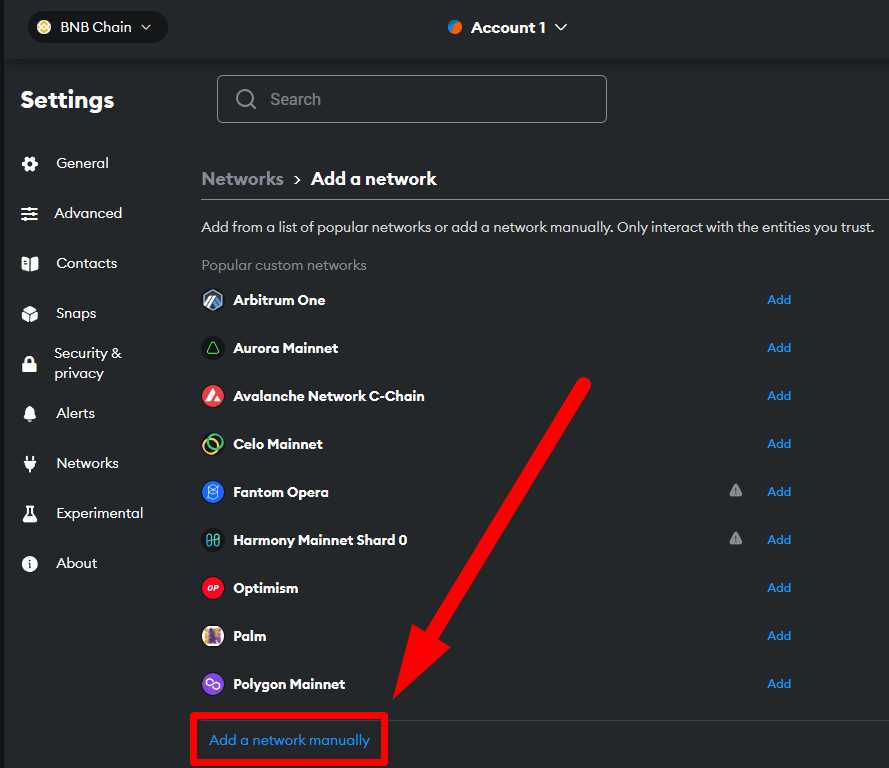
To connect with Binance, you need to add the Binance Smart Chain network to Metamask. In Metamask, click on the network selector (usually located at the top of the extension) and select “Custom RPC.” Enter the following details to set up the Binance Smart Chain network:
- Network Name: Binance Smart Chain
- RPC URL: https://bsc-dataseed.binance.org/
- Chain ID: 56
- Symbol: BNB
- Block Explorer URL: https://bscscan.com
Step 3: Obtain Binance Wallet Address
Next, you need to obtain your Binance Smart Chain wallet address. If you don’t have a Binance account, create one on the Binance website and go to the “Wallet” section to find your wallet address.
Step 4: Add Binance Wallet to Metamask
In Metamask, click on the account icon and select “Import Account.” Choose the option to import via wallet address and paste your Binance Smart Chain wallet address. Give the account a name, such as “Binance Wallet,” and click “Import.”
Step 5: Connect Metamask to Binance
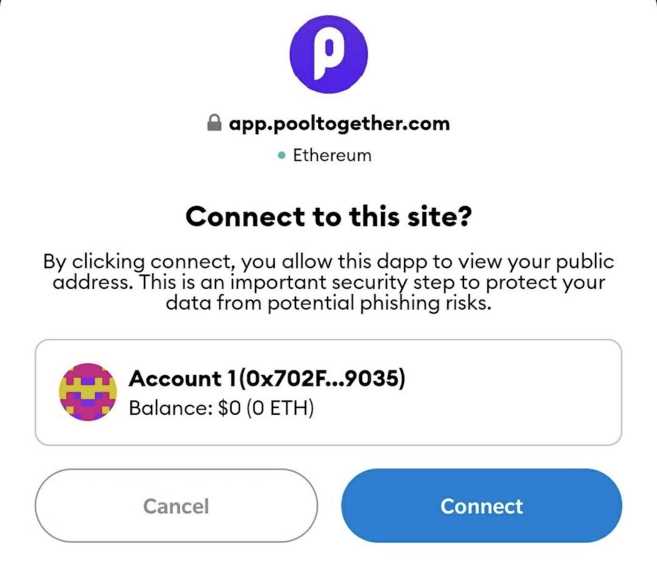
Now that you have added your Binance wallet to Metamask, it’s time to connect the two platforms. Open your Binance account and go to the “Wallet” section. From the list of wallets, select your Binance Smart Chain wallet. Click on “Connect” and choose “Metamask” as the wallet provider. Approve the connection request in Metamask.
That’s it! Your Binance account and Metamask wallet are now connected. You can easily switch between wallets in Metamask to access your Binance funds and interact with Binance dapps. Just make sure the Binance Smart Chain network is selected in Metamask when you want to use your Binance account.
Note: Be cautious when connecting your wallets and only use trusted sources. Keep your wallet information safe and protect it with strong security measures.
Step-by-Step Instructions for Seamless Integration
1. Install the Metamask browser extension if you haven’t already. You can find it in the Chrome Web Store or Firefox Add-ons.
2. Create a new Metamask wallet or import an existing one by clicking on the extension’s icon and following the on-screen instructions.
3. Once your wallet is set up or imported, click on the Metamask icon to open the extension.
4. In the Metamask window, click on the “Networks” tab and select “Custom RPC”.
5. Fill in the following details in the Custom RPC section:
- Network Name: Binance Smart Chain
- New RPC URL: https://bsc-dataseed.binance.org
- Chain ID: 56
- Symbol: BNB
- Block Explorer: https://bscscan.com
6. Click “Save” to add the Binance Smart Chain network to your Metamask account.
7. Visit the Binance website and create a new account or log in if you already have one.
8. After logging in, go to the “Wallet” tab and click on “Deposit”. Select the cryptocurrency you want to deposit into Binance.
9. Copy the deposit address provided by Binance.
10. Go back to Metamask and click on the extension’s icon to open it.
11. In the Metamask window, click on “Send” to open the transaction form.
12. Paste the deposit address into the “Recipient” field.
13. Enter the amount of cryptocurrency you want to deposit into Binance.
14. Click “Next” and review the transaction details.
15. Confirm the transaction by clicking “Confirm” in the Metamask window.
16. Wait for the transaction to be processed and confirmed on the Binance network.
17. After the transaction is confirmed, you should see the deposited cryptocurrency in your Binance account.
18. You can now use the deposited cryptocurrency on the Binance platform for trading, investing, or other purposes.
Note: Make sure to double-check the deposit address before confirming the transaction to avoid sending funds to the wrong address. It is also recommended to start with a small amount for your first deposit to ensure everything is working correctly.
Create a Binance Account
To start using Binance on Metamask, you will first need to create an account on the Binance cryptocurrency exchange platform. Follow the step-by-step guide below to create your Binance account:
Step 1: Visit the Binance website
Open your web browser and go to the official Binance website at www.binance.com.
Step 2: Click on “Register”
On the Binance website, locate the “Register” button and click on it to start the registration process.
Step 3: Complete the registration form
Fill in the required information in the registration form, including your email address and a strong password. Make sure to use a password that is unique and not easily guessable to enhance the security of your account.
Step 4: Agree to the terms and conditions
Read and understand the terms and conditions of using Binance. If you agree, check the box indicating that you have read and agreed to the terms.
Step 5: Complete the security check

Binance may require you to complete a security check to verify that you are a human and not a bot. This may involve solving a simple puzzle or selecting specific images.
Step 6: Verify your email address
Binance will send a verification email to the email address you provided during registration. Open the email and click on the verification link to verify your email address.
Step 7: Enable two-factor authentication (2FA)
For added security, it is recommended to enable two-factor authentication on your Binance account. You can do this by installing a 2FA app like Google Authenticator on your mobile device and following the instructions provided by Binance.
Once you have completed these steps and your account is verified and secured, you are ready to proceed with using Binance on Metamask. Make sure to keep your account information and login credentials secure to protect your assets. Remember: Always use strong passwords and enable 2FA whenever possible.
A Simple Guide to Registration on Binance
Registering on Binance is a quick and easy process that allows you to access a wide range of cryptocurrency trading options. Follow the steps below to create an account:
| Step 1: | Visit the official Binance website at www.binance.com. |
| Step 2: | Click on the “Register” button located at the top right corner of the website. |
| Step 3: | Enter your email address and create a strong password. Make sure to choose a password that includes a combination of uppercase and lowercase letters, numbers, and special characters. |
| Step 4: | Read and agree to the Binance terms of use and privacy policy by checking the boxes provided. |
| Step 5: | Complete the security verification by solving the puzzle or selecting the correct images as prompted. |
| Step 6: | Click on the “Register” button to create your account. |
| Step 7: | Check your email inbox for a confirmation email from Binance. Open the email and click on the provided link to verify your account. |
Once you have completed these steps, you will have successfully registered on Binance. You can now proceed to login and start exploring the various features and trading options offered by the platform.
Connecting Binance to Metamask
One of the first things you’ll need to do in order to use Binance on Metamask is to connect your Binance account to your Metamask wallet. This is a simple process that can be done in just a few steps.
Step 1: Install Metamask
If you don’t already have Metamask installed, you’ll need to download and install it from the official website. Metamask is a browser extension that allows you to manage your Ethereum wallet and interact with decentralized applications (dApps).
Step 2: Create or Import a Wallet
Once you have Metamask installed, you’ll need to either create a new wallet or import an existing one. If you’re creating a new wallet, be sure to securely save your seed phrase as this will be necessary for wallet recovery. If you’re importing a wallet, you’ll need to enter your private key or JSON file.
Step 3: Connect to Binance Smart Chain
With your Metamask wallet set up, you’ll now need to connect it to the Binance Smart Chain. To do this, click on the Metamask extension in your browser and select “Custom RPC” from the network dropdown. Enter the following details:
- Network Name: Binance Smart Chain
- New RPC URL: https://bsc-dataseed1.binance.org/
- Chain ID: 56
- Symbol: BNB
- Block Explorer URL: https://bscscan.com/
Click “Save” to add the Binance Smart Chain network to Metamask.
Step 4: Add Binance Token to Metamask
In order to use Binance on Metamask, you’ll need to add the Binance token to your Metamask wallet. To do this, click on the Metamask extension in your browser and select “Add Token” from the menu. Enter the Binance token contract address, which is 0xbb4CdB9CBd36B01bD1cBaEBF2De08d9173bc095c, and click “Next” to add the token.
That’s it! You’ve successfully connected your Binance account to Metamask. You can now use Binance on Metamask to trade cryptocurrencies, participate in DeFi projects, and more.
Setting Up Your Metamask Wallet for Binance Integration
Integrating your Metamask wallet with Binance allows you to seamlessly transfer funds and trade crypto assets. Follow these step-by-step instructions to set up your Metamask wallet for Binance integration:
Step 1: Install the Metamask Extension

If you haven’t done so already, install the Metamask extension on your preferred web browser. Visit the Metamask website and follow the instructions to add it to your browser. Once installed, create a new wallet or import an existing one.
Step 2: Get Your Binance Smart Chain Network Details
To integrate Binance with Metamask, you’ll need to add the Binance Smart Chain network details to your wallet. Open your Metamask extension and click on the network dropdown. Select “Custom RPC” and enter the following details:
Network Name: Binance Smart Chain
New RPC URL: https://bsc-dataseed.binance.org/
Chain ID: 56
Symbol: BNB
Block Explorer URL: https://bscscan.com/
Step 3: Switch to the Binance Smart Chain Network
After adding the Binance Smart Chain network details, you need to switch to this network within your Metamask wallet. Click on the network dropdown and select “Binance Smart Chain” from the list. Your Metamask wallet is now configured to interact with the Binance network.
Step 4: Connect Metamask to Binance
Now that your Metamask wallet is set up for Binance integration, you can connect it to your Binance account. Visit the Binance website and log in to your account. Go to the “Wallet” tab and click on “Wallet Connect”. Follow the instructions to scan the QR code using your Metamask wallet. Your Metamask wallet is now connected to Binance.
Note: Make sure you keep your Metamask wallet and Binance account secure. Enable two-factor authentication and only use secure devices to access your accounts.
Transferring Funds to Binance
Once you have set up your Binance account and connected Metamask, you will need to transfer funds from your Metamask wallet to your Binance account in order to start trading. Follow these steps to transfer funds:
- Make sure you are logged in to your Binance account.
- Click on the “Wallet” tab in the navigation menu.
- From the dropdown menu, select the cryptocurrency you want to transfer to Binance.
- Click on the “Deposit” button next to the cryptocurrency you selected.
- A wallet address will be displayed. Copy this address.
- Switch to your Metamask wallet.
- Click on the Metamask extension logo to open the extension.
- In the extension, click on the account name and select the account you want to send funds from.
- Click on the “Send” button.
- In the “Recipient Address” field, paste the wallet address you copied from Binance.
- Enter the amount you want to transfer in the “Amount” field.
- Review the transaction details and click on the “Confirm” button.
Once the transaction is confirmed, the funds will be transferred from your Metamask wallet to your Binance account. It may take some time for the transaction to be processed, so be patient.
It’s important to double-check the wallet address before initiating the transfer to ensure that you are sending the funds to the correct destination. Sending funds to the wrong address may result in permanent loss of funds.
What is Binance?
Binance is a popular cryptocurrency exchange platform that allows users to buy, sell, and trade various cryptocurrencies.
What is Metamask?
Metamask is a cryptocurrency wallet and browser extension that allows users to interact with blockchain-based applications.
How can I connect Binance to Metamask?
To connect Binance to Metamask, you need to add the Binance Smart Chain network to your Metamask wallet. Go to the Metamask app and click on the Networks dropdown menu. Then click on “Custom RPC” and fill in the following details: Network Name – “Binance Smart Chain”, New RPC URL – “https://bsc-dataseed.binance.org/”, ChainID – “56”, Symbol – “BNB”, and Block Explorer URL – “https://bscscan.com/”. Click “Save” to add the network.
What can I do on Binance with Metamask?
With Binance connected to Metamask, you can use Metamask as a wallet to store your Binance assets, trade on the Binance platform, participate in token sales and initial coin offerings (ICOs), and interact with decentralized applications (dApps) on the Binance Smart Chain network.