
Are you a cryptocurrency enthusiast looking to expand your horizons and try out different blockchain networks? Solana is a high-performance blockchain platform that offers fast and low-cost transactions, making it an attractive choice for many users. By integrating Solana with Metamask, a popular cryptocurrency wallet, you can easily access the Solana network and seamlessly execute transactions.
This step-by-step guide will walk you through the process of integrating Solana with Metamask so you can start enjoying the benefits of the Solana ecosystem. Whether you’re a seasoned blockchain user or just getting started, this guide will provide you with the necessary instructions to get up and running in no time.
Step 1: Install Metamask
Before we can integrate Solana with Metamask, you’ll need to ensure that you have the Metamask extension installed in your web browser. Metamask is available for Chrome, Firefox, Brave, and Edge, making it compatible with a wide range of browsers. Visit the official Metamask website and follow the instructions to install the extension on your preferred browser.
Step 2: Add the Solana Network
Once you have Metamask installed, open the extension and click on the network selection dropdown. From the dropdown menu, select “Custom RPC” to add a custom network. In the network settings, fill in the following details:
Network Name: Solana
New RPC URL: https://api.mainnet-beta.solana.com
Chain ID: 101
Currency Symbol: SOL
After entering the details, click “Save” to add the Solana network to Metamask.
Step 3: Connect to Solana
With the Solana network added to Metamask, the next step is to connect your wallet to Solana. Open the extension and click on the network selection dropdown again. This time, select “Solana” as the active network. Metamask will now be connected to the Solana blockchain, allowing you to perform transactions and interact with decentralized applications on Solana.
That’s it! You’ve successfully integrated Solana with Metamask. Now you can explore the world of Solana and take advantage of its fast and cost-efficient transactions. Happy blockchain browsing!
What is Solana?
Solana is a high-performance blockchain platform designed for decentralized applications and crypto-native projects. It aims to provide fast, scalable, and low-cost transactions, making it ideal for applications that require high-speed and high-capacity processing.
Unlike traditional blockchain networks, Solana utilizes a unique combination of technologies to achieve its high performance. It uses a consensus mechanism called Proof of History (PoH), which orders and timestamps transactions, ensuring their integrity and providing a time reference. This allows Solana to process transactions in parallel, significantly increasing its throughput.
Solana also utilizes a Byzantine Fault Tolerant (BFT) consensus model, called Tower BFT, which ensures the security and reliability of the network. This consensus model allows validators to agree on the validity of transactions and reach consensus, even in the presence of malicious actors.
In addition to its speed and scalability, Solana also offers low transaction fees, making it an attractive choice for developers and users. Its architecture and design make it well-suited for a wide range of applications, including decentralized finance (DeFi), non-fungible tokens (NFTs), gaming, and more.
As a developer, integrating Solana with Metamask allows you to leverage the power of the Solana network and provide seamless transaction experiences for your users.
What is Metamask?
Metamask is a popular browser extension that serves as a cryptocurrency wallet and bridge between web applications and the Ethereum blockchain. It allows users to securely manage their digital assets, interact with decentralized applications (dApps), and make seamless transactions.
Metamask is compatible with major browsers such as Chrome, Firefox, and Brave. Once installed, it creates a non-custodial wallet for the user, which means the user has full control over their private keys and funds. With Metamask, users can easily connect to Ethereum-based dApps and sign transactions without manually entering their private keys.
Through Metamask, users can send and receive cryptocurrencies, view their transaction history, and manage multiple Ethereum accounts. It also provides a secure way to store and access different ERC-20 tokens, which are tokens built on the Ethereum blockchain.
Metamask simplifies the process of interacting with the Ethereum network, making it more user-friendly and accessible to a wider audience. Its integration with web browsers allows users to seamlessly access decentralized applications and participate in decentralized finance (DeFi) protocols.
Overall, Metamask plays a crucial role in the Ethereum ecosystem, enabling users to securely navigate the world of cryptocurrencies and blockchain technology.
Step 1: Install Metamask
In order to integrate Solana with Metamask and enable seamless transactions, the first step is to install Metamask. Metamask is a cryptocurrency wallet and browser extension that allows users to interact with the Ethereum network.
To install Metamask, follow these steps:
- Open your preferred web browser and go to the official Metamask website.
- Click on the “Get Chrome Extension” button if you are using Google Chrome, or select the appropriate option for your browser.
- Click on the “Add to Chrome” button to start the installation process.
- A pop-up window will appear asking for confirmation. Click on the “Add Extension” button to proceed.
- After the extension is added, you will see the Metamask icon on your browser’s toolbar.
Once Metamask is installed, you can proceed to the next step of integrating Solana with Metamask for seamless transactions.
Create a Metamask Wallet
To start integrating Solana with Metamask, you first need to create a Metamask wallet. Follow the steps below:
- Go to the Metamask website and click on the “Get Started” button.
- Choose your preferred browser extension. Metamask supports Chrome, Firefox, Brave, and Edge.
- Click on the extension and follow the on-screen instructions to install and set up Metamask.
- Create a new wallet by clicking on the “Create a Wallet” button.
- Set a strong password for your wallet and click on “Create”. Remember to write down your password and keep it safe.
- Metamask will provide you with a secret backup phrase. This phrase is crucial for restoring your wallet in case you forget your password or lose access to your device. Write down this phrase and store it securely.
- Confirm your secret backup phrase by selecting the words in the correct order on the next screen.
- Your wallet is now created! You can customize your wallet name and add an optional profile picture if you wish.
- Make sure the network selected in Metamask is the Ethereum Mainnet. If not, click on the network dropdown and choose “Ethereum Mainnet”.
You are now ready to integrate Solana with Metamask and start seamlessly transacting on the Solana network!
Connect Metamask to Solana
To connect Metamask to Solana, you’ll first need to install the Solana network on your Metamask wallet. Here’s how:
- Open your Metamask wallet and click on the network selection dropdown.
- Click on “Custom RPC”.
- In the “New RPC URL” field, enter the Solana network URL: https://api.mainnet-beta.solana.com.
- Click on “Save” to add the Solana network to your Metamask wallet.
Once you’ve added the Solana network, you’ll need to add a custom token for Solana. Follow these steps:
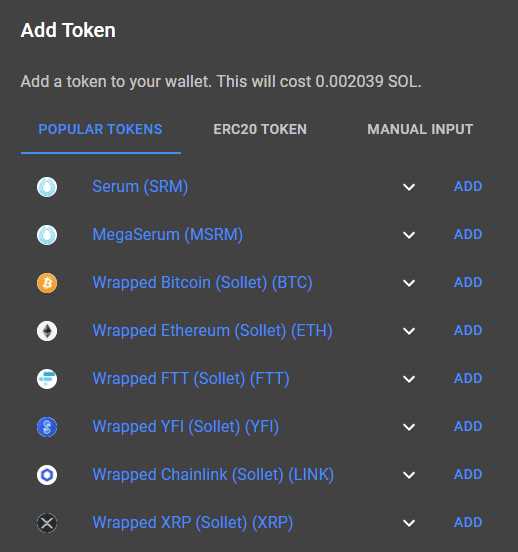
- Go to the “Assets” tab in your Metamask wallet.
- Click on “Add Token”.
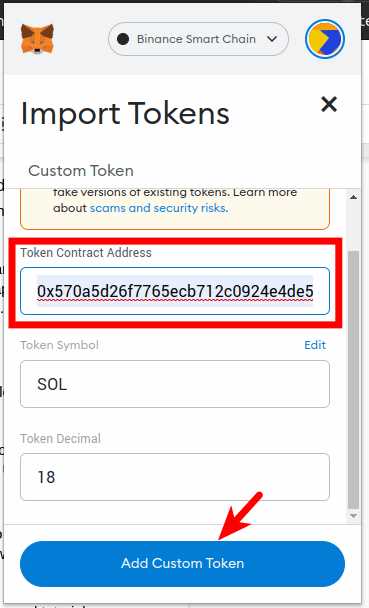
- Click on “Custom Token”.
- In the “Token Contract Address” field, enter the contract address for Solana: 0xc4b7a1C2691A5c33e87CF03D8E4cBED8dF365Fb6.
- Set the token symbol as “SOL”.
- Set the token decimal places as “9”.
- Click on “Next” and then “Add Tokens” to add Solana to your Metamask wallet.
Now you should be connected to Solana through your Metamask wallet. You can start using your Metamask wallet to interact with Solana applications and perform seamless transactions on the Solana network.
Step 2: Fund Your Wallet
To start using Solana with Metamask, you will need to have some Solana tokens in your wallet. Follow these steps to fund your wallet:
1. Obtain Solana Tokens: If you don’t have any Solana tokens, you will need to acquire them. You can purchase SOL tokens from popular cryptocurrency exchanges or use a decentralized exchange (DEX) on the Solana network. Make sure you have enough funds to cover transaction fees as well.
2. Open Metamask: Launch your Metamask wallet and make sure you are connected to the Solana network. If you haven’t added Solana to your network list, you can do so by selecting the Custom RPC option and entering the Solana RPC URL and chain ID.
3. View Your Solana Wallet Address: In Metamask, click on your wallet address to view it. You will need this address to receive SOL tokens. Copy it to your clipboard.
4. Send SOL Tokens: Go to the platform or exchange where you have your SOL tokens and initiate a transfer. Paste your Metamask wallet address as the recipient address. Make sure to double-check the address to avoid any mistakes. Confirm the transaction and wait for it to complete.
5. Verify Your Balance: Once the transaction is confirmed, go back to Metamask and check your balance. You should see the transferred SOL tokens reflected in your wallet.
6. Start Transacting on Solana: With a funded wallet, you are now ready to use Solana for seamless transactions. You can interact with decentralized applications, participate in token sales, or simply transfer SOL tokens to other addresses.
Remember to always keep your wallet address and private keys secure. Fund your wallet with caution and double-check all transaction details before confirming.
Note: The process of funding your wallet may vary depending on the platform or exchange you use to acquire SOL tokens.
Obtain SOL Tokens

Before integrating Solana with Metamask, you will need to obtain SOL tokens. SOL is the native cryptocurrency of the Solana blockchain, and having some SOL tokens in your wallet is necessary for performing transactions on the network.
Here are a few ways you can obtain SOL tokens:
1. Purchase from a cryptocurrency exchange:
One of the simplest ways to obtain SOL tokens is by purchasing them from a cryptocurrency exchange that supports Solana. Some popular exchanges where you can find SOL tokens include Binance, FTX, Coinbase, and Kraken. Simply create an account on any of these exchanges, deposit your desired amount of fiat currency or other cryptocurrencies, and use the trading interface to buy SOL tokens.
2. Participate in Solana token sales:
Solana often conducts token sales, allowing users to purchase SOL tokens directly from the project. Keep an eye on Solana’s official website, social media channels, and community forums for announcements about upcoming token sales. Participating in token sales can be a great way to get SOL tokens at a discounted price or during the project’s early stages.
3. Receive SOL tokens from others:

Another way to obtain SOL tokens is by receiving them from others. You can ask someone who already holds SOL tokens to send you some as a gift or in exchange for goods or services. This option may require some networking and connections within the Solana community.
Once you have obtained SOL tokens, you can proceed with integrating Solana with Metamask and enjoy seamless transactions on the Solana network.
What is Solana?
Solana is a high-performance blockchain platform designed for decentralized applications and crypto-currencies.
How can I integrate Solana with Metamask?
You can integrate Solana with Metamask by following these steps: 1. Install the Solana extension for Metamask. 2. Create a new wallet or import an existing one. 3. Connect the wallet to the Solana network. 4. Start using Solana with Metamask for seamless transactions.