
If you’re new to the world of cryptocurrencies and Ethereum, you may have heard of Metamask. Metamask is a popular Ethereum wallet and browser extension that allows you to securely store, send, and receive Ethereum and other ERC-20 tokens directly from your browser. In this guide, we’ll walk you through the process of setting up and using Metamask on Firefox, one of the most widely used web browsers.
Step 1: Install Metamask Extension
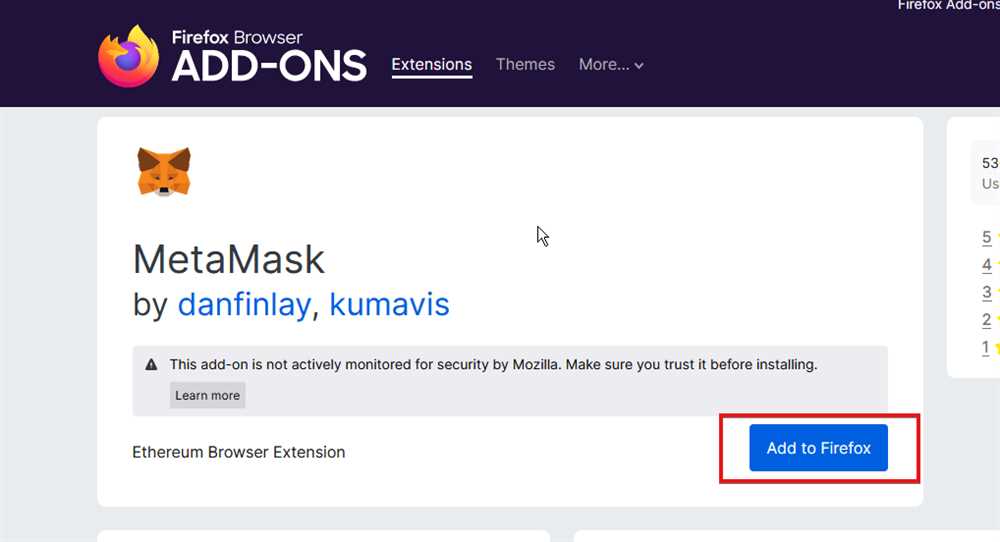
The first step to using Metamask on Firefox is to install the Metamask extension. Go to the Firefox Add-ons store and search for “Metamask”. Click on the “Add to Firefox” button to start the installation process. Once installed, you should see the Metamask icon in the upper-right corner of your browser.
Step 2: Create a New Wallet
To start using Metamask, you’ll need to create a new wallet. Click on the Metamask icon in your browser and select “Create a Wallet”. Follow the instructions to set a strong password and create a new wallet. Make sure to store your seed phrase in a safe and secure place, as it can be used to restore your wallet in case you forget your password.
Step 3: Connect to the Ethereum Network
Once you have created your wallet, you’ll need to connect to the Ethereum network. Click on the Metamask icon and select “Main Ethereum Network” from the dropdown menu. You can also choose to connect to a test network if you’re developing or testing applications on the Ethereum platform.
Step 4: Add Funds to Your Wallet
Now that you have set up your Metamask wallet and connected to the Ethereum network, it’s time to add funds to your wallet. You can do this by clicking on the “Deposit” button in the Metamask interface and following the instructions to transfer Ethereum or ERC-20 tokens to your wallet address. Make sure to double-check the destination address before making any transfers.
Step 5: Start Transacting!
Once you have funds in your Metamask wallet, you’re ready to start transacting on the Ethereum network. You can use Metamask to send and receive Ethereum and ERC-20 tokens, interact with decentralized applications (dapps), and participate in decentralized finance (DeFi) protocols. Simply click on the Metamask icon in your browser to access your wallet and start making transactions.
Using Metamask on Firefox provides a convenient and secure way to manage your Ethereum assets without the need for a separate wallet application. Follow the steps outlined in this guide to set up and start using Metamask on Firefox, and you’ll be on your way to participating in the exciting world of Ethereum.
Getting Started with Metamask
Metamask is a browser extension that allows you to access the Ethereum blockchain and interact with decentralized applications (dApps) securely and conveniently. In this guide, we will walk you through the process of setting up and using Metamask on the Firefox browser.
Step 1: Install the Metamask Extension
To begin, open your Firefox browser and navigate to the official Metamask page on the Firefox Add-ons website. Click on the “Add to Firefox” button to start the installation process. Once the extension is installed, you will see the Metamask fox icon in your browser toolbar.
Step 2: Create a Metamask Account
Click on the Metamask fox icon in your browser toolbar and select “Create a Wallet” to start setting up your Metamask account. Follow the on-screen instructions to generate a strong password and save your secret backup phrase. Make sure to write down your backup phrase and keep it in a safe place, as it is the only way to recover your account if you forget your password.
Step 3: Connect to the Ethereum Network
Once you have created your Metamask account, you will be prompted to choose a network. Select the “Main Ethereum Network” to connect to the main Ethereum blockchain. You can also choose other networks like the Ropsten Test Network for testing purposes.
Step 4: Fund Your Metamask Account
To make Ethereum transactions, you need to have Ether (ETH) in your Metamask account. You can either purchase Ether from a cryptocurrency exchange and transfer it to your account, or you can receive Ether from another Ethereum address. Once you have some Ether in your account, you are ready to start using Metamask for Ethereum transactions.
By following these steps, you can get started with Metamask on Firefox and enjoy secure and convenient Ethereum transactions. Remember to always keep your Metamask account and backup phrase safe, as they grant access to your funds.
Download and Install Metamask Extension
To use Metamask on Firefox, you first need to download and install the Metamask extension. Follow the steps below to get started:
- Launch your Firefox web browser.
- Go to the Firefox Add-ons marketplace by clicking on the menu button (three lines) in the top-right corner of the browser and selecting “Add-ons”.
- In the search bar, type “Metamask” and press Enter.
- Click on the “Add to Firefox” button next to the Metamask extension.
- A pop-up will appear asking for your permission to install the extension. Click “Add” to continue.
- Wait for the extension to download and install. Once it’s done, a confirmation message will appear.
- You will now see the Metamask extension icon in the top-right corner of your Firefox browser.
Congratulations! You have successfully installed the Metamask extension on Firefox. In the next section, we will learn how to set up and use Metamask to securely and conveniently transact on the Ethereum network.
Create a New Ethereum Wallet
To start using Metamask on Firefox, you need to create a new Ethereum wallet. Here are the steps to follow:
- Open your Firefox browser and navigate to the Metamask website.
- Click on the “Get Firefox Extension” button on the homepage.
- A new tab will open in your browser with the Metamask extension page on the Firefox Add-Ons website.
- Click on the “Add to Firefox” button.
- Firefox will ask for confirmation to install the extension. Click on the “Add” button to proceed.
- Once the extension is installed, click on the Metamask fox icon in the top-right corner of your Firefox browser window.
- A popup window will appear asking you to create a new wallet or import an existing one. Click on the “Create a Wallet” option.
- You will be prompted to create a strong password for your wallet. Make sure to choose a password that is unique and not easily guessable.
- After setting up your password, click on the “Create” button.
- You will be presented with a seed phrase, which is a series of 12 or 24 words. This is your backup phrase in case you ever lose access to your wallet. Write down the seed phrase and store it in a safe place.
- Click on the words in the correct order to verify your seed phrase.
- Once your seed phrase is verified, your wallet is successfully created.
Congratulations! You have successfully created a new Ethereum wallet using Metamask on Firefox. Now you are ready to securely and conveniently perform Ethereum transactions.
Import an Existing Ethereum Wallet
If you already have an existing Ethereum wallet that you would like to use with Metamask, you can easily import it into the extension. Here’s how:
Step 1: Install Metamask Extension
If you haven’t done so already, you’ll need to install the Metamask extension on your Firefox browser. You can find the extension in the Firefox Add-ons store and add it to your browser.
Step 2: Access Metamask
Once the extension is installed, you’ll see the Metamask fox icon at the top-right corner of your browser. Click on the fox icon to open the Metamask extension.
Step 3: Set up Metamask
If you’re using Metamask for the first time, you’ll need to set it up by following the prompts. Create a new wallet by clicking on the “Create a Wallet” button, and then follow the instructions to set up a password and back up your seed phrase.
Step 4: Import the Existing Wallet
To import an existing Ethereum wallet, click on the account icon in the top-right corner of the Metamask extension. From the dropdown menu, select “Import Account”.
In the import account screen, you’ll have the option to import your wallet using a private key, JSON file, or mnemonic phrase. Choose the method that you prefer and follow the instructions to import your wallet.
Step 5: Access and Use your Existing Wallet
Once you’ve successfully imported your existing Ethereum wallet into Metamask, you can access and use it by selecting the imported account from the account dropdown menu in the Metamask extension.
| Import Methods | Description |
|---|---|
| Private Key | Use a private key associated with your existing Ethereum wallet to import it into Metamask. |
| JSON File | Import your wallet by uploading the JSON file that contains your wallet information. |
| Mnemonic Phrase | Import your wallet by entering the mnemonic phrase (seed phrase) associated with your existing Ethereum wallet. |
By following these steps, you can easily import your existing Ethereum wallet into Metamask and securely manage your Ethereum transactions using the extension on Firefox.
Using Metamask on Firefox
Metamask is a popular Ethereum wallet and browser extension that allows users to securely manage their Ethereum accounts and interact with decentralized applications (dapps) on the Ethereum blockchain. In this guide, we will walk you through the process of setting up and using Metamask on Firefox.
Installing Metamask on Firefox
To install Metamask on Firefox, follow these steps:
- Open the Firefox browser and go to the Firefox Add-ons Store.
- Search for “Metamask” in the search bar.
- Click on the “Add to Firefox” button next to the Metamask extension.
- Review the permissions that Metamask requires and click “Add” to install the extension.
- Once the installation is complete, you will see the Metamask icon in your browser toolbar.
Setting Up Metamask
After installing Metamask, you will need to set it up with your Ethereum account. Here’s how:
- Click on the Metamask icon in your browser toolbar to open the extension.
- Click on the “Get Started” button.
- Select “Create a Wallet” to generate a new Ethereum account or “Import Wallet” if you already have one.
- If you choose to create a new wallet, follow the instructions to set a password and back up your seed phrase.
- If you choose to import a wallet, enter your seed phrase or private key and follow the instructions.
- Once your wallet is set up, you can customize the account name and add any additional accounts you may have.
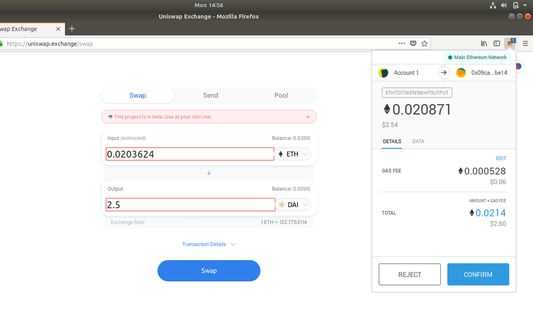
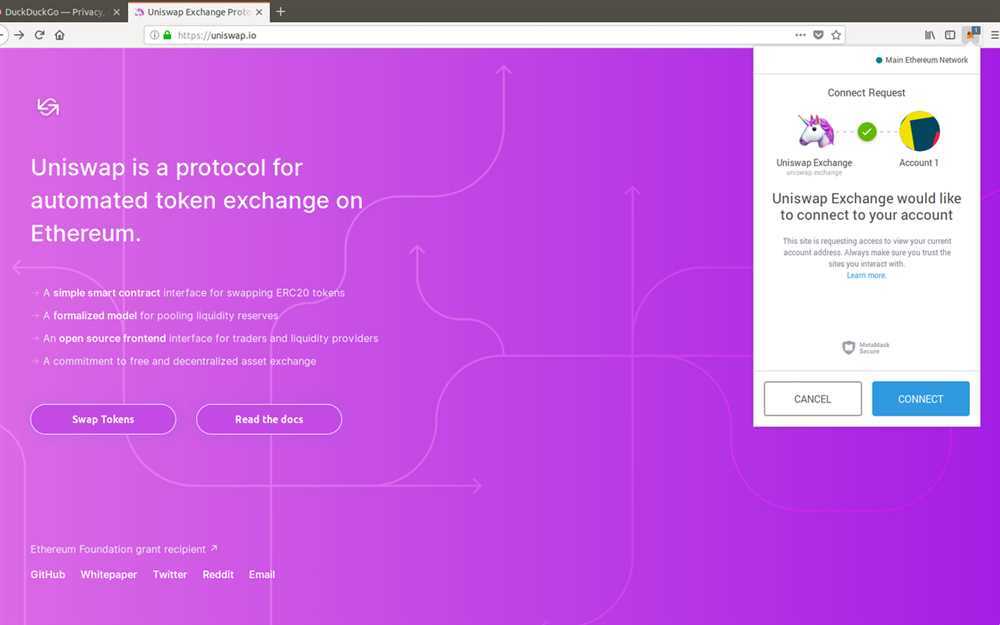
Using Metamask with Dapps
With Metamask set up, you can now use it to interact with dapps on the Ethereum blockchain. Here’s how:
- Visit a dapp that is compatible with Metamask.
- Click on the Metamask icon in your browser toolbar to open the extension.
- Make sure you are logged in to your desired Ethereum account.
- Follow the instructions provided by the dapp to perform actions such as making transactions or signing messages.
- Review and confirm any transactions or requests that Metamask presents to you.
Using Metamask on Firefox gives you a secure and convenient way to manage your Ethereum accounts and interact with the Ethereum ecosystem. Make sure to keep your browser and Metamask extension up to date for the best experience.
| Pros | Cons |
|---|---|
| Securely manage Ethereum accounts | Requires installation and setup |
| Interact with decentralized applications | May be incompatible with some dapps |
| Easy transaction signing | Dependent on browser and extension updates |
Can I use Metamask on Firefox?
Yes, you can use Metamask on Firefox. It is a browser extension that allows you to manage and interact with Ethereum-based applications directly from your browser.