
Welcome to our step-by-step guide on how to safely and efficiently transfer tokens using Metamask. Metamask is a popular browser extension that allows users to interact with decentralized applications (dApps) on the Ethereum blockchain. With Metamask, you can securely manage your cryptocurrencies and easily send or receive tokens.
Before we dive into the details of token transfers, it’s important to understand the role of Metamask in this process. Metamask acts as a bridge between your browser and the Ethereum network, providing you with a user-friendly interface to interact with dApps. It stores your private keys locally on your device and signs transactions securely, ensuring the safety of your assets.
To begin, make sure you have Metamask installed in your browser and set up with your Ethereum account. Once you’re ready, open Metamask and navigate to the “Assets” tab. Here, you’ll see a list of your tokens, including their balances. If the token you want to transfer is not listed, you’ll need to add it manually by clicking on “Add Token” and providing the contract address of the token.
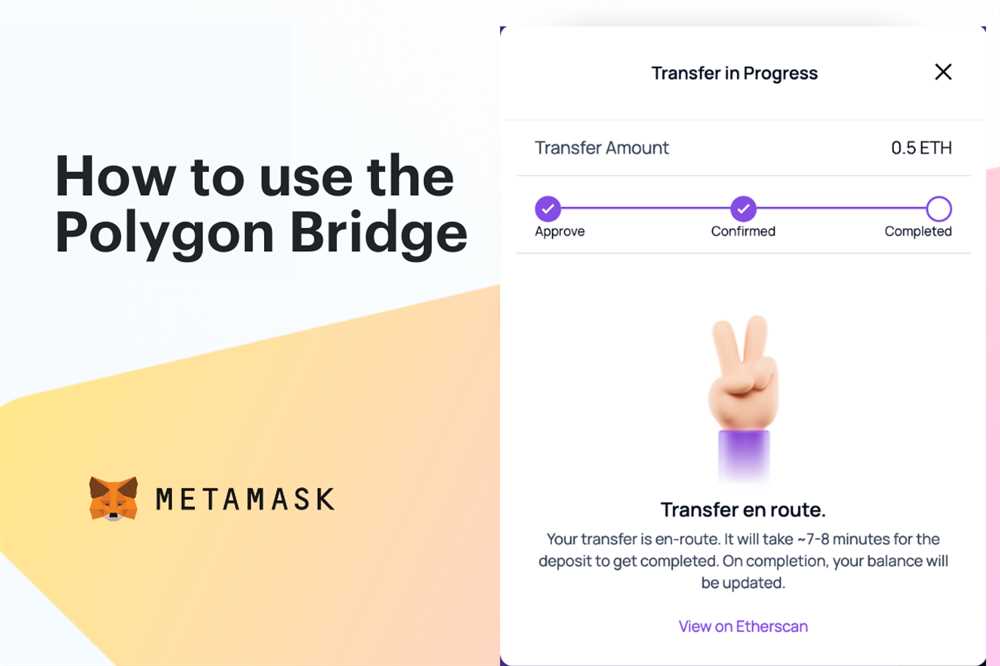
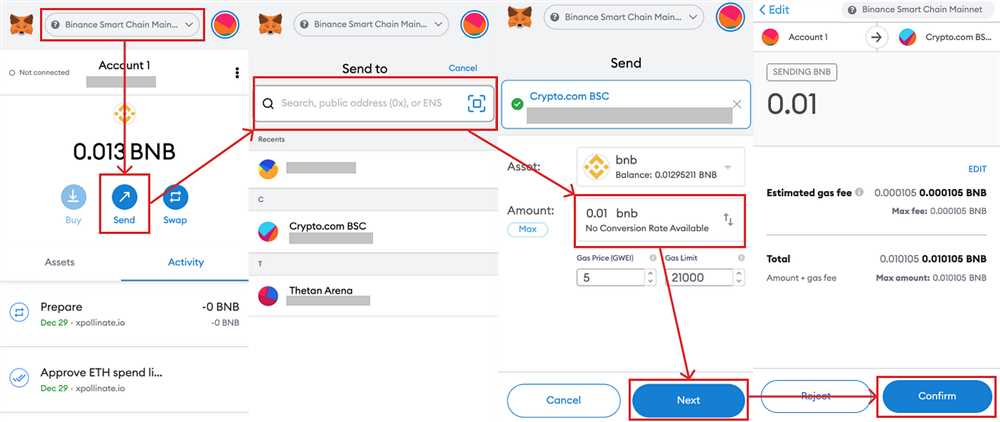
Once you have selected the token you want to transfer, click on the “Send” button. You’ll be prompted to enter the recipient’s Ethereum address and the amount of tokens you wish to send. It’s important to double-check the recipient’s address to ensure the tokens are sent to the correct wallet. Additionally, be mindful of the gas fees associated with the transaction, as these fees are required for processing the transfer on the Ethereum network.
After reviewing the details, click on “Next” to proceed. Metamask will display a summary of the transaction, including the recipient’s address, the amount of tokens, and the estimated gas fees. If everything looks correct, click on “Confirm” to sign and send the transaction. Metamask will generate a unique transaction hash, which you can use to track the progress of the transfer on an Ethereum block explorer.
And that’s it! You’ve successfully transferred tokens using Metamask. It’s important to remember that Metamask is just a tool, and it’s up to you to ensure the security of your private keys and the accuracy of the transaction details. By following this guide and taking the necessary precautions, you can safely and efficiently transfer tokens with Metamask.
What is Metamask and why it is important for token transfer
Metamask is a browser extension that enables users to interact with decentralized applications (dApps) on the Ethereum network. It is an Ethereum wallet and a bridge between traditional web browsers and the blockchain. Metamask allows users to securely store and manage their cryptocurrency assets, as well as seamlessly interact with Ethereum-based smart contracts and decentralized exchanges.
When it comes to token transfers, Metamask plays a crucial role in ensuring safe and efficient transactions. Here are some key reasons why Metamask is important:
1. Secure Storage
Metamask provides a secure digital wallet where users can store their tokens and private keys. The private keys are encrypted and only accessible by the user, ensuring the safety of their assets. This eliminates the need to rely on centralized exchanges or third-party custodians, reducing the risk of hacks or theft.
2. Easy Transaction Management
Metamask simplifies the process of token transfer by providing a user-friendly interface. Users can easily send and receive tokens, specify the amount and destination address, and even set gas fees. The built-in transaction history allows users to keep track of their transfers, providing transparency and accountability.
3. Integration with dApps
Metamask seamlessly integrates with popular decentralized applications, allowing users to interact with various services and protocols. Users can participate in token sales (Initial Coin Offerings), trade tokens on decentralized exchanges, engage with decentralized finance (DeFi) platforms, and much more. Metamask facilitates these transactions by securely signing and broadcasting messages on the Ethereum network.
4. Enhanced Privacy
Metamask enhances privacy by allowing users to create multiple Ethereum addresses within a single wallet. This enables users to separate their transactions and maintain anonymity if desired. Additionally, Metamask does not require users to provide personal information, further protecting their privacy and reducing the risk of identity theft.
In conclusion, Metamask is a crucial tool for token transfer as it provides secure storage, easy transaction management, integration with dApps, and enhanced privacy. Its user-friendly interface and compatibility with the Ethereum network make it a popular choice among cryptocurrency enthusiasts and investors.
Step 1: Download and Install Metamask
Before you can start safely and efficiently transferring tokens with Metamask, you need to download and install the Metamask extension. Follow the steps below to get started:
1. Open your web browser
Ensure that you have a web browser installed on your device, such as Google Chrome, Mozilla Firefox, or Brave.
2. Go to the Metamask website
Visit the official Metamask website by typing “https://metamask.io” into your browser’s address bar and pressing Enter.
3. Download Metamask
Once you are on the Metamask website, you will see a prominent “Get Chrome Extension” button. Click on this button to start the download process. Note that Metamask is currently only available as a browser extension and is compatible with Chrome, Firefox, Brave, and Edge.
4. Add Metamask to your browser
After the download is complete, you will be redirected to your browser’s extension page. Click on the “Add to [Browser Name]” button to install Metamask.
5. Set up your Metamask account
Once Metamask is installed, you will see its icon in your browser’s extension toolbar. Click on the icon to launch Metamask. Follow the on-screen instructions to create a new Metamask account or import an existing one using your seed phrase or private key.
Congratulations! You have successfully downloaded and installed Metamask on your browser. In the next steps, we will guide you on how to use Metamask to safely and efficiently transfer tokens.
| Note: | Make sure to only download Metamask from the official website to avoid installing any malicious extensions. |
Step 2: Set Up Metamask with your Ethereum Wallet
Before you can start transferring tokens with Metamask, you need to set up your Ethereum wallet. Follow these steps to get started:
- Open your web browser and go to the Metamask website.
- Click on the “Get Chrome Extension” button.
- Once the extension is installed, click on the Metamask icon in your browser’s toolbar to open the extension.
- Click on the “Create a Wallet” button to create a new wallet.
- Follow the prompts to set up a password and confirm it.
- Read and agree to the terms of service and privacy policy.
- Click on the “Create” button to complete the wallet creation process.
- Metamask will generate a unique 12-word seed phrase. Write down this seed phrase and store it in a safe place. This seed phrase can be used to recover your wallet if you ever lose access to it.
- Click on the “Next” button to proceed.
- Metamask will display your wallet address. This address is unique to your wallet and can be used to receive tokens.
- Click on the “Copy” button to copy your wallet address to the clipboard.
- Now that your wallet is set up, you can proceed to the next step to fund your wallet and start transferring tokens.
Setting up Metamask with your Ethereum wallet is essential for securely managing and transferring tokens. Make sure to keep your wallet password and seed phrase safe and never share them with anyone.
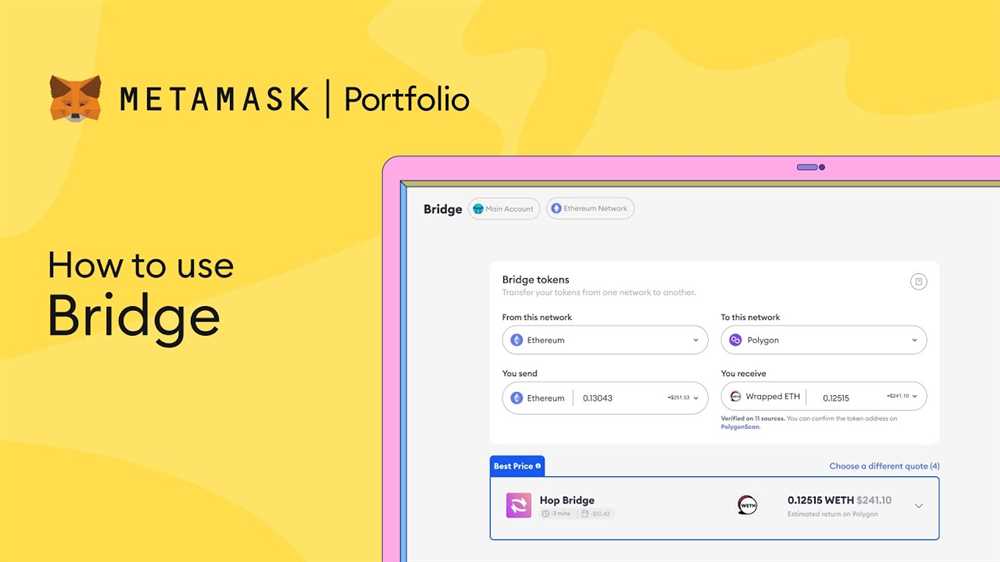
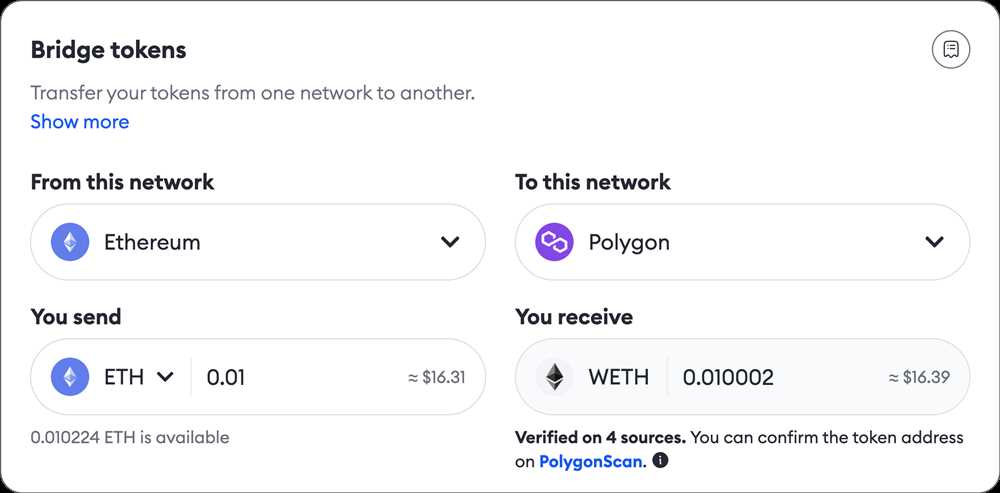
Step 3: Connect Metamask to the Decentralized Exchange
Now that you have set up your Metamask wallet and funded it with some tokens, it’s time to connect it to a decentralized exchange. Decentralized exchanges allow you to trade tokens directly from your wallet without the need for a centralized intermediary.
Here are the steps to connect Metamask to a decentralized exchange:
| Step 1: | Open your Metamask extension/plugin and ensure that it is connected to the Ethereum main network. You can do this by clicking on the Metamask icon in your browser toolbar and selecting the “Main Ethereum Network” from the dropdown menu. |
| Step 2: | Visit a decentralized exchange platform of your choice. Some popular decentralized exchanges include Uniswap, SushiSwap, and PancakeSwap. Make sure to choose a reliable and secure platform. |
| Step 3: | Connect your Metamask wallet to the decentralized exchange by clicking on the “Connect Wallet” or similar button on the exchange platform. Metamask will prompt you to authorize the connection. |
| Step 4: | Review and confirm the connection request in your Metamask wallet. It’s important to verify that the website URL shown in Metamask matches the URL of the decentralized exchange you are connecting to. This ensures that you are not connecting to a malicious website. |
| Step 5: | Once the connection is established, you will have access to the decentralized exchange’s trading interface. You can now select the tokens you want to trade, set the desired trading parameters, and execute the trades. |
Remember to exercise caution when using decentralized exchanges, as they do not have the same level of regulation and protection as centralized exchanges. It’s essential to do your own research and only use reputable platforms.
Congratulations! You have successfully connected your Metamask wallet to a decentralized exchange. You are now ready to trade tokens securely and efficiently.
What is Metamask?
Metamask is a browser extension and digital wallet that allows users to interact with the Ethereum blockchain. It is primarily used for accessing and managing Ethereum-based decentralized applications (dApps).
How can I install Metamask?
To install Metamask, you need to go to the Metamask website and download the extension for your preferred browser. Once installed, you can create a new wallet or import an existing one. Follow the on-screen instructions to set it up and secure it with a strong password.
How can I transfer tokens with Metamask?
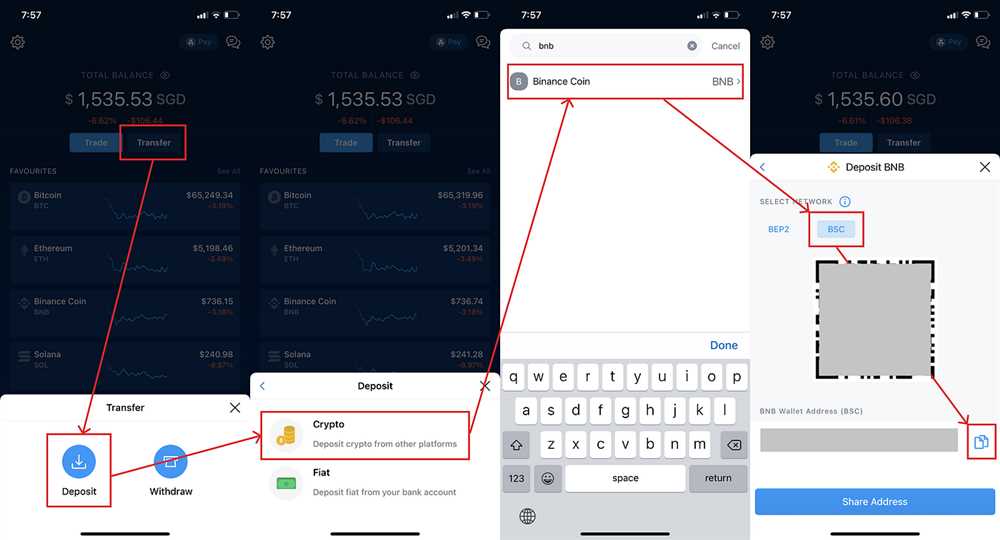
To transfer tokens with Metamask, you need to first open the wallet interface by clicking on the Metamask extension in your browser. Then, click on the “Send” button and enter the recipient’s address, the amount of tokens you want to send, and any additional data required. Finally, review the transaction details and click “Confirm” to send the tokens.
Are token transfers with Metamask safe?
Token transfers with Metamask are generally considered safe as long as you take necessary precautions. Metamask itself is a secure wallet that uses encryption and advanced security measures to protect your private keys. However, it’s important to ensure that you are sending tokens to the correct address and double-check all the transaction details to prevent any mistakes or scams.