
Metamask is a popular Ethereum wallet that allows users to interact with decentralized applications (dApps) and manage their digital assets. However, by default, Metamask only supports the Ethereum network. If you want to access the Matic Network, a layer 2 scaling solution for Ethereum, you need to add it to your Metamask wallet. Fortunately, the process is straightforward and can be done in just a few easy steps.
To add the Matic Network to your Metamask wallet, follow these steps:
Step 1: Install Metamask Extension
If you haven’t already, install the Metamask browser extension on your preferred web browser. Metamask is available for Chrome, Firefox, and Brave browsers. Once installed, set up your Metamask wallet by creating a new account or importing an existing one using your mnemonic phrase.
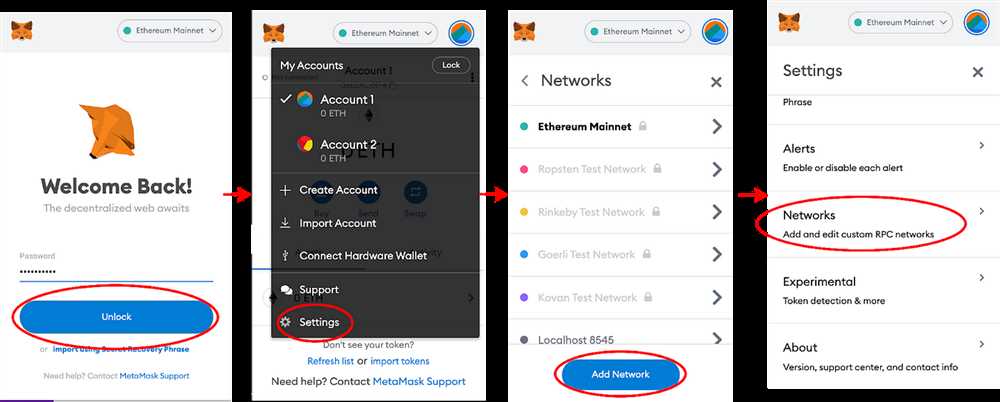
Step 2: Access Metamask Settings
After setting up your Metamask wallet, click on the Metamask extension icon in your browser’s toolbar. This will open the Metamask pop-up window. From the pop-up, click on the three horizontal lines in the top-right corner to access the Metamask menu. From the menu, select “Settings.”
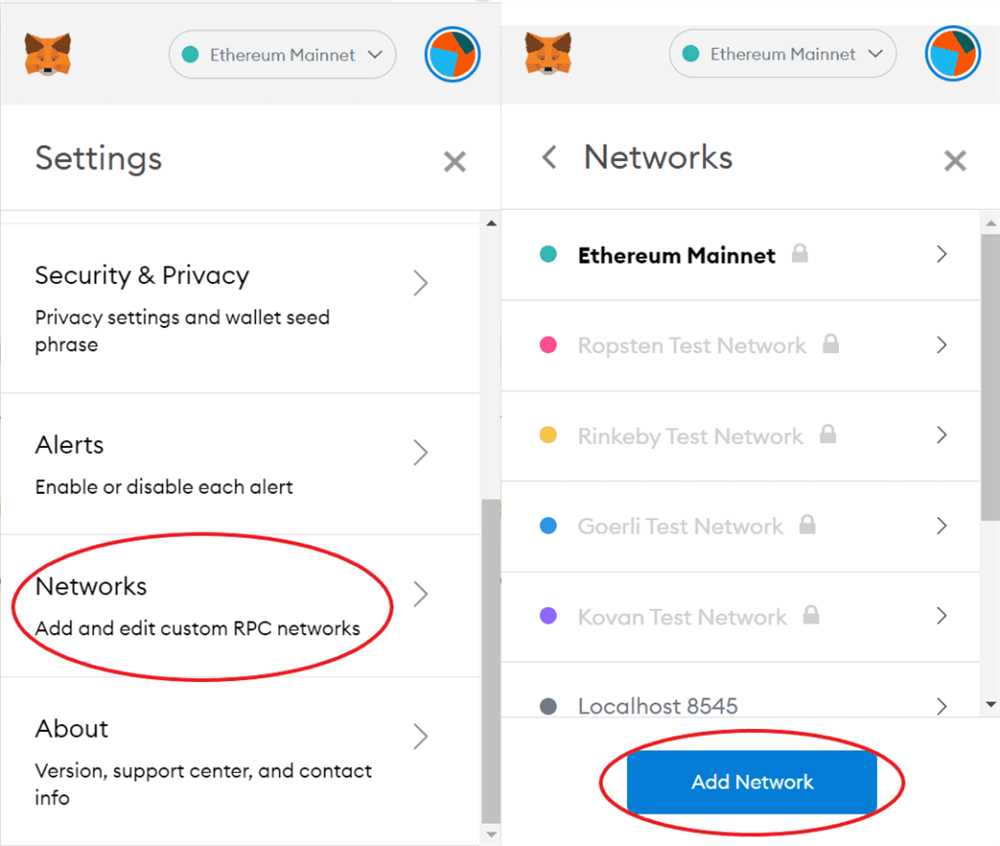
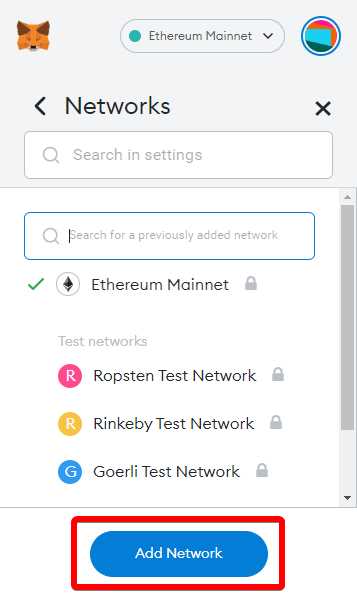
Step 3: Add Custom RPC Network
In the Metamask Settings, navigate to the “Networks” tab. Scroll down to the bottom of the page and click on the “Add Network” button. This will allow you to add a custom network to your Metamask wallet. Fill out the following details:
- Network Name: Matic
- New RPC URL: https://rpc-mainnet.matic.network
- Chain ID: 137
- Currency Symbol (optional): MATIC
- Block Explorer (optional): https://explorer.matic.network
Once you have filled out the details, click on the “Save” button to add the Matic Network to your Metamask wallet.
Step 4: Switch to Matic Network
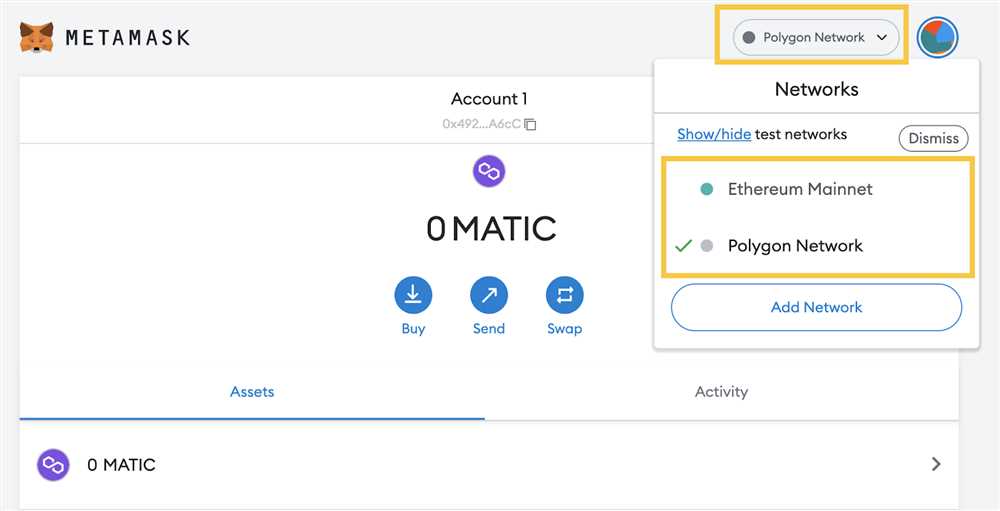
Now that you have added the Matic Network to your Metamask wallet, you can switch to it by clicking on the Metamask extension icon in your browser’s toolbar. From the pop-up window, click on the network name (by default, it should be set to “Main Ethereum Network”). This will open a dropdown menu with the available networks. Select “Matic” from the list, and your Metamask wallet will now be connected to the Matic Network.
Congratulations! You have successfully added the Matic Network to your Metamask wallet. You can now enjoy fast and low-cost transactions on the Matic Network and leverage the benefits of layer 2 scalability for your Ethereum transactions.
What is Matic Network?
Matic Network is a Layer 2 scaling solution for Ethereum that aims to provide faster and more efficient transactions. It solves the scalability issues of Ethereum by using sidechains, which are independent blockchains that can interact with the main Ethereum blockchain. Matic Network uses a technology called Plasma, which allows for faster transaction processing and reduces the burden on the Ethereum main chain.
By utilizing sidechains, Matic Network is able to achieve high scalability and throughput, enabling faster and cheaper transactions compared to Ethereum’s main chain. It also provides a seamless experience for users, as they can interact with decentralized applications (DApps) on Matic Network using their existing Ethereum addresses.
Matic Network also offers a range of developer tools and infrastructure to support the development of decentralized applications. This includes the Matic Network Wallet, a browser extension that allows users to manage their assets and interact with DApps on Matic Network.
Overall, Matic Network aims to make Ethereum more scalable and user-friendly, enabling a wide range of applications to be built on the platform. By providing faster and cheaper transactions, it opens up new possibilities for decentralized finance, gaming, and other applications that require high transaction throughput.
Understanding the basics of Matic Network
Matic Network is a layer 2 scaling solution for Ethereum that aims to improve scalability and usability for decentralized applications (dApps). It achieves this by leveraging sidechains, which are separate blockchains that can communicate with the Ethereum mainnet.
With Matic Network, users can enjoy faster and cheaper transactions compared to the Ethereum mainnet. This is because transactions on Matic sidechains can be confirmed in a matter of seconds, and the transaction fees are significantly lower.
Matic Network Architecture
The Matic Network architecture consists of three main components:
- Matic Mainnet: The main Ethereum chain, where users can interact with smart contracts and perform transactions.
- Matic PoS Chain: A sidechain that uses a Proof of Stake (PoS) consensus mechanism to validate transactions. This enables faster transaction confirmation and higher scalability.
- Matic Wallet: A user-friendly wallet that provides an interface for interacting with dApps on the Matic Network. It is compatible with popular wallets like Metamask and enables seamless transactions on the Matic sidechain.
Benefits of Matic Network
There are several benefits of using Matic Network:
- Scalability: Matic Network enables faster transactions and higher throughput compared to the Ethereum mainnet. This scalability is crucial for the mass adoption of decentralized applications.
- Lower Fees: Transactions on Matic sidechains have significantly lower fees compared to the Ethereum mainnet, making it more cost-effective for users.
- Interoperability: Matic Network is fully compatible with Ethereum, allowing easy migration of dApps from the Ethereum mainnet to Matic sidechains.
- User-friendly Experience: The Matic Wallet provides a seamless and intuitive experience for users, making it easy to interact with dApps on the Matic Network.
By understanding the basics of Matic Network, users can take advantage of its scalability and usability benefits to enhance their experience with Ethereum-based dApps.
How to Add Matic Network to Metamask?
If you want to use the Matic Network on the Metamask wallet, follow these simple steps:
- Open the Metamask extension on your browser and make sure you are logged in.
- Click on the network dropdown at the top of the Metamask extension and select “Custom RPC”.
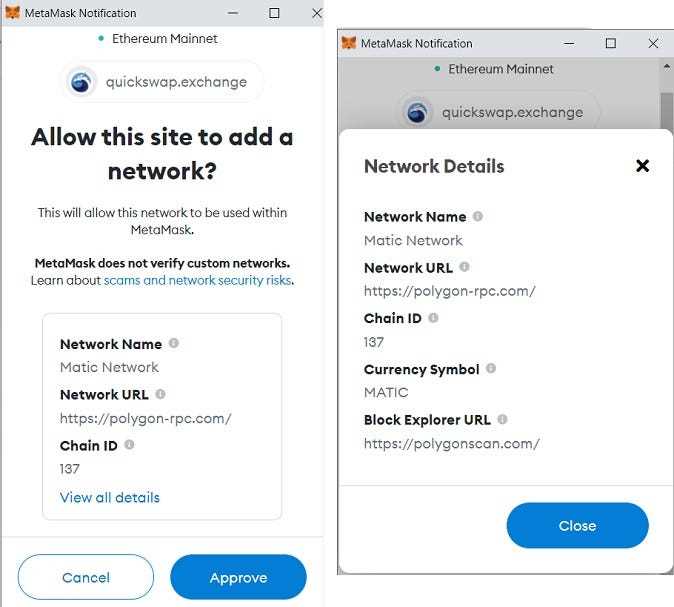
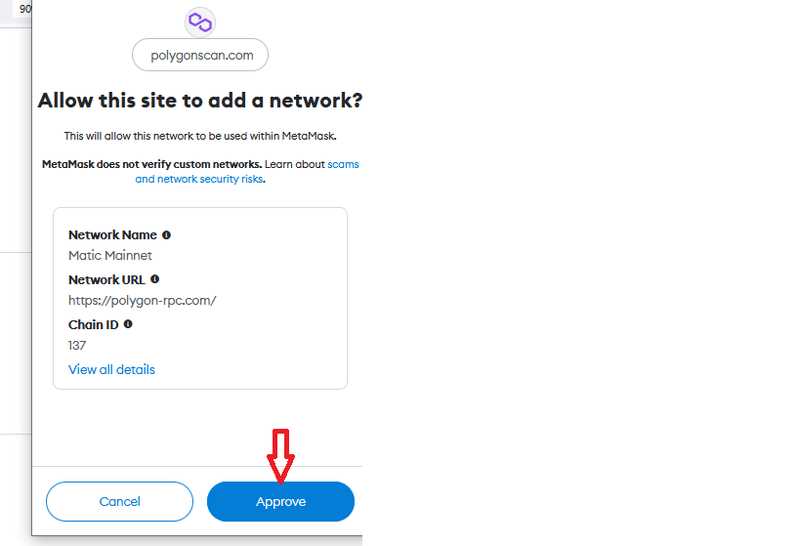
- A form will pop up where you can enter the Matic Network details. Fill in the following information:
- Network Name: Matic Mainnet (or any name you prefer)
- New RPC URL: https://rpc-mainnet.matic.network (for the Matic Mainnet)
- ChainID: 137 (for the Matic Mainnet)
- Symbol: MATIC
- Block Explorer URL: https://explorer.matic.network/ (optional)
- Click “Save” to add the Matic Network to your Metamask wallet. You should now see the Matic Network option in the network dropdown.
That’s it! You have successfully added the Matic Network to Metamask. You can now use your Metamask wallet to interact with decentralized applications (dApps) and perform transactions on the Matic Network.
Remember to always double-check the details entered when adding a custom network to Metamask. Incorrect information may result in losing funds or the inability to access the desired network.
Step-by-step guide on adding Matic Network to Metamask
Adding the Matic Network to your Metamask wallet is a simple process that allows you to access and use the Matic Network’s features within the Metamask interface. Follow the steps below to add the Matic Network to your Metamask wallet:
Step 1: Install Metamask
If you haven’t already done so, install the Metamask extension for your web browser. Metamask is available for Chrome, Firefox, and Brave browsers.
Step 2: Create or Import Wallet
If you don’t have a Metamask wallet, create a new wallet by following the prompts after installing the extension. If you already have a Metamask wallet, import it by clicking on the Metamask icon in your browser and selecting “Import Wallet”. Enter the required information to import your wallet.
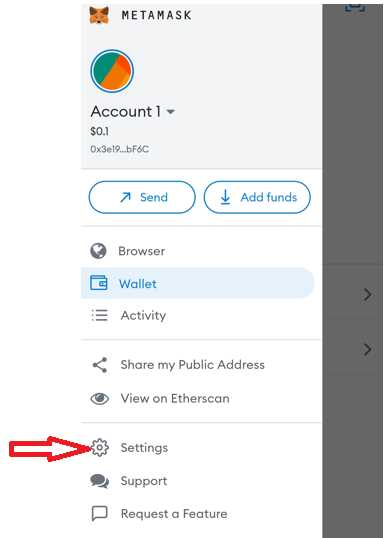
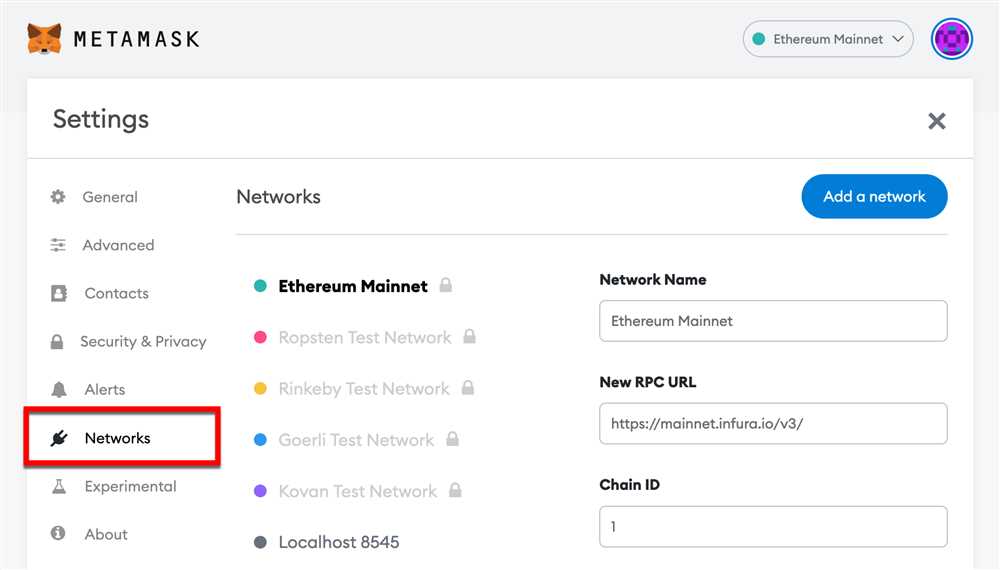
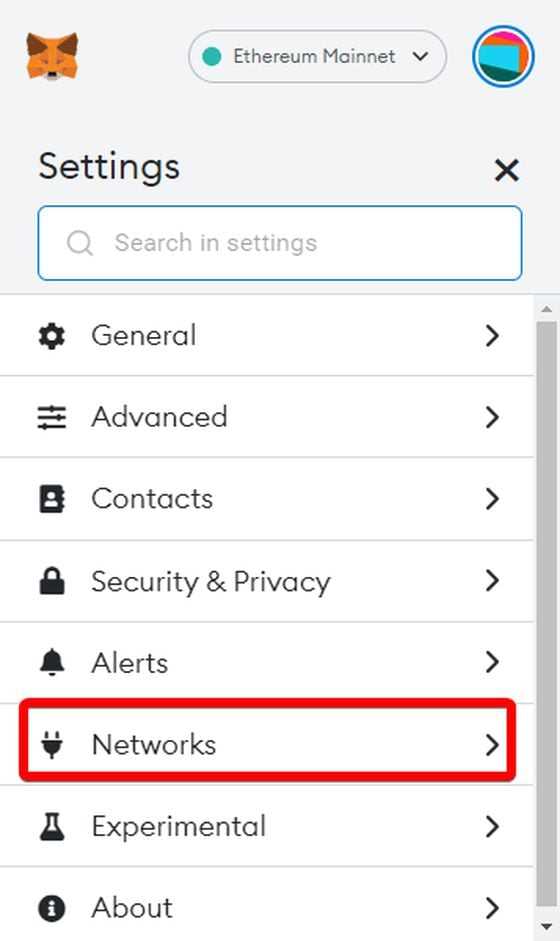
Step 3: Access Network Settings
Once you have installed or imported your Metamask wallet, click on the Metamask icon in your browser to open the extension. Click on the account icon in the top right corner and select “Settings” from the dropdown menu.
Step 4: Add Matic Network
In the Metamask settings, navigate to the “Networks” tab. Click on the “Add Network” button to open a form where you can add the Matic Network details.
| Network Name: | Matic Mainnet |
| New RPC URL: | https://rpc-mainnet.matic.network |
| Chain ID: | 137 |
| Currency Symbol: | MATIC |
| Block Explorer URL: | https://explorer.matic.network |
Fill in the above details in the “Add Network” form and click “Save”.
Step 5: Switch to Matic Network
To switch to the Matic Network, click on the account icon in the top right corner of Metamask, and select “Matic Mainnet” from the dropdown list.
Congratulations! You have successfully added the Matic Network to your Metamask wallet. You can now use the Matic Network’s features and interact with Matic dapps using your Metamask wallet.
The Benefits of Using Matic Network with Metamask
Metamask is a popular browser extension that allows users to interact with decentralized applications (DApps) on the Ethereum blockchain. By adding Matic Network to Metamask, users can enjoy the following benefits:
- Fast and Scalable Transactions: Matic Network is a Layer 2 scaling solution that enables faster and cheaper transactions compared to the Ethereum mainnet. By using Matic Network with Metamask, users can enjoy significantly reduced transaction fees and faster confirmation times.
- Improved User Experience: Matic Network seamlessly integrates with Metamask, allowing users to enjoy a smooth and familiar user experience. Users can continue to use their existing Metamask wallets to interact with DApps on Matic Network, without the need for additional wallets or accounts.
- Access to Matic Network DApps: By adding Matic Network to Metamask, users gain access to a wide range of DApps built on the Matic Network. These DApps offer various features and services, including decentralized exchanges, gaming platforms, and more.
- Interoperability: Matic Network is compatible with Ethereum, meaning that users can seamlessly transfer assets between the two networks. This interoperability allows users to take advantage of the benefits of Matic Network without sacrificing compatibility with Ethereum-based applications and services.
By adding Matic Network to Metamask, users can unlock a world of possibilities and enjoy a more efficient and cost-effective blockchain experience. Whether you are a developer, trader, or avid DApp user, Matic Network with Metamask is a powerful combination that enhances the capabilities of the Ethereum ecosystem.
What is Matic Network?
Matic Network is a Layer 2 scaling solution for Ethereum that aims to provide faster and cheaper transactions. It achieves this by utilizing sidechains, which are connected to the main Ethereum network.