
If you are new to the world of cryptocurrencies and decentralized applications, you have probably heard of Metamask. Metamask is a popular browser extension that allows users to interact with the Ethereum blockchain and access decentralized applications, or dApps. While Metamask is a powerful tool, it can also be a bit confusing for beginners. In this article, we will take a closer look at some common problems users encounter when using Metamask and provide you with tips and tricks to navigate through them effortlessly.
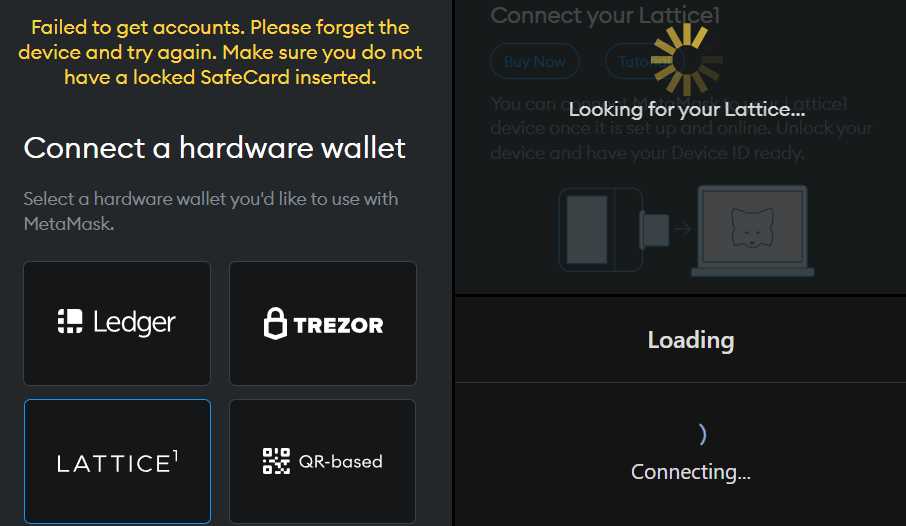
Problem 1: Unable to connect to the Ethereum network
If you are having trouble connecting to the Ethereum network through Metamask, the first thing you should check is your internet connection. Make sure that you are connected to a stable and reliable network. If you are still experiencing issues, try switching to a different network in the Metamask settings. Additionally, you can also try clearing your browser cache and restarting your computer to see if that resolves the problem.
Problem 2: Unable to see my tokens or balance
If you are unable to see your tokens or balance in Metamask, make sure that you have added the correct token contract address. Sometimes, tokens are not automatically added to your wallet, and you need to manually add them by entering the contract address. You can find the contract address of a token by searching for it on a blockchain explorer or consulting the token’s website or social media channels. Once you have the contract address, you can add the token by clicking on the “Add Token” button in the Metamask interface.
Problem 3: Transaction is taking too long to confirm
If your transaction is taking longer than usual to confirm, it could be due to network congestion. Ethereum is a busy blockchain, and sometimes there is a high volume of transactions, resulting in longer confirmation times. You can check the status of your transaction by clicking on the transaction in your Metamask history. If you find that your transaction is still pending, you can try increasing the gas price to prioritize your transaction. However, be careful not to set the gas price too high, as it can result in unnecessary fees.
By familiarizing yourself with these common problems and their solutions, you will be better equipped to navigate through the Metamask interface and enjoy a seamless experience with decentralized applications. Remember, practice makes perfect, and the more you use Metamask, the more comfortable you will become with it. So, dive in, explore the world of decentralized finance, and embrace the power of Metamask!
Metamask Basics and Account Setup
Metamask is a popular browser extension that allows users to interact with decentralized applications (dApps). It serves as a digital wallet and a bridge between the user and the Ethereum blockchain.
To begin using Metamask, follow these steps to set up your account:
Step 1: Install Metamask
Go to the official Metamask website or search for the Metamask extension in your browser’s extension store. Click on the installation button and follow the prompts to add the extension to your browser.
Step 2: Create a New Wallet
After installing Metamask, click on the extension icon on your browser toolbar. You will see a welcome screen that allows you to create a new wallet or import an existing one. Choose “Create a Wallet” and create a strong password to encrypt your wallet.
Write down your secret backup phrase and keep it safe. This phrase is the only way to restore your wallet in case of a lost password or device.
Step 3: Accessing Your Wallet
Once you have created a wallet, you can access it by clicking on the Metamask icon and entering your password. This will open the main Metamask interface where you can view your account balance, transaction history, and manage your settings.
By default, Metamask connects to the Ethereum mainnet. If you want to switch to a testnet or a custom network, click on the network name at the top of the interface and select the desired network from the drop-down menu.
Step 4: Account Backup
To ensure the safety of your funds, it is crucial to back up your account. In the Metamask interface, click on the account icon on the top right corner and select “Account details”. Scroll down to the “Export Private Key” section and click on “Export”. This will give you access to your private key, which can be used to restore your wallet on other devices.
Remember to store your private key securely and never share it with anyone. Losing your private key can result in permanent loss of access to your funds.
These are the basic steps to set up and access your Metamask account. Familiarize yourself with the interface and explore the various features it offers. As you become more comfortable using Metamask, you can start interacting with dApps, sending and receiving Ether, and managing your digital assets.
Creating a Metamask Account
To start using Metamask, you need to create an account. Follow these steps to set up your Metamask account:
- Install the Metamask extension from the browser store or visit the official Metamask website to download it.
- After installation, click on the Metamask icon in your browser extension bar to open the Metamask wallet.
- Click on “Get Started” to begin the account creation process.
- Read and accept the terms and conditions presented by Metamask.
- Create a strong, unique password for your account and click “Create”.
- Metamask will generate a recovery seed phrase consisting of 12 or 24 words. Write down this seed phrase and keep it in a safe place. It is crucial for recovering your account if anything happens to your device.
- Confirm your seed phrase by selecting the words in the correct order.
- Your Metamask account is now created! You can start using it to manage your cryptocurrencies and interact with decentralized applications.
Remember to never share your seed phrase with anyone. Treat it like your private key, as anyone with access to your seed phrase can gain control over your account. Keep it offline and secure to protect your funds.
Connecting Metamask to a DApp
Metamask is a popular Ethereum wallet and browser extension that allows users to interact with decentralized applications (DApps) on the Ethereum blockchain. To connect Metamask to a DApp, follow the steps below:
Step 1: Install Metamask
If you haven’t already done so, you’ll need to install the Metamask extension on your web browser. Metamask supports Google Chrome, Mozilla Firefox, and Brave browsers. Visit the Metamask website or search for “Metamask” in your browser’s extension marketplace to download and install the extension.
Step 2: Set up Metamask
After installing Metamask, click on the Metamask icon in your browser’s toolbar to launch the extension. Follow the on-screen instructions to create a new wallet or import an existing one. Make sure to securely store your Metamask wallet’s seed phrase, as it is necessary to recover your wallet if you ever lose access to it.
Step 3: Connect to the DApp
Once you have set up Metamask, navigate to the DApp you want to use. The DApp should have a user interface that allows you to connect your wallet. Look for a “Connect” or “Connect Wallet” button on the DApp’s website or interface.
Click on the “Connect” or “Connect Wallet” button, and a dialog box will appear asking for permission to connect with your Metamask wallet. Review the permissions requested and click on “Connect” to authorize the connection.
If the connection is successful, you should see a confirmation message indicating that your wallet is connected. You may also be prompted to select the Ethereum network you want to use (e.g., Mainnet, Ropsten, or a custom network).
Step 4: Interacting with the DApp
Once your Metamask wallet is connected to the DApp, you can start interacting with it. Depending on the DApp, you may be able to perform various actions, such as sending transactions, purchasing tokens, or interacting with smart contracts.
When you perform an action that requires a transaction, Metamask will display a transaction confirmation dialog. Review the transaction details and customize the gas fees if necessary. Click on “Confirm” to send the transaction.
Remember to check the DApp’s documentation or interface for specific instructions on how to use it with Metamask, as each DApp may have unique features and functionalities.
In conclusion, connecting Metamask to a DApp is a straightforward process that involves installing and setting up Metamask, navigating to the DApp, and authorizing the connection. Once connected, you can enjoy the benefits of interacting with decentralized applications on the Ethereum blockchain.
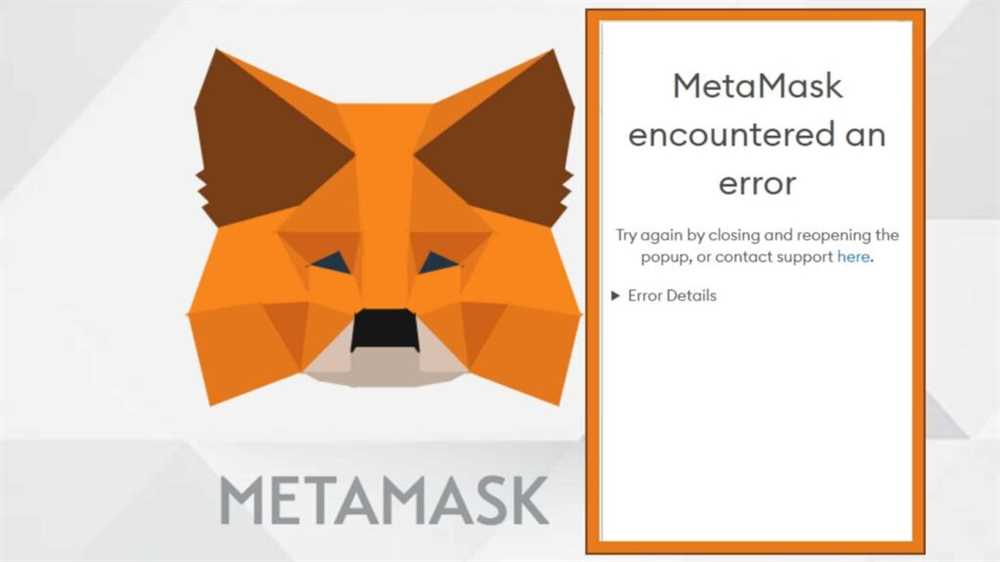
Troubleshooting Metamask Issues
1. Unable to connect to the Ethereum network
If you are having trouble connecting to the Ethereum network, check your internet connection first. Make sure you have a stable internet connection and try restarting Metamask. If the problem persists, try switching to a different network (e.g. switching from the Mainnet to the Rinkeby Testnet) and see if that resolves the issue. You can also try resetting your account from the settings menu.
2. Transactions are not going through
If your transactions are not being processed, there could be several reasons for this. First, check the gas price you have set for your transaction. If it’s too low, the transaction may be stuck in the pending state. Increase the gas price to ensure it gets processed in a reasonable amount of time. Additionally, check if you have enough funds in your account to cover the transaction and the gas fees.
3. Invalid password or seed phrase
If you are getting an “invalid password” or “invalid seed phrase” error, double-check the password or seed phrase you entered. Make sure there are no spelling mistakes or typos. If you still can’t access your account, you may need to reset your password or restore your account using the seed phrase.
4. Missing tokens or assets
If you are not seeing your tokens or assets in your Metamask wallet, make sure you have added the correct token contract address to your wallet. You may need to manually add the token by entering its contract address, symbol, and decimal places. If you have already added the token but it’s not showing up, try refreshing the page or restarting Metamask. Additionally, check if the token has been hidden or disabled in your wallet settings.
5. Unsupported browser or browser extension
If you are using an unsupported browser or browser extension, you may encounter compatibility issues with Metamask. Make sure you are using a supported browser like Chrome, Firefox, or Brave. Disable any conflicting browser extensions and try again. If the problem persists, try using Metamask in a different browser or reinstall the extension.
Remember, if you are still experiencing issues with Metamask, don’t hesitate to seek further help from the Metamask community or support channels. They will be able to provide more specific assistance based on your situation.
Fixing Metamask Connection Problems
If you are experiencing connection problems with Metamask, there are several steps you can take to troubleshoot and resolve the issue.
1. Check your internet connection: Make sure you are connected to the internet and have a stable connection. Slow or unstable internet can prevent Metamask from connecting to the blockchain.
2. Update Metamask: Ensure that you are using the latest version of Metamask. Developers often release updates to improve compatibility and fix bugs. Check the Metamask website or the Chrome Web Store to see if there is a new version available.
3. Try a different browser: If you are using Metamask on a particular browser and experiencing connection issues, try switching to a different browser. Sometimes compatibility issues with specific browsers can cause connection problems.
4. Disable browser extensions: Some browser extensions can interfere with Metamask’s connection to the blockchain. Disable any other extensions you have installed and see if the issue persists. If the problem is resolved, you may need to selectively enable extensions to determine which one is causing the problem.
5. Check the network settings: Make sure you are connected to the correct network in Metamask. If you are trying to connect to a test network or a custom network, double-check the network settings to ensure they are accurate.
6. Clear cache and cookies: Clearing your browser’s cache and cookies can help resolve connection issues. This will remove any temporary data that may be causing conflicts with Metamask.
7. Restart your computer or device: Sometimes a simple restart can fix connection problems. Try restarting your computer or device and see if the issue is resolved.
If none of these steps resolve your connection problems, you may need to reach out to the Metamask support team or consult the Metamask community for further assistance. They may be able to provide additional guidance or troubleshooting steps specific to your situation.
Dealing with Insufficient Gas Error
One common error that users may encounter when using Metamask is the “Insufficient Gas” error. This error message indicates that there is not enough gas allocated to complete a transaction on the blockchain. Gas is a unit used to measure the computational work required to execute transactions or perform operations on the Ethereum network.
When you get an “Insufficient Gas” error, it means that the gas limit specified for the transaction is lower than the required gas amount. This can occur for a variety of reasons, such as network congestion, high network fees, or a low gas limit set by the user.
Increasing the Gas Limit
To resolve this error, you can increase the gas limit for the transaction. Follow these steps:
- Open Metamask by clicking on the extension icon in your browser.
- Select the transaction that encountered the error from the transaction history.
- Click on the “Edit” or “Retry” button (the specific button may vary depending on the version of Metamask you are using).
- In the transaction settings, look for the gas limit field. Increase the value to a higher amount, such as 250,000 or 500,000.
- Confirm the changes and submit the transaction again.
Adjusting Gas Price
In some cases, increasing the gas limit may not be enough to resolve the error. You may also need to adjust the gas price, which determines the amount you are willing to pay for each unit of gas.
To adjust the gas price, follow these steps:
- Open Metamask and click on the extension icon in your browser.
- Select the transaction that encountered the error from the transaction history.
- Click on the “Edit” or “Retry” button.
- In the transaction settings, look for the gas price field. Increase the value to a higher amount, such as 50 Gwei or 100 Gwei.
- Confirm the changes and submit the transaction again.
By increasing both the gas limit and gas price, you can ensure that your transaction has enough gas to be processed by the Ethereum network. Keep in mind that higher gas limits and gas prices may result in higher transaction fees, so it’s important to consider the current network conditions and adjust accordingly.
If you continue to encounter the “Insufficient Gas” error, you may want to check the gas requirements of the specific transaction or consult with the dApp or service you are interacting with for further assistance.
How do I connect Metamask to my browser?
To connect Metamask to your browser, first, make sure you have installed the Metamask extension. Then, click on the Metamask icon in your browser toolbar and follow the instructions to create a new account or import an existing one. Once your account is set up, you will be connected to the Ethereum network and can start using Metamask to interact with decentralized applications.
Why am I getting the “Insufficient funds for gas” error?
The “Insufficient funds for gas” error occurs when you don’t have enough ETH in your Metamask wallet to cover the transaction fees (gas) required to execute a transaction. To fix this, you can send some ETH to your wallet from an exchange or another wallet. Make sure you have enough ETH to cover the gas fees for your transactions.
What should I do if my Metamask is not connecting to dapps?
If Metamask is not connecting to dapps, there are a few things you can try. First, make sure you are using the latest version of Metamask. If not, update it to the latest version. Also, check if you have any ad blockers or privacy extensions enabled in your browser that may be interfering with Metamask. If so, disable them and try again. Finally, try clearing your browser cache and restarting your browser. If the issue still persists, you can contact Metamask support for further assistance.
How do I recover my Metamask account if I forgot my password?
If you forgot your Metamask password, don’t worry, you can still recover your account using the secret backup phrase (seed phrase) that you were provided when you set up your Metamask account. Simply click on “Forgot Password” on the Metamask login screen and follow the instructions to enter your seed phrase and create a new password. It is important to keep your seed phrase secure, as anyone with access to it can access your funds.