
Metamask has become the go-to wallet for many Ethereum users, offering a secure and convenient way to interact with decentralized applications. As the popularity of layer 2 solutions grows, it becomes essential to configure Metamask to support networks other than the Ethereum mainnet.
One such network gaining traction is Polygon, a layer 2 scaling solution that aims to provide fast and low-cost transactions for Ethereum users. Configuring Metamask to work with Polygon can be a bit challenging for beginners, but with the right steps, you can master the setup process like a pro.
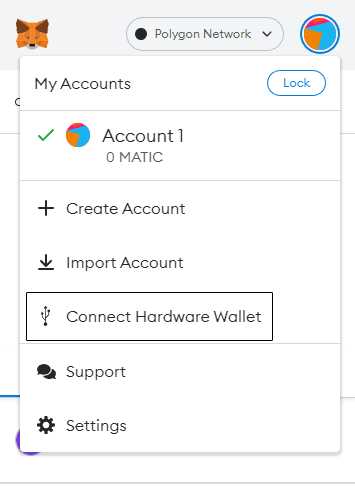
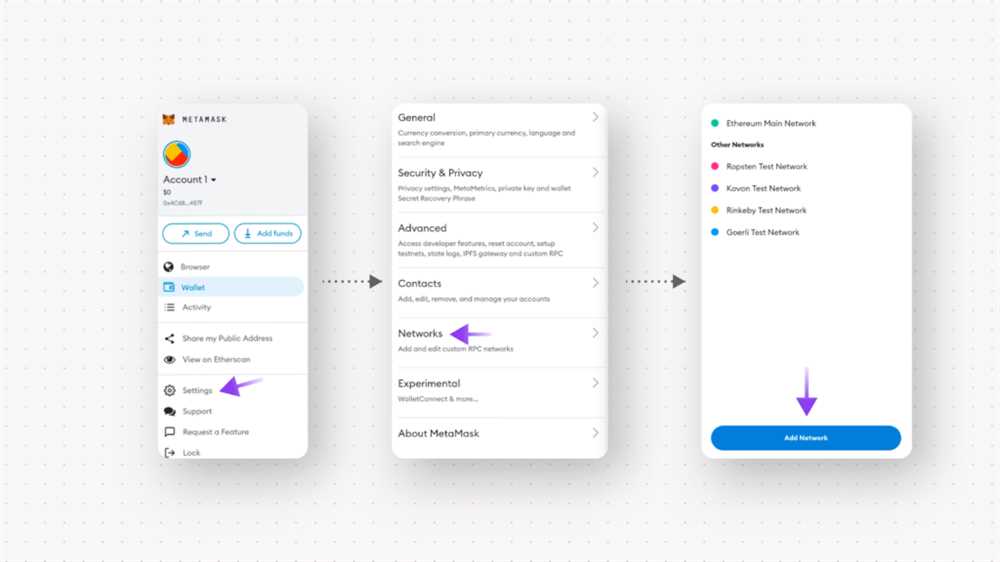
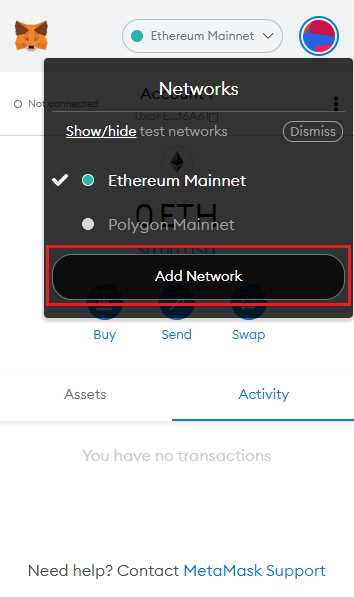
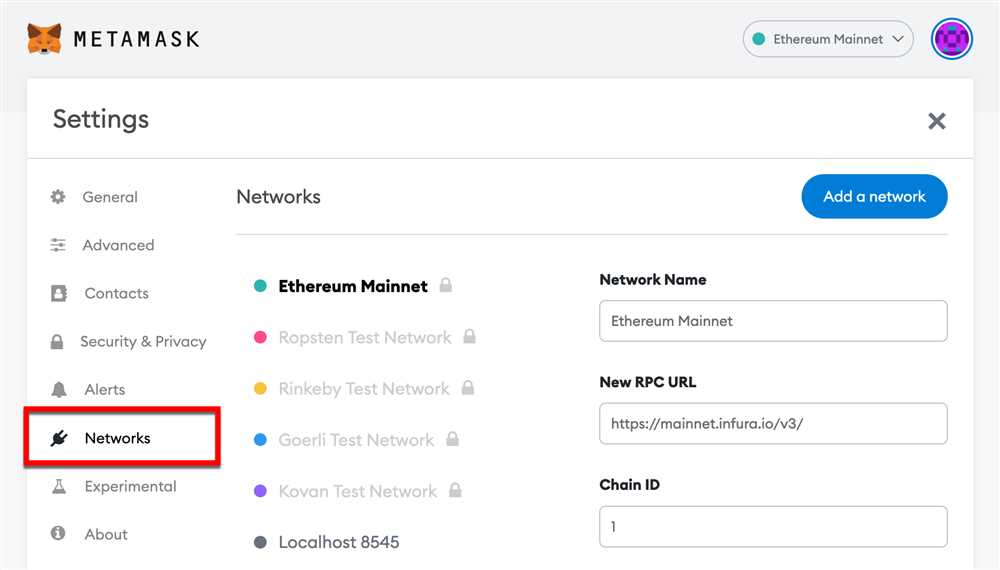
The first step is to install the Metamask extension on your web browser if you haven’t already. Once installed, create a new wallet or import an existing one. After that, navigate to the settings tab and select “Networks” from the menu. Here, you will find an option to add a custom network.
Next, you need to enter the required details to configure Metamask for Polygon. Make sure to provide the network name, RPC URL, and chain ID correctly. You can obtain these details from the official Polygon documentation or other reliable sources. Don’t forget to save the changes and switch to the Polygon network to start enjoying the benefits of layer 2 scalability.
By mastering the setup process for configuring Polygon on Metamask, you open up a world of possibilities in the decentralized finance ecosystem. You can seamlessly interact with decentralized applications and enjoy faster and cheaper transactions, all while taking advantage of the security and convenience provided by Metamask.
Mastering the Setup Process
Setting up and configuring Polygon on Metamask is an important step towards seamless and efficient use of the Polygon network. This process can seem daunting at first, but with the right guidance and attention to detail, you can become a pro at it in no time.
Understanding Polygon and Metamask
Before we delve into the setup process, let’s quickly understand what Polygon and Metamask are. Polygon is a scaling solution for Ethereum that aims to improve its speed and scalability. Metamask, on the other hand, is a browser extension wallet that allows users to interact with decentralized applications (dApps) on the Ethereum network.
To get started, make sure you have the latest version of Metamask installed in your browser. If you don’t have it, simply download and install it from the official Metamask website.
Adding the Polygon Network to Metamask
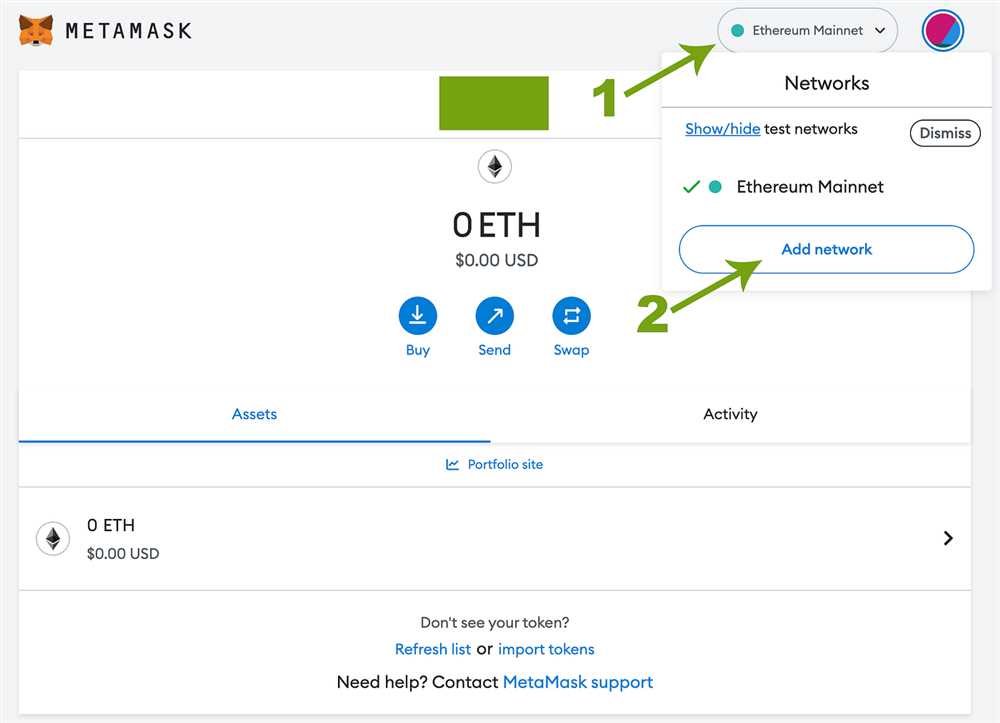
Once Metamask is installed, open it and click on the network dropdown at the top. Select “Custom RPC” to add a custom network.
In the “Network Name” field, enter “Polygon” or any name of your choice. In the “New RPC URL” field, enter “https://rpc-mainnet.maticvigil.com” as the RPC URL for the Polygon Mainnet. If you want to configure the Polygon Testnet, use “https://rpc-mumbai.maticvigil.com” as the RPC URL.
Next, enter the Chain ID. For the Polygon Mainnet, the Chain ID is 137, and for the Testnet, it is 80001. Leave the other fields blank, and click “Save” to add the network.
Configuring the Network
After adding the Polygon network, you will see it listed in the networks dropdown. Select the Polygon network to switch to it. Now, you need to configure the network to display the correct token balances.
Click on the “Assets” tab and then click on “Add Token” to add the desired tokens to your Metamask wallet. Enter the token contract address and click “Next”. Metamask will automatically detect the token details and display them in your wallet.
Additionally, you can customize the order and visibility of tokens by clicking on the “…” icon next to each token. You can also set default gas prices and choose a transaction speed that suits your needs.
Once you have configured the Polygon network and added your desired tokens, you are all set to start using Polygon on Metamask like a pro! You can now seamlessly interact with dApps on the Polygon network, send and receive tokens, and explore the vast ecosystem it offers.
Remember, practicing and experimenting with different features and functionalities will further enhance your understanding of the setup process, allowing you to make the most out of your experience on the Polygon network.
Keep exploring and have fun!
Configuring Polygon on Metamask Like a Pro
Configuring Polygon on Metamask is an essential step for anyone looking to participate in the Polygon ecosystem and take advantage of its low transaction fees and fast confirmations. In this guide, we will walk you through the process of configuring Polygon on Metamask like a pro.
Step 1: Install Metamask
If you haven’t already, download and install the Metamask extension for your web browser. Metamask is available for Chrome, Firefox, Brave, and other popular browsers.
Step 2: Create or Import a Wallet
Open Metamask and either create a new wallet or import an existing one using your seed phrase or private key. Make sure to securely store your seed phrase or private key as it is the key to accessing your wallet.
Step 3: Connect to the Polygon Network
In the Metamask extension, click on the network dropdown and select “Custom RPC”. Here, you will be able to configure the Polygon network.
Step 4: Network Configuration
Enter the following details to configure the Polygon network:
- Network Name: Polygon
- New RPC URL: https://polygon-rpc.com/
- Chain ID: 137
- Symbol: MATIC
- Block Explorer URL: https://polygonscan.com/
Step 5: Save and Connect
Click on the “Save” button to save the network settings. After saving, you will be connected to the Polygon network. You can verify this by checking if the network name and symbol on the Metamask extension have changed to “Polygon” and “MATIC” respectively.
Step 6: Adding Tokens
To add tokens to your Metamask wallet on the Polygon network, click on the “Add Token” button on the main Metamask screen. You can search for the token by its name or contract address.
Congratulations! You have successfully configured Polygon on Metamask like a pro. You are now ready to explore the Polygon ecosystem and start interacting with decentralized applications and protocols on the network.
Understanding Polygon and Metamask

When it comes to navigating the world of blockchain technology, understanding the basics is crucial. Two key components that come into play are Polygon and Metamask.
Polygon
Polygon, formerly known as Matic Network, is a scaling solution built on the Ethereum network. It aims to address the scalability challenges faced by Ethereum, such as high fees and slow transaction speeds. By using a combination of sidechains, the Polygon network allows for faster and cheaper transactions, making it an attractive option for developers and users.
With Polygon, developers can create decentralized applications (dApps) and smart contracts that benefit from the scalability and interoperability offered by the network. Users can also interact with dApps on Polygon, enjoying faster transactions and lower fees compared to the Ethereum mainnet.
Metamask
Metamask is a popular browser extension that serves as a cryptocurrency wallet and a gateway to the decentralized web. It allows users to manage their digital assets, interact with dApps, and securely store their private keys.
Metamask is compatible with various networks, including Ethereum and Polygon. By adding Polygon to Metamask, users can seamlessly switch between networks and access the benefits of the Polygon ecosystem.
Setting up Metamask for Polygon involves configuring the network settings and adding the custom RPC (Remote Procedure Call) endpoint provided by Polygon. This allows Metamask to connect to the Polygon network and interact with dApps and tokens on that network.
Once set up, users can enjoy the speed and affordability of transactions on Polygon, while still benefiting from the security and convenience provided by Metamask.
In conclusion, understanding the relationship between Polygon and Metamask is essential for anyone looking to navigate the world of blockchain technology. By leveraging the scalability of Polygon and the features of Metamask, users can experience a faster, more efficient blockchain experience.
Step-by-Step Guide to Configuring Polygon on Metamask
Configuring Polygon on Metamask allows you to access the Polygon network and take advantage of its low fees and fast transaction speeds. Follow these simple steps to configure Polygon on Metamask:
Step 1: Install Metamask
If you haven’t already, install the Metamask extension on your web browser. Metamask is available for Chrome, Firefox, Brave, and Edge. After installation, set up your Metamask account with a strong password.
Step 2: Create a New Wallet or Import an Existing Wallet
Once Metamask is installed, you can create a new wallet or import an existing wallet using your seed phrase or private key. Make sure to securely store your seed phrase or private key.
Step 3: Connect Metamask to the Polygon Network
Open your Metamask extension and click on the network dropdown menu. Select “Custom RPC” to manually add a network. Enter the following information to connect Metamask to the Polygon network:
| Network Name: | Polygon |
| New RPC URL: | https://rpc-mainnet.maticvigil.com |
| Chain ID: | 137 |
| Symbol: | MATIC |
| Block Explorer URL: | https://explorer-mainnet.maticvigil.com |
After entering the information, click on “Save” to connect Metamask to the Polygon network.
Step 4: Add MATIC Tokens to Metamask
To add MATIC tokens to your Metamask wallet, click on the “Assets” tab and then click on “Add Token.” Select “Custom Token” and enter the following information:
| Token Contract Address: | 0xcc42724C6683B7E57334c4E856f4c9965ED682bD |
| Token Symbol: | MATIC |
| Decimals of Precision: | 18 |
Click on “Next” and then on “Add Tokens” to add MATIC tokens to your Metamask wallet.
That’s it! You have successfully configured Polygon on Metamask. You can now interact with dApps on the Polygon network and enjoy its benefits.
Best Practices for Configuring Polygon on Metamask
Configuring Polygon on Metamask requires attention to detail to ensure a smooth and hassle-free experience. To help you navigate the process like a pro, here are some best practices:
1. Update Metamask: Before getting started, make sure you have the latest version of Metamask installed on your browser. Updates often include improvements and new features that enhance the user experience.
2. Choose the Right Network: Metamask supports various blockchain networks, including Polygon. When configuring Polygon, it is essential to select the correct network in the network dropdown menu on the Metamask extension. This ensures you are connected to the Polygon network and can interact with Polygon-based applications correctly.
3. Use the Correct RPC Endpoint: Each blockchain network has its unique RPC (Remote Procedure Call) endpoint, which acts as a bridge for communication between your wallet and the network. When configuring Polygon, it is crucial to enter the correct RPC endpoint for Polygon in the settings of your Metamask extension. Using the wrong RPC endpoint can result in failed transactions or other issues.
4. Secure Your Account: As with any cryptocurrency wallet, security is paramount. Make sure to set up a strong password for your Metamask account and enable two-factor authentication for an extra layer of security. Additionally, be vigilant when interacting with dApps and websites, only entering your seed phrase or private key on trusted platforms.
5. Add Custom Tokens: If you plan to transact with specific tokens on the Polygon network, it is necessary to add them as custom tokens in your Metamask wallet. This allows you to monitor and interact with these tokens seamlessly.
6. Regularly Back Up Your Wallet: Always keep a backup of your Metamask wallet by securely storing your seed phrase. In the event of a lost or compromised device, your seed phrase is crucial for recovering your funds.
7. Stay Informed: Stay up to date with the latest news and updates from the Metamask and Polygon communities. Following official channels and participating in community forums can provide valuable insights and help you stay informed about any updates or changes that may impact your configuration.
By following these best practices, you can ensure a smooth and secure experience when configuring Polygon on Metamask. Embrace the power of decentralized finance on Polygon while enjoying peace of mind.
Troubleshooting Tips and Common Issues
1. Incorrect Network Configuration
One common issue is setting up the wrong network configuration on Metamask. Make sure you have selected the correct network for Polygon. You can do this by clicking on the network dropdown menu in the top-right corner of the Metamask extension and selecting “Polygon Mainnet” or “Matic Mainnet”.
2. Insufficient Gas
Another common issue is running out of gas when performing transactions on Polygon. Transactions on Polygon require a small amount of gas to be paid in the MATIC token. Make sure you have enough MATIC in your Metamask wallet to cover the transaction fees.
Pro tip: You can get some free MATIC on the Polygon Faucet to cover your gas fees for testing purposes.
3. Slow Network Connection
If you’re experiencing slow network connection or your transactions are taking a long time to confirm, it could be due to network congestion. Try changing the gas price to a higher value to prioritize your transaction. You can do this by opening the advanced gas settings in Metamask and manually increasing the gas price.
4. Disconnecting and Reconnecting
If you’re having trouble connecting to the Polygon network or experiencing intermittent connectivity issues, try disconnecting and reconnecting your Metamask wallet. Sometimes, simply refreshing the page or restarting your browser can resolve these issues.
5. Clearing Cache and Resetting Metamask
If none of the above solutions work, you can try clearing your browser cache and resetting your Metamask wallet. This will remove any temporary data and configurations that might be causing conflicts. Make sure to export your wallet seed phrase and private keys before resetting.
Please note that these troubleshooting tips and common issues are intended as general guidance and may not resolve all possible problems. If you continue to experience issues, it is recommended to seek assistance from the Metamask support team or the Polygon community.
What is Polygon?
Polygon is a scaling solution for Ethereum that aims to solve issues related to high fees and slow transaction speeds on the Ethereum network. It is a sidechain that operates alongside the Ethereum blockchain, providing faster and cheaper transactions.
What is Metamask?
Metamask is a popular cryptocurrency wallet and browser extension that allows users to access and interact with decentralized applications (dApps) on the Ethereum network. It provides a user-friendly interface for managing Ethereum accounts, private keys, and transactions.