
If you’re diving into the world of cryptocurrency, then you’re likely to come across the need to transfer your digital assets from one wallet to another. One common scenario is sending cryptocurrency from Coinbase to Metamask. But how exactly can you master this art?
First, it’s important to understand the difference between Coinbase and Metamask. Coinbase is a centralized cryptocurrency exchange where you can buy, sell, and store your digital assets. On the other hand, Metamask is a browser extension wallet that allows you to interact with decentralized applications (DApps) on the Ethereum blockchain.
To transfer cryptocurrency from Coinbase to Metamask, you’ll need to follow a few steps. First, ensure that you have both a Coinbase account and a Metamask wallet set up. Next, log in to your Coinbase account and navigate to the “Accounts” section. Here, you’ll see a list of your cryptocurrency holdings.
Select the cryptocurrency you want to send to Metamask, and click on the “Send” button. You’ll be prompted to enter the recipient’s wallet address. This is where you’ll need to copy your Metamask wallet address and paste it in the provided field. Double-check the address to ensure its accuracy.
Once you’ve entered the recipient’s address, Coinbase will ask you to confirm the transaction. Take a moment to review the details, including the amount you’re sending and the transaction fee. When you’re satisfied, click on the “Confirm” button to initiate the transfer.
After confirming the transaction, you’ll need to wait for the blockchain network to process it. The time it takes can vary depending on network congestion and the specific cryptocurrency you’re sending. You can track the progress of the transaction by using the transaction ID provided by Coinbase.
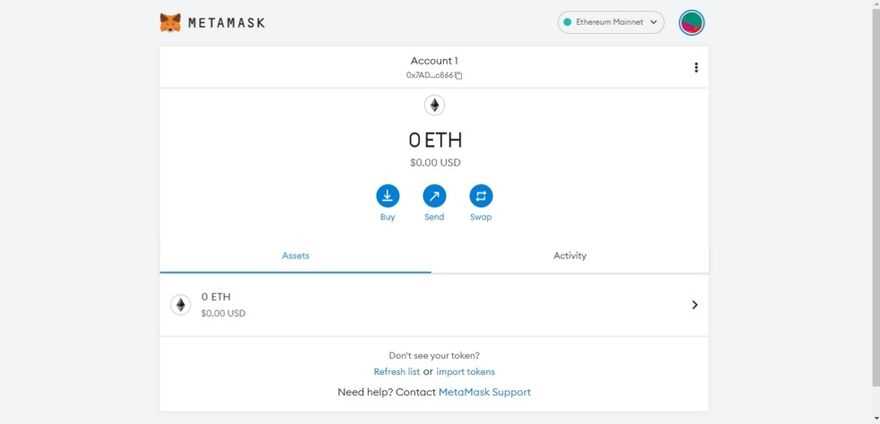
When the transfer is complete, you can log in to your Metamask wallet and verify that the cryptocurrency has arrived. You’ll be able to see the incoming transaction in your wallet’s transaction history. Congratulations! You’ve successfully transferred cryptocurrency from Coinbase to Metamask.
Mastering the art of transferring cryptocurrency is an essential skill for any crypto enthusiast. By understanding the process and following the necessary steps, you can confidently move your digital assets between wallets and explore the exciting world of decentralized finance.
Transferring Cryptocurrency: A Step-by-Step Guide
Transferring cryptocurrency from one wallet to another can seem like a daunting task, but with a few simple steps, you can easily send your digital assets from Coinbase to Metamask. Whether you want to store your cryptocurrency in a more secure wallet or use it for decentralized applications, this guide will walk you through the process.
Step 1: Set up a Metamask Wallet
If you haven’t already, you’ll need to install the Metamask extension in your web browser and create a new wallet. Metamask is a popular Ethereum wallet that allows you to store, manage, and interact with decentralized applications.
Step 2: Access Your Coinbase Account
Log in to your Coinbase account and navigate to the ‘Accounts’ section. Choose the cryptocurrency you want to send and click on the ‘Send’ button.
Step 3: Enter the Recipient Address
In your Metamask wallet, copy your wallet address by clicking on the account name and selecting ‘Copy Address’.
Go back to Coinbase and paste the address into the recipient field. Make sure to double-check the address to avoid any errors.
Step 4: Specify the Amount
Enter the amount of cryptocurrency you want to transfer. Coinbase will show you the fee for the transaction. Take note of this fee as it will be deducted from the total amount sent.
Step 5: Review and Confirm
Review all the details of your transaction, including the recipient address and amount. Once you’ve double-checked everything, click the ‘Send’ or ‘Confirm’ button to initiate the transfer.
Step 6: Wait for Confirmation
After confirming the transfer, you’ll need to wait for the transaction to be confirmed on the blockchain. This process can vary in time depending on network congestion and the cryptocurrency you’re sending.
Step 7: Check Your Metamask Wallet
Once the transaction is confirmed, you can check your Metamask wallet to see the updated balance. The transferred cryptocurrency should now be visible in your wallet.
Disclaimer: Please note that cryptocurrency transactions are irreversible. Make sure to verify all the details before initiating the transfer. It’s also recommended to start with a small test transaction to ensure everything is working correctly.
By following these step-by-step instructions, you should now be able to successfully transfer your cryptocurrency from Coinbase to Metamask. Enjoy the benefits of a more secure wallet and the ability to interact with decentralized applications!
Get Familiar with Coinbase and Metamask
Before you can transfer cryptocurrency from Coinbase to Metamask, it’s important to understand these two platforms and how they work.
Coinbase
Coinbase is one of the most popular cryptocurrency exchanges. It allows you to buy, sell, and store various cryptocurrencies, including Bitcoin, Ethereum, and Litecoin. Coinbase provides a user-friendly interface, making it easy for beginners to navigate and start investing in digital assets.
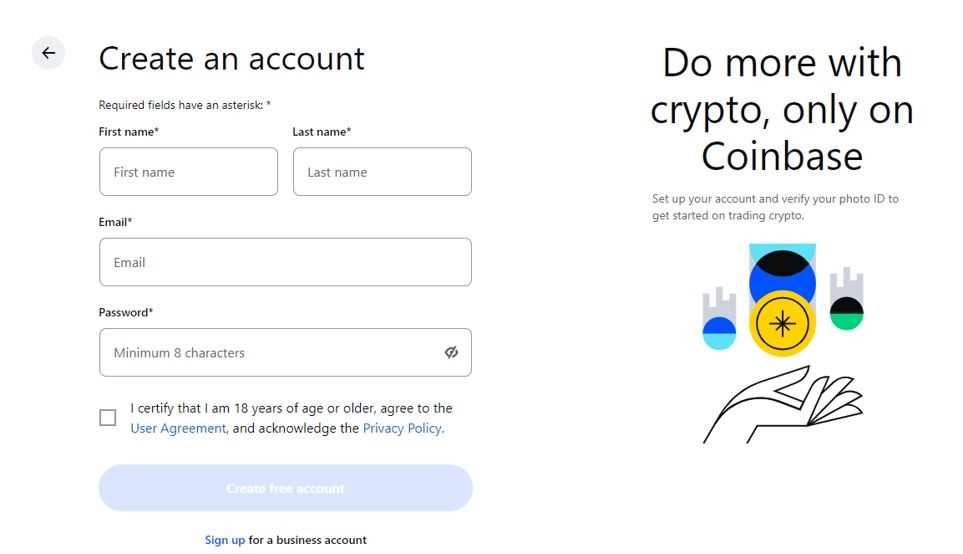
When using Coinbase, you’ll need to create an account and complete the necessary verification process. Once your account is set up, you can link your bank account or credit card to buy cryptocurrencies. Coinbase also provides a secure wallet where you can store your digital assets.
Metamask
Metamask is a cryptocurrency wallet and browser extension that allows you to interact with Ethereum decentralized applications (dApps). It acts as a bridge between your browser and the Ethereum network, making it easy to manage your Ethereum-based assets and interact with dApps seamlessly.
To use Metamask, you’ll need to install the browser extension and set up a new wallet. Metamask provides you with a unique wallet address, which you can use to send and receive Ethereum and other ERC-20 tokens. One key advantage of Metamask is the ability to connect to various dApps, enabling you to participate in decentralized finance (DeFi) activities and other Ethereum-based projects.
Now that you have a basic understanding of Coinbase and Metamask, let’s dive into the process of transferring cryptocurrency from Coinbase to Metamask.
Understand the Basics of Cryptocurrency Transfers
When it comes to transferring cryptocurrency, it’s important to have a basic understanding of how the process works. Whether you’re sending funds from Coinbase to Metamask or any other wallet, the following key concepts are crucial to grasp:
Wallets: Cryptocurrency wallets are digital tools used to store, send, and receive cryptocurrencies. These wallets come in different forms such as hardware, software, or online services.
Public and Private Keys: Every cryptocurrency wallet has a unique set of public and private keys. Public keys serve as the address where funds can be sent, while private keys are used to access and authorize transactions.
Blockchain: Cryptocurrencies operate on decentralized networks known as blockchains. A blockchain is a distributed ledger that records all transactions in a secure and transparent manner.
Transactions: A cryptocurrency transfer involves creating and broadcasting a transaction on the blockchain network. This transaction requires input from the sender, which includes the recipient’s public key, the amount being sent, and any additional details.
Confirmations: Once a transaction is created and broadcasted, it needs to be confirmed by the network. This process involves miners solving complex mathematical problems to validate the transaction. Each confirmation adds another layer of security and ensures that the transaction is legitimate.
Transaction Fees: Cryptocurrency transfers typically incur transaction fees. These fees compensate miners for their work in validating transactions and maintaining the blockchain network.
Block Time: Block time refers to the average time it takes to mine a new block on the blockchain network. Different cryptocurrencies have varying block times, which can affect the speed of transaction confirmations.
Network Congestion: During periods of high demand, blockchain networks can become congested, leading to delays in transaction confirmations. It’s important to be aware of network congestion and adjust your expectations accordingly.
By understanding these basic concepts, you’ll be better equipped to navigate the world of cryptocurrency transfers. Whether you’re sending funds from Coinbase to Metamask or any other combination of wallets, having a solid foundation in these fundamentals will help you make informed decisions and ensure the security of your transactions.
How to Prepare Your Coinbase Account for Transfer
Before you can transfer cryptocurrency from Coinbase to Metamask, you need to make sure your Coinbase account is properly prepared. Follow these steps to ensure a smooth transfer process:
1. Verify Your Account: Make sure your Coinbase account is fully verified. This includes providing your personal details and completing any necessary identity verification steps. Verification may take some time, so it’s important to start this process early.
2. Set Up 2-Factor Authentication: Enable two-factor authentication (2FA) to add an extra layer of security to your Coinbase account. This will require you to enter a code from an authentication app or received via SMS each time you log in or perform certain actions.
3. Check Withdrawal Limits: Verify your withdrawal limits on Coinbase to ensure you can transfer the desired amount of cryptocurrency to Metamask. Depending on your account level and verification status, there may be certain limits in place.
4. Update Contact Information: Double-check your contact information on Coinbase to ensure it is up to date. This includes your email address and phone number, as Coinbase may use this information for account security and communication purposes.
5. Understand Fees: Familiarize yourself with the fees associated with transferring cryptocurrency from Coinbase to Metamask. Coinbase may charge a network fee for the transfer, and there may also be gas fees associated with sending transactions on the blockchain.
6. Secure Your Account: Take the necessary steps to secure your Coinbase account. This includes using a strong, unique password, enabling 2FA, and being cautious of phishing attempts and suspicious emails. Consider using a hardware wallet for added security.
7. Familiarize Yourself with Metamask: Get acquainted with the Metamask wallet and understand how it works before initiating the transfer. Make sure you have the wallet installed and set up correctly.
By following these steps, you’ll ensure that your Coinbase account is properly prepared for transferring cryptocurrency to Metamask. This will help minimize any potential issues or delays during the transfer process, allowing you to easily and securely manage your digital assets.
Step-by-Step Guide: Sending Cryptocurrency from Coinbase to Metamask
If you’ve recently started exploring the world of cryptocurrencies, you might have already come across Coinbase and Metamask. Coinbase is a popular cryptocurrency exchange that allows you to buy, sell, and store various digital assets, while Metamask is a digital wallet that enables you to manage your Ethereum (ETH) and other ERC-20 tokens.
In this step-by-step guide, we will walk you through the process of sending cryptocurrency from your Coinbase account to your Metamask wallet. Following these steps will allow you to have full control over your digital assets and benefit from the additional features provided by Metamask.
Step 1: Open Your Coinbase Account
The first step is to open your Coinbase account and ensure that you have the necessary funds available for the transfer. If you haven’t created an account yet, simply visit the Coinbase website and sign up. Once you’ve logged into your account, navigate to the wallet tab and select the cryptocurrency you want to send.
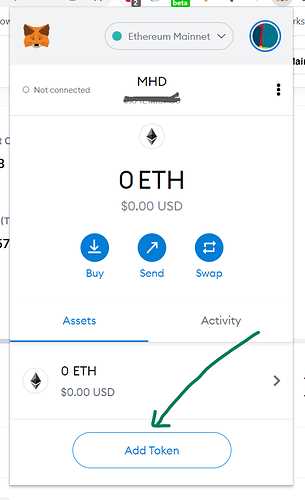
Step 2: Generate Your Metamask Wallet Address
Next, open your Metamask wallet or install the Metamask browser extension if you haven’t already done so. Once you have access to your Metamask wallet, find the “Receive” or “Deposit” button and click on it. This will display your unique wallet address, which you will need for the transfer.
Step 3: Initiate the Transfer on Coinbase

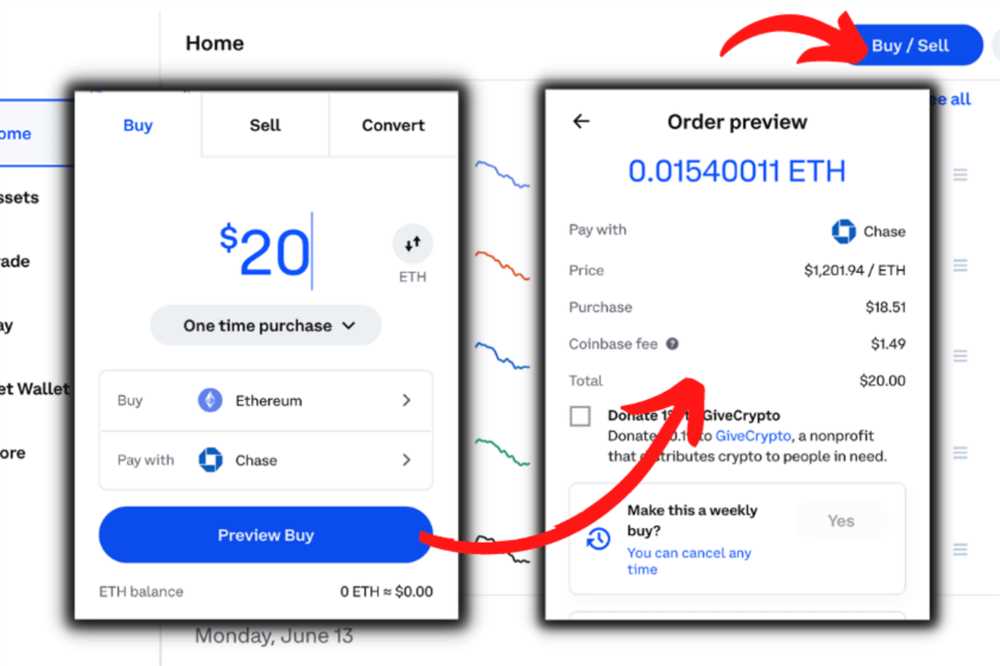
Now that you have both your Coinbase account and Metamask wallet ready, return to your Coinbase wallet tab and click on the “Send” button. Enter your Metamask wallet address as the recipient, specify the amount you wish to send, and review the transaction details to ensure everything is correct.
It’s crucial to double-check the accuracy of the wallet address, as sending cryptocurrency to the wrong address can result in irreversible loss of funds. Take your time and make sure you’ve copied the correct address from your Metamask wallet.
Step 4: Confirm the Transaction
After reviewing the transaction details and confirming that everything is accurate, click on the “Send” button to initiate the transfer. Depending on the blockchain network on which the cryptocurrency operates, the transaction confirmation time may vary. Be patient and wait for the transaction to be confirmed.
During this time, you can track the progress of your transfer by using the transaction ID provided by Coinbase or exploring the blockchain explorer for the specific cryptocurrency you’ve sent.
Step 5: Verify the Received Funds in Metamask
Once the transaction is confirmed, you will see the funds in your Metamask wallet. You can now access and manage your cryptocurrency from within your Metamask wallet, as well as take advantage of the additional features and decentralized applications (DApps) that Metamask offers.
It’s important to note that different cryptocurrencies may have different transaction fees and confirmation times. Additionally, make sure to keep your private keys and backup phrases secure, as losing them can result in permanent loss of access to your digital assets.
Congratulations! You’ve successfully sent cryptocurrency from Coinbase to your Metamask wallet. By following this step-by-step guide, you have taken control of your digital assets and can now enjoy the benefits of using Metamask as your Ethereum wallet.
Tips and Best Practices for a Successful Transfer
Transferring cryptocurrency from Coinbase to Metamask can be an exciting but also nerve-wracking process. To ensure a smooth transfer, follow these tips and best practices:
1. Double-check the recipient’s address
Before initiating the transfer, make sure you have the correct recipient address for your Metamask wallet. One small mistake in the address can result in the loss of your funds.
2. Set the appropriate gas fees
Gas fees are required for every cryptocurrency transfer on the Ethereum blockchain. Make sure to set the gas fees appropriately to avoid delays or failed transactions. You can check the current gas prices on Ethereum gas fee trackers and adjust accordingly.
3. Enable two-factor authentication (2FA)
Adding an extra layer of security to your Coinbase and Metamask accounts with two-factor authentication can help prevent unauthorized access to your funds. Consider using an authenticator app for additional security.
4. Start with a small test transfer
If it is your first time transferring cryptocurrency between Coinbase and Metamask, it is advisable to start with a small test transfer. This allows you to familiarize yourself with the process and ensures that everything is working properly before transferring larger amounts.
5. Keep your software and hardware updated
Ensure that you are using the latest version of the Coinbase and Metamask applications, as well as keeping your device’s operating system up to date. This helps protect against potential security vulnerabilities.
6. Be patient
Transfers between Coinbase and Metamask may take some time to complete, especially during periods of high network congestion. Be patient and avoid making multiple transfer attempts, as this can lead to confusion and potential errors.
By following these tips and best practices, you can increase the chances of a successful transfer and have peace of mind while moving your cryptocurrency assets.
Can I send cryptocurrency from Coinbase to Metamask?
Yes, you can transfer cryptocurrency from Coinbase to Metamask. Coinbase allows you to send your cryptocurrencies to any external wallet, including Metamask.
Is there a fee for transferring cryptocurrency from Coinbase to Metamask?
Yes, Coinbase charges a network fee for transferring cryptocurrency to an external wallet like Metamask. The fee amount depends on the cryptocurrency you are transferring and the current network congestion.