
Are you interested in investing in Matic cryptocurrency and wondering how to get started? Look no further! This step-by-step guide will walk you through the process of purchasing Matic using Metamask, one of the most popular and secure digital wallets available.
Step 1: Set Up Metamask
If you haven’t already, the first thing you’ll need to do is set up a Metamask wallet. Metamask is a browser extension that allows you to manage your Ethereum-based assets, including Matic. Simply download the extension, create a new wallet, and make sure to securely store your secret backup phrase.
Step 2: Add Funds to Metamask
Now that you have your Metamask wallet set up, it’s time to add funds to it. To purchase Matic, you’ll need to have Ethereum in your wallet. You can either transfer Ethereum from another wallet or purchase it from a cryptocurrency exchange and then send it to your Metamask wallet address.
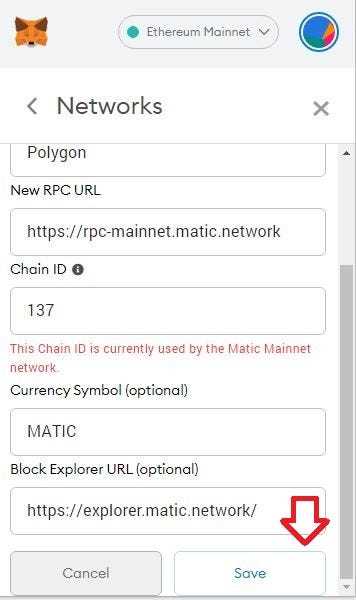
Step 3: Connect to Matic Network
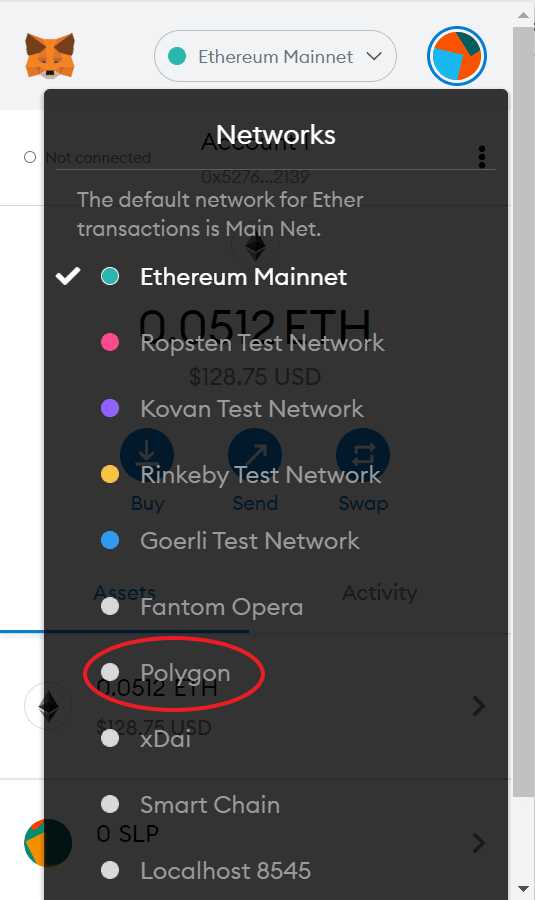
Next, you’ll need to connect Metamask to the Matic network. Click on the Metamask extension in your browser and select the network dropdown. Choose “Custom RPC” and enter the Matic Mainnet RPC URL (rpc.matic.network) in the “New RPC URL” field. Click “Save” to connect to the Matic network.
Step 4: Find an Exchange
Now it’s time to find an exchange where you can purchase Matic. There are several exchanges that support Matic trading, such as Binance, Coinbase, and Kraken. Sign up for an account on the exchange of your choice and complete the necessary verification steps.
Step 5: Deposit Ethereum
After creating an account on the exchange, you’ll need to deposit Ethereum into your exchange wallet. This can usually be done by navigating to the “Deposits” section on the exchange platform and generating an Ethereum deposit address. Make sure to copy the address accurately and initiate the transfer from your Metamask wallet.
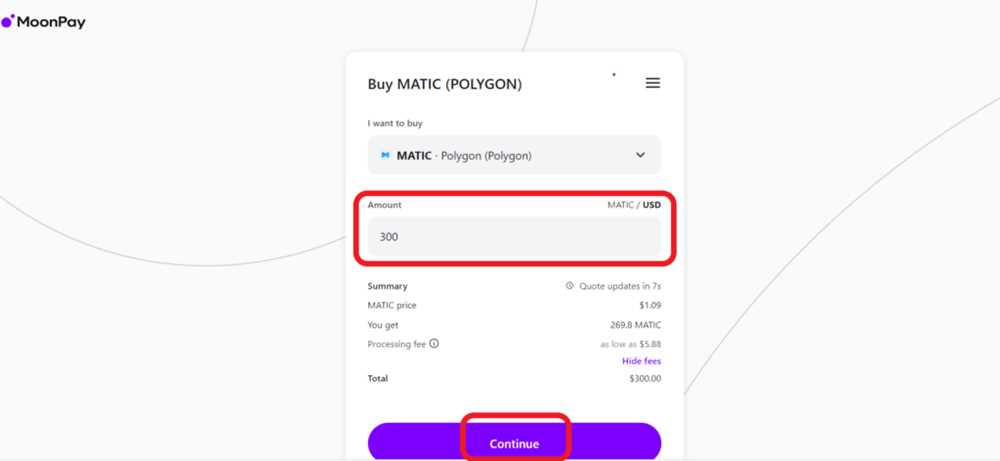
Step 6: Purchase Matic
Once your Ethereum deposit has been confirmed on the exchange, you can start purchasing Matic. This is typically done by navigating to the “Trading” section of the exchange platform and searching for the Matic trading pair. Place a buy order for the desired amount of Matic and wait for the transaction to be completed.
Step 7: Transfer Matic to Metamask
After the Matic purchase is complete, it’s time to transfer your Matic tokens to your Metamask wallet. Navigate to the “Withdraw” or “Send” section on the exchange platform, enter your Metamask wallet address as the recipient, and initiate the transfer.
Congratulations! You have successfully purchased Matic on Metamask. Your Matic tokens should now be visible in your Metamask wallet, ready for you to use, trade, or hold as you please.
Disclaimer: Cryptocurrency investments carry risks, and it’s important to do thorough research and exercise caution when purchasing and storing digital assets. This guide is for informational purposes only and should not be considered financial advice.
What is Matic?
Matic is a Layer 2 scaling solution for Ethereum, designed to improve the scalability and usability of the Ethereum network. It aims to address the limitations of the Ethereum blockchain, such as high gas fees and slow transaction speeds, by providing a more efficient and cost-effective infrastructure.
Matic achieves this scalability by using a combination of sidechains, a modified version of the Plasma framework, and a decentralized network of validators. These solutions allow Matic to process thousands of transactions per second and significantly reduce transaction fees, making it a suitable option for various applications, including decentralized finance (DeFi), gaming, and non-fungible tokens (NFTs).
One of the key features of Matic is the ability to seamlessly bridge Ethereum assets to the Matic network and back. This means that users can easily transfer their ERC-20 or ERC-721 tokens from Ethereum to Matic to take advantage of the scalability benefits, and vice versa. The bridging process is secure and decentralized, ensuring the integrity and immutability of the assets.
Matic also supports several developer-friendly features, such as the ability to deploy smart contracts on the Matic network, integrate with existing Ethereum tools and libraries, and access the Matic chain via an Ethereum-compatible API. This makes it easier for developers to build and deploy scalable decentralized applications (dApps) on Matic.
Key Features of Matic:
Scalability: Matic addresses the scalability limitations of Ethereum by utilizing sidechains and a modified version of the Plasma framework, enabling high throughput and low transaction fees.
Ethereum Compatibility: Matic is fully compatible with the Ethereum network, allowing seamless transfer of assets between Ethereum and Matic networks.
Developer-friendly: Matic provides tools, libraries, and APIs that enable developers to easily build and deploy dApps on the Matic network, leveraging their existing Ethereum development knowledge and tools.
Overall, Matic offers a scalable and user-friendly solution for Ethereum, enabling efficient and cost-effective transactions. By addressing the scalability challenges of Ethereum, Matic aims to foster wider adoption of blockchain technology and unlock its full potential for mainstream applications.
Setting up Metamask
Before you can purchase Matic on Metamask, you need to set up the Metamask wallet extension on your web browser. Here are the steps to get started:
- Open your preferred web browser and go to the Metamask website.
- Click on the “Get Chrome Extension” button if you are using Google Chrome, or “Get Firefox Extension” if you are using Mozilla Firefox.
- Once the extension is installed, you will see the Metamask icon in your browser’s toolbar.
- Click on the Metamask icon to open the extension.
- Click on the “Get Started” button.
- In the next step, read and accept the Terms of Service.
- Create a new wallet by entering a strong password that you can remember. Click on “Create” to proceed.
- You will be shown a series of 12 random words. Note down these words in the correct order as they will be used for wallet recovery in case you forget your password.
- Click on the words in the correct order to verify your backup phrase.
- Your Metamask wallet is now set up and ready to use.
Make sure to keep your password and backup phrase secure. With Metamask set up, you can now proceed to purchase Matic.
Installing Metamask
To purchase Matic on Metamask, you will need to have Metamask installed on your web browser. Metamask is a cryptocurrency wallet and browser extension that allows you to interact with decentralized applications (dApps) on the Ethereum network. Follow the steps below to install Metamask on your preferred web browser:
Step 1: Choose Your Web Browser
Metamask is compatible with various web browsers, including Chrome, Firefox, Brave, and Edge. Choose the web browser you prefer and open it on your device.
Step 2: Visit the Metamask Website
Open a new tab or window in your web browser and navigate to the official Metamask website. You can simply search for “Metamask” on your preferred search engine to find the website.
Step 3: Download and Install Metamask
On the Metamask website, you will find a “Download” or “Get Metamask” button. Click on this button to initiate the download process. Follow the prompts to complete the installation.
Step 4: Set Up Metamask
Once Metamask is installed, you will see the Metamask icon in your web browser’s toolbar. Click on the icon to launch the Metamask extension.
Follow the on-screen instructions to set up your Metamask wallet. This may include creating a new wallet, importing an existing wallet, or connecting a hardware wallet. Make sure to securely back up your wallet seed phrase, as it is crucial for wallet recovery.
After completing the setup process, you will be asked to create a password for your Metamask wallet. Choose a strong, unique password and remember it for future access to your wallet.
Congratulations! You have successfully installed Metamask on your web browser. You are now ready to purchase Matic using Metamask.
Creating an Account
In order to purchase Matic on Metamask, you will first need to create an account. Follow these steps to create a new account:
Step 1: Install Metamask
If you haven’t already, download and install the Metamask browser extension for your preferred web browser. Metamask is available for Chrome, Firefox, and Brave browsers.
Step 2: Launch Metamask
Once Metamask is installed, you can open it by clicking on the Metamask icon that appears in your browser’s toolbar. This will open a new window.
Step 3: Agree to Terms
When you open Metamask for the first time, you will be asked to agree to their terms of use. Read through the terms and, if you agree, click on the “Accept” button.
Step 4: Create a New Account
After accepting the terms, you will be prompted to create a new account. Choose a strong password and click on the “Create” button. Metamask will then generate a unique 12-word recovery phrase for your account. It is important to write down this phrase and keep it in a safe place, as it can be used to recover your account if you ever lose access to it.
Step 5: Confirm Recovery Phrase
Next, you will be asked to confirm your recovery phrase. Metamask will show you the words in a specific order, and you will need to rearrange them correctly. This is an important security feature to ensure that you have accurately recorded your recovery phrase. Once you have rearranged the words correctly, click on the “Confirm” button.
Step 6: Set a PIN
After confirming your recovery phrase, you will be prompted to set a PIN for quick access to your Metamask account. Choose a PIN that is easy for you to remember but difficult for others to guess. Once you have entered your PIN, click on the “Set PIN” button.
That’s it! You have successfully created a new account on Metamask. You can now proceed to the next steps to purchase Matic.
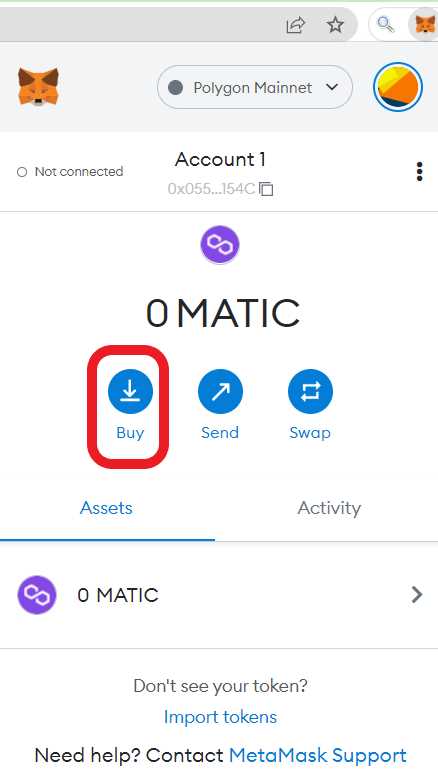
Funding your Metamask Account
When using Metamask to purchase Matic tokens, the first step is to fund your Metamask account. This will allow you to have enough funds to execute the transaction.
Here’s a step-by-step guide on how to fund your Metamask account:
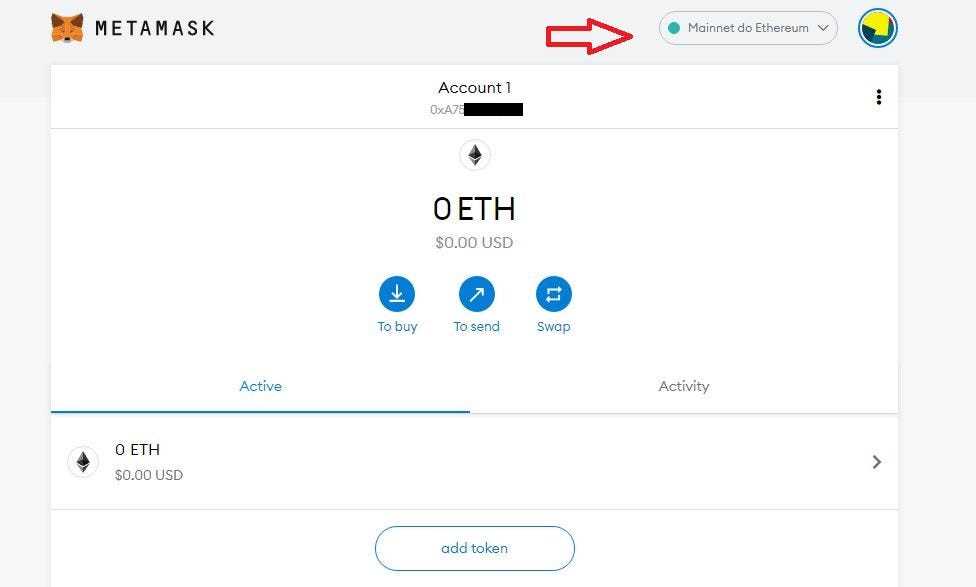
- Open the Metamask extension on your web browser.
- Login to your Metamask account using your credentials.
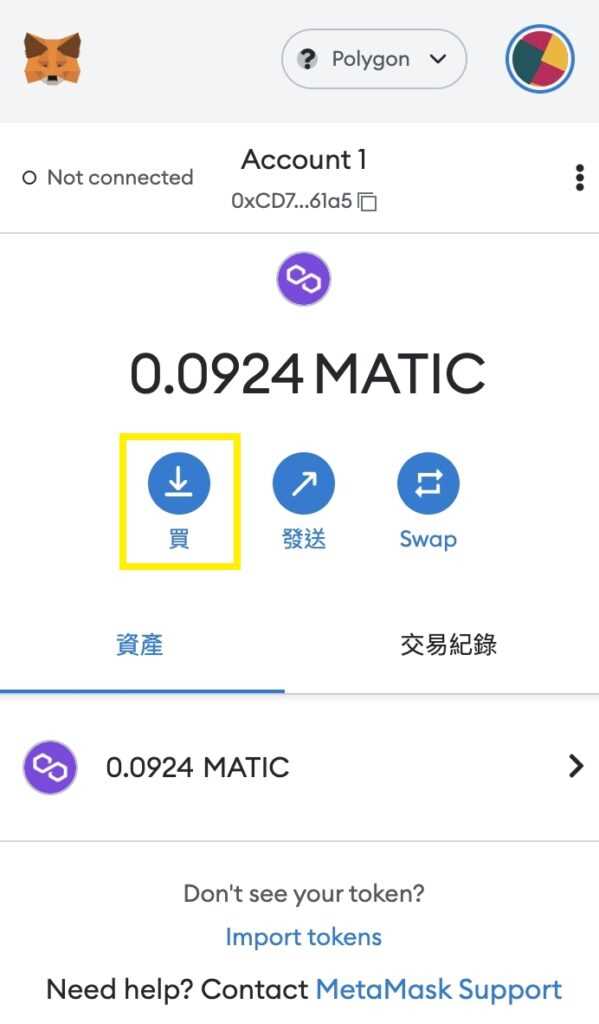
- Once logged in, click on the account icon at the top right corner of the extension.
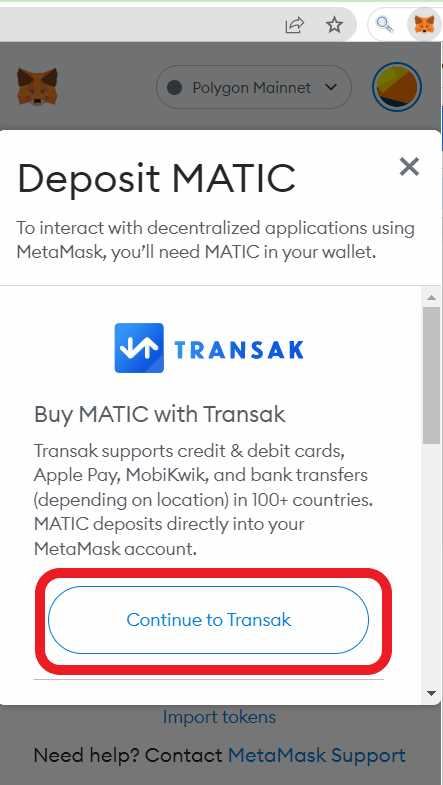
- From the dropdown menu, select “Deposit”.
- A screen will appear with your account address and a QR code.
You can choose to fund your Metamask account using either Ether (ETH) or another supported cryptocurrency. Here are the steps for each option:
Funding with Ether (ETH)
- Copy your account address shown on the screen.
- Open your preferred cryptocurrency exchange or wallet.
- Go to the “Send” or “Withdraw” section of your account.
- Paste your Metamask account address into the recipient field.
- Enter the amount of ETH you wish to send to your Metamask account.
- Verify all the details are correct and confirm the transaction.
Funding with another supported cryptocurrency
If you prefer to fund your Metamask account with a supported cryptocurrency other than ETH, follow these steps:
- Copy your account address shown on the screen.
- Open your preferred cryptocurrency exchange or wallet.
- Go to the “Send” or “Withdraw” section of your account.
- Select the supported cryptocurrency you want to use.
- Paste your Metamask account address into the recipient field.
- Enter the amount of the cryptocurrency you wish to send to your Metamask account.
- Verify all the details are correct and confirm the transaction.
Once you have successfully sent funds to your Metamask account, you will be ready to proceed with purchasing Matic tokens.
Purchasing Ether (ETH)
To purchase Matic on Metamask, you will first need to have Ethereum (ETH) in your wallet. If you don’t have any ETH, you will need to purchase some before you can proceed with buying Matic.
Step 1: Choose a Cryptocurrency Exchange
There are several cryptocurrency exchanges where you can purchase ETH, such as Coinbase, Binance, and Kraken. Choose a reputable exchange that supports your country and sign up for an account.
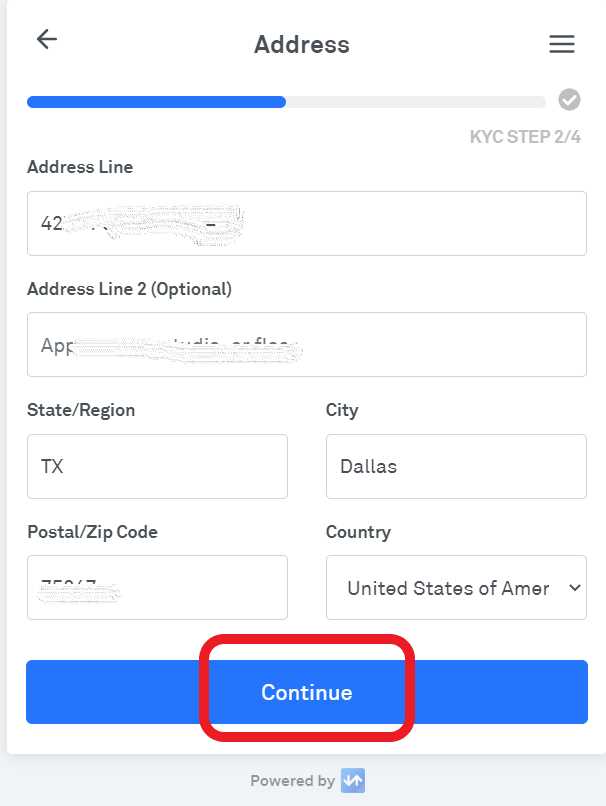
Step 2: Complete the Verification Process
Once you have created an account on the exchange, you may need to complete a verification process, which typically involves providing identification documents to comply with anti-money laundering (AML) and know your customer (KYC) regulations. This step may take some time, so be prepared to wait for approval.
Step 3: Deposit Fiat Currency or Another Cryptocurrency
After your account is verified, you will need to deposit fiat currency (such as USD, EUR, or GBP) or another cryptocurrency (such as Bitcoin or Litecoin) into your exchange account. Follow the instructions provided by the exchange to deposit funds.
Step 4: Purchase Ether (ETH)
Once you have funds in your exchange account, navigate to the trading platform and search for the ETH trading pair. For example, if you deposited USD, you would look for the ETH/USD trading pair.
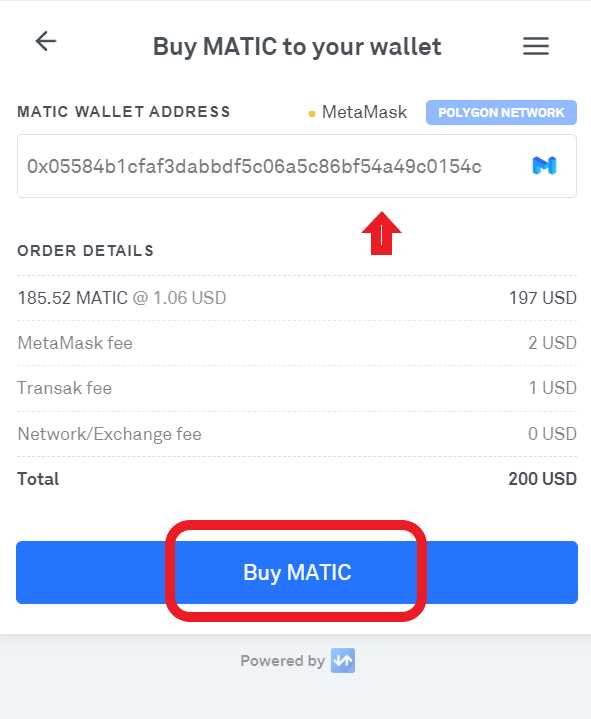
Choose the amount of ETH you would like to purchase and place a buy order. Review the details of your order, including the price and any associated fees, and confirm the purchase.
Step 5: Withdraw Ether (ETH) to Your Wallet
After your ETH purchase is completed, it’s important to withdraw the ETH to your personal wallet for security and control. Locate the “Withdraw” or “Send” function on the exchange and enter your wallet address.
Double-check that you have entered the correct wallet address, as cryptocurrency transactions are irreversible and sending funds to the wrong address could result in permanent loss of your assets.
Confirm the withdrawal and wait for the transaction to be processed. Once the ETH is successfully transferred to your wallet, you are ready to proceed with purchasing Matic on Metamask.
What is Metamask?
Metamask is a cryptocurrency wallet and browser extension that allows users to interact with decentralized applications (dApps) and manage their digital assets.
Why would I want to purchase Matic?
Purchasing Matic, also known as Polygon, can be beneficial as it is the native token of the Polygon network and can be used for various purposes such as paying for transaction fees, participating in network governance, and staking to earn rewards.