
Welcome to our comprehensive tutorial on how to import NFTs to Metamask like a pro. Non-Fungible Tokens (NFTs) have gained significant popularity in recent years, offering a unique way to represent ownership of digital assets. Metamask, on the other hand, is a widely used cryptocurrency wallet and decentralized application platform that allows users to securely manage their digital assets.
Importing NFTs to Metamask is a crucial skill for anyone looking to participate in the rapidly growing world of digital collectibles and art. By importing NFTs to Metamask, you can easily view, trade, and interact with your digital assets in a secure and user-friendly manner. Whether you’re a seasoned NFT collector or a newbie exploring this exciting new space, this tutorial will guide you through the process step by step.
In this tutorial, we will cover everything you need to know to successfully import your NFTs to Metamask. We will start with the basics, explaining what NFTs are and how they work. We will then walk you through the process of creating a Metamask wallet, connecting it to popular NFT marketplaces, and finally importing your NFTs securely. By the end of this tutorial, you will have the skills and knowledge to confidently manage your NFTs in Metamask.
So, let’s dive in and master the art of importing NFTs to Metamask together!
Mastering the Art of Importing NFTs to Metamask
Importing NFTs into your Metamask wallet allows you to manage, trade, and interact with your non-fungible tokens directly from your wallet. This comprehensive tutorial will guide you through the process of importing NFTs to Metamask and ensure you have a seamless experience in the world of digital collectibles.
What is Metamask?
Metamask is a browser extension and cryptocurrency wallet that enables users to interact with decentralized applications (DApps) on the Ethereum blockchain. It provides a user-friendly interface and serves as a secure wallet to store and manage your Ethereum and ERC-20 tokens.
Why Import NFTs to Metamask?
Importing NFTs to Metamask consolidates your digital assets in one place, making it easier to keep track of and trade them. It also allows you to conveniently showcase your NFT collection and interact with various DApps that support Metamask integration.
Here are the steps to import NFTs to Metamask:
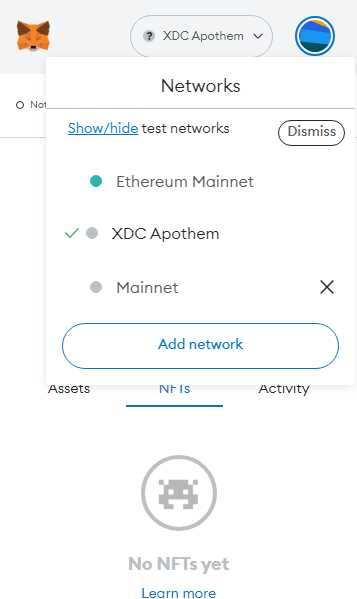
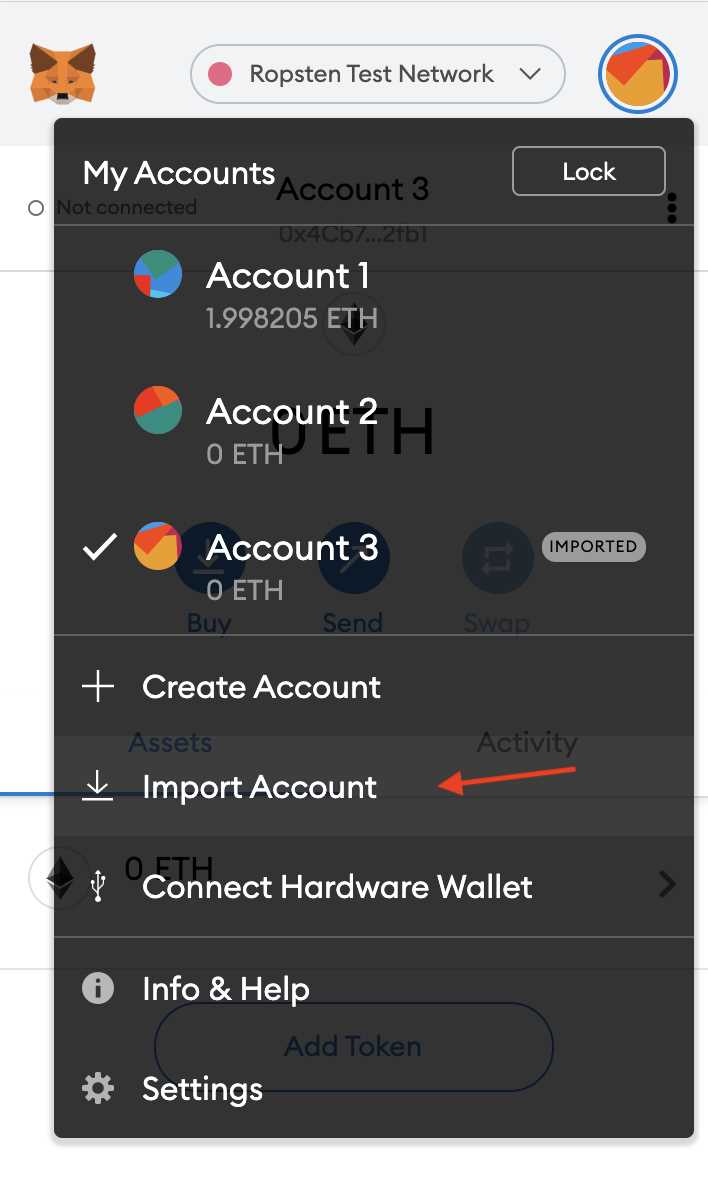
- Open your Metamask wallet and click on the account icon at the top right corner.
- Select “Import Account” from the drop-down menu.
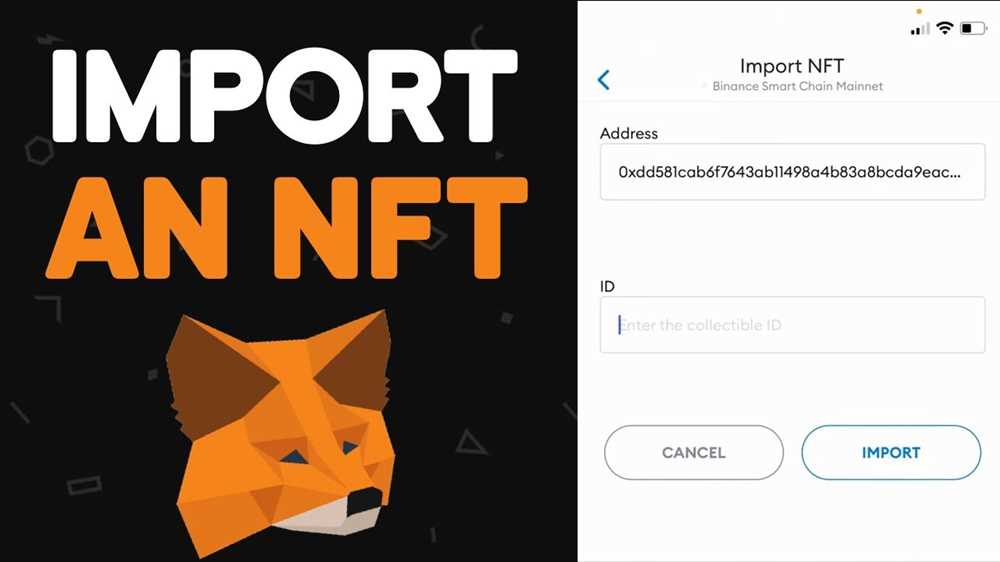
- Choose the option to import an NFT.
- Enter the contract address of the NFT you want to import.
- Metamask will automatically detect the NFT and fetch its metadata, including the name and image.
- Review the details and click on “Import” to complete the process.
Once imported, you can view and manage your NFTs by navigating to the “Assets” tab in your Metamask wallet. You can also connect your wallet to various NFT marketplaces and platforms to buy, sell, and trade your digital collectibles seamlessly.
Remember to exercise caution and be mindful of the contract addresses you import, ensuring their authenticity and legitimacy. Importing NFTs to Metamask opens up a world of opportunities, but it is crucial to stay vigilant and protect your digital assets.
Now that you have mastered the art of importing NFTs to Metamask, you can take full advantage of the decentralized ecosystem and explore the vibrant world of digital collectibles.
A Comprehensive Tutorial
Welcome to our comprehensive tutorial on importing NFTs to Metamask! In this guide, we will walk you through the step-by-step process of importing NFTs to your Metamask wallet. By the end of this tutorial, you will have a clear understanding of how to import your favorite non-fungible tokens to Metamask and view them in your wallet.
1. Install Metamask
If you don’t have Metamask installed already, the first step is to install it on your browser. Metamask is a popular cryptocurrency wallet that allows you to interact with decentralized applications (dApps) and store your digital assets securely. You can download Metamask from the official website and install it on Chrome, Firefox, or Brave browsers.
2. Create or Import a Wallet
Once you have installed Metamask, the next step is to create a new wallet or import an existing one. If you already have a Metamask wallet, you can simply import it by using your wallet’s seed phrase. If you don’t have a wallet yet, you can create a new one by following the instructions provided by Metamask. Make sure to back up your wallet’s seed phrase in a safe place.
3. Connect Metamask to the App or Platform
After setting up your wallet, you need to connect Metamask to the app or platform where you want to import the NFT. This can be a marketplace, a blockchain game, or any other platform that supports Metamask integration. To connect Metamask, simply click on the Metamask icon in your browser toolbar, log in to your wallet if you aren’t already, and follow the instructions provided by the app or platform.
4. Importing NFTs to Metamask
Once you have connected Metamask to the app or platform, you can start importing your NFTs. The process may vary slightly depending on the platform, but generally, you will need to navigate to the section or tab where your NFTs are stored or listed. Look for an option to import or transfer your NFTs to your Metamask wallet. Follow the instructions provided on the platform to complete the import process.
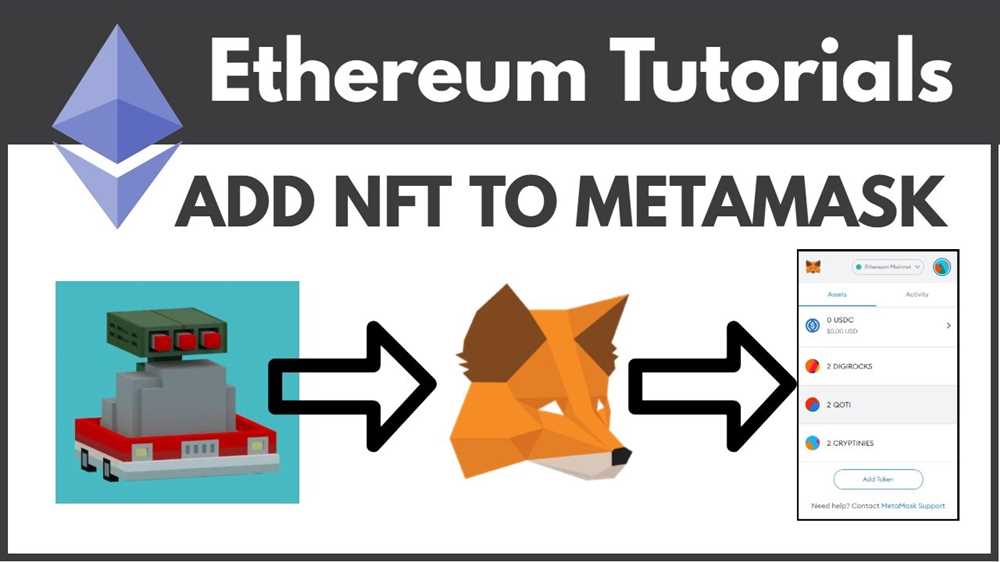
5. Viewing Imported NFTs in Metamask

After successfully importing your NFTs, you can view them in your Metamask wallet. To do this, click on the Metamask icon in your browser toolbar and log in to your wallet if you aren’t already. Once logged in, you should see a section dedicated to your NFTs or assets. Click on this section to view your imported NFTs and explore their details, such as their name, image, and other metadata.
That’s it! You have now completed our comprehensive tutorial on importing NFTs to Metamask. We hope this tutorial has been helpful in guiding you through the process of importing and viewing your favorite non-fungible tokens in your Metamask wallet. Enjoy exploring the world of NFTs and decentralized applications!
| Section | Description |
|---|---|
| 1. Install Metamask | Learn how to install Metamask on your browser. |
| 2. Create or Import a Wallet | Discover how to create a new wallet or import an existing one on Metamask. |
| 3. Connect Metamask to the App or Platform | Find out how to connect Metamask to the app or platform where you want to import NFTs from. |
| 4. Importing NFTs to Metamask | Learn the steps to import your NFTs to Metamask from a platform or app. |
| 5. Viewing Imported NFTs in Metamask | Understand how to view the NFTs you have imported in your Metamask wallet. |
Understanding NFTs
NFTs, or Non-Fungible Tokens, have gained significant popularity in recent years due to their uniqueness and scarcity. Unlike cryptocurrencies such as Bitcoin or Ethereum, which are fungible and can be exchanged on a like-for-like basis, NFTs represent a specific digital asset, making them indivisible and unique.
What are NFTs?
NFTs are digital tokens that represent ownership or proof of existence of a unique item or piece of content, such as artwork, music, videos, virtual real estate, or even collectibles. Each NFT is stored on a blockchain and contains metadata that provides information about the item it represents.
While NFTs can be bought and sold like any other asset, what sets them apart is the ability to prove ownership and authenticity in a transparent and immutable manner. With each transfer recorded on the blockchain, the history and ownership of an NFT can be easily traced.
How do NFTs work?
NFTs are typically created using smart contracts on blockchain platforms like Ethereum. Each NFT is minted with a unique identifier, which ensures that it cannot be duplicated or copied. The smart contract also includes details about the item, such as its description, creator, and any additional properties or attributes.
Once created, NFTs can be bought, sold, and traded on various online marketplaces or platforms that support the specific blockchain on which they were created. Anyone with the necessary wallet, such as MetaMask, can participate in the NFT ecosystem by purchasing or minting their own NFTs.
It’s important to note that while owning an NFT grants you ownership rights over a specific digital asset, it does not necessarily grant you copyright or reproduction rights. These rights are typically held by the creator or original rights holder of the item.
Benefits and Challenges of NFTs
NFTs offer several benefits, such as providing artists and creators with new opportunities to monetize their digital creations and allowing collectors to prove ownership and support their favorite artists. Additionally, NFTs enable fractional ownership, allowing multiple individuals to co-own a single item.
However, NFTs also face challenges, including environmental concerns due to the energy-intensive nature of blockchain networks and potential issues with copyright infringement or intellectual property disputes. As the NFT ecosystem continues to evolve, it is crucial to address these challenges and ensure the responsible and sustainable growth of the technology.
- NFTs represent ownership or proof of existence of unique digital items or content.
- They are created using smart contracts on blockchain platforms.
- NFTs can be bought, sold, and traded on various online marketplaces.
- Owning an NFT grants ownership rights, but not necessarily copyright or reproduction rights.
- NFTs offer benefits such as new monetization opportunities and fractional ownership.
- Challenges include environmental concerns and intellectual property issues.
Overall, NFTs have revolutionized the way we think about digital ownership and have opened up exciting possibilities in the world of art, collectibles, and digital assets. Understanding how NFTs work and the implications they have is essential for anyone looking to participate in this growing ecosystem.
A Beginner’s Guide
If you’re new to the world of NFTs and importing them to your Metamask wallet, this comprehensive tutorial will guide you through the process step by step. Whether you’re an artist looking to sell your digital artwork or a collector interested in owning unique digital assets, importing NFTs to Metamask is an essential skill to learn.
What is an NFT?
An NFT, or Non-Fungible Token, is a unique digital asset that runs on blockchain technology. Unlike cryptocurrencies such as Bitcoin or Ethereum, which are fungible and can be exchanged on a one-to-one basis, NFTs are indivisible and cannot be exchanged on a like-for-like basis. This uniqueness makes NFTs ideal for representing ownership of digital artwork, music, virtual real estate, and other digital assets.
Why use Metamask?
Metamask is a popular cryptocurrency wallet and gateway to the decentralized web. It allows users to securely store, manage, and use their digital assets, including Ethereum-based NFTs. By importing NFTs to Metamask, you can easily access and interact with your collectibles and participate in the growing NFT marketplace.
Importing NFTs to Metamask involves a few simple steps, which we will outline in this tutorial. By the end, you’ll be able to confidently import NFTs and start building your digital collection.
- Install Metamask: First, you need to install the Metamask extension for your preferred web browser. Visit the Metamask website, follow the instructions to set up your account, and create a new wallet.
- Secure your wallet: Once you have created a wallet, ensure that you set up strong security measures. This includes enabling two-factor authentication, setting a strong password, and storing your recovery phrase in a safe place.
- Get some Ether (ETH): NFT transactions on Ethereum require the use of Ether, the native cryptocurrency of the Ethereum blockchain. You’ll need to purchase or acquire some Ether to cover transaction fees and to buy or sell NFTs.
- Connect Metamask to a marketplace: To import NFTs, you’ll need to connect your Metamask wallet to a marketplace or platform that supports NFTs. Some popular options include OpenSea, Rarible, and SuperRare. Follow the instructions on the respective marketplace to connect your wallet.
- Import your NFT: Once your Metamask wallet is connected to a marketplace, navigate to the “My Collections” or “My Wallet” section. Look for the option to import or add an NFT and follow the instructions. This typically involves entering the contract address of the NFT and confirming the import.
- View and manage your imported NFTs: After importing an NFT to your Metamask wallet, you’ll be able to view and manage it within the wallet interface. You can transfer, buy, sell, or interact with your NFT as desired.
With this beginner’s guide, you now have the knowledge to start importing NFTs to your Metamask wallet. Remember to do thorough research on NFT projects and marketplaces before investing or participating in the NFT space. Happy collecting!
Setting up Metamask
Metamask is a popular cryptocurrency wallet and browser extension that allows users to securely manage their Ethereum wallets and interact with decentralized applications (dApps). In order to import NFTs to Metamask, you’ll first need to set it up and connect it to your browser.
To begin, follow these steps:
Step 1: Install the Metamask extension by visiting the official Metamask website or searching for “Metamask” in the browser extension store.
Step 2: Once installed, click on the Metamask icon in your browser toolbar to open the extension.
Step 3: If you already have an Ethereum wallet, click on the “Import Wallet” option. If not, click on “Create a Wallet” to set up a new one.
Step 4: Follow the on-screen instructions to import an existing wallet or create a new one. Make sure to securely store your seed phrase, as it is required for wallet recovery.
Step 5: Once your wallet is set up, you will be prompted to create a password and confirm it. Choose a strong password that you can remember, but that is also difficult for others to guess.
Step 6: After setting up your password, you will be able to access your Metamask wallet, view your Ethereum address, and manage your funds.
Note: It is important to keep your Metamask wallet secure by enabling two-factor authentication and regularly updating your password.
Now that you’ve set up Metamask, you’re ready to start importing NFTs and exploring the world of digital art and collectibles!
Step-by-Step Instructions
Follow these step-by-step instructions to learn how to import NFTs to Metamask:
- Open the Metamask extension in your browser.
- Click on the account icon in the top right corner and select “Import Account”.
- Choose the “Import using Secret Recovery Phrase” option.
- Enter your Secret Recovery Phrase and set a strong password.
- Click on “Import” to import your account.
- Now, click on the account icon again and select “Add Token”.
- Select the “Custom Token” tab.
- Enter the contract address, token symbol, and decimals for the NFT you want to import.
- Click on “Next” and then “Add Tokens” to add the NFT to your Metamask wallet.
- You can now see your imported NFTs in your Metamask wallet under the “Assets” tab.
By following these simple instructions, you will be able to easily import your desired NFTs to your Metamask wallet and manage them with ease.
What is Metamask?
Metamask is a cryptocurrency wallet that allows users to store, manage, and interact with their digital assets, including non-fungible tokens (NFTs).
How can I import NFTs to Metamask?
You can import NFTs to Metamask by following a comprehensive tutorial, such as “Mastering the Art of Importing NFTs to Metamask”. This tutorial will guide you through the process step-by-step.
Is it difficult to import NFTs to Metamask?
It can be a bit challenging for beginners, but with the right guidance and tutorial, such as “Mastering the Art of Importing NFTs to Metamask”, it becomes much easier.
What are the benefits of importing NFTs to Metamask?
Importing NFTs to Metamask allows you to have complete control and ownership of your digital assets. It also provides a convenient way to manage and interact with your NFTs within the Metamask wallet.
Can I use Metamask to import NFTs from any blockchain?
Metamask supports the Ethereum blockchain, so you can import NFTs from any Ethereum-based blockchain, such as Ethereum itself, Binance Smart Chain, or Polygon.