
Welcome to our step-by-step tutorial on setting up and using the USDT contract address in Metamask! Whether you’re new to blockchain technology or an experienced investor, this guide will walk you through the process of integrating USDT into your Metamask wallet.
USDT, also known as Tether, is a stablecoin that is pegged to the US Dollar. It is a widely used cryptocurrency for trading, investing, and making payments in decentralized applications. By setting up the USDT contract address in your Metamask wallet, you will be able to store, send, and receive USDT tokens with ease, all within the familiar and secure environment of Metamask.
In this tutorial, we will cover all the necessary steps to get you started. We will begin by explaining how to install the Metamask wallet browser extension and create a new wallet if you don’t already have one. Next, we’ll guide you through the process of adding the USDT token to your Metamask wallet by entering the contract address. Finally, we will demonstrate how to send and receive USDT tokens using Metamask, ensuring you have the knowledge to fully utilize this powerful feature.
This tutorial assumes that you have some basic knowledge of cryptocurrencies and how to use Metamask. If you’re new to either of these topics, don’t worry! We will provide explanations and tips along the way to make sure you have a smooth and successful experience setting up and using the USDT contract address in Metamask. So let’s get started!
Overview of USDT Contract
USDT (Tether) is a cryptocurrency that is pegged to the value of a specific fiat currency, typically the US dollar. It is often used as a stablecoin, providing stability in an otherwise volatile crypto market. The USDT contract serves as the backbone for the creation and management of USDT tokens.
The USDT contract is built on the Ethereum blockchain and is implemented using the ERC-20 standard. This means that it follows a set of rules and specifications that allow it to be compatible with other ERC-20 tokens, making it easy to integrate and use within the Ethereum ecosystem.
The USDT contract address is a unique identifier for the USDT contract on the Ethereum blockchain. It is a hexadecimal string that points to the location of the contract within the blockchain. This address is required when interacting with the USDT contract, such as when sending or receiving USDT tokens or accessing contract-specific functions.
By setting up and using the USDT contract address in Metamask, users can easily manage their USDT tokens directly from their Metamask wallet. This allows for seamless integration and access to the USDT ecosystem, providing a convenient and secure way to transact with USDT.
Overall, the USDT contract plays a crucial role in the functionality and value of the USDT token. It ensures that each USDT token is backed by an equivalent amount of fiat currency, providing stability and trust to users in the crypto market.
Step 1: Installing Metamask Extension
In order to use the USDT contract address in Metamask, you first need to install the Metamask extension on your browser. Follow these steps to install Metamask:
- Open your browser and go to the Metamask website. You can find the website by doing a quick search on your preferred search engine.
- On the Metamask website, click on the “Get Chrome Extension” or “Get Firefox Extension” button, depending on the browser you are using.
- After clicking the button, you will be redirected to the respective browser’s extension store. Click on the “Add to Chrome” or “Add to Firefox” button to begin the installation process.
- A confirmation dialog will appear. Click on “Add extension” to confirm the installation.
- Once the extension is installed, a new icon will appear on the top right corner of your browser, representing the Metamask wallet.
Congratulations! You have successfully installed the Metamask extension on your browser. Now you can move on to the next steps of setting up and using the USDT contract address.
Step 2: Adding USDT Contract to Metamask
After successfully installing and setting up Metamask, the next step is to add the USDT contract address to your wallet. Here’s how:
1. Open Metamask
Open the Metamask extension on your browser. Make sure you are logged in and your wallet is connected.
2. Click on the Network Selection Dropdown
In the top center of the Metamask extension, you will see a dropdown menu where you can select the network. Click on it to open the dropdown options.
3. Select Custom RPC
In the dropdown options, select “Custom RPC” to add a custom network.
4. Fill in the Network Details
A form will appear where you can fill in the details of the custom network. Here’s what you need to enter:
- Network Name: Enter a name for the network (e.g., USDT Contract).
- New RPC URL: Enter the RPC URL for the network you want to connect to. This will typically be provided by the USDT contract provider or developer.
- Chain ID: Enter the chain ID for the network. This is a unique identifier assigned to each Ethereum network. The chain ID for the USDT contract may also be provided by the contract provider or developer.
- Symbol (optional): You can enter a symbol for the network if you want. This is an optional field.
- Block Explorer URL (optional): You can enter the block explorer URL for the network if you want. This is also an optional field.
5. Save the Network
After entering the network details, click on the “Save” button to save the network. The custom network will now appear in the network selection dropdown.
6. Switch to the Custom Network
Click on the network selection dropdown again and select the custom network you just added (e.g., USDT Contract). Metamask will switch to the selected network.
7. Add USDT Contract Address
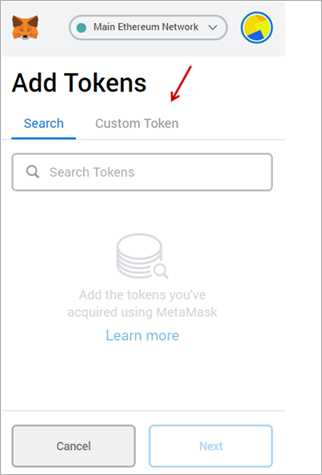
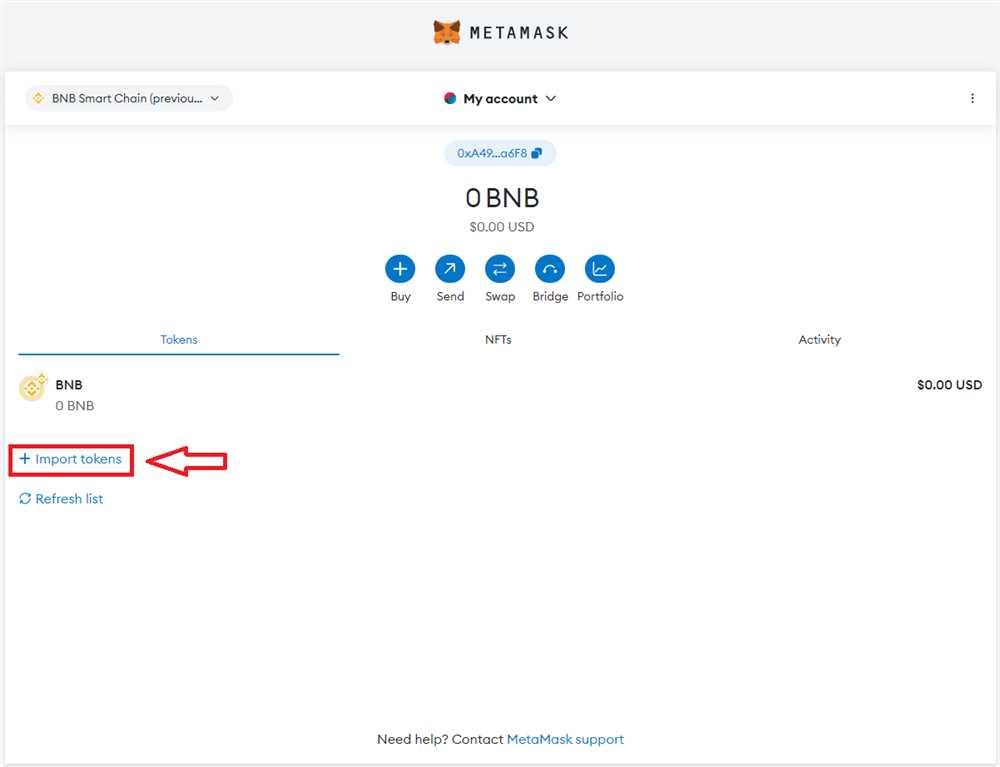
Once you are on the custom network, click on the menu icon (three horizontal lines) on the top left corner of the Metamask extension. From the menu, select “Add Token”.
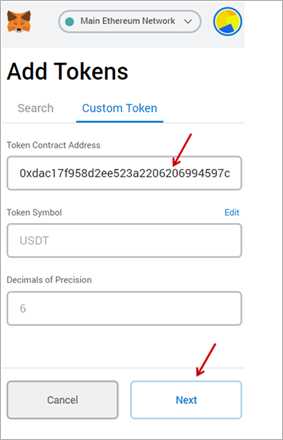
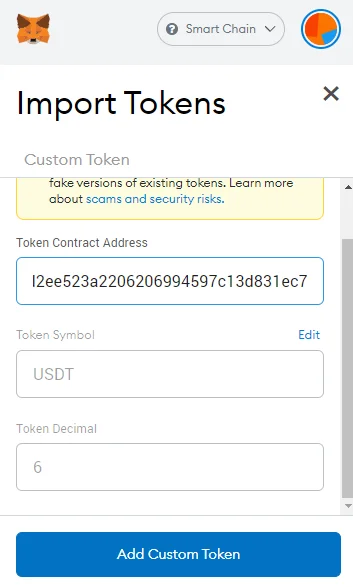
A form will appear where you can add the USDT contract address. Here’s what you need to enter:
- Token Contract Address: Enter the USDT contract address. This address is typically provided by the USDT token provider.
- Token Symbol (optional): You can enter a symbol for the USDT token if you want. This is an optional field.
- Decimals of Precision: Enter the number of decimals of precision for the USDT token. This information can also be obtained from the USDT token provider.
After entering the contract address details, click on the “Next” button.
8. Confirm and Add Token
A confirmation screen will appear showing the USDT token details. Review the information and click on the “Add Tokens” button to add the USDT token to your Metamask wallet.
That’s it! You have successfully added the USDT contract to Metamask and can now view and manage your USDT tokens in your wallet.
Step 3: Using USDT Contract in Metamask
Once you have successfully added the USDT contract address to your Metamask wallet, you can start using it. Here are the steps to use the USDT contract in Metamask:
Step 3.1: Selecting the USDT Contract
- Open the Metamask extension.
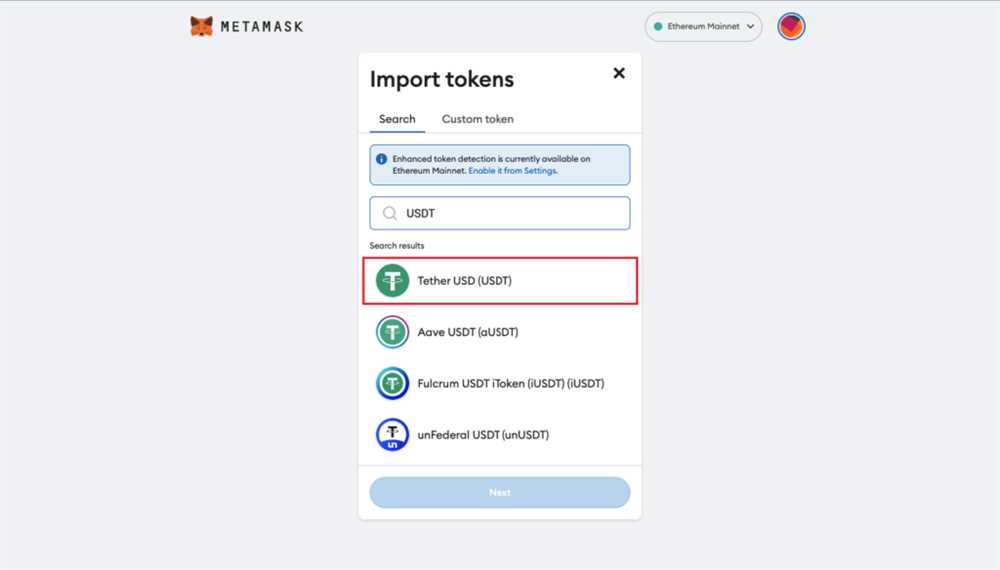
- Click on the three dots icon (More Options) and select “Add Token” from the dropdown menu.
- In the “Token Contract Address” field, paste the USDT contract address that you previously added.
- Click on “Next” and then on “Add Tokens” to finalize the process of adding the USDT contract to your wallet.
Step 3.2: Sending and Receiving USDT
Now that you have added the USDT contract to your wallet, you can easily send and receive USDT tokens. Here’s how:
- To send USDT tokens, click on the “Send” button in the Metamask extension.
- Enter the recipient’s address, the amount of USDT tokens you want to send, and any optional message.
- Click on “Next” and then on “Confirm” to complete the transaction.
- To receive USDT tokens, simply provide your wallet address to the sender.
Remember that you will need to have enough ETH in your wallet to cover the transaction fees when sending or receiving USDT tokens.
Step 3.3: Viewing USDT Balance
To view your USDT token balance, follow these steps:
- Open the Metamask extension.
- Click on the account icon in the top right corner.
- Select the wallet that you added the USDT contract to.
- Under the “Assets” section, you will see your USDT balance.
That’s it! You can now use the USDT contract address in Metamask to send, receive, and view your USDT tokens.
What is USDT?
USDT, or Tether, is a stablecoin that is pegged to the value of the US dollar. It is used as a digital representation of the dollar and is popular for its stability and liquidity.
What is Metamask?
Metamask is a digital wallet and browser extension that allows users to interact with decentralized applications on the Ethereum blockchain. It provides a secure and user-friendly way to manage Ethereum-based assets and interact with smart contracts.
Why would I want to set up a USDT contract address in Metamask?
Setting up a USDT contract address in Metamask allows you to easily send and receive USDT tokens within the wallet interface. It provides a convenient way to manage your USDT holdings and interact with DeFi protocols and applications that use USDT.
How do I set up a USDT contract address in Metamask?
To set up a USDT contract address in Metamask, you need to add the USDT token to your wallet by adding the USDT contract address and token symbol manually. This can be done by navigating to the “Add Token” section in Metamask, entering the USDT contract address and token details, and confirming the addition. Once added, you will be able to send and receive USDT tokens directly from your Metamask wallet.