
Welcome to the world of cryptocurrency and blockchain technology! If you’re new to the game, you may be wondering how to get started with Metamask and its networks list. Fear not, for we have the ultimate step-by-step guide to help you navigate through this powerful tool.
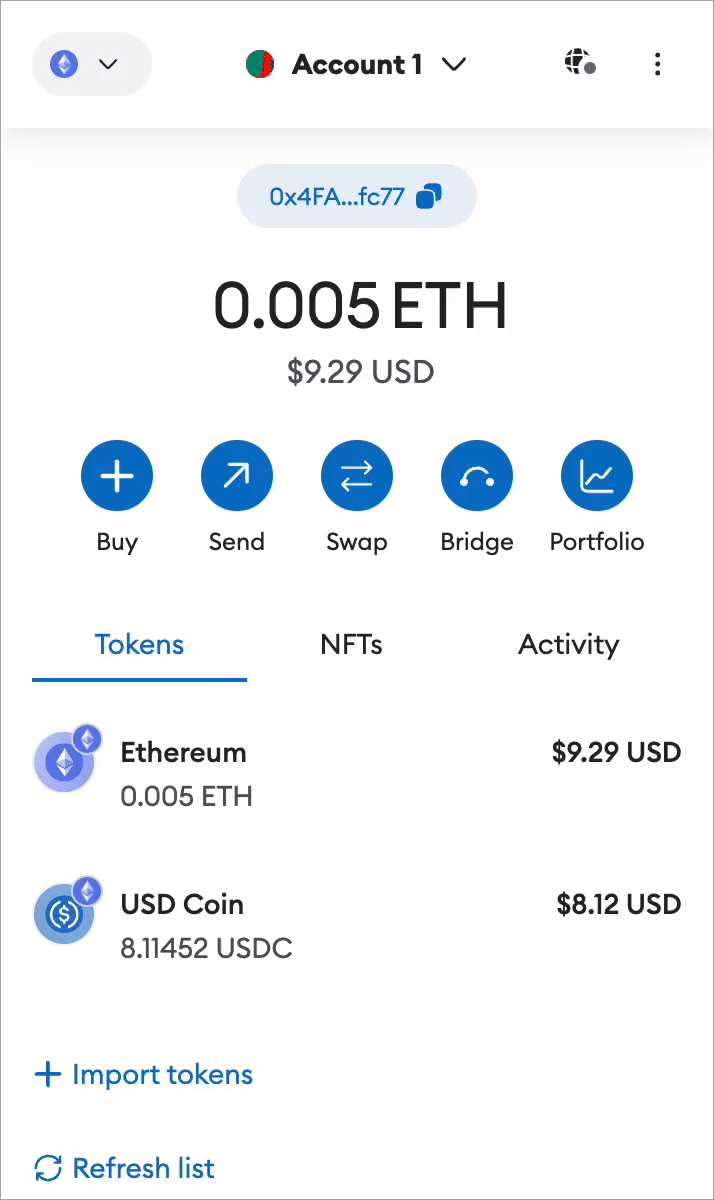
Metamask is a browser extension that allows you to interact with decentralized applications (dApps) on the Ethereum network. It serves as a digital wallet, giving you the ability to securely store, send, and receive Ethereum and other ERC-20 tokens. With Metamask, you can access a wide range of dApps for purposes such as trading, lending, gaming, and more!
One of the key features of Metamask is the networks list, which allows you to connect to various Ethereum networks, including the mainnet, testnets, and custom networks. Each network has its own unique features and purposes. Understanding how to master the networks list is essential for navigating the world of decentralized finance (DeFi) and blockchain development.
In this step-by-step guide, we will walk you through the process of adding and switching between networks in Metamask. We will explore the different types of networks available and explain when and why you might want to switch between them. By the end, you will have the knowledge and confidence to fully utilize the networks list in Metamask.
Understanding Metamask Networks: Exploring the Basics
Metamask is a popular browser extension that allows users to interact with decentralized applications (dApps) on the Ethereum blockchain. One of the key features of Metamask is the ability to connect to different networks or test networks. In this article, we will explore the basics of Metamask networks and how to use them effectively.
What are Metamask Networks?
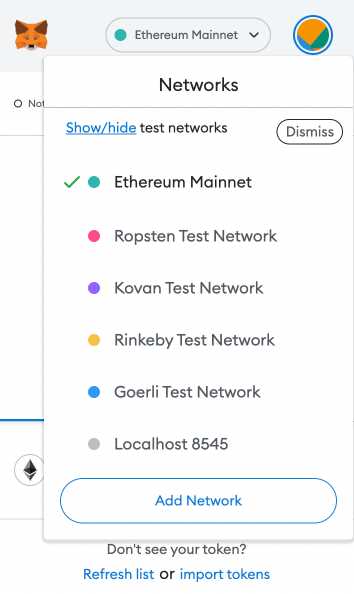
Metamask networks are different instances of the Ethereum blockchain that you can connect to using the Metamask extension. Each network has its own unique features and characteristics. The default network in Metamask is the Ethereum Mainnet, which is the production-ready network. However, there are several other networks available for testing and development purposes.
Types of Metamask Networks
Metamask supports various types of networks, including the following:
-
Ethereum Mainnet: This is the main network that runs the Ethereum blockchain. It is used for real transactions and has real economic value.
-
Ropsten Testnet: This is a test network that is designed to mimic the Ethereum Mainnet. It is used for testing and development purposes without the need for real Ether.
-
Kovan Testnet: This is another test network that is widely used for testing Ethereum applications. It is similar to Ropsten Testnet but has its own distinct features.
-
Rinkeby Testnet: This test network is used for testing smart contracts and decentralized applications. It has a faucet system that allows users to obtain test Ether for testing purposes.
-
Localhost 8545: This network is used for local development and testing. It connects to a locally running Ethereum node on your machine.
By default, Metamask comes preconfigured with the Ethereum Mainnet and the Ropsten Testnet. However, you can also add custom networks if needed.
Switching Networks in Metamask
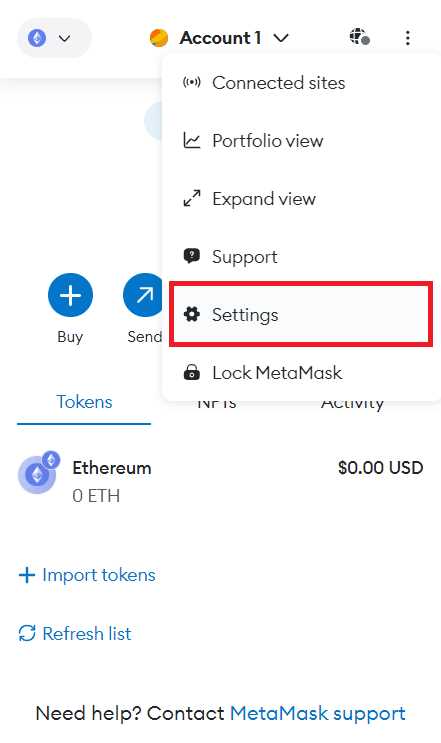
To switch networks in Metamask, you need to follow these steps:
-
Click on the Metamask extension in your browser.
-
In the Metamask popup, click on the network dropdown menu.
-
Select the desired network from the list.
-
Metamask will prompt you to confirm the network switch.
-
Once confirmed, you will be connected to the selected network.
It’s important to note that when switching networks, your account balance and transaction history will be specific to the chosen network. Make sure to switch back to the Ethereum Mainnet if you want to view your actual account balance and transaction history.
In conclusion, understanding Metamask networks is crucial for effectively using this powerful browser extension. By exploring and utilizing different networks, you can test and develop decentralized applications without risking real Ether on the Ethereum Mainnet. Remember to switch networks wisely and use the appropriate network for the intended purpose.
Getting Started: Setting Up and Configuring Your Metamask Wallet
Welcome to the world of decentralized finance! In order to interact with various decentralized applications (DApps) on blockchain networks, you’ll need to set up and configure your Metamask wallet. Here’s a step-by-step guide to get you started:
Step 1: Install the Metamask Extension
The first step is to install the Metamask extension in your web browser. Metamask supports popular web browsers like Chrome, Firefox, and Brave. Simply go to the extension store of your chosen web browser and search for “Metamask”. Click on the “Add to Chrome” (or your respective browser) button to install the extension.
Step 2: Create a New Wallet
Once the extension is installed, click on the Metamask icon in your browser’s toolbar and follow the instructions to create a new wallet. Make sure to set a strong password and securely back up your seed phrase. This seed phrase will be used to restore your wallet in case you forget your password or switch devices.
Step 3: Connect to a Network
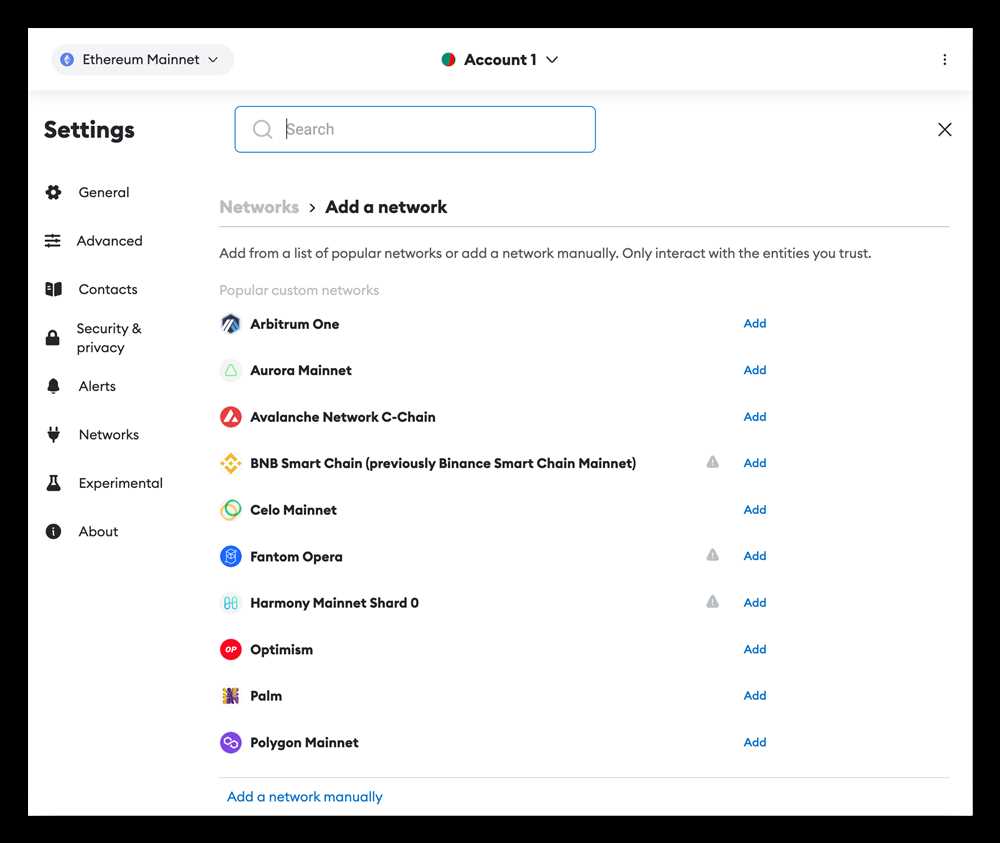
After creating your wallet, Metamask will automatically connect to the Ethereum main network. However, to interact with other blockchain networks, you’ll need to configure Metamask accordingly. Click on the network name at the top of the Metamask window and select “Custom RPC” to add a new network. Enter the network’s details, such as the URL and chain ID, and click “Save”. You can now switch networks by selecting the desired network from this dropdown.
Note: Be cautious when switching networks, as each network has its own tokens and contracts. Make sure you’re using the correct network to avoid any loss of funds or unintended transactions.
Step 4: Import or Transfer Funds
Your Metamask wallet is now set up, but it’s empty. You’ll need to import or transfer funds to start using decentralized applications. If you already have cryptocurrency in another wallet or exchange, you can import it into Metamask by clicking on the account icon in the Metamask window, selecting “Import Account”, and following the instructions.
If you don’t have any cryptocurrency yet, you can purchase some on popular exchanges like Coinbase or Binance. Once you have cryptocurrency in your exchange account, you can transfer it to your Metamask wallet by copying your wallet’s address and initiating a withdrawal from the exchange.
That’s it! You’re now ready to explore the world of decentralized finance and interact with various DApps using your Metamask wallet. Remember to always double-check the network you’re connected to and be cautious when transacting with your funds.
What is Metamask?
Metamask is a popular Ethereum wallet that allows users to store, manage, and interact with their cryptocurrencies and decentralized applications.
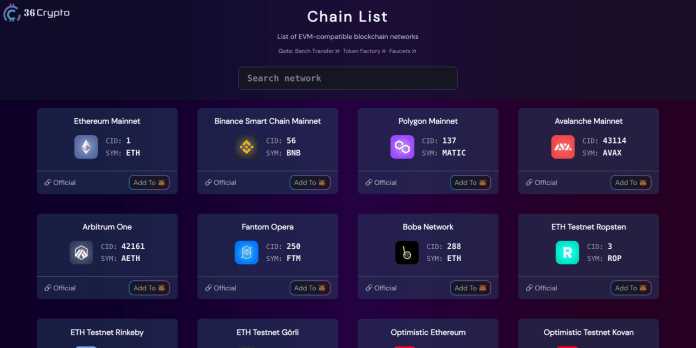
How can I add a custom network in Metamask?
To add a custom network in Metamask, follow these steps: 1. Open Metamask and click on the network dropdown. 2. Click on “Custom RPC”. 3. Fill in the network details such as the network name, RPC URL, and chain ID. 4. Click on “Save” to add the custom network.
Why would I need to use a custom network in Metamask?
Using a custom network in Metamask allows you to connect to networks other than the main Ethereum network. This can be useful for testing purposes, accessing decentralized applications on other networks, or interacting with specific blockchain projects.
What are the important parameters when adding a custom network in Metamask?
When adding a custom network in Metamask, you need to provide the following parameters: 1. Network name: a descriptive name for the network. 2. RPC URL: the URL of the custom network’s JSON-RPC endpoint. 3. Chain ID: the unique identifier for the network. 4. Symbol: the symbol or ticker of the network’s native currency. 5. Block explorer URL: the URL of the block explorer for the custom network.