
Metamask is a popular Ethereum wallet that allows users to interact with decentralized applications (dApps) on the Ethereum blockchain. By default, Metamask connects to the Ethereum mainnet, but it also supports custom RPC (Remote Procedure Call) networks. In this step-by-step guide, we will show you how to create a custom RPC in Metamask, so you can connect to your own private network or testnet.
The first step is to open the Metamask extension in your browser. If you haven’t installed Metamask yet, you can find it in the Chrome Web Store or Firefox Add-ons. Once you have it installed, click on the Metamask icon in your browser’s toolbar to open the extension.
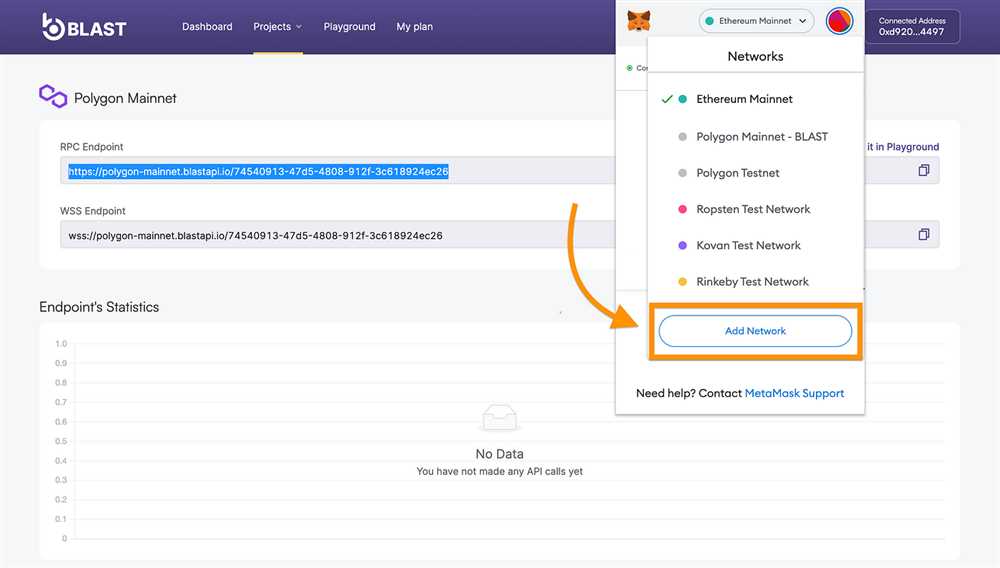
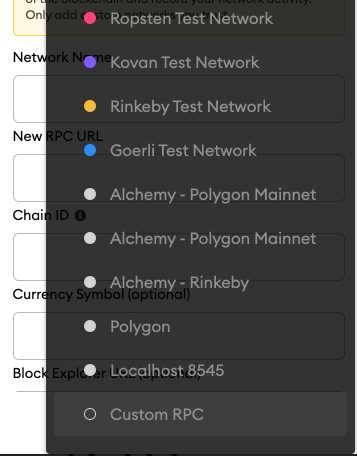
Once the Metamask interface is open, click on the network dropdown menu at the top of the screen. This will display a list of available networks, including the Ethereum mainnet and other popular testnets like Ropsten and Rinkeby. To create a custom RPC, scroll down to the bottom of the list and click on the “Custom RPC” option.
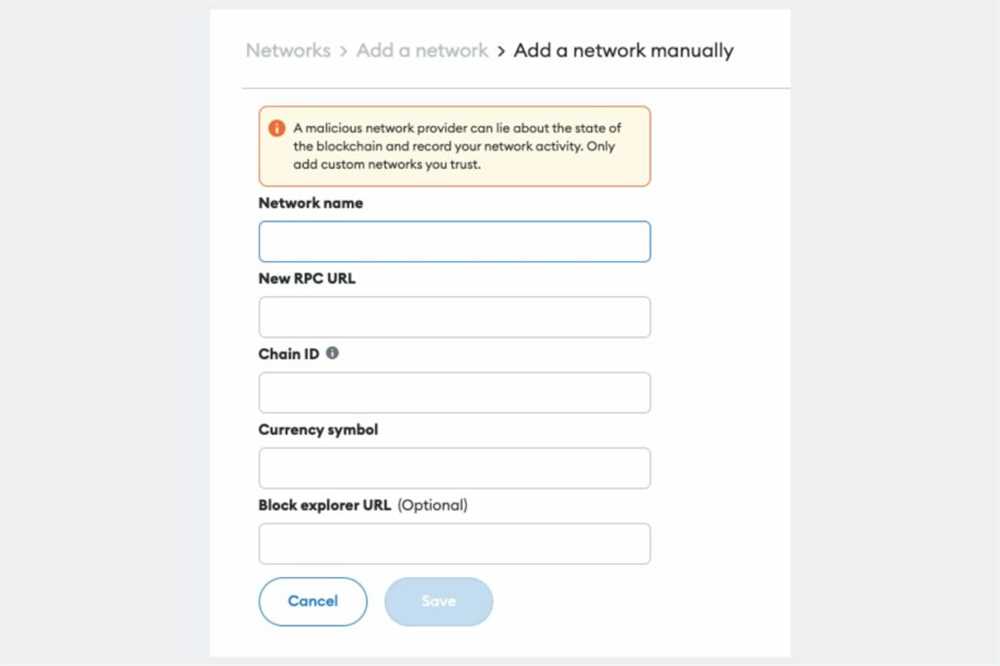
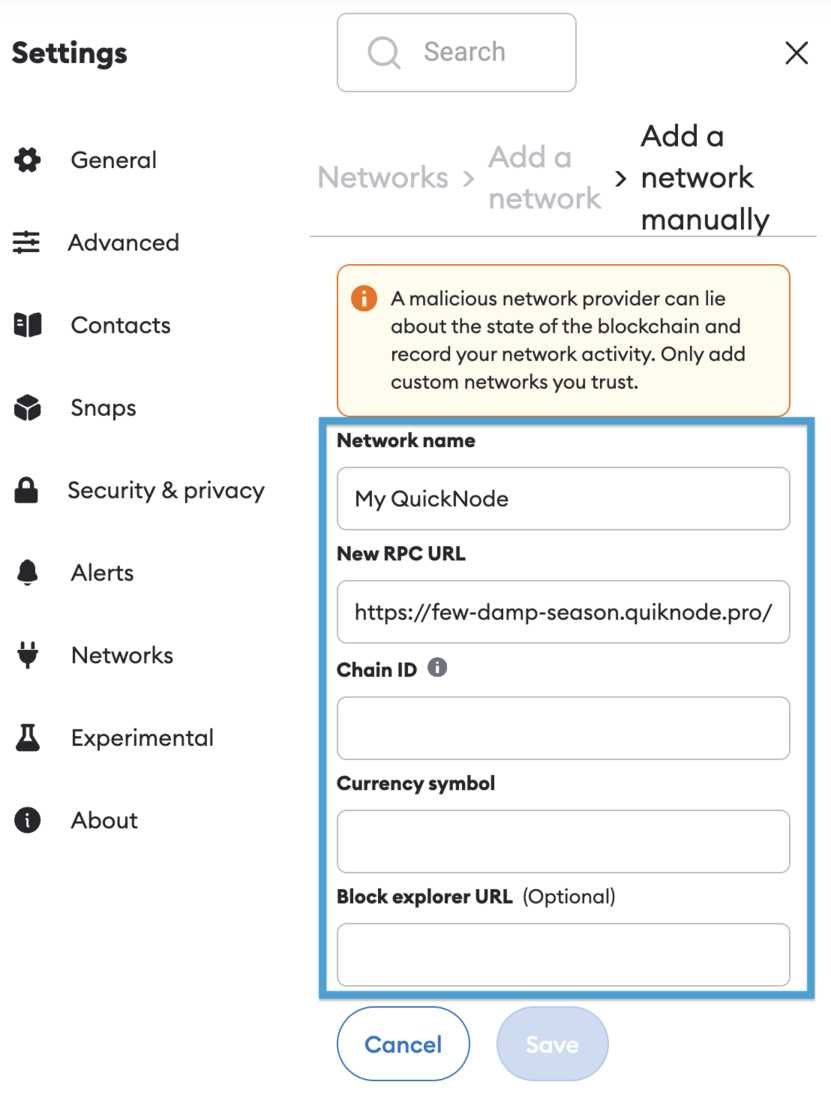
Now, you will see a form where you can enter the details of your custom RPC network. The most important fields are the “Network Name,” “New RPC URL,” and “Chain ID.” The “Network Name” can be any name you choose to identify your network. The “New RPC URL” should be the URL of your custom network’s node. Finally, the “Chain ID” is a unique identifier for your network, which you can obtain from your network’s documentation or developer.
What is Metamask?
Metamask is a popular browser extension that serves as a cryptocurrency wallet and allows users to interact with blockchain applications directly from their web browser. It is compatible with Google Chrome, Firefox, Opera, and Brave browsers.
With Metamask, users can securely store and manage their cryptocurrencies, including popular tokens such as Ethereum and ERC-20 tokens. It also provides a seamless way to connect to decentralized applications (dApps) by injecting a browser extension and acting as a bridge between the user interface and the Ethereum blockchain.
Metamask offers a user-friendly interface, making it easy for beginners to navigate and interact with decentralized applications. It simplifies the process of interacting with blockchain networks, such as sending and receiving cryptocurrencies, viewing transaction history, managing private keys, and interacting with smart contracts.
One of the key features of Metamask is the ability to connect to different Ethereum networks, including the main Ethereum network, test networks, and custom networks. This allows users to access a wide range of dApps on various networks with just one wallet.
To use Metamask, users need to create an account and set up a password. They can then import an existing Ethereum wallet or create a new one. Once set up, Metamask generates a unique account address for the user to receive funds and interact with dApps.
In summary, Metamask is an essential tool for anyone looking to engage with blockchain applications. It provides a secure and convenient way to manage cryptocurrencies and interact with decentralized applications, all within the familiar environment of a web browser.
What is Custom RPC?
Custom RPC, or custom remote procedure call, is a feature in the MetaMask wallet that allows users to connect to and interact with custom networks or blockchains that are not natively supported by MetaMask. RPC is a communication protocol used by blockchain networks to enable different applications and wallets to interact with the blockchain.
With custom RPC, users can connect to their own private or test networks, or to networks that have been created by other developers or organizations. These networks can use different consensus algorithms, have their own tokens or assets, and implement different smart contract standards.
Users can add custom RPCs to their MetaMask wallet by specifying the network’s name, RPC URL, chain ID, and other parameters. Once added, the custom network will appear as an option in the network dropdown in MetaMask, allowing users to easily switch between different networks and interact with dApps and smart contracts on those networks.
Custom RPC is a powerful feature that enables developers and users to experiment with and build on different blockchain networks. It provides flexibility and opens up possibilities for innovation and collaboration in the blockchain ecosystem.
Step 1: Install Metamask
To create a custom RPC in Metamask, the first step is to install the Metamask browser extension. Metamask is available for Google Chrome, Firefox, and Brave browsers. You can find the extension by searching for “Metamask” in the respective browser’s extension store. Once you find it, click on “Add to Chrome” (or the equivalent for your browser) to install it.
After Metamask is installed, you will see its icon in your browser’s toolbar. Click on the icon to open Metamask. If this is your first time using Metamask, you will need to set up an account. Click on “Create a new wallet” and follow the instructions to set up a password and generate a seed phrase. Make sure to store your seed phrase in a secure place, as it can be used to recover your wallet if you lose access to it.
Once you have set up your account, Metamask will ask you to agree to its Terms of Use. Read through them and click on “Accept” if you agree. You will then be prompted to import your seed phrase. Select “I have a seed phrase” and enter your 12-word seed phrase. Follow the on-screen instructions to complete the import process.
After importing your seed phrase, you will have successfully installed and set up Metamask on your browser. You can now proceed to the next step to create a custom RPC.
Create an Ethereum Wallet
An Ethereum wallet is essential for interacting with the Ethereum blockchain. It allows you to securely store, send, and receive Ethereum and other ERC-20 tokens. To create an Ethereum wallet, follow these steps:
1. Choose a Wallet Provider
There are many wallet providers available, each with their own features and security measures. Popular options include:
- Metamask: A browser extension that allows you to access Ethereum dapps and manage your funds.
- MyEtherWallet: An online wallet where you can create and manage Ethereum wallets.
- Hardware wallets: Physical devices that store your private keys offline, providing an extra layer of security.
2. Install and Set Up the Wallet
Once you’ve chosen a wallet provider, visit their website or download their app to install the wallet on your device.
Follow the instructions provided by the wallet provider to set up your wallet. This usually involves creating a password, writing down a recovery phrase, and securing your private keys.
3. Fund Your Wallet
To start using your Ethereum wallet, you’ll need to fund it with some Ether (ETH). You can purchase ETH from a cryptocurrency exchange using fiat currency (such as USD or EUR) or trade other cryptocurrencies for ETH.
Once you have ETH, you can send it to your wallet’s public address. This address acts as your unique identifier on the Ethereum blockchain.
4. Make Regular Backups
It’s crucial to regularly back up your wallet to prevent loss of funds. Most wallets provide a recovery phrase when you set them up–store this phrase in a safe place offline. Additionally, consider creating multiple backups and storing them in different secure locations.
If you lose access to your wallet–for example, if you forget your password or lose your device–you can use the recovery phrase to restore your wallet and regain access to your funds.
By following these steps, you’ll be able to create your own Ethereum wallet and start securely managing your Ethereum and ERC-20 tokens.
Add Metamask to Your Browser
To create a custom RPC in Metamask, you first need to add the Metamask extension to your browser. Here’s how you can do it:
- Open your preferred browser (Chrome, Firefox, or Brave).
- Navigate to the appropriate extension store for your browser:
- Chrome: Go to the Chrome Web Store.
- Firefox: Go to the Firefox Add-ons website.
- Brave: Go to the Chrome Web Store (Metamask is also supported on Brave).
- In the search bar, type “Metamask” and press Enter.
- Click on the result that says “Metamask – NFT Wallet” or similar.
- Click on the “Add to Chrome” or “Add to Firefox” button.
- A pop-up window will appear, asking for confirmation. Click on “Add extension” to proceed.
- Once the extension is added, you will see the Metamask icon in the browser toolbar.
- Click on the Metamask icon to open the extension.
- Follow the setup instructions to create a new Metamask wallet or import an existing one.
Once you have successfully added Metamask to your browser and set up your wallet, you can proceed to the next steps to create a custom RPC.
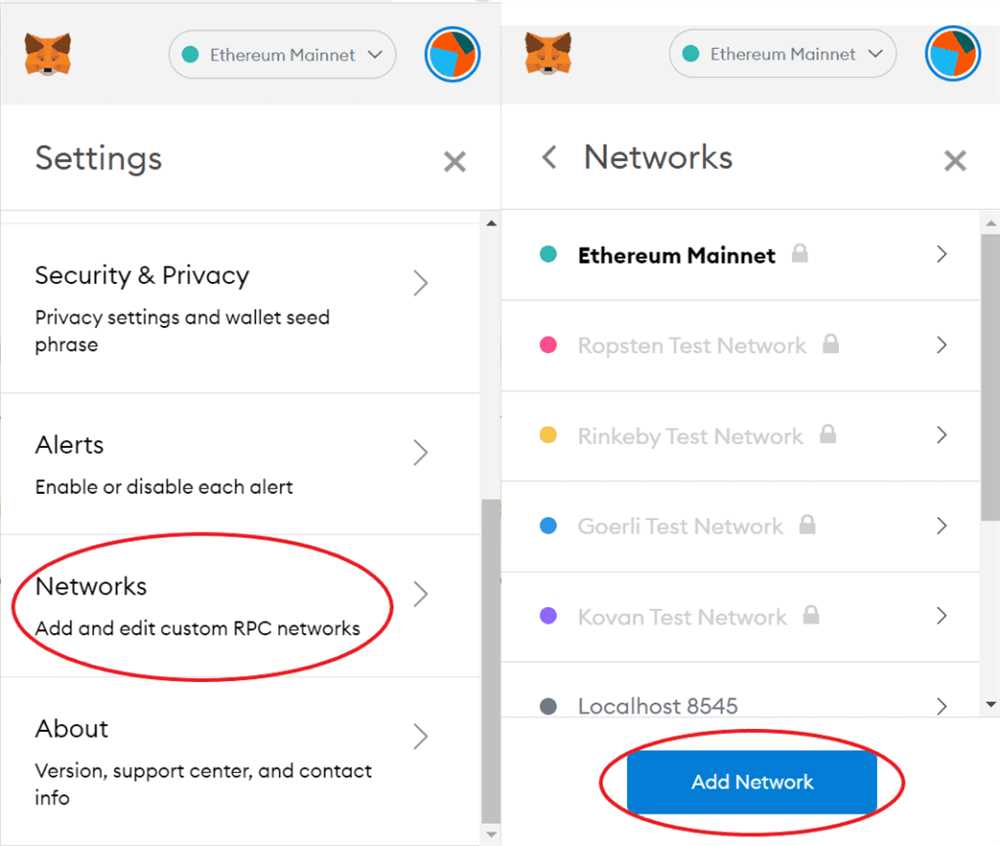
Step 2: Access Metamask Settings
After installing and setting up Metamask, the next step is to access the Metamask settings. To do this, click on the Metamask extension icon located on the top right corner of your browser.
A dropdown menu will appear, displaying various options. Select the “Settings” option from the menu.
Enable Developer Mode
In the Metamask settings, you will find a section called “Advanced”. Click on this section to expand it.
Within the “Advanced” section, there is an option called “Developer mode”. Toggle the switch to enable developer mode.

Enabling developer mode will unlock additional functionality and options in Metamask that are needed to create a custom RPC.
Access RPC Settings
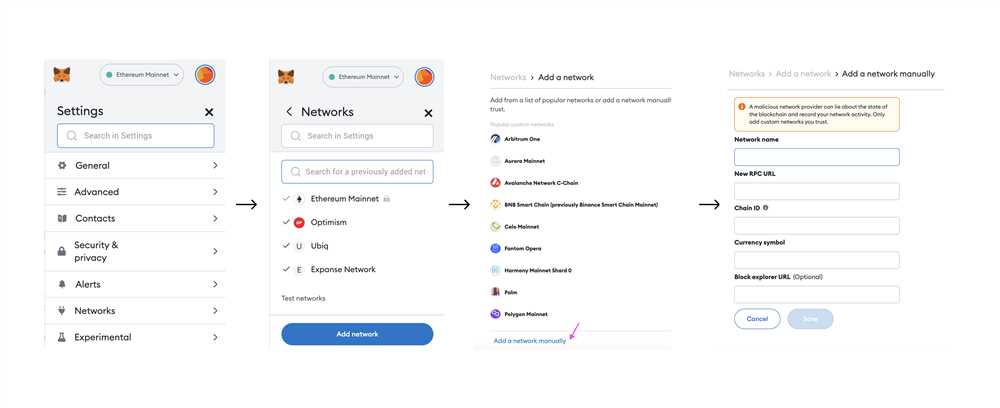
After enabling developer mode, you will see a new option called “Networks” in the Metamask settings. Click on this option to navigate to the Networks settings.
Within the Networks settings, you will find a section called “Custom RPC”. This is where you can add and configure your custom RPC endpoint.

Click on the “Custom RPC” button to proceed to the next step of creating your custom RPC.
Open Metamask Extension
To create a custom RPC in Metamask, you’ll need to start by opening the Metamask extension in your browser. Here’s a step-by-step guide on how to do it:
- Click on the Metamask icon in your browser’s toolbar. It looks like a fox head.
- A pop-up window will appear in the top right corner of your browser. Click on the “Get Started” button to initiate the setup process.
- If you’re using Metamask for the first time, you’ll be asked to create a new wallet. Follow the prompts to set up your wallet by creating a password and agreeing to the terms of use.
- Once your wallet is set up, you’ll be taken to the main Metamask interface. To access the extension settings, click on the menu icon in the top left corner (represented by three horizontal lines).
- From the menu, select “Settings”. This will open the Metamask settings page.
- In the settings page, look for the “Networks” tab. Click on it to access the network settings.
- Scroll down to the bottom of the page, where you’ll find the “Add Network” button. Click on it to start creating a custom RPC.
By following these steps, you’ll be able to open the Metamask extension and access the settings necessary to create a custom RPC. This will enable you to connect to your desired blockchain network and interact with decentralized applications on that network using Metamask.
What is Metamask?
Metamask is a popular cryptocurrency wallet and browser extension that allows users to interact with decentralized applications (dapps) on the Ethereum blockchain.
Why would I want to create a custom RPC in Metamask?
Creating a custom RPC in Metamask allows you to connect to a blockchain network that is not natively supported by Metamask. This is useful if you want to interact with a specific blockchain or if you are developing your own blockchain network.
What is an RPC endpoint?
An RPC (Remote Procedure Call) endpoint is a URL that allows users to send requests and interact with a blockchain network. It acts as a bridge between a user’s wallet (such as Metamask) and the blockchain network.
How do I create a custom RPC in Metamask?
To create a custom RPC in Metamask, you need to open the Metamask extension and go to the settings. From there, you can click on the “Networks” tab and then “Add Network” to enter the details of the custom RPC. This includes the network name, RPC URL, chain ID, and currency symbol.