
If you’re a cryptocurrency enthusiast, chances are you’ve heard of TRC20 tokens. These tokens are built on the TRON blockchain and can be used for various purposes, such as crowdfunding, decentralized applications, and more. Metamask, on the other hand, is a popular cryptocurrency wallet that allows users to securely store, send, and receive digital assets.
In this step-by-step guide, we will walk you through the process of adding TRC20 tokens to your Metamask wallet. By following these simple steps, you’ll be able to access and manage your TRC20 tokens with ease.
Step 1: Install Metamask
If you haven’t already done so, start by installing the Metamask extension in your preferred web browser. You can find the Metamask extension in the Chrome Web Store, Firefox Add-ons, or any other official browser extension marketplace. Follow the prompts and set up your Metamask wallet by creating a new account or importing an existing one.
Step 2: Connect to the TRON Network
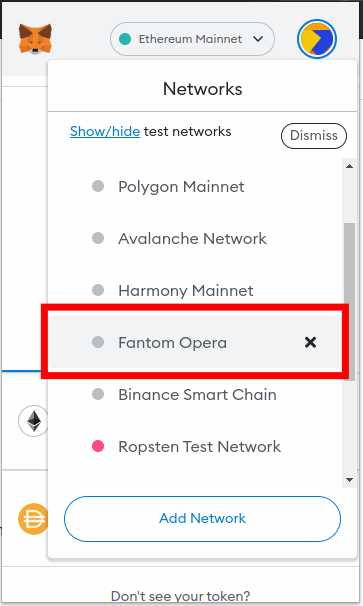
Once you have installed and set up Metamask, click on the Metamask extension icon in your browser to open the wallet. In the top right corner, you’ll see the network selection dropdown. Click on it and select “Custom RPC”.
In the “Custom RPC” section, you will need to enter the TRON network details. Fill in the following information:
Network Name: TRON
New RPC URL: https://api.trongrid.io/
Chain ID: 1
Currency Symbol (optional): TRX
Once you have filled in the details, click on “Save” to connect to the TRON network.
Step 3: Add the Token
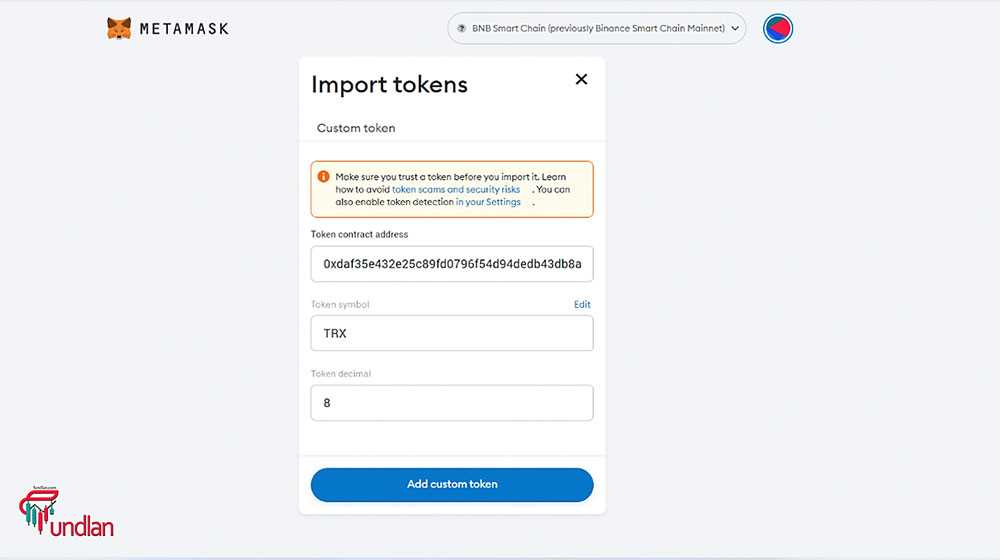
Now that you are connected to the TRON network, you can add your desired TRC20 token to your Metamask wallet. To do this, click on the Metamask extension icon and select “Add Token” from the dropdown menu. In the “Add Token” window, click on the “Custom Token” tab.
Here you will need to enter the contract address of the TRC20 token you want to add. You can find this information on the token’s website or by reaching out to the token’s developers. Once you have entered the contract address, click on “Next”.
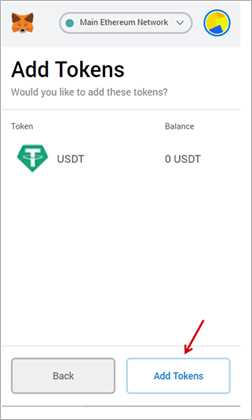
Metamask will automatically populate the token details, such as the token symbol and number of decimal places. Verify that the information is correct and click on “Add Tokens”.
Step 4: Access and Manage Your Tokens
Congratulations! You have successfully added the TRC20 token to your Metamask wallet. You can now access and manage your tokens by clicking on the Metamask extension icon and selecting your wallet. You will see the added token listed along with your other digital assets.
To send or receive the added token, simply copy the wallet address or scan the QR code provided. You can also view your token balances, transaction history, and other relevant information within the Metamask wallet interface.
By following these four simple steps, you can easily add TRC20 tokens to your Metamask wallet and take full control of your digital assets. Enjoy the convenience and security that Metamask offers, and explore the exciting world of TRON-based tokens!
Overview of TRC20 Tokens
TRC20 is a technical standard used for implementing tokens on the TRON blockchain. Similar to ERC20 tokens on the Ethereum network, TRC20 tokens are smart contracts that can be used to represent any digital asset or utility token.
TRC20 tokens are fully compatible with the TRON network and can be stored in compatible wallets such as MetaMask. They have gained popularity due to their ability to enable new decentralized applications and facilitate the transfer of value on the TRON blockchain.
When creating a new TRC20 token, developers need to include certain functions in their smart contract, such as transfer, balanceOf, and approve. These functions allow token holders to send and receive tokens, check their balance, and authorize others to spend tokens on their behalf.
One advantage of using TRC20 tokens is the ability to create and customize tokens with specific properties and functionalities. This flexibility allows developers to create tokens that can be used for various purposes, such as stablecoins, gaming assets, or governance tokens.
Another benefit of TRC20 tokens is the inherent security provided by the TRON blockchain. Transactions and token transfers are securely recorded on the blockchain, making it difficult for malicious actors to tamper with or alter token balances.
TRC20 Token vs. TRC10 Token
TRC20 tokens are often compared to TRC10 tokens, another type of token standard on the TRON blockchain. While both token standards serve similar purposes, there are some differences between the two.
TRC20 tokens are more advanced and feature-rich compared to TRC10 tokens. They support additional functionalities, such as the ability to implement complex smart contracts, and allow for greater customization and interoperability with other decentralized applications.
In contrast, TRC10 tokens are simpler and more straightforward. They are often used for basic token transfers and do not offer the same level of customizability or complexity as TRC20 tokens.
| TRC20 Tokens | TRC10 Tokens |
|---|---|
| Advanced functionality | Basic functionality |
| Support for smart contracts | No support for smart contracts |
| Greater customization | Less customization |
Overall, TRC20 tokens provide developers with more options and flexibility when it comes to creating and utilizing tokens on the TRON blockchain. They have become an essential component of the TRON ecosystem and enable the development of a wide range of decentralized applications and tokenized assets.
Step 1: Installing Metamask
To add TRC20 tokens to Metamask, the first step is to install the Metamask extension in your browser. Follow the instructions below to install Metamask:
- Open your preferred browser (Chrome, Firefox, Brave, etc.) and go to the official Metamask website.
- Click on the “Get Chrome Extension” or “Get Firefox Extension” button, depending on your browser.
- After clicking the button, you will be redirected to the appropriate extension store (Chrome Web Store or Firefox Add-ons).
- Click the “Add to Chrome” or “Add to Firefox” button to initiate the installation process.
- A pop-up will appear on the screen confirming the installation. Click “Add extension” to proceed.
- Once the extension is installed, you will see the Metamask fox icon added to your browser’s toolbar.
- Click the fox icon to launch the Metamask extension.
- A welcome screen will appear asking you to create a new wallet or import an existing one. Follow the on-screen instructions to set up your wallet.
- After creating your wallet, you will be asked to create a password for the extension. Make sure to choose a strong password and remember it.
- Click “I agree” to proceed to the next step.
- Metamask will display a secret backup phrase. It’s important to write down and keep this phrase in a safe place. This phrase can be used to recover your wallet in case you forget your password or lose access to your device.
- Once you have backed up your secret phrase, click “Next” to complete the installation process.
Congratulations! You have now successfully installed Metamask in your browser.
Step 2: Accessing the Metamask Wallet
Once you have successfully installed the Metamask extension in your browser, follow these steps to access your Metamask wallet:
| Step 1 | Click on the Metamask icon in your browser extensions toolbar. |
| Step 2 | A new window will pop up with a welcome message. Click on the “Get Started” button. |
| Step 3 | You will then be prompted to either import an existing wallet or create a new wallet. Choose the option that suits you best. |
| Step 4 | Follow the instructions provided by Metamask to complete the wallet creation or importing process. |
| Step 5 | Once you have accessed your Metamask wallet, you will be able to see your wallet address and balance. |
Accessing your Metamask wallet is a crucial step in managing and interacting with TRC20 tokens. Make sure to keep your wallet address and private key secure to protect your funds.
Step 3: Adding TRC20 Tokens
Once you have successfully set up your Metamask wallet and have some TRX (TRON) in your account, you can now proceed to add TRC20 tokens to your wallet.
Method 1: Adding tokens manually
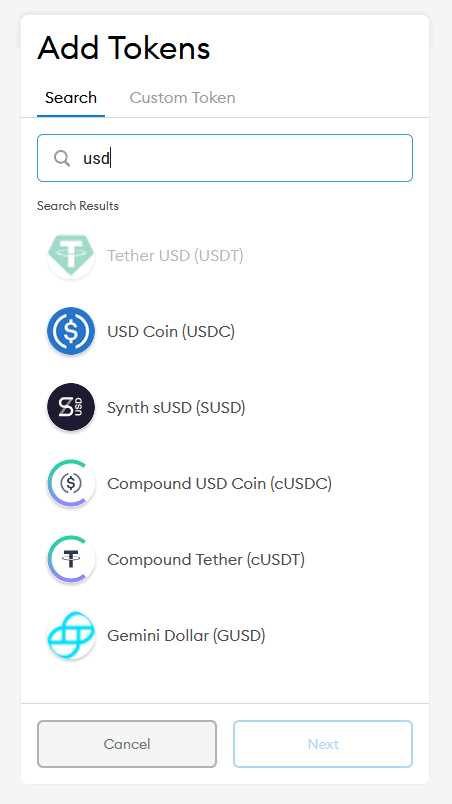
1. Open your Metamask wallet and click on the “Assets” tab.
2. Scroll down and click on the “+ Add Token” button.
3. Select the “Custom Token” tab.
4. In the “Token Contract Address” field, paste the contract address of the TRC20 token you want to add.
5. Metamask should automatically populate the “Token Symbol” and “Decimals of Precision” fields. If not, you can find this information on the token’s website or from the token issuer.
6. Click on the “Next” button.
7. Review the token details and click on the “Add Token” button to confirm.
Method 2: Importing a token using a token URL
1. Obtain the token URL or token JSON file provided by the token issuer.
2. Open your Metamask wallet and click on the “Assets” tab.
3. Scroll down and click on the “+ Add Token” button.
4. Select the “Custom Token” tab.
5. Click on the “Import Token” button.
6. Paste the token URL or upload the token JSON file in the respective fields.
7. Click on the “Next” button.
8. Review the token details and click on the “Add Token” button to confirm.
Method 3: Adding tokens from the TRONSCAN website
1. Go to the TRONSCAN website (https://tronscan.org/).
2. Search for the TRC20 token you want to add.
3. Click on the token name to open its page.
4. Copy the contract address of the token.
5. Open your Metamask wallet and click on the “Assets” tab.
6. Scroll down and click on the “+ Add Token” button.
7. Select the “Custom Token” tab.
8. In the “Token Contract Address” field, paste the contract address you copied from the TRONSCAN website.
9. Metamask should automatically populate the “Token Symbol” and “Decimals of Precision” fields. If not, you can find this information on the token’s page on the TRONSCAN website.
10. Click on the “Next” button.
11. Review the token details and click on the “Add Token” button to confirm.
Once you have successfully added the TRC20 tokens to your Metamask wallet, you will be able to view your token balances and perform transactions using these tokens.
What are TRC20 tokens?
TRC20 tokens are tokens that are built on the TRON blockchain. They follow a set of standards that allow for the creation and implementation of smart contracts.
Can I add TRC20 tokens to my Metamask wallet?
Yes, you can add TRC20 tokens to your Metamask wallet by following a few simple steps. I will guide you through the process.
How do I add TRC20 tokens to Metamask?
To add TRC20 tokens to Metamask, you need to first open your Metamask wallet and click on the “Add Token” button. Then, enter the contract address of the TRC20 token you want to add and click on “Next”. Metamask will automatically detect the details of the token, and you can click on “Add Tokens” to finalize the process.