
Metamask is a popular cryptocurrency wallet that allows users to securely store, manage, and interact with their digital assets. One of the key features of Metamask is the ability to add custom tokens, which allows users to view and transact with tokens that are not natively supported by the wallet. This step-by-step guide will walk you through the process of adding tokens to Metamask, giving you the freedom to manage all your tokens in one place.
Step 1: Accessing Metamask
The first step is to ensure that you have the Metamask extension installed on your web browser. Once installed, click on the extension icon to open the Metamask wallet. If you don’t have an existing Metamask wallet, you will need to create one by following the on-screen instructions.
Step 2: Adding a Custom Token
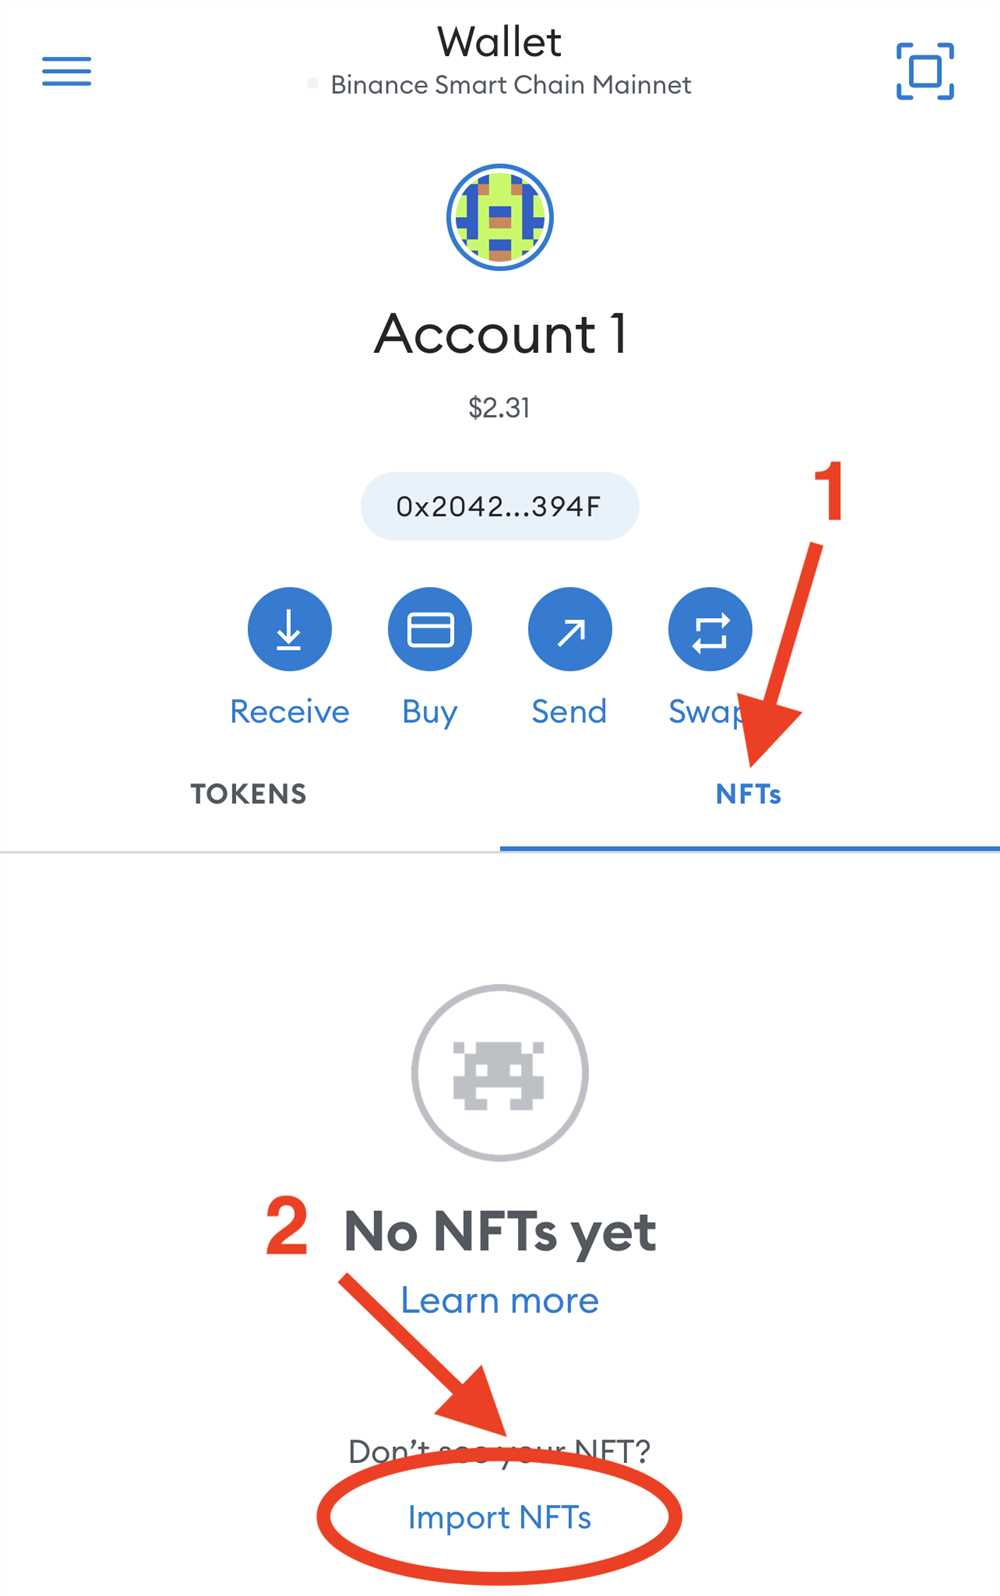
Once you have access to your Metamask wallet, navigate to the “Assets” tab. Here, you will find a list of all the tokens that are currently added to your wallet. To add a custom token, click on the “Add Token” button.
Step 3: Token Contract Address
In order to add a custom token, you will need to provide the token’s contract address. This address uniquely identifies the token on the blockchain. You can obtain the contract address from the token’s website or from other trusted sources. Once you have the contract address, enter it into the “Token Contract Address” field.
Step 4: Token Symbol and Decimals
After entering the token’s contract address, Metamask will attempt to automatically fill in the token symbol and decimals. If these fields are not populated automatically, you will need to manually enter the token symbol and decimal values. The token symbol is a shorthand representation of the token, e.g., ETH for Ethereum, while the decimal value determines the token’s level of divisibility.
Step 5: Adding the Token
Once you have entered all the required information, click on the “Next” button to proceed. Metamask will validate the token contract address and if successful, you will be presented with a confirmation screen. Review the details and click on the “Add Tokens” button to complete the process. The custom token will now be added to your Metamask wallet and will be visible under the “Assets” tab.
By following these simple steps, you can easily add custom tokens to your Metamask wallet, giving you full control over your digital assets. Whether you are managing a diverse portfolio or exploring new tokens, Metamask makes it easy to stay organized and secure.
Setting up Metamask
To add tokens to Metamask, you first need to set up a Metamask wallet on your browser. Follow these steps to get started:
- Install the Metamask extension on your browser. You can find it on the Chrome Web Store or Firefox Add-ons.
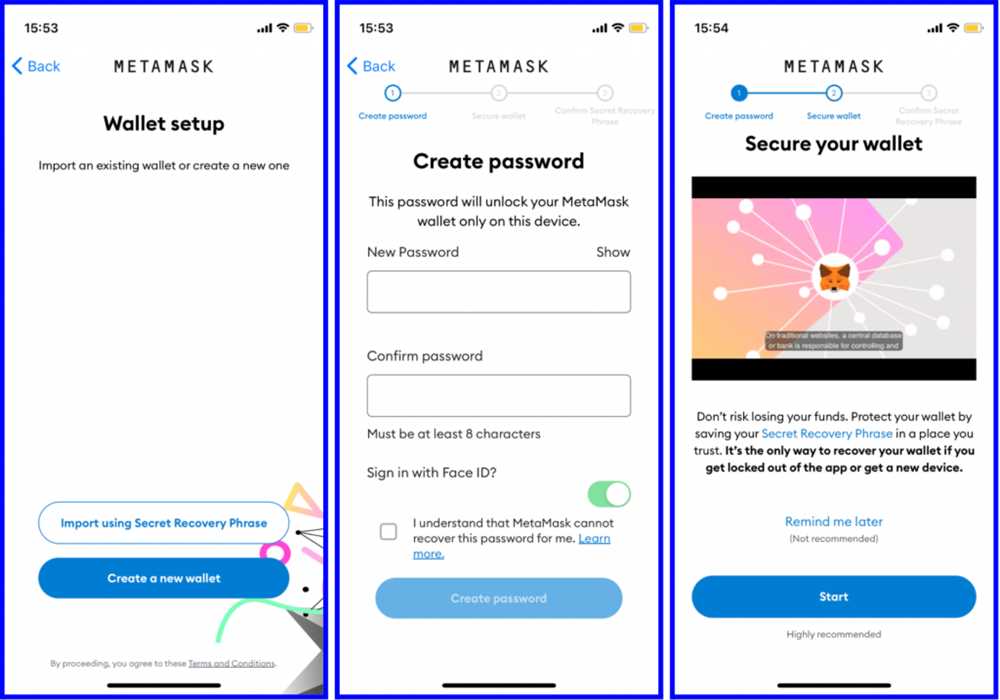
- Open the Metamask extension and click on the “Get Started” button.
- Create a new wallet by setting up a strong password. Make sure to remember this password as you will need it to access your wallet.
- Read and agree to the terms of service and privacy policy.
- Click on the “Import Wallet” button if you already have a wallet seed phrase. Otherwise, proceed with the “Create a Wallet” option.
- If you choose to create a new wallet, you will be provided with a unique 12-word seed phrase. Write down this seed phrase and keep it in a safe and secure place. This seed phrase is crucial for wallet recovery in case you lose access to your wallet.
- Confirm the seed phrase by selecting the words in the correct order.
- Set a name for your wallet and choose an avatar for identification purposes.
- After completing the wallet setup process, you will be taken to the main Metamask interface, where you can manage your Ethereum account.
Congratulations! You have successfully set up Metamask on your browser. Now you are ready to add tokens to your wallet.
Create a Metamask Account
To add tokens to your Metamask wallet, you will need to have a Metamask account. If you already have a Metamask account, you can skip this step and proceed to the next one. Otherwise, follow the steps below to create a new Metamask account:
Step 1: Install Metamask Extension
Before you can create a Metamask account, you need to install the Metamask extension in your web browser. Metamask is available for popular browsers like Google Chrome and Mozilla Firefox. Simply search for “Metamask” in your browser’s extension store and click on the “Install” button.
Step 2: Set Up a New Account
Once you have installed the Metamask extension, click on the Metamask icon in your browser’s toolbar. A pop-up window will appear with the Metamask logo. Click on the “Get Started” button to begin setting up your new account.
You will be presented with two options: “Import Wallet” and “Create a Wallet”. Since you are creating a new account, select the “Create a Wallet” option.
Metamask will now generate a unique 12-word seed phrase for you. Write down this seed phrase and keep it in a safe place. This seed phrase is your backup in case you ever lose access to your Metamask account. It is important to never share this phrase with anyone.
After you have written down your seed phrase, click on the “Next” button. Metamask will then ask you to confirm your seed phrase by selecting the words in the correct order. Once you have done that, click on the “Confirm” button.
In the next step, you will need to create a strong password for your Metamask account. Choose a password that is easy for you to remember but difficult for others to guess. Enter the password, confirm it, and click on the “Create” button.
Congratulations! You have successfully created a new Metamask account. You can now customize your account settings and start adding tokens to your wallet.
Step 3: Importing Existing Account (Optional)
If you already have a Metamask account that you want to use to add tokens, you can import it instead of creating a new account. To import an existing account, click on the Metamask icon in your browser’s toolbar and select the “Import Wallet” option. Follow the prompts to enter your seed phrase and password, and your existing account will be imported into Metamask.
Note: It is important to keep your Metamask account secure. Make sure to regularly update your browser and Metamask extension to the latest versions, and be cautious of phishing attempts or suspicious websites.
| Tips |
|---|
|
Connect Metamask to Your Browser
To start using Metamask, you need to connect it to your browser. Here’s how you can do it:
Step 1: Install Metamask Extension
The first step is to install the Metamask extension in your browser. Metamask supports multiple browsers, including Chrome, Firefox, and Brave.
To install Metamask, go to the extension store of your browser and search for “Metamask”. Click on the “Add to browser” or “Install” button to install the extension.
Step 2: Create a Metamask Account
Once the extension is installed, click on the Metamask icon in your browser toolbar. This will open a new tab with the Metamask interface.
Click on the “Get Started” button and then select the “Create a Wallet” option. You will be asked to set a password for your Metamask account. Make sure to choose a strong password and remember it.
After setting the password, click on the “Create” button. Metamask will generate a unique seed phrase that you need to backup. This seed phrase is the only way to access your Metamask account, so make sure to write it down and store it in a safe place.
Step 3: Connect Metamask to your Browser
Now that you have created a Metamask account, it’s time to connect it to your browser. Click on the Metamask icon in your browser toolbar again and then click on the “Next” button.
Metamask will now ask if you want to import an existing wallet or create a new one. Since you have just created a new wallet, select the “Create a new wallet” option and click on the “Import using seed phrase” button.
Enter the seed phrase that you backed up in the previous step and click on the “Import” button. Metamask will verify the seed phrase and once it’s done, you will be successfully connected to your browser.
That’s it! You have now connected Metamask to your browser. You can now start using Metamask to manage your Ethereum wallet, interact with decentralized applications, and add tokens to your wallet.
Adding Tokens to Metamask
Adding tokens to your Metamask wallet allows you to manage and interact with different digital assets on the Ethereum blockchain. Here’s a step-by-step guide on how to add tokens to your Metamask wallet:
| Step | Description |
|---|---|
| 1 | Open the Metamask extension in your browser and make sure you are logged in. |
| 2 | Click on the menu icon (three horizontal lines) located at the top right corner of the extension. |
| 3 | Select the “Add Token” option from the dropdown menu. |
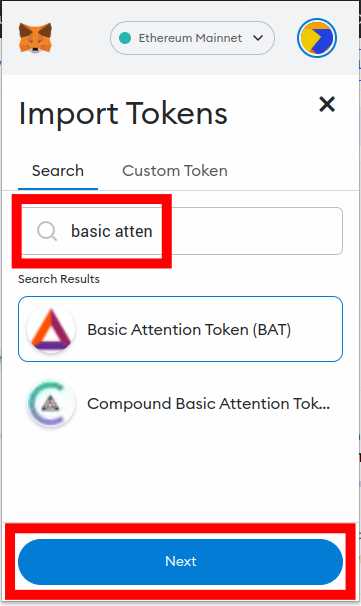
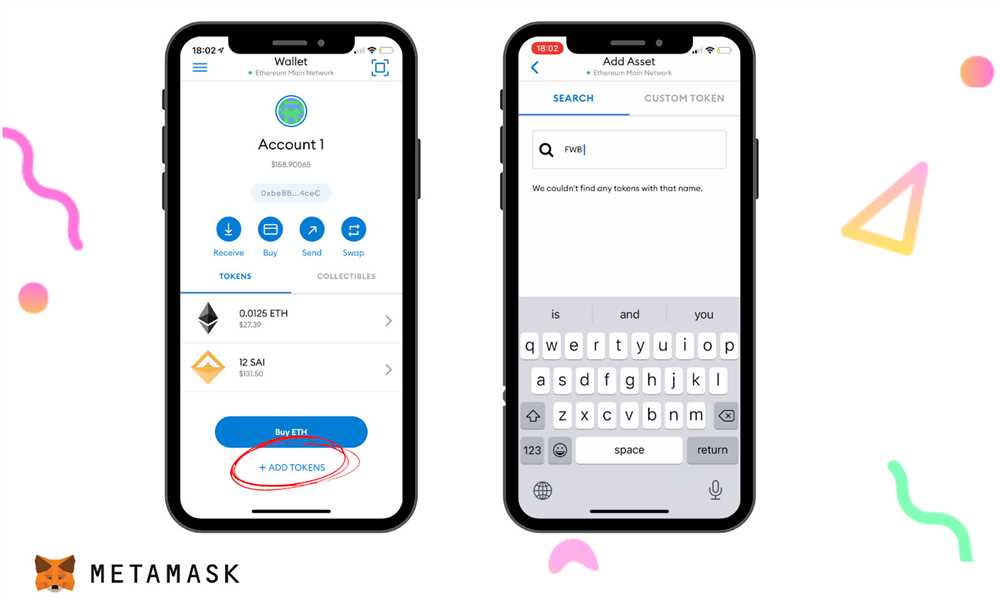
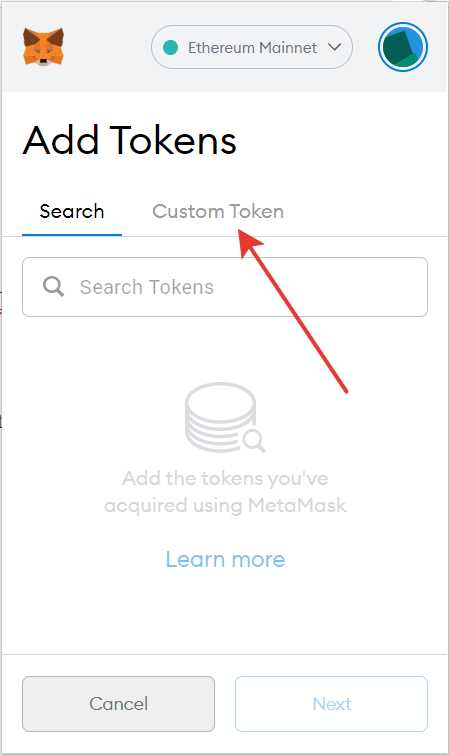
| 4 | A new window will appear with two tabs: “Search” and “Custom Token”. |
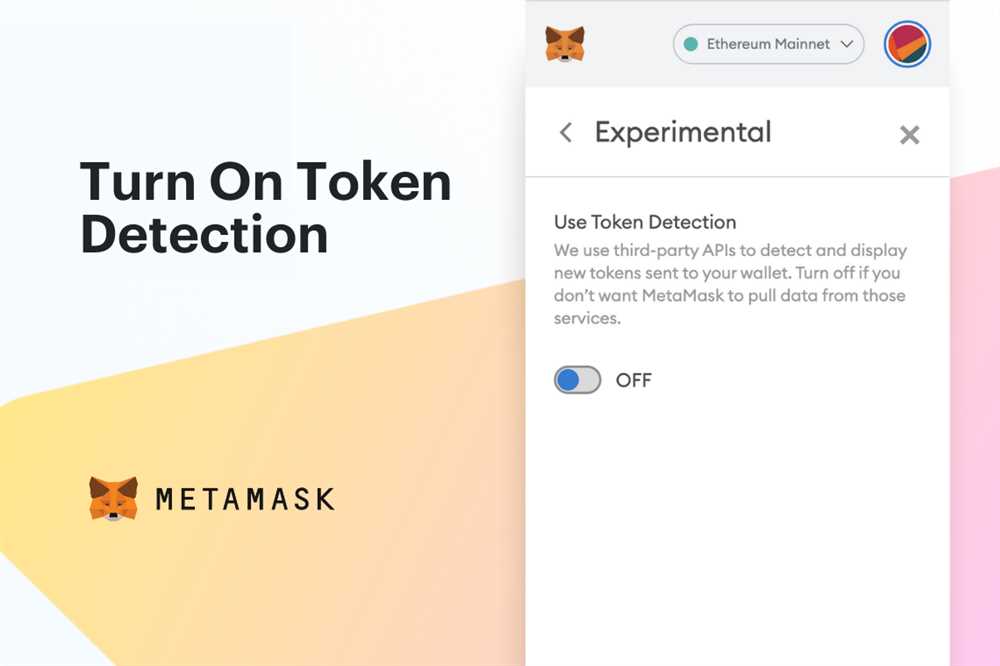
| 5 | If the token you want to add is a popular token, go to the “Search” tab and enter the token name or symbol. Metamask will automatically search for the token and display the results. |
| 6 | If the token you want to add is not a popular token or is a custom token, go to the “Custom Token” tab. |
| 7 | Enter the token contract address, token symbol, and decimals in the respective fields. You can find this information on the token’s official website or from reliable sources. |
| 8 | Click on the “Next” button to proceed. |
| 9 | Review the token details and click on the “Add Tokens” button to add the token to your Metamask wallet. |
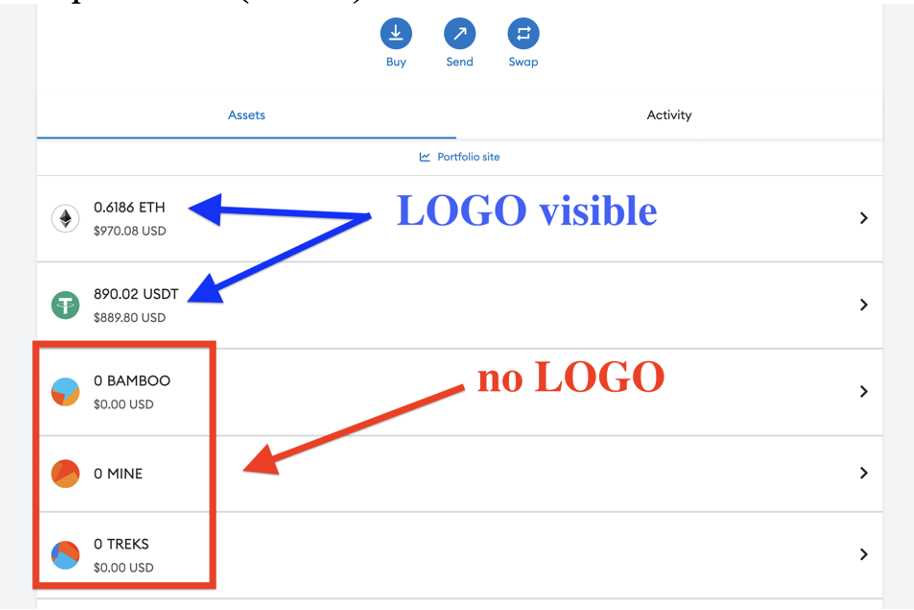
| 10 | The token should now be successfully added to your Metamask wallet, and you will be able to view and manage the token balance. |
By following these steps, you can easily add tokens to your Metamask wallet and start using them for various purposes such as trading, staking, or participating in decentralized finance (DeFi) applications.
Find the Token Contract Address
In order to add a token to your Metamask wallet, you will need to know the token contract address. This address is a unique identifier for each token and serves as a way to track and interact with the token on the blockchain.
To find the token contract address, you can follow these steps:
- Visit the official website or social media page of the token you want to add.
- Look for the token contract address section or something similar.
- Copy the contract address that is provided.
Alternatively, you can use token listing platforms, such as CoinMarketCap or CoinGecko, to find the token contract address. Simply search for the token’s name or symbol on the platform, and it will usually display the contract address along with other details about the token.
Once you have the token contract address, you are ready to add the token to your Metamask wallet and start interacting with it on the blockchain.
What is Metamask?
Metamask is a cryptocurrency wallet that allows users to store, manage, and interact with blockchain tokens and decentralized applications (dApps) on the Ethereum network.